Page 17 of 88

CAUTION!
DO NOT place any article under a power seat or impede its ability to move as it may
cause damage to the seat controls. Seat travel may become limited if movement is
stopped by an obstruction in the seat’s path.
Fold-Flat Front Passenger Seat
• The front passenger seat can be folded flatto allow for extended cargo space. Pull up
on the seatback rel ease lever to fold down
the seatback.
Flip 'n Stow™ Front Passenger Seat Storage
• The seat latch release-loop is located in the center of the seat cushion between the
seat cushion and the seatback. Pull the loop upward to release the latch and then
forward to open the seat to the detent position.
NOTE: Make sure that objects inside the bin do not interfere with the latch before
closing the seat. Push the seat cushion downward after closing it to make sure it latches
to the base.
WARNING!
Be certain that the seat cushion is locked sec urely into position before using the seat.
Otherwise, the seat will not provide the proper stability for passengers. An improperly
latched seat cushion could cause serious injury.
15
GETTING STARTED
Page 18 of 88

REAR SEATS
60/40 Split Second-Row Passenger Seats
To Lower The Seatback
• Locate the seatback release lever on the lower outboard side of the seat.
• Place one hand on the seatback and apply a gentle pressure.
• Lift the seatback release lever with the other hand, allowing the seatback to moveforward slightly, and then release the lever.
• Gently guide the seatback into the folded position.
To Raise The Seatback
• Raise the seatback and lock it in place.
WARNING!
Be certain that the seatback is locked securely into position. Otherwise, the seat will
not provide the proper stability for child seats and/or passengers. An improperly
latched seat could cause serious injury.
Forward And Rearward Adjustment
• The control lever is on the outboard side of the seat. Lift the lever to move the seat
forward or rearward. Release the lever once
the seat is in the position desired.
Recliner Adjustment
• The seatback release lever is on theoutboard side of the seat. To recline the
seat, lean back, lift the lever, position the
seatback as desired, and then release the
lever. To return the seatback to its normal
upright position, lean back, lift the lever,
lean forward, and then release the lever
once the seatback is in the upright position.
GETTING STARTED
16
Page 19 of 88
 — Seven Passenger Models
To Move The Second-Row Passenger Seat
Forward
NOTE:Raise the 20% seatback/armrest
before moving the 60% seat to allow for ful")
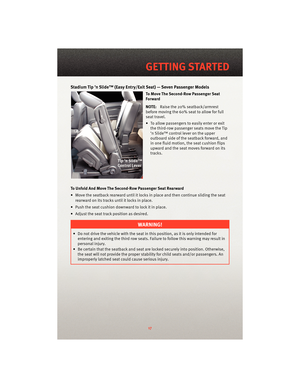
Stadium Tip ’n Slide™ (Easy Entry/ExitSeat) — Seven Passenger Models
To Move The Second-Row Passenger Seat
Forward
NOTE:Raise the 20% seatback/armrest
before moving the 60% seat to allow for full
seat travel.
• To allow passengers to easily enter or exit the third-row passenger seats move the Tip
’n Slide™ control lever on the upper
outboard side of the seatback forward, and
in one fluid motion, the seat cushion flips
upward and the seat moves forward on its
tracks.
To Unfold And Move The Second-Row Passenger Seat Rearward
• Move the seatback rearward until it locks in place and then continue sliding the seat rearward on its tracks until it locks in place.
• Push the seat cushion downward to lock it in place.
• Adjust the seat track position as desired.
WARNING!
• Do not drive the vehicle with the seat in this position, as it is only intended for entering and exiting the third row seats. Failure to follow this warning may result in
personal injury.
• Be certain that the seatback and seat are locked securely into position. Otherwise, the seat will not provide the proper stability for child seats and/or passengers. An
improperly latched seat could cause serious injury.
17
GETTING STARTED
Page 20 of 88

50/50 Split Third-Row Passenger Seats With Fold-Flat Feature
To Fold The Seat
• With the second-row passenger seat fullyupright, pull the latch release-loop located
at the top of the seatback upward, push the
seat forward slightly, and release the
release-loop. Then, continue to push the
seat forward. The head restraints will fold
automatically as the seat moves forward.
To Unfold The Seat
• Grasp the assist s trap loop on the seatback and pull it tow ard you to raise the
seatback. Continue to raise the seatback until it locks in place. Then, raise the head
restraint to lock it in place.
• To lock the seatback in a reclined position, pull the latch release-loop located at the top of the seatback upward, allow the seatback to recline, then release the
release-loop.
WARNING!
• Be certain that the seatback is locked securely into position. Otherwise, the seatwill not provide the proper stability for passengers. An improperly latched seat
could cause serious injury.
• Do not allow a passenger to sit in a third row seat without having the head restraint unfolded and locked in place. Failure to follow this warning may result in personal
injury to the passenger in the event of an accident.
• Do not allow a passenger to sit in a third row seat with the second row seatback(s) folded flat. In a collision, the passenger could slide underneath the seat belt and
be seriously or even fatally injured.
GETTING STARTED
18
Page 21 of 88

HEATED SEATS
Front Heated Seats
• The controls for front heatedseats are
located in the switch bank in the center of
the instrument panel.
• Press the switch once to select High-level heating. Press the switch a second time to
select Low-level heating. Press the switch a
third time to shut the heating elements Off.
WARNING!
• Persons who are unable to feel pain to the skin because of advanced age, chronicillness, diabetes, spinal cord injury, medication, alcohol use, exhaustion or other
physical conditions must exercise care when using the seat heater. It may cause
burns even at low temperatures, especially if used for long periods of time.
• Do not place anything on the seat that insulates against heat, such as a blanket or cushion. This may cause the seat heater to overheat. Sitting in a seat that has been
overheated could cause serious burns due to the increased surface temperature of
the seat.
CAUTION!
Repeated overheating of the seat could damage the heating element and/or degrade
the material of the seat.
TILT / TELESCOPING STEERING COLUMN
• The tilt/telescoping control lever is locatedbelow the steering wheel at the end of the
steering column.
• Push down on the lever to unlock the steering column.
• To tilt the steering column, move the steering wheel upward or downward as
desired. To lengthen or shorten the steering
column, pull the steering wheel outward or
push it inward as desired.
• Pull upward on the lever to lock the column firmly in place.
19
GETTING STARTED
Page 22 of 88

WARNING!
Do not adjust the steering wheel while driving. The tilt/telescoping adjustment must
be locked while driving. Adjusting the steering wheel while driving or driving without
the tilt/telescoping adjustment locked could cause the driver to lose control of the
vehicle. Failure to follow this warning may result in serious injury or death.
PROGRAMMABLE FEATURES
Electronic Vehicle Information Center (EVIC) – If Equipped
• The EVIC can be used to program the following Personal Settings. Press and release the MENU button
until Personal Settings displays, then press the SCROLL
button
to scroll through the settings. Press the FUNCTION SELECT buttonto
change the setting.
• Language • Headlamps With Wipers
• Auto UNLK On Exit • ILLUMIN Approach
• RKE Unlock • Key-Off Power Delay
• Sound Horn With Lock • NAV Turn By Turn
• Flash Lamp Lock • Display ECO Message
• Headlamp Off Delay • Display Units of Measure In
Key Fob Programmable Features
• The following features may also be programmed by using the Key Fob transmitter or the ignition switch and driver's door lock switch.
NOTE: Pressing the LOCK button while you are inside the vehicle will activate the
Vehicle Security Alarm. Opening a door with the Vehicle Security Alarm activated will
cause the alarm to sound. Press the UNLOCK button to deactivate the Vehicle Security
Alarm.
Unlock On First Press
• To unlock either the driver's side, or all doors, on the first press of the UNLOCK button:
• Press and hold the LOCK button for at least 4 seconds, but no longer than10 seconds. Then, press and hold the UNLOCK button while still holding the LOCK
button.
• Release both buttons at the same time.
GETTING STARTED
20
Page 23 of 88

Auto Unlock Doors On Exit
• To have all of the vehicle doors unlock when any door is opened:• Enter your vehicle and close all the doors.
• Within 15 seconds, cycle the ignition switch from the LOCK position to the ONposition a minimum of four times, ending in the LOCK position (do not start the
engine).
• Within 30 seconds, press the driver’s door lock switch in the UNLOCK direction. A single chime will indicate that programming is complete.
Auto Door Lock
• To have the doors lock automatically when the vehicle’s speed exceeds 15 mph
(24 km/h):
• The auto door lock feature can be enabled or disabled by your authorized dealer. See your authorized dealer for programming.
Sound Horn With Lock
• To turn the horn chirp on or off when the doors are locked:
• Press the LOCK button for at least 4 seconds, but no longer than 10 seconds. Then,press the PANIC button while still holding the LOCK button.
• Release both buttons at the same time.
Flashing Lights With Lock
• The turn signal lights flashing, when the doors are locked or unlocked, feature can be turned on or off. To turn this feature on or off:
• Press and hold the UNLOCK button for at least 4 seconds, but no longer than 10 seconds. Then, press and hold the LOCK button while still holding the UNLOCK
button.
• Release both buttons at the same time.
21
GETTING STARTED
Page 24 of 88

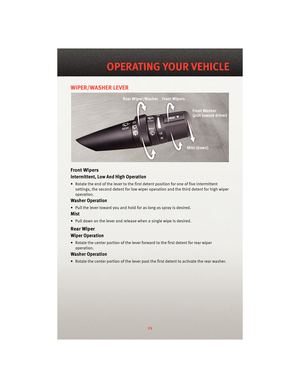
TURN SIGNAL/LIGHTS LEVER
Headlights/Parking Lights/Automatic Headlights
• Rotate the end of the lever to the first detent for parking lights, the second
detent for headlights
and the third detent for AUTO.
• When set to AUTO, the system automatically turns the headlights on or off based on ambient light levels.
Instrument Panel Dimmer
• Rotate the center portion of the lever t o the extreme bottom position to fully dim the
instrument panel lights and prevent the int erior lights from illuminating when a door
is opened.
• Rotate the center portion of the lever up to increase the brightness of the instrument panel lights when the parking lights or headlights are on.
• Rotate the center portion of the lever u pward to the next detent position to brighten
the odometer and radio controls when the parking lights or headlights are on.
• Rotate the center portion of the lever upward to the last detent to turn on the interior lighting.
High Beam Operation
• Push the lever forward to activate the high beams.
NOTE: For safe driving, turn off high beams when oncoming traffic is present to prevent
headlight glare and as a courtesy to other motorists.
Fog Lights
• Turn on the parking lights or low beam headlights and pull out the end of the lever.
Turn Signal s/Lane Change Assist
• Tap the lever up or down once and the turn signal (right or left) will flash three times
and automatically turn off.
OPERATING YOUR VEHICLE
22