2010 DODGE JOURNEY ESP
[x] Cancel search: ESPPage 4 of 88

WELCOME FROM CHRYSLER GROUP LLC
Congratulations on selecting your new Chrysler Group LLC vehicle. Be assured that it
represents precision workman ship, distinctive styling, and high quality - all essentials
that are traditional to our vehicles.
This guide illustrates and describes the operation of features and equipment that are
either standard or optional on this vehicle. This guide may also include a description of
features and equipment that are no longer available or were not ordered on this vehicle.
Please disregard any features and equipment described in this guide that are not
available on this vehicle. Chrysler Group LLC reserves the right to make changes in
design and specifications and/or make additions to or improvements to its products
without imposing any obligation upon itself to install them on products previously
manufactured.
For complete owner information, refer to the DVD in the owner’s kit provided at the time
of new vehicle purchase. For your convenience, the information contained on the DVD
may also be printed and saved for future reference.
Chrysler Group LLC is committed to protecting our environment and natural resources. By
converting from paper to electronic delivery f or the majority of the user information for
your vehicle, together we greatly reduce the demand for tree-based products and lessen
the stress on our environment.
Vehicles Sold In Canada
With respect to any Vehicles Sold in Canada, the name Chrysler Group LLC shall be
deemed to be deleted and the name Chrysler C anada Inc. used in substitution therefore.
Driving And Alcohol
Drunken driving is one of the most frequent causes of accidents.
Your driving ability can be seriously impaired with blood alcohol levels far below the
legal minimum. If you are drinking, don’t drive. Ride with a designated non-drinking
driver, call a cab, a friend, or use public transportation.
WARNING!
Driving after drinking can lead to an accident. Your perceptions are less sharp, your
reflexes are slower, and your judgment is impaired when you have been drinking.
Never drink and then drive.
INTRODUCTION/WELCOME
2
Page 8 of 88

INSTRUMENT CLUSTER
Warning Lights
- Low Fuel Warning Light
- Charging System Light**
- Oil Pressure Warning Light**
- Anti-Lock Brake (ABS) Light**
- Airbag Warning Light**
- Electronic Throttle Control (ETC) Light
- Tire Pressure Monitoring System (TPMS) Light
- Engine Temperature Warning Light
- Seat Belt Reminder Light
- Brake Warning Light**
- Malfunction Indicator Light (MIL)**
- Electronic Stability Program (ESP) Indicator Light / Brake Assist System
(BAS) Warning Light**
- All-Wheel Drive (AWD) Failure Indicator Light
6
CONTROLS AT A GLANCE
Page 9 of 88

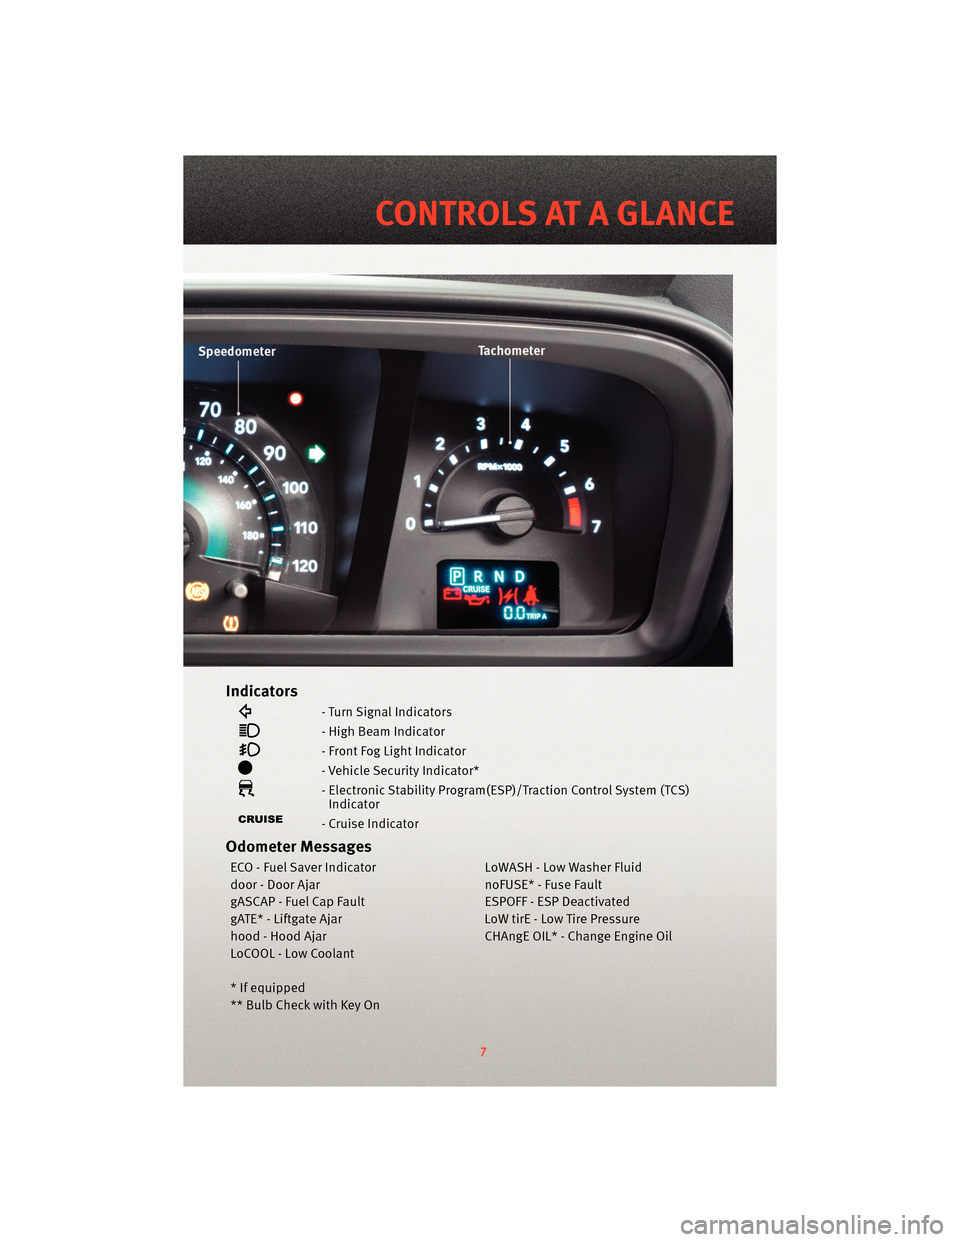
Indicators
- Turn Signal Indicators
- High Beam Indicator
- Front Fog Light Indicator
- Vehicle Security Indicator*
- Electronic Stability Program(ESP)/Traction Control System (TCS)Indicator
- Cruise Indicator
Odometer Messages
ECO - Fuel Saver Indicator LoWASH - Low Washer Fluid
door - Door Ajar noFUSE* - Fuse Fault
gASCAP - Fuel Cap Fault ESPOFF - ESP Deactivated
gATE* - Liftgate Ajar LoW tirE - Low Tire Pressure
hood - Hood Ajar CHAngE OIL* - Change Engine Oil
LoCOOL - Low Coolant
* If equipped
** Bulb Check with Key On
7
CONTROLS AT A GLANCE
Page 21 of 88

HEATED SEATS
Front Heated Seats
• The controls for front heatedseats are
located in the switch bank in the center of
the instrument panel.
• Press the switch once to select High-level heating. Press the switch a second time to
select Low-level heating. Press the switch a
third time to shut the heating elements Off.
WARNING!
• Persons who are unable to feel pain to the skin because of advanced age, chronicillness, diabetes, spinal cord injury, medication, alcohol use, exhaustion or other
physical conditions must exercise care when using the seat heater. It may cause
burns even at low temperatures, especially if used for long periods of time.
• Do not place anything on the seat that insulates against heat, such as a blanket or cushion. This may cause the seat heater to overheat. Sitting in a seat that has been
overheated could cause serious burns due to the increased surface temperature of
the seat.
CAUTION!
Repeated overheating of the seat could damage the heating element and/or degrade
the material of the seat.
TILT / TELESCOPING STEERING COLUMN
• The tilt/telescoping control lever is locatedbelow the steering wheel at the end of the
steering column.
• Push down on the lever to unlock the steering column.
• To tilt the steering column, move the steering wheel upward or downward as
desired. To lengthen or shorten the steering
column, pull the steering wheel outward or
push it inward as desired.
• Pull upward on the lever to lock the column firmly in place.
19
GETTING STARTED
Page 26 of 88

SPEED CONTROL LEVER
Cruise ON/OFF
• Push the ON/OFF button to activate theSpeed Control.
• CRUISE will appear on the instrument cluster to indicate the Speed Control is on.
• Push the ON/OFF button a second time to turn the system off.
WARNING!
Leaving the Electronic Speed Control system on when not in use is dangerous. You
could accidentally set the system or cause it to go faster than you want. You could lose
control and have an accident. Always leave the Electronic Speed Control system off
when you are not using it.
Set
• With Speed Control on, push down and release the lever to set a desired speed.
WARNING!
Electronic Speed Control can be dangerous where the system cannot maintain a
constant speed. Your vehicle could go too fast for the conditions, and you could lose
control. An accident could be the result. Do not use Electronic Speed Control in heavy
traffic or on roads that are winding, icy, snow-covered or slippery.
Accel/Decel
• Push and hold the lever up to accelerate or down to decelerate the vehicle; release thelever to save the new set speed.
• Once a speed is set, tapping the lever up or down will increase or decrease the set speed approximately 1 mph (2 km/h).
Cancel
• Pull the lever toward you or apply the brakes to cancel the set speed and maintain theset speed in memory.
• Push the ON/OFF button to turn the system off and erase the set speed memory.
Resume
• To resume a previously selected speed in memory, push the lever up and release.
OPERATING YOUR VEHICLE
24
Page 30 of 88

SYNC Temperature Button
• Push the SYNC button once to control driver and passenger temperaturessimultaneously. Push the SYNC button a second time to control the temperatures
individually.
Air Recirculation
• Use recirculation for maximum A/C operation.
• For window defogging, turn the recirculation button off.
• If the Recirculation button is pushed while in the AUTO mode, the indicator light may flash three times to indicate the cabin air is being controlled automatically.
Rear Passenger Climate Controls
PARKVIEW®REAR BACK-UP CAMERA
• You can see an on-screen image of the rear of your vehicle whenever the shift lever isput into REVERSE. The ParkView®Rear Back-Up Camera image will be displayed on the
radio display screen, located on the center stack of the instrument panel.
WARNING!
Drivers must be careful when backing up even when using the ParkView®Rear
Back-Up Camera. Always check carefully behind your vehicle, and be sure to check for
pedestrians, animals, other vehicles, obstruction s, or blind spots before backing up.
You are responsible for the safety of your surroundings and must continue to pay
attention while backing up. Failure to do so can result in serious injury or death.
OPERATING YOUR VEHICLE
28
Page 35 of 88

Auxiliary Mode
• The auxiliary (AUX) jack allows a portable device, such as an MP3 player or a cassetteplayer, to be plugged into the radio and uti lize the vehicle’s audio system to amplify
the source and play through the vehicle speakers.
• Pressing the AUX button will change the mode to auxiliary device if the AUX jack is connected.
• The control of the external device cannot be provided by the radio; use the device controls instead.
Clock Setting
• Press and hold the TIME button until the hours blink; turn the TUNE/SCROLL controlknob to set the hours.
• Press the TUNE/SCROLL control knob until the minutes begin to blink; turn the TUNE/SCROLL control knob to set the minutes.
• Press the TUNE/SCROLL control knob to save the time change.
• To exit, press any button/knob or wait five seconds.
Station Presets
• Press the SET/RND button once and SET 1 will show in the display. Then select the button (1–6).
• A second station may be added to each push button. Press the SET/RND button twice and SET 2 will show in the display, then select button (1–6).
How To Load Multiple CDs/DVDs
REQ Radio Only
• Press the LOAD button and then press the button with the corresponding number
(1–6) where the CD is being loaded. The radio will display PLEASE WAIT and prompt
when to INSERT DISC.
• After the radio displays INSERT DISC, insert the CD into the player. The radio display will show LOADING DISC when the disc is loading and “READING DISC” when the radio
is reading the disc.
• Press the eject button and then the cor responding number (1–6) to eject the desired
disc.
33
ELECTRONICS
Page 42 of 88

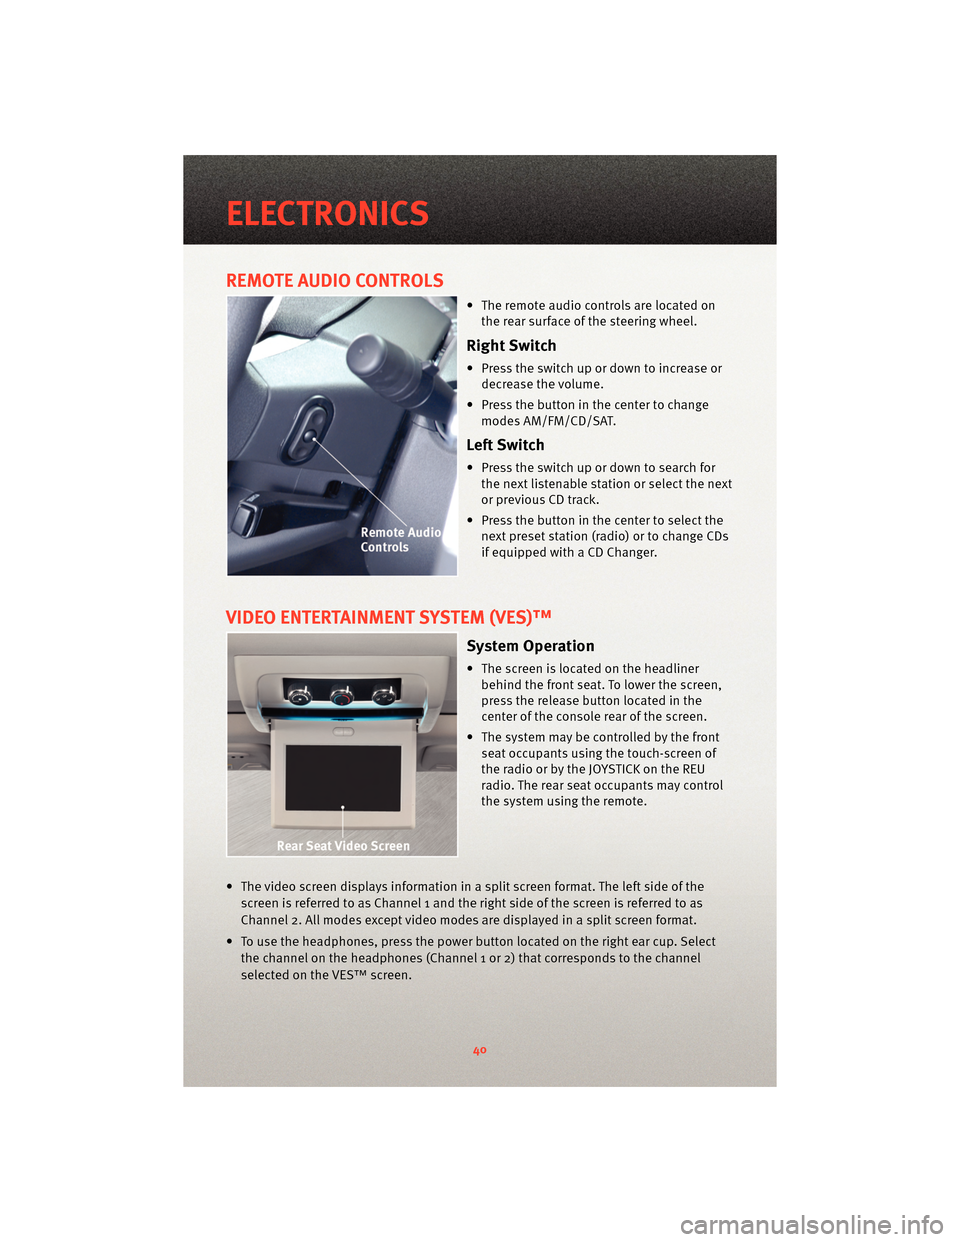
REMOTE AUDIO CONTROLS
• The remote audio controls are located onthe rear surface of the steering wheel.
Right Switch
• Press the switch up or down to increase ordecrease the volume.
• Press the button in the center to change modes AM/FM/CD/SAT.
Left Switch
• Press the switch up or down to search forthe next listenable station or select the next
or previous CD track.
• Press the button in the center to select the next preset station (radio) or to change CDs
if equipped with a CD Changer.
VIDEO ENTERTAINMENT SYSTEM (VES)™
System Operation
• The screen is located on the headlinerbehind the front seat. To lower the screen,
press the release button located in the
center of the console rear of the screen.
• The system may be controlled by the front seat occupants using the touch-screen of
the radio or by the JOYSTICK on the REU
radio. The rear seat occupants may control
the system using the remote.
• The video screen displays information in a split screen format. The left side of the screen is referred to as Channel 1 and the right side of the screen is referred to as
Channel 2. All modes except video modes are displayed in a split screen format.
• To use the headphones, press the power button located on the right ear cup. Select the channel on the headphones (Channel 1 or 2) that corresponds to the channel
selected on the VES™ screen.
ELECTRONICS
40