Page 49 of 76

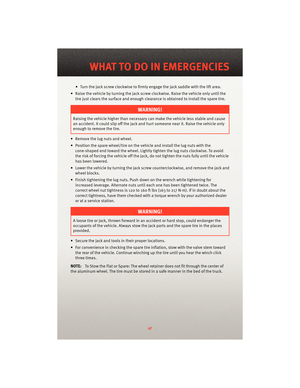
• Turn the jack screw clockwise to firmly engage the jack saddle with the lift area.
• Raise the vehicle by turning the jack screw clockwise. Raise the vehicle only until the tire just clears the surface and enough clearance is obtained to install the spare tire.
WARNING!
Raising the vehicle higher than necessary can make the vehicle less stable and cause
an accident. It could slip off the jack and hurt someone near it. Raise the vehicle only
enough to remove the tire.
• Remove the lug nuts and wheel.
• Position the spare wheel/tire on the vehicle and install the lug nuts with the cone-shaped end toward the wheel. Lightly tight en the lug nuts clockwise. To avoid
the risk of forcing the vehicle off the jack, do not tighten the nuts fully until the vehicle
has been lowered.
• Lower the vehicle by turning the jack screw counterclockwise, and remove the jack and wheel blocks.
• Finish tightening the lug nuts. Push do wn on the wrench while tightening for
increased leverage. Alternate nuts until each one has been tightened twice. The
correct wheel nut tightness is 120 to 160 ft lbs (163 to 217 N·m). If in doubt about the
correct tightness, have them checked w ith a torque wrench by your authorized dealer
or at a service station.
WARNING!
A loose tire or jack, thrown forward in an accident or hard stop, could endanger the
occupants of the vehicle. Always stow the jack parts and the spare tire in the places
provided.
• Secure the jack and tools in their proper locations.
• For convenience in checking the spare tire inflation, stow with the valve stem toward the rear of the vehicle. Continue winching up the tire until you hear the winch click
three times.
NOTE: To Stow the Flat or Spare: The wheel retainer does not fit through the center of
the aluminum wheel. The tire must be stored in a safe manner in the bed of the truck.
47
WHAT TO DO IN EMERGENCIES
Page 50 of 76
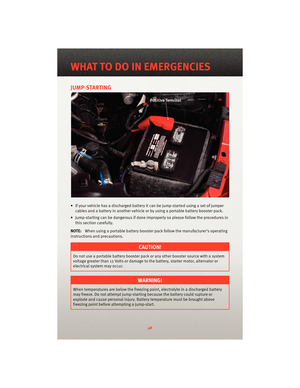
JUMP-STARTING
• If your vehicle has a discharged battery it can be jump-started using a set of jumpercables and a battery in another vehicle or by using a portable battery booster pack.
• Jump-starting can be dangerous if done improperly so please follow the procedures in this section carefully.
NOTE: When using a portable battery booster pack follow the manufacturer’s operating
instructions and precautions.
CAUTION!
Do not use a portable battery booster pack or any other booster source with a system
voltage greater than 12 Volts or damage to the battery, starter motor, alternator or
electrical system may occur.
WARNING!
When temperatures are below the freezing point, electrolyte in a discharged battery
may freeze. Do not attempt jump-starting because the battery could rupture or
explode and cause personal injury. Battery temperature must be brought above
freezing point before attempting a jump-start.
WHAT TO DO IN EMERGENCIES
48
Page 51 of 76

Preparations for Jump-Start
• The battery in your vehicle is located in the front of the engine compartment, behind
the left headlight assembly.
WARNING!
• Take care to avoid the radiator coolin g fan whenever the hood is raised. It can start
anytime the ignition switch is on. You can be injured by moving fan blades.
• Remove any metal jewelry, such as watch bands or bracelets, that might make an inadvertent electrical contact. You could be seriously injured.
• Batteries contain sulfuric acid that can burn your skin or eyes and generate hydrogen gas which is flammable and explosive. Keep open flames or sparks away
from the battery.
• Set the parking brake, shift the autom atic transmission into PARK and turn the ignition
to LOCK.
• Turn off the heater, radio, and all unnecessary electrical accessories.
• If using another vehicle to jump-start the battery, park the vehicle within the jumper cables reach, set the parking brake and make sure the ignition is OFF.
WARNING!
Do not allow vehicles to touch each other as this could establish a ground connection
and personal injury could result.
Jump-Starting Procedure
WARNING!
Failure to follow this procedure could result in personal injury or property damage due
to battery explosion.
CAUTION!
Failure to follow these procedures could result in damage to the charging system of
the booster vehicle or the discharged vehicle.
• Connect the positive (+)end of the jumper cable to the positive (+)post of the
discharged vehicle.
• Connect the opposite end of the positive (+)jumper cable to the positive (+)post of
the booster battery.
• Connect the negative end (-)of the jumper cable to the negative (-)post of the booster
battery.
49
WHAT TO DO IN EMERGENCIES
Page 52 of 76
jumper cable to a good engine ground
(exposed metal part of the discharged vehicle’s engine) away from the battery and the
fuel injection system.
WARNI")
• Connect the opposite end of the negative(-)jumper cable to a good engine ground
(exposed metal part of the discharged vehicle’s engine) away from the battery and the
fuel injection system.
WARNING!
Do not connect the cable to the negative post (-)of the discharged battery. The
resulting electrical spark could cause the battery to explode and could result in
personal injury.
• Start the engine in the vehicle that has the booster battery, let the engine idle a few minutes, and then start the engine in the vehicle with the discharged battery.
Once the engine is started, remove the jumper cables in the reverse sequence:
• Disconnect the negative (-)jumper cable from the engine ground of the vehicle with
the discharged battery.
• Disconnect the negative end (-)of the jumper cable from the negative (-)post of the
booster battery.
• Disconnect the opposite end of the positive (+)jumper cable from the positive (+)
post of the booster battery.
• Disconnect the positive (+)end of the jumper cable from the positive (+)post of the
discharged vehicle.
• Reinstall the air intake duct.
• If frequent jump-starting is required to start your vehicle you should have the battery and charging system inspected at your authorized dealer.
CAUTION!
Accessories that can be plugged into the vehicle power outlets draw power from the
vehicle’s battery, even when not in use (i.e., cellular phones, etc.). Eventually, if
plugged in long enough, the vehi cle’s battery will discharge sufficiently to degrade
battery life and/or prevent the engine from starting.
WHAT TO DO IN EMERGENCIES
50
Page 53 of 76
EMERGENCY TOW HOOKS
• If your vehicle is equipped with tow hooks, they are mounted in the front and the rear.
NOTE:For off-road recovery, it is recommended to use both of the front tow hooks to
minimize the risk of damage to the vehicle.
WARNING!
• Chains are not recommended for freeing a stuck vehicle. Chains may break, causing serious injury or death.
• Stand clear of vehicles when pulling with tow hooks. Tow straps and chains may break, causing serious injury.
CAUTION!
Tow hooks are for emergency use only, to rescue a vehicle stranded off-road. Do not
use tow hooks for tow truck hookup or highway towing. You could damage your
vehicle. Tow straps are recommended when towing the vehicle; chains may cause
vehicle damage.
51
WHAT TO DO IN EMERGENCIES
Page 54 of 76
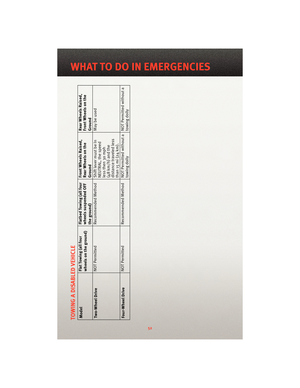
TOWING A DISABLED VEHICLEModelFlat Towing (all four
wheels on the ground)Flatbed Towing (all four
wheels suspended OFF
the ground)Front Wheels Raised,
Rear Wheels on the
GroundRear Wheels Raised,
Front Wheels on the
Ground
Two-Wheel Drive NOT Permitted
Recommended Method Shift lever must be In
NEUTRAL, the speed
less then 30 mph
(48 km/h) and the
distance traveled less
than 15 mi (24 km).May be used
Four-Wheel Drive NOT Permitted
Recommended Method NOT Permitted without a
towing dolly NOT Permitted without a
towing dolly
52
WHAT TO DO IN EMERGENCIES
Page 55 of 76

FREEING A STUCK VEHICLE
• If your vehicle becomes stuck in mud, sand or snow, it can often be moved by arocking motion. Turn your steering wheel right and left to clear the area around the
front wheels. Then move the shift lever back and forth between REVERSE and 1st gear.
Using minimal accelerator pedal pressure to maintain the rocking motion, without
spinning the wheels, is most effective.
• Allow the engine to idle with the shift lever in NEUTRAL for at least one minute after every five rocking-motion cycles. This wil l minimize overheating and reduce the risk of
transmission failure during prolonge d efforts to free a stuck vehicle.
WARNING!
Fast spinning tires can be dangerous. Forces generated by excessive wheel speeds
may cause tire damage or failure. Atire could explode and injure someone. Do not
spin your vehicle's wheels faster than 30 mph (48 km/h) when you are stuck. Do not
let anyone near a spinning wheel, no matter what the speed.
WARNING!
• Chains are not recommended for freeing a stuck vehicle. Chains may break, causing serious injury or death.
• Stand clear of vehicles when pulling with tow hooks. Tow straps and chains may break, causing serious injury.
CAUTION!
• When “rocking” a stuck vehicle by moving between 1st and REVERSE, do not spinthe wheels faster than 15 mph (24 km/h), or drivetrain damage may result.
• Revving the engine or s pinning the wheels too fast ma y lead to transmission
overheating and failure. It can also damage the tires. Do not spin the wheels above
30 mph (48 km/h) while in gear (no transmission shifting occurring).
53
WHAT TO DO IN EMERGENCIES
Page 56 of 76

• This vehicle is equipped with an event data recorder (EDR). The main purpose of anEDR is to record, in certain crash or near crash-like situations, such as an air bag
dep")
EVENT DATA RECORDER (EDR)
• This vehicle is equipped with an event data recorder (EDR). The main purpose of anEDR is to record, in certain crash or near crash-like situations, such as an air bag
deployment or hitting a road obst acle, data that willassist in understanding how a
vehicle’s systems performed. The EDR is designed to record data related to vehicle
dynamics and safety systems for a short period of time, typically 30 seconds or less.
The EDR in this vehicle is designed to record such data as:
• How various systems in your vehicle were operating;
• Whether or not the driver and passenger s afety belts were buckled/fastened;
• How far (if at all) the driver was depressing the accelerator and/or brake pedal; and,
• How fast the vehicle was traveling.
• These data can help provide a better u nderstanding of the circumstances in which
crashes and injuries occur.
NOTE: EDR data are recorded by your vehicle only if a non-trivial crash situation occurs;
no data are recorded by the EDR under normal driving conditions and no personal data
(e.g. name, gender, age, and crash location) are recorded. However, other parties, such
as law enforcement, could combine the EDR data with the type of personally identifying
data routinely acquired during a crash investigation.
• To read data recorded by an EDR, special equipment is required, and access to the vehicle or the EDR is needed. In addition to the vehicle manufacturer, other parties
such as law enforcement, that have the special equipment, can read the information if
they have access to the vehicle or the EDR.
WHAT TO DO IN EMERGENCIES
54


Flatbed Towing (all four
wheels suspended OFF
the ground)Front Wheels Raised,
Rear Wheels on the
GroundRear Wheels Raised,
Fron")