Page 77 of 450
Whenever a change is noticed in the sound of the exhaust
system, when exhaust fumes can be detected inside the
vehicle, or when the underside or rear of the vehicle is
damaged, have a competent mechanic inspect the com-
plete exhaust system and adjacent body areas for broken,
damaged, deteriorated, or mispositioned parts. Open
seams or loose connections could permit exhaust fumes
to seep into the passenger compartment. In addition,
inspect the exhaust system each time the vehicle is raised
for lubrication or oil change. Replace as required.
Safety Checks You Should Make Inside the
Vehicle
Seat Belts
Inspect the belt system periodically, checking for cuts,
frays, and loose parts. Damaged parts must be replaced
immediately. Do not disassemble or modify the system.
Front seat belt assemblies must be replaced after a
collision. Rear seat belt assemblies must be replaced aftera collision if they have been damaged (i.e., bent retractor,
torn webbing, etc.). If there is any question regarding belt
or retractor condition, replace the belt.
Airbag Warning Light
The light should come on and remain on for six to eight
seconds as a bulb check when the ignition switch is first
turned ON. If the light is not lit during starting, see your
authorized dealer. If the light stays on, flickers, or comes
on while driving, have the system checked by an autho-
rized dealer.
Defroster
Check operation by selecting the defrost mode and place
the blower control on high speed. You should be able to
feel the air directed against the windshield. See your
authorized dealer for service if your defroster is
inoperable.
76 THINGS TO KNOW BEFORE STARTING YOUR VEHICLE
Page 121 of 450
NOTE:Keep in mind that you have to press the Voice
Command
button first and wait for the beep
before speaking the “Barge In” commands.
Voice Training
For users experiencing difficulty with the system recog-
nizing their voice commands or numbers the Uconnect™
Voice “Voice Training” feature may be used.
1. Press the Voice Command
button, say “System
Setup” and once you are in that menu then say “Voice
Training.” This will train your own voice to the system
and will improve recognition.
2. Repeat the words and phrases when prompted by
Uconnect™ Voice. For best results, the “Voice Training”
session should be completed when the vehicle is parked,
engine running, all windows closed, and the blower fan
switched off. This procedure may be repeated with a new
user. The system will adapt to the last trained voice only.
SEATS
Seats are a primary part of the Occupant Restraint System
of the vehicle. Proper use of the seats is needed for safe
operation of the vehicle.
WARNING!
•It is extremely dangerous to ride in a cargo area,
inside or outside of a vehicle. In a collision, people
riding in these areas are more likely to be seri-
ously injured or killed.
•Do not allow people to ride in any area of your
vehicle that is not equipped with seats and seat
belts.
•Be sure everyone in your vehicle is in a seat and
using a seat belt properly.
120 UNDERSTANDING THE FEATURES OF YOUR VEHICLE
Page 122 of 450
Manual Seat Adjustment
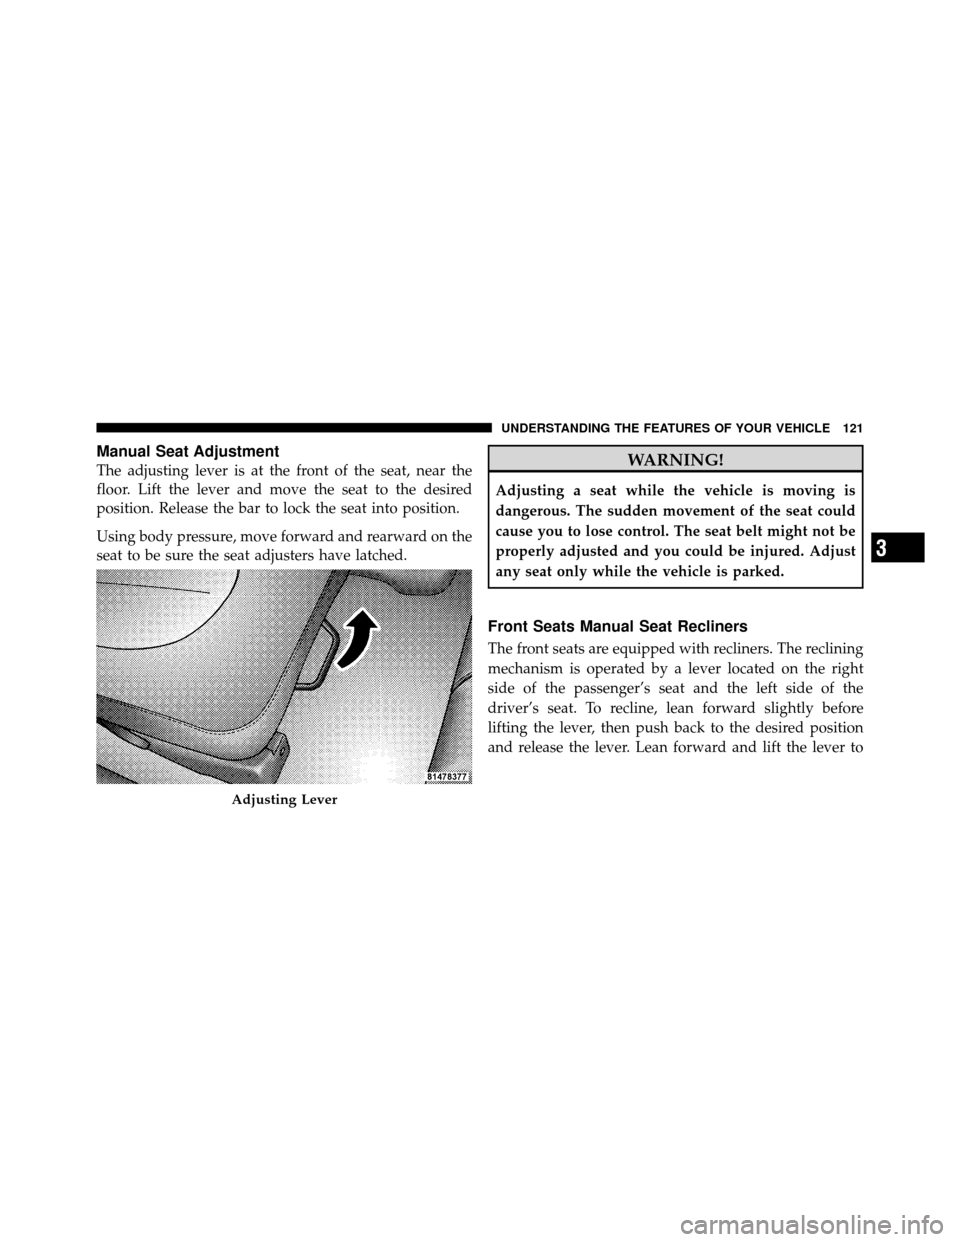
The adjusting lever is at the front of the seat, near the
floor. Lift the lever and move the seat to the desired
position. Release the bar to lock the seat into position.
Using body pressure, move forward and rearward on the
seat to be sure the seat adjusters have latched.WARNING!
Adjusting a seat while the vehicle is moving is
dangerous. The sudden movement of the seat could
cause you to lose control. The seat belt might not be
properly adjusted and you could be injured. Adjust
any seat only while the vehicle is parked.
Front Seats Manual Seat Recliners
The front seats are equipped with recliners. The reclining
mechanism is operated by a lever located on the right
side of the passenger’s seat and the left side of the
driver’s seat. To recline, lean forward slightly before
lifting the lever, then push back to the desired position
and release the lever. Lean forward and lift the lever to
Adjusting Lever
3
UNDERSTANDING THE FEATURES OF YOUR VEHICLE 121
Page 123 of 450
return the seatback to its normal position. Using body
pressure, lean forward and rearward on the seat to be
sure the seatback is locked.WARNING!
Do not ride with the seatback reclined so that the
shoulder belt is no longer resting against your chest.
In a collision you could slide under the seat belt and
be seriously or even fatally injured. Use the recliner
only when the vehicle is parked.
Manual Lumbar Support Adjustment — If
Equipped
The manual lumbar support rotary control adjustment is
located on the left side of the driver’s seat. Rotate the
knob to increase or decrease the amount of lumbar
support.
Recline Lever
122 UNDERSTANDING THE FEATURES OF YOUR VEHICLE
Page 126 of 450
The seat angle can also be adjusted by using the two
toggle switches, tilting it up or down.WARNING!
Adjusting a seat while the vehicle is moving is
dangerous. The sudden movement of the seat could
cause you to lose control. The seat belt might not be
properly adjusted and you could be injured. Adjust
any seat only while the vehicle is parked.
CAUTION!
DO NOT place any article under a power seat or
impede its ability to move as it may cause damage to
the seat controls. Seat travel may become limited if
movement is stopped by an obstruction in the seat’s
path.
Tilt Adjustment
3
UNDERSTANDING THE FEATURES OF YOUR VEHICLE 125
Page 176 of 450

5. High Beam IndicatorThe high beam indicator will illuminate if the
headlights are on high beam.
6. Seat Belt Reminder Light The seat belt reminder light will illuminate for
several seconds after the ignition is turned ON as
a reminder to “buckle up.” This light will remain
on as long as the seat belt remains unbuckled. If this light
flashes, it indicates a fault in the seat belt system. Have
the system checked by an authorized dealer. Refer to
“Occupant Restraints” in “Things To Know Before Start-
ing Your Vehicle” for further information.
7. Engine Temperature Warning Light This light warns of an overheated engine condi-
tion. As temperatures rise and the gauge ap-
proaches H(Hot), this indicator will illuminate
and a single chime will sound after reaching a set threshold. Further overheating will cause the tempera-
ture gauge to pass
H(Hot), the indicator will continu-
ously flash and a continuous chime will occur until the
engine is allowed to cool.
CAUTION!
Driving with a hot engine cooling system could
damage your vehicle. If the temperature light is on,
safely pull over and stop the vehicle. Idle the vehicle
in neutral with the air conditioner turned off until
the light turns off. If the light remains on, turn the
engine off immediately, and call for service.4
UNDERSTANDING YOUR INSTRUMENT PANEL 175
Page 250 of 450
STARTING PROCEDURES
Before starting your vehicle, adjust your seat, adjust both
inside and outside mirrors, and fasten your seat belts.
WARNING!
Do not leave children or animals inside parked
vehicles in hot weather. Interior heat buildup may
cause serious injury or death.
Automatic Transmission
Start the engine with the shift lever in NEUTRAL or
PARK position. Apply the brake before shifting to any
driving range.
NOTE: This vehicle is equipped with a transmission
shift interlocking system. The brake pedal must be
pressed to shift out of PARK.
Tip Start Feature
Turn the ignition switch to START position and release it
as soon as the starter engages. The starter motor will
continue to run, but will automatically disengage itself
when the engine is running. If the engine fails to start, the
starter will disengage automatically in 10 seconds. If this
occurs, turn the ignition switch to the LOCK position,
wait 10 to 15 seconds, then repeat the “Normal Starting”
procedure.
Normal Starting
NOTE:Normal starting of either a warm or cold engine
is obtained without pumping or pressing the accelerator
pedal.
Turn the ignition switch to the START position and
release when the engine starts. If the engine fails to start
within 10 seconds, turn the key to the OFF position, wait
5 seconds, then repeat the “Normal Starting” procedure.
5
STARTING AND OPERATING 249
Page 364 of 450
WARNING! (Continued)
•Battery posts, terminals and related accessories
contain lead and lead compounds. Wash hands
after handling.
CAUTION!
•It is essential when replacing the cables on the
battery that the positive cable is attached to the
positive post, and the negative cable is attached to
the negative post. Battery posts are marked (+)
positive and (-) negative and are identified on the
battery case.
•If a “fast charger” is used while the battery is in
the vehicle, disconnect both vehicle battery cables
before connecting the charger to the battery. Do
not use a “fast charger” to provide starting voltage.
Air Conditioner Maintenance
For best possible performance, your air conditioner
should be checked and serviced by an authorized dealer
at the start of each warm season. This service should
include cleaning of the condenser fins and a performance
test. Drive belt tension should also be checked at this
time.
CAUTION!
Do not use chemical flushes in your air conditioning
system as the chemicals can damage your air condi-
tioning components. Such damage is not covered by
the New Vehicle Limited Warranty.
7
MAINTAINING YOUR VEHICLE 363