Page 66 of 450
provides for the installation of the child restraint without
using the vehicle’s seat belts, instead securing the child
restraint using lower anchorages and upper tether straps
from the child restraint to the vehicle structure. LATCH-
compatible child restraint systems are now available.
However, because the lower anchorages are to be intro-
duced over a period of years, child restraint systems
having attachments for those anchorages will continue to
also have features for installation using the vehicle’s seat
belts. Child restraints having tether straps and hooks for
connection to the top tether anchorages, have been
available for some time. For some older child restraints,
many child restraint manufacturers offer add-on tether
strap kits or retro-fit kits. You are urged to take advantage
of all the available attachments provided with your child
restraint in any vehicle.Extended Cab
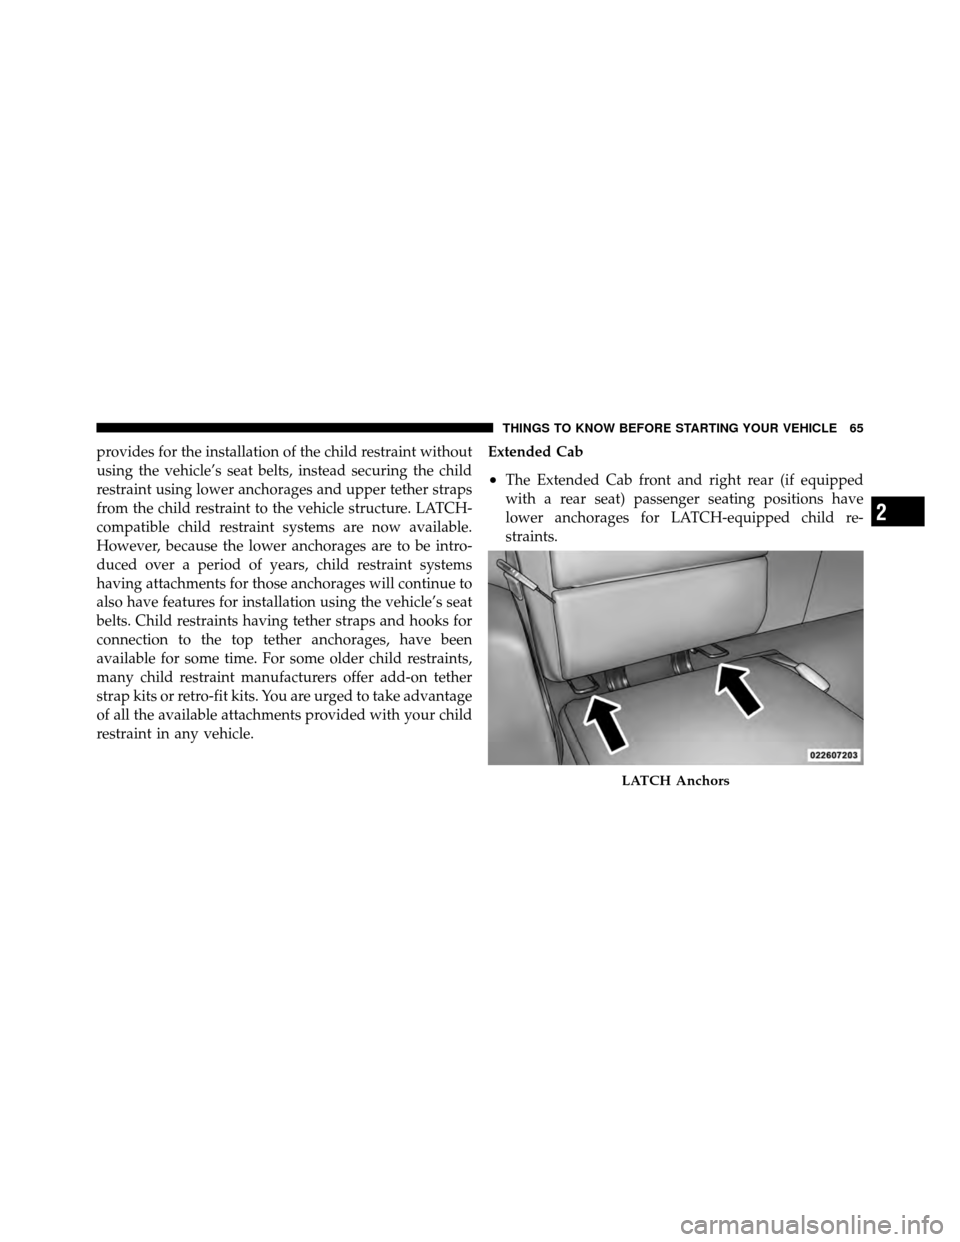
•The Extended Cab front and right rear (if equipped
with a rear seat) passenger seating positions have
lower anchorages for LATCH-equipped child re-
straints.
LATCH Anchors
2
THINGS TO KNOW BEFORE STARTING YOUR VEHICLE 65
Page 70 of 450
Installing Child Restraints Using the Vehicle Seat
Belt
The passenger seat belts are equipped with either cinch-
ing latch plates or automatic locking retractors, which are
designed to keep the lap portion tight around the child
restraint, so that it should not be necessary to use a
locking clip. If the seat belt has a cinching latch plate,
pulling up on the shoulder portion of the lap/shoulder
belt will tighten the belt. The cinching latch plate will
keep the belt tight; however, any seat belt system will
loosen with time, so check the belt occasionally and pull
it tight if necessary. Pull the belt from the retractor until
there is enough to allow you to pass through the child
restraint and slide the latch plate into the buckle. Then,
pull the belt until it is fully extended from the retractor.
Allow the belt to return to the retractor, pulling on the
excess webbing to tighten the lap portion around the
child restraint. For automatic locking retractor seat belts,
refer to�Automatic Locking Mode�. If you have trouble tightening the lap/shoulder belt on the child restraint
because, the buckle or latch plate is too close to the belt
path opening on the restraint, follow these steps. If the
buckle is webbing-mounted, disconnect the latch plate
from the buckle and twist the short buckle-end belt to
shorten it. Insert the latch plate into the buckle with the
release button facing out. If the belt still can’t be tight-
ened, the buckle is not webbing-mounted, or if pulling
and pushing on the restraint loosens the belt, you may
need to do something more. Disconnect the latch plate
from the buckle, turn the latch plate around, and insert
the latch plate into the buckle again. If you still can’t
make the child restraint secure, try a different seating
position or use the locking clip provided with your child
restraint. To complete the child seat installation, refer to
�Child Restraint Tether Anchor�.
2
THINGS TO KNOW BEFORE STARTING YOUR VEHICLE 69
Page 74 of 450
WARNING!
An incorrectly anchored tether strap could lead to
seat failure and injury to the child. In a collision, the
seat could come loose and allow the child to crash
into the inside of the vehicle or other passengers, or
even be thrown from the vehicle. Use only the anchor
positions directly behind the child restraint to secure
a child restraint top tether strap. See your authorized
dealer for help, if necessary.
Transporting Pets
Airbags deploying in the front seat could harm your pet.
An unrestrained pet will be thrown about and possibly
injured, or injure a passenger during panic braking or in
a collision. Pets should be restrained in the rear seat in
pet harnesses or pet carriers that are secured by seat belts.Multiple Child Restraints
1 — Inner Anchor Strap Rings 4 — Passenger Side Rear ChildSeat
2 — Snap Hook 5 — Center Rear Child Seat
3 — Tether Strap 6 — Drivers Side Rear Child Seat
2
THINGS TO KNOW BEFORE STARTING YOUR VEHICLE 73
Page 83 of 450
▫Gate Operator/Canadian Programming .... 152
▫ Using HomeLink� ................... 152
▫ Reprogramming A Single HomeLink�
Button ............................ 153
▫ Security ........................... 153
▫ Troubleshooting Tips .................. 153
▫ General Information .................. 154
� Electrical Power Outlets ................. 154
� Cupholders .......................... 156
� Rear Crate ’N Go� Storage — If Equipped .... 157
▫ Plastic Grocery Bag Retainers ............ 159
� Console Features — If Equipped ........... 159
▫ Floor Console Features ................ 159 �
Cargo Area Features ................... 161
▫
Rear Cargo Area Utility Rails — If Equipped. . 161
� Rear Window Features .................. 162
▫ Rear Window Defroster — If Equipped ..... 162
▫ Sliding Rear Window — If Equipped ...... 163
� Slide-In Campers ...................... 164
▫ Camper Applications .................. 164
▫ General Information .................. 164
▫ Carbon Monoxide Warning-Vehicles
Equipped With A Cap Or Slide-In Campers . . 164
� Tailgate ............................ 165
▫ Tailgate Removal .................... 165
▫
Two–Position Tailgate/Upper Load Platform. . 166
82 UNDERSTANDING THE FEATURES OF YOUR VEHICLE
Page 149 of 450
Outside Temperature
Because the ambient temperature sensor is located under
the hood, engine temperature can influence the displayed
temperature; therefore, temperature readings are slowly
updated when the vehicle speed is below 20 mph
(30 km/h) or during stop-and-go driving.
GARAGE DOOR OPENER — IF EQUIPPED
HomeLink�replaces up to three remote controls (hand-
held transmitters) that operate devices such as garage
door openers, motorized gates, lighting or home security
systems. The HomeLink� unit operates off of your vehi-
cle’s battery.
The HomeLink� buttons are located in the overhead
console, and contain one, two or three dots/lines desig-
nating the different HomeLink� channels.NOTE:
HomeLink� is disabled when the Vehicle Theft
Alarm is active.
HomeLink Buttons
148 UNDERSTANDING THE FEATURES OF YOUR VEHICLE
Page 153 of 450
Gate Operator/Canadian Programming
Canadian radio-frequency laws require transmitter sig-
nals to “time-out” (or quit) after several seconds of
transmission – which may not be long enough for
HomeLink�to pick up the signal during programming.
Similar to this Canadian law, some U.S. gate operators are
designed to “time-out” in the same manner.
It may be helpful to unplug the device during the cycling
process to prevent possible overheating of the garage
door or gate motor.
If you are having difficulties programming a garage door
opener or a gate operator, replace “Programming
HomeLink,” Step 3, with the following:
3. Continue to press and hold the HomeLink� button,
while you press and release (“cycle”), your handheld
transmitter every two seconds until HomeLink� hassuccessfully accepted the frequency signal. The indica-
tor(s) will change from a slow flash to a rapid flash
when trained.
If you unplugged the device for training, plug it back in
at this time.
Then proceed with Step 4 under, “Programming
HomeLink�,” earlier in this section.
Using HomeLink�
To operate, press and release the programmed
HomeLink�
button. Activation will now occur for the
trained device (i.e., garage door opener, gate operator,
security system, entry door lock, home/office lighting,
etc.,). The handheld transmitter of the device may also be
used at any time.
152 UNDERSTANDING THE FEATURES OF YOUR VEHICLE
Page 154 of 450
Reprogramming A Single HomeLink�Button
To reprogram a channel that has been previously trained,
follow these steps:
1. Turn the ignition switch to the ON/RUN position.
2. Press and hold the desired HomeLink� button for
20 seconds until the indicator(s) starts to flash. Do not
release the button.
3. Without releasing the button, proceed with Program-
ming HomeLink�, Step #2, and follow all remaining
steps.
Security
It is advised to erase all channels before you sell or turn
in your vehicle.
To do this, press and hold the two outside buttons for
20 seconds until the indicators begin to flash. Note that
all channels will be erased. Individual channels cannot be
erased. The HomeLink�
Universal Transceiver is disabled when
the Vehicle Theft Alarm is active.
Troubleshooting Tips
If you are having trouble programming HomeLink �, here
are some of the most common solutions:
•Replace the battery in the original transmitter.
•Press the LEARN button on the garage door opener to
complete the training for Rolling Code.
•Did you unplug the device for training and remember
to plug it back in?
If you have any problems, or require assistance, please
call toll-free 1–800–355–3515 or, on the Internet at
www.HomeLink.com, for information or assistance.
3
UNDERSTANDING THE FEATURES OF YOUR VEHICLE 153
Page 162 of 450
CARGO AREA FEATURES
Rear Cargo Area Utility Rails — If Equipped
CAUTION!
The maximum load per cleat should not exceed
320 lbs (145 kg) and the angle of the load on each
cleat should not exceed 60 degrees above horizontal,
or damage to the cleat or cleat rail may occur.
There are four adjustable cleats that can be used to assist
in securing cargo. Each cleat must be located and tight-
ened down in one of the detent’s, along either rail, in
order to keep cargo properly secure.
To move the cleat to any position on the rail, turn the nut
counterclockwise, approximately three turns. Then pull
out on the cleat and slide it to the detent nearest the
desired location. Make sure the cleat is seated in the
detent and tighten the nut.
1 — Utility Rail Cleat
2 — Cleat Retainer Nut
3 — Utility Rail Detent
3
UNDERSTANDING THE FEATURES OF YOUR VEHICLE 161