2010 DODGE DAKOTA reset
[x] Cancel search: resetPage 180 of 450

CHAngE OIL Message
Your vehicle is equipped with an engine oil change
indicator system. The “CHAngE OIL” message will flash
in the instrument cluster odometer for approximately
12 seconds after a single chime has sounded, to indicate
the next scheduled oil change interval. The engine oil
change indicator system is duty cycle based, which
means the engine oil change interval may fluctuate
dependent upon your personal driving style.
Unless reset, this message will continue to display each
time you turn the ignition switch to the ON/RUN
position. To turn off the message temporarily, press and
release the Trip Odometer button on the instrument
cluster. To reset the oil change indicator system (after
performing the scheduled maintenance), refer to the
following procedure:1. Turn the ignition switch to the ON position (do not
start the engine). 2. Fully depress the accelerator pedal slowly three
times within 10 seconds.
3. Turn the ignition switch to the OFF/LOCK position.
NOTE: If the indicator message illuminates when you
start the vehicle, the oil change indicator system did not
reset. If necessary, repeat this procedure.
16. Odometer
The odometer shows the total distance the vehicle has
been driven.
U.S. Federal regulations require that upon transfer of
vehicle ownership, the seller certify to the purchaser the
correct mileage that the vehicle has been driven. If your
odometer needs to be repaired or serviced, the repair
technician should leave the odometer reading the same
as it was before the repair or service. If s/he cannot do so,
then the odometer must be set at zero, and a sticker must
be placed in the door jamb stating what the mileage was
4
UNDERSTANDING YOUR INSTRUMENT PANEL 179
Page 181 of 450

before the repair or service. It is a good idea for you to
make a record of the odometer reading before the repair/
service, so that you can be sure that it is properly reset, or
that the door jamb sticker is accurate if the odometer
must be reset at zero.
17. Fog Light Indicator — If EquippedThe fog light indicator illuminates when the fog
lights are on.
18. Transmission Temperature Warning Light This light indicates that there is excessive trans-
mission fluid temperature, that might occur
with severe usage such as trailer towing. If this
light comes on, stop the vehicle and run the
engine at idle or faster, with the transmission in NEU-
TRAL, until the light goes off.CAUTION!
Continuous driving with the Transmission Tempera-
ture Warning Light illuminated will eventually cause
severe transmission damage or transmission failure.
WARNING!
In some circumstances a Transmission Temperature
Warning Light, under continued operation, could
cause the fluid to boil over, come in contact with hot
engine or exhaust components and cause a fire.
180 UNDERSTANDING YOUR INSTRUMENT PANEL
Page 188 of 450

29. 4WD LOW Indicator
This light alerts the driver that the vehicle is in
the four-wheel drive LOW mode. The front and
rear driveshafts are mechanically locked to-
gether forcing the front and rear wheels to rotate
at the same speed. Low range provides a greater gear
reduction ratio to provide increased torque at the wheels.
30. Odometer/Trip Odometer Button
Press the ODOMETER/TRIP ODOMETER button to
toggle between the odometer and the trip odometer
display. Holding the button in, resets the trip odometer
reading.
ELECTRONIC DIGITAL CLOCK
The clock and radio each use the display panel built into
the radio. A digital readout shows the frequency and/or
time in hours and minutes (depending on your radio
model), whenever the ignition switch is in the ON or
ACC position. When the ignition switch is in the OFF position, or when
the radio frequency is being displayed, timekeeping is
accurately maintained.
On the AM/FM/CD (6-disc) radio, the time button
alternates the location of the time and frequency on the
display. On the AM/FM/CD (single-disc) radio, only one
of the two, time or frequency, is displayed.
Clock Setting Procedure
1. Press and hold the TIME button until the hours blink.
2. Adjust the hours by turning the TUNE/AUDIO con-
trol knob.
3. After the hours are adjusted, push the TUNE/AUDIO
control knob to set the minutes.
4. Adjust the minutes by turning the TUNE/AUDIO
control knob.
5. To exit, press any button/knob, or wait approximately
five seconds.
4
UNDERSTANDING YOUR INSTRUMENT PANEL 187
Page 193 of 450

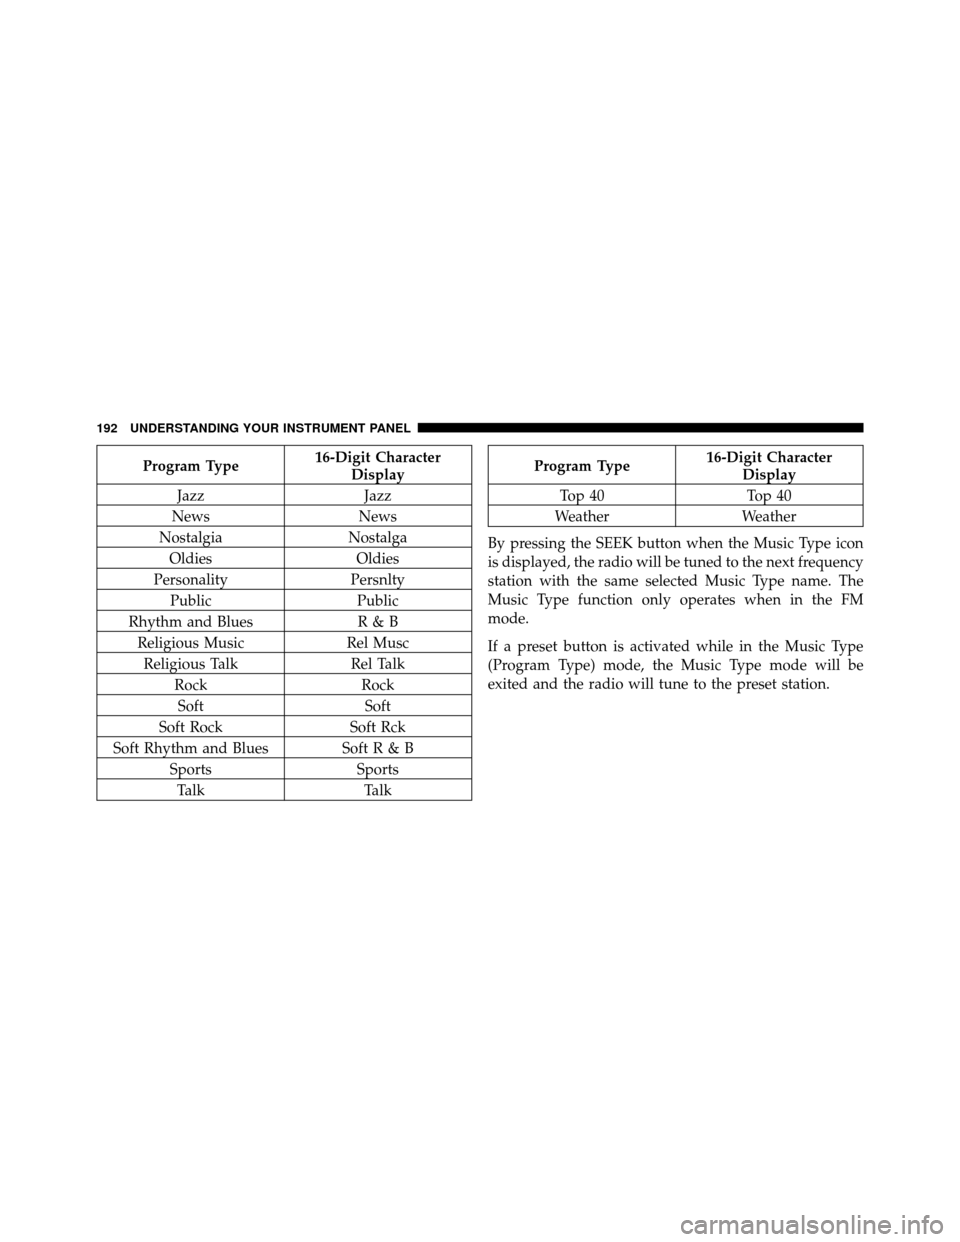
Program Type16-Digit Character
Display
Jazz Jazz
News News
Nostalgia Nostalga
Oldies Oldies
Personality Persnlty
Public Public
Rhythm and Blues R & B
Religious Music Rel Musc
Religious Talk Rel Talk
Rock Rock
Soft Soft
Soft Rock Soft Rck
Soft Rhythm and Blues SoftR&B Sports Sports
Talk TalkProgram Type16-Digit Character
Display
Top 40 Top 40
Weather Weather
By pressing the SEEK button when the Music Type icon
is displayed, the radio will be tuned to the next frequency
station with the same selected Music Type name. The
Music Type function only operates when in the FM
mode.
If a preset button is activated while in the Music Type
(Program Type) mode, the Music Type mode will be
exited and the radio will tune to the preset station.
192 UNDERSTANDING YOUR INSTRUMENT PANEL
Page 197 of 450

You may add a second station to each pushbutton by
repeating the above procedure with this exception: Press
the SET button twice and SET 2 will show in the display
window. Each button can be set for SET 1 and SET 2 in
both AM and FM. This allows a total of 12 AM, 12 FM,
and 12 Satellite (if equipped) stations to be stored into
pushbutton memory. The stations stored in SET 2
memory can be selected by pressing the pushbutton
twice.
Every time a preset button is used, a corresponding
button number will display.
Buttons1-6
These buttons tune the radio to the stations that you
commit to pushbutton memory {12 AM, 12 FM, and 12
Satellite (if equipped) stations}.
DISC Button
Pressing the DISC button will allow you to switch from
AM/FM modes to Disc modes.
Operation Instructions - (DISC MODE for CD and
MP3/WMA Audio Play, DVD-VIDEO)
The radio DVD player and many DVD discs are coded by
geographic region. These region codes must match in
order for the disc to play. If the region code for the DVD
disc does not match the region code for the radio DVD
player, it will not play the disc. Customers may take their
vehicle to an authorized dealer to change the region code
of the player a maximum of five times.
CAUTION!
The radio may shut down during extremely hot
conditions. When this occurs, the radio will indicate
“Disc Hot” and shut off until a safe temperature is
reached. This shutdown is necessary to protect the
optics of the DVD player and other radio internal
components.
196 UNDERSTANDING YOUR INSTRUMENT PANEL
Page 212 of 450

You may add a second station to each pushbutton by
repeating the above procedure with this exception: Press
the SET/RND button twice and SET 2 will show in the
display window. Each button can be set for SET 1 and
SET 2 in both AM and FM. This allows a total of 12 AM
and 12 FM stations to be stored into pushbutton memory.
The stations stored in SET 2 memory can be selected by
pressing the pushbutton twice.
Every time a preset button is used, a corresponding
button number will display.
Buttons1-6
These buttons tune the radio to the stations that you
commit to pushbutton memory (12 AM and 12 FM
stations).
DISC Button
Pressing the DISC button will allow you to switch from
AM/FM modes to Disc modes.
Operation Instructions — CD MODE For CD And
MP3 Audio Play
NOTE:
•The ignition switch must be in the ON or ACC
position to operate the radio.
•This radio is capable of playing compact discs (CD),
recordable compact discs (CD-R), rewritable compact
discs (CD-RW), compact discs with MP3 tracks and
multisession compact discs with CD and MP3 tracks.
Inserting Compact Disc(s)
Gently insert one CD into the CD player with the CD
label facing up. The CD will automatically be pulled into
the CD player and the CD icon will illuminate on the
radio display. If a CD does not go into the slot more than
1.0 in (2.5 cm), a disc may already be loaded and must be
ejected before a new disc can be loaded.
4
UNDERSTANDING YOUR INSTRUMENT PANEL 211
Page 222 of 450

Program Type16-Digit Character
Display
Classic Rock Cls Rock
College College
Country Country
Foreign Language Language
Information Inform
Jazz Jazz
News News
Nostalgia Nostalga
Oldies Oldies
Personality Persnlty
Public Public
Rhythm and Blues R & B
Religious Music Rel Musc
Religious Talk Rel Talk
Rock RockProgram Type16-Digit Character
Display
Soft Soft
Soft Rock Soft Rck
Soft Rhythm and Blues Soft R&B
Sports Sports
Talk Talk
Top 40 Top 40
Weather Weather
By pressing the SEEK button when the Music Type icon
is displayed, the radio will be tuned to the next frequency
station with the same selected Music Type name. The
Music Type function only operates when in the FM
mode.
If a preset button is activated while in the Music Type
(Program Type) mode, the Music Type mode will be
exited and the radio will tune to the preset station.
4
UNDERSTANDING YOUR INSTRUMENT PANEL 221
Page 223 of 450

SETUP Button
Pressing the SETUP button allows you to select between
the following items:
•Set Clock— Pressing the SELECT button will allow
you to set the clock. Adjust the hours by turning the
TUNE/SCROLL control knob. After adjusting the
hours, press the TUNE/SCROLL control knob to set
the minutes. The minutes will begin to blink. Adjust
the minutes using the right side TUNE/SCROLL
control knob. Press the TUNE/SCROLL control knob
to save time change.
AM/FM Button
Press the button to select either AM or FM mode.
SET/RND Button — To Set the Pushbutton
Memory
When you are receiving a station that you wish to
commit to pushbutton memory, press the SET/RND
button. The symbol SET 1 will now show in the display window. Select the button (1–6) you wish to lock onto this
station and press and release that button. If a button is
not selected within five seconds after pressing the SET/
RND button, the station will continue to play but will not
be stored into pushbutton memory.
You may add a second station to each pushbutton by
repeating the above procedure with this exception: Press
the SET/RND button twice and SET 2 will show in the
display window. Each button can be set for SET 1 and
SET 2 in both AM and FM. This allows a total of 12 AM
and 12 FM stations to be stored into pushbutton memory.
The stations stored in SET 2 memory can be selected by
pressing the pushbutton twice.
Every time a preset button is used, a corresponding
button number will display.Buttons 1 - 6
These buttons tune the radio to the stations that you commit
to pushbutton memory (12 AM and 12 FM stations).
222 UNDERSTANDING YOUR INSTRUMENT PANEL