Page 94 of 484

The Uconnect™ Phone can be used with any Hands-Free
Profile certified Bluetooth�cellular phone. See the
Uconnect™ website for supported phones. If your cellu-
lar phone supports a different profile (e.g., Headset
Profile) you may not be able to use any Uconnect™
Phone features. Refer to your cellular service provider or
the phone manufacturer for details.
The Uconnect™ Phone is fully integrated with the vehi-
cle’s audio system. The volume of the Uconnect™ Phone
can be adjusted either from the radio volume control
knob or from the steering wheel radio control (right
switch), if so equipped.
The radio display will be used for visual prompts from
the Uconnect™ Phone such as �CELL�or caller ID on
certain radios.Operation
Voice commands can be used to operate the Uconnect™
Phone and to navigate through the Uconnect™ Phone
menu structure. Voice commands are required after most
Uconnect™ Phone prompts. You will be prompted for a
specific command and then guided through the available
options.
•Prior to giving a voice command, one must wait for
the beep, which follows the �Ready�prompt or another
prompt.
•For certain operations, compound commands can be
used. For example, instead of saying �Setup�and then
�Phone Pairing,� the following compound command
can be said: �Setup Phone Pairing.�
3
UNDERSTANDING THE FEATURES OF YOUR VEHICLE 93
Page 143 of 484

Headlights On with Wipers (Available with
Automatic Headlights Only)
When this feature is active, the headlights will turn on
approximately 10 seconds after the wipers are turned on
if the headlight switch is placed in the AUTO position. In
addition, the headlights will turn off when the wipers are
turned off if they were turned on by this feature.
The “Headlights On with Wipers” feature can be turned
on or off through the Electronic Vehicle Information
Center (EVIC) (if equipped). Refer to “Electronic Vehicle
Information Center (EVIC)/Personal Settings (Customer-
Programmable Features)” in “Understanding Your In-
strument Panel” for further information.
TILT/TELESCOPING STEERING COLUMN
This feature allows you to tilt the steering column
upward or downward. It also allows you to lengthen or
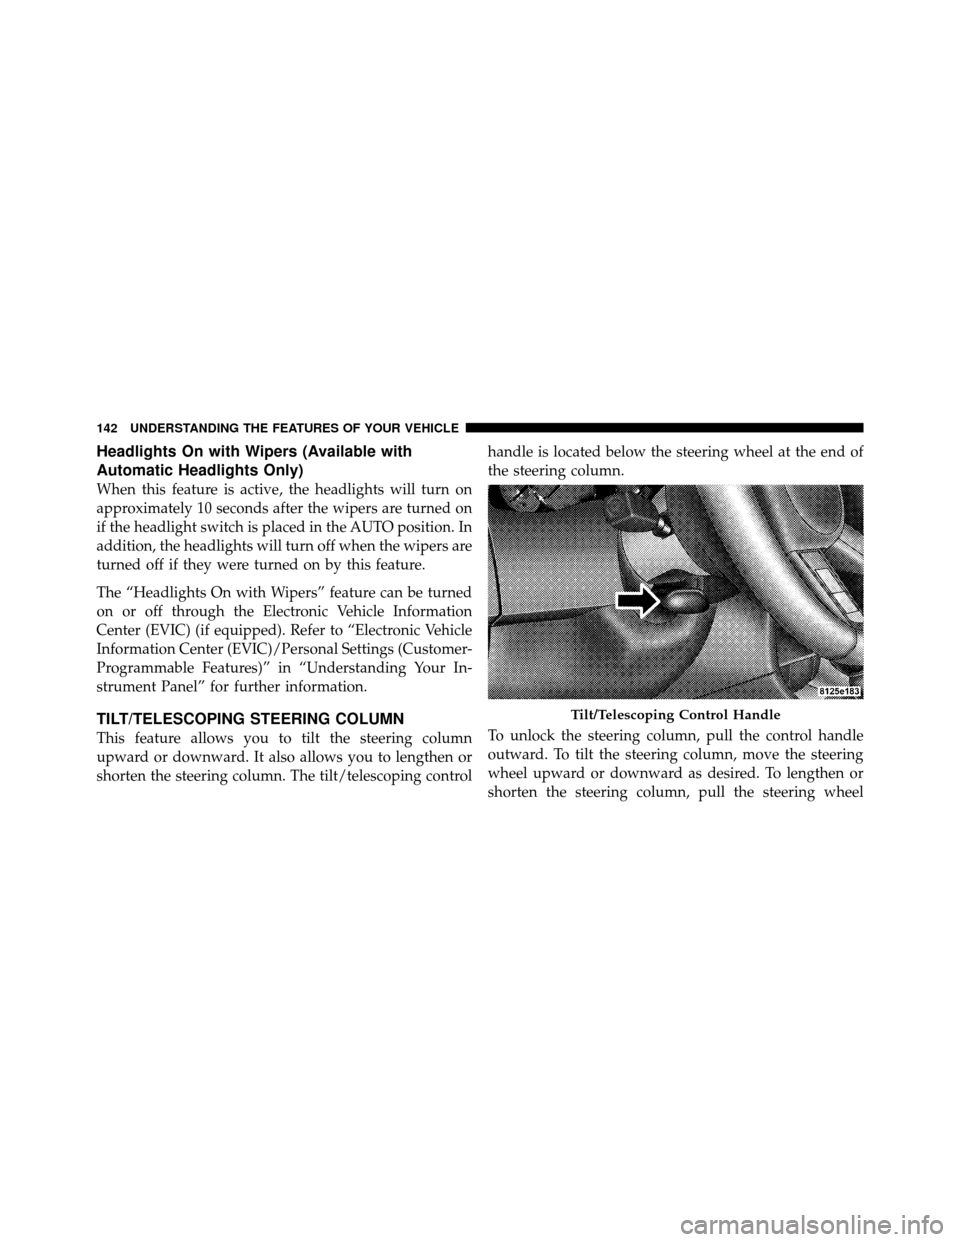
shorten the steering column. The tilt/telescoping controlhandle is located below the steering wheel at the end of
the steering column.
To unlock the steering column, pull the control handle
outward. To tilt the steering column, move the steering
wheel upward or downward as desired. To lengthen or
shorten the steering column, pull the steering wheel
Tilt/Telescoping Control Handle
142 UNDERSTANDING THE FEATURES OF YOUR VEHICLE
Page 144 of 484

outward or push it inward as desired. To lock the steering
column in position, push the control handle inward until
fully engaged.
WARNING!
Do not adjust the steering column while driving.
Adjusting the steering column while driving or driv-
ing with the steering column unlocked, could cause
the driver to lose control of the vehicle. Be sure the
steering column is locked before driving your ve-
hicle. Failure to follow this warning may result in
serious injury or death.
ADJUSTABLE PEDALS — IF EQUIPPED
The adjustable pedals system is designed to allow a
greater range of driver comfort for steering wheel tilt and
seat position. This feature allows both the brake and
accelerator pedal to move toward or away from the
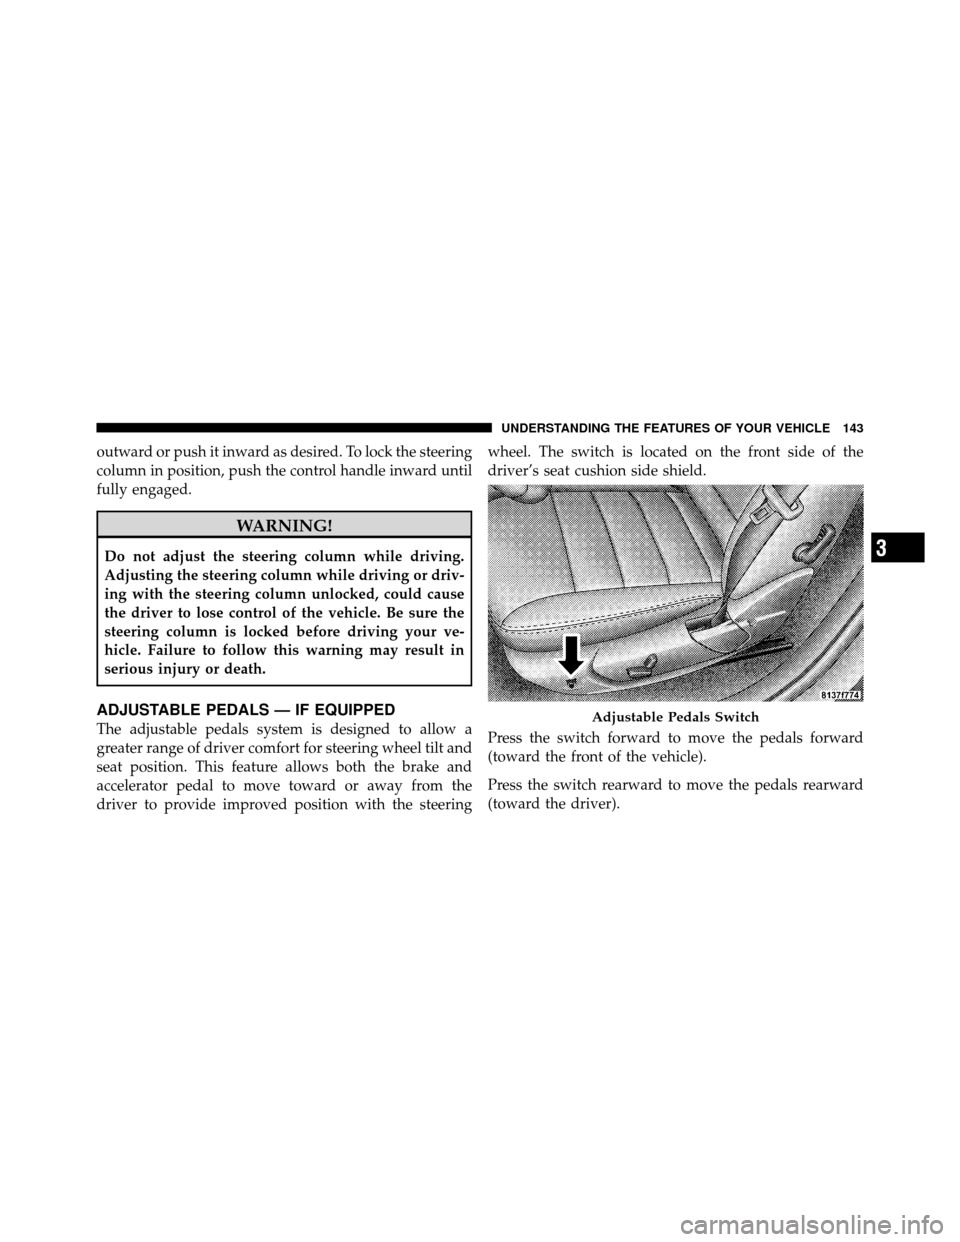
driver to provide improved position with the steeringwheel. The switch is located on the front side of the
driver’s seat cushion side shield.
Press the switch forward to move the pedals forward
(toward the front of the vehicle).
Press the switch rearward to move the pedals rearward
(toward the driver).Adjustable Pedals Switch
3
UNDERSTANDING THE FEATURES OF YOUR VEHICLE 143
Page 145 of 484
•The pedals can be adjusted with the ignition OFF.
•The pedals can be adjusted while driving.
•The pedalscannotbe adjusted when the transmission
is in REVERSE or when the Electronic Speed Control is
on.
CAUTION!
Do not place any article under the adjustable pedals
or impede its ability to move as it may cause damage
to the pedal controls. Pedal travel may become lim-
ited if movement is stopped by an obstruction in the
adjustable pedal’s path.
WARNING!
Do not adjust the pedals while the vehicle is moving.
You could lose control and have an accident. Always
adjust the pedals while the vehicle is parked.
ELECTRONIC SPEED CONTROL
When engaged, Electronic Speed Control takes over the
accelerator operation at speeds greater than 25 mph
(40 km/h).
The Electronic Speed Control lever, located on the right-
side of the steering wheel, operates the system.
144 UNDERSTANDING THE FEATURES OF YOUR VEHICLE
Page 147 of 484

To Set At A Desired Speed
Turn the Electronic Speed Control ON. When the vehicle
reaches the speed desired, push the lever downward to
SET DECEL and release. Remove your foot from the
accelerator pedal and the vehicle will operate at the
selected speed.
NOTE:
•Electronic Speed Control will only function in 3rd, 4th,
or 5th gear when in the Autostick�mode (if
equipped).
•The Electronic Speed Control may not engage if a
different size tire is installed on one wheel, such as the
compact spare tire.
To Deactivate
The system will disable Electronic Speed Control without
erasing the memory if you:
•Softly tap the brake pedal.
•Press the brake pedal.
•Pull the Electronic Speed Control lever toward you
(CANCEL).
Pushing and releasing the ON/OFF button or turning the
ignition OFF erases the set speed from memory.
To Resume Speed
If you deactivated the Electronic Speed Control without
erasing the set speed from memory and your vehicle
speed is above 20 mph (32 km/h) you can resume the
previous set speed. To do so, push the lever upward to
RESUME ACCEL and release. Then remove your foot
from the accelerator pedal.
To Vary the Speed Setting
When the Electronic Speed Control is set, you can in-
crease speed by pushing up and holding the RESUME
ACCEL lever. If the lever is continually held in the
146 UNDERSTANDING THE FEATURES OF YOUR VEHICLE
Page 168 of 484
UNDERSTANDING YOUR INSTRUMENT PANEL
CONTENTS
�Instrument Panel Features ............... 170
� Instrument Cluster – Base ............... 171
� Instrument Cluster – Premium ............ 172
� Instrument Cluster Descriptions ........... 173
� Electronic Vehicle Information Center (EVIC) –
If Equipped .......................... 186
▫ Electronic Vehicle Information Center (EVIC)
Displays ........................... 188
▫ Oil Change Required .................. 189
▫ Trip Functions ...................... 190 ▫
Automatic All Wheel Drive (AWD) Displays
— If Equipped ...................... 193
▫ Driver-Selectable Surround Sound (DSS) –
If Equipped ........................ 194
▫ Compass Display .................... 195
▫ Navigation — If Equipped .............. 197
▫ Personal Settings (Customer-Programmable
Features) .......................... 197
� Media Center 730N/430 (RER/REN/RBZ) —
AM/FM Stereo Radio And CD/DVD/HDD/
NAV — If Equipped .................... 201
4
Page 178 of 484

WARNING!
If a warning light remains on the system may not be
working and you will not have the benefit of ESP or
BAS. Under certain driving conditions, where ESP or
BAS would be beneficial, you - if you have not
adjusted your driving speeds and stopping in or to
account for the lack of the feature, may be in acci-
dent.
14. Oil Pressure Warning Light This light indicates low engine oil pressure. The
light should turn on momentarily when the engine
is started. If the light turns on while driving, stop the
vehicle and shut off the engine as soon as possible. A
chime will sound for four minutes when this light turns
on. Do not operate the vehicle until the cause is corrected.
This light does not indicate how much oil is in the engine.
The engine oil level must be checked under the hood.
15. High Beam Indicator
This indicator will turn on when the high beam
headlights are on. Push the multifunction lever
away from the steering wheel to switch the headlights to
high beam.
16. Seat Belt Reminder Light This light will turn on for five to eight seconds as
a bulb check when the ignition switch is first
turned ON. A chime will sound if the driver’s seat
belt is unbuckled during the bulb check. The Seat Belt
Warning Light will flash or remain on continuously if the
driver’s seat belt remains unbuckled after the bulb check
or when driving. Refer to “Occupant Restraints” in
“Things To Know Before Starting Your Vehicle” for
further information.
4
UNDERSTANDING YOUR INSTRUMENT PANEL 177
Page 179 of 484

17.Shift Lever Indicator — Automatic Transmission Only
The Shift Lever Indicator is self-contained within the
instrument cluster. It displays the gear position of the
automatic transmission.
18. Front Fog Light Indicator — If EquippedThis indicator will illuminate when the front fog
lights are on.
19. Odometer / Electronic Vehicle Information Center
(EVIC) Display Area
The odometer shows the total distance the vehicle has
been driven. The trip odometer shows individual trip
mileage. Refer to “Trip Odometer Button” for additional
information.
NOTE: U.S. Federal regulations require that upon trans-
fer of vehicle ownership, the seller certify to the pur-
chaser the correct mileage that the vehicle has been
driven. If your odometer needs to be repaired or serviced,
the repair technician should leave the odometer reading the same as it was before the repair or service. If s/he
cannot do so, then the odometer must be set at zero, and
a sticker must be placed in the door jamb stating what the
mileage was before the repair or service. It is a good idea
for you to make a record of the odometer reading before
the repair/service, so that you can be sure that it is
properly reset, or that the door jamb sticker is accurate if
the odometer must be reset at zero.
Vehicle Odometer Messages
When the appropriate conditions exist, the following
messages will display in the odometer:
ECO
...................... Fuel Saver Indicator
2drivE ........ V ehicle is in Rear Wheel Drive (RWD)
4drivE .......... V ehicle is in All Wheel Drive (AWD
tCASE ..................... AWD System Fault
gASCAP ............ Loose Fuel Filler Cap Message
Lo tirE ...................... LowTirePr essure
noFUSE .......................... Fuse Fault
CHAngE OIL ............... Oil Change Required
178 UNDERSTANDING YOUR INSTRUMENT PANEL