Page 197 of 530

connected to the battery. Do not exceed a maximum
power of 160 Watts (13 Amps) shared between the lower
panel outlet and the removable floor console outlet.
The outlet in the rear quarter panel near the liftgate and
the upper outlet in the instrument panel are both con-
trolled by the ignition switch. Each of these outlets can
support 160 Watts (13 Amps). Do not exceed 160 Watts
(13 Amps) for each of these outlets.
The power outlets include tethered caps, labeled with a
key or battery symbol indicating the power source. The
power outlet, located on the lower instrument panel, is
powered directly from the battery. Items plugged into
this power outlet may discharge the battery and/or
prevent the engine from starting.
WARNING!
To avoid serious injury or death:(Continued)
WARNING! (Continued)
•Only devices designed for use in this type of
outlet should be inserted into any 12 Volt outlet.
•Do not touch with wet hands.
•Close the lid when not in use and while driving
the vehicle.
•If this outlet is mishandled, it may cause an
electric shock and failure.
CAUTION!
•Many accessories that can be plugged in draw
power from the vehicle’s battery, even when not in
use (i.e., cellular phones, etc.). Eventually, if
plugged in long enough, the vehicle’s battery will
discharge sufficiently to degrade battery life
and/or prevent the engine from starting.(Continued)
196 UNDERSTANDING THE FEATURES OF YOUR VEHICLE
ProCarManuals.com
Page 199 of 530
To avoid overloading the circuit, check the power ratings
on electrical devices prior to using the inverter.
The power inverter switch is located near the center of
the instrument panel below the two 12 Volt power
outlets.To turn on the power outlet, press the switch once. Press
the switch a second time to turn the power outlet off.
Power Inverter OutletPower Inverter Switch
198 UNDERSTANDING THE FEATURES OF YOUR VEHICLE
ProCarManuals.com
Page 200 of 530
CUPHOLDERS
There are nine cupholders in the interior. Two cupholders
in the center front instrument panel, four in the floor
consoles and three more are located in the third row
quarter trim panel.
All liners are removable for cleaning. Pull the flexible
liner from the cupholder drawer or tray starting at one
edge for easy removal. Refer to “Cleaning The Instru-
ment Panel Cupholders” in “Maintaining Your Vehicle”
for further information.
Instrument Panel Cupholders
The instrument panel cupholders are located in a pull-out
drawer just above the lower storage bin.Pull the drawer out firmly until it stops, and place the
container to be held in either one of the cupholder wells.
The cupholders are designed to accommodate a wide
variety of container types and sizes. Press down on the
container to engage the cupholder retention features.Front Cupholders
3
UNDERSTANDING THE FEATURES OF YOUR VEHICLE 199
ProCarManuals.com
Page 202 of 530

of the two cupholders in the center front instrument
panel. To install the ash receiver, align the receiver so the
thumb grip on the lid is facing rearward. Press the ash
receiver into either of the cup wells to secure. Pull
upward on the ash receiver to remove for cleaning
and/or storage.
The left rear trim panel cupholder is designed to accom-
modate a second ash receiver, if desired.
STORAGE
Glove Compartments
There are both upper and lower glove compartments.
Upper Glove Compartment
To open the upper compartment, press in on the upper
latch. The door will spring open about 1 in (2.54 cm).
Manually lift the front edge of the door upward until
fully opened and the detent is engaged.To close the compartment door, firmly push downward
on the door’s surface to release the detent and latch the
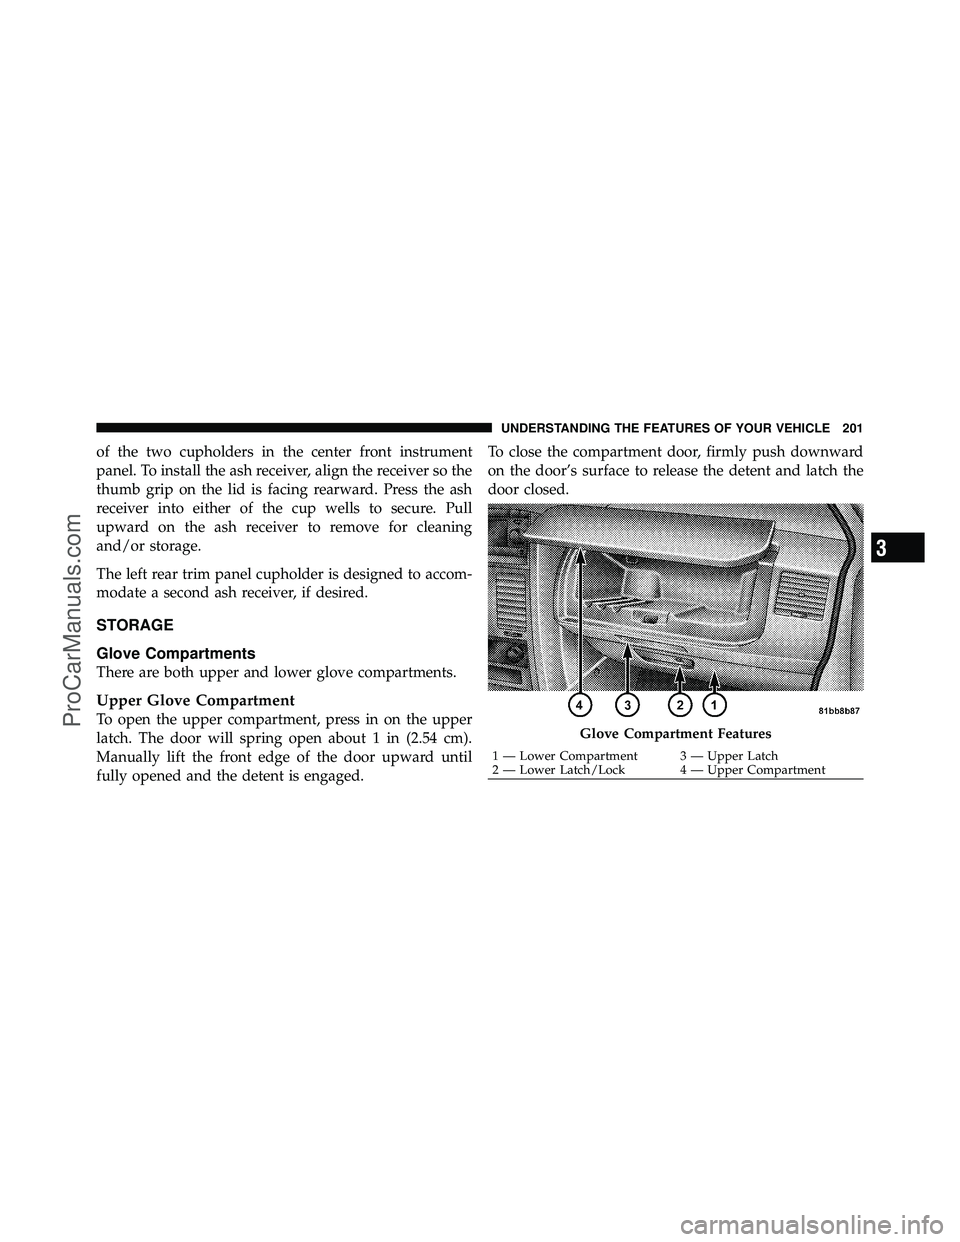
door closed.Glove Compartment Features
1 — Lower Compartment 3 — Upper Latch
2 — Lower Latch/Lock 4 — Upper Compartment
3
UNDERSTANDING THE FEATURES OF YOUR VEHICLE 201
ProCarManuals.com
Page 220 of 530
UNDERSTANDING YOUR INSTRUMENT PANEL
CONTENTS
�Instrument Panel Features ............... 223
� Instrument Cluster – Base ............... 224
� Instrument Cluster – Premium ............ 225
� Instrument Cluster — Anniversary ......... 226
� Instrument Cluster Descriptions ........... 227
� Compass Mini-Trip Computer (CMTC) —
If Equipped .......................... 241
▫ CMTC Reset Buttons .................. 241
▫ Compass/Temperature Display .......... 243�
Electronic Vehicle Information Center (EVIC) —
If Equipped .......................... 244
▫ Electronic Vehicle Information Center (EVIC)
Displays ........................... 246
▫ Trip Functions ...................... 248
▫ Compass Display / ECO
(Fuel Saver Mode) — If Equipped ........ 250
▫ Personal Settings
(Customer-Programmable Features) ....... 252
4
ProCarManuals.com
Page 221 of 530

�Media Center 730N/430 (RER/REN/RBZ) —
AM/FM Stereo Radio And CD/DVD/HDD/
NAV — If Equipped .................... 257
▫ Operating Instructions — Voice Command
System (VR) — If Equipped ............. 258
▫ Operating Instructions — Uconnect™
Phone — If Equipped ................. 258
▫ Clock Setting Procedure — RBZ Radio ..... 258
▫ Clock Setting Procedure —
RER/REN Radio ..................... 260
� Media Center 130 (RES) — AM/FM Stereo
Radio With CD Player (MP3 AUX Jack) ....... 262
▫ Operating Instructions — Radio Mode ..... 263
▫ Operation Instructions — CD Mode For CD
And MP3 Audio Play ................. 266 ▫
Notes On Playing MP3 Files ............ 268
▫ Operation Instructions - Auxiliary Mode .... 270
� Media Center 130 (RES/RSC) — AM/FM
Stereo Radio With CD Player (MP3 AUX Jack)
And Sirius Radio ...................... 271
▫ Operating Instructions — Radio Mode ..... 271
▫ Operation Instructions — CD Mode For CD
And MP3 Audio Play ................. 277
▫ Notes On Playing MP3 Files ............ 279
▫ List Button (CD Mode For MP3 Play) ...... 281
▫ Info Button (CD Mode For MP3 Play) ...... 282
▫ Operating Instructions - Uconnect™ Phone
(If Equipped) ....................... 283
220 UNDERSTANDING YOUR INSTRUMENT PANEL
ProCarManuals.com
Page 222 of 530

�Universal Consumer Interface (UCI) 0.5 —
If Equipped .......................... 283
▫ Connecting The iPod� ................. 284
▫ Using This Feature ................... 284
▫ Controlling The iPod� Using
Radio Buttons ....................... 285
▫ Play Mode ......................... 285
▫ List Or Browse Mode ................. 286
� Uconnect™ Multimedia (Satellite Radio) —
If Equipped (REN/RER/RBZ/RES Radios
Only) ............................... 288
▫ System Activation .................... 288
▫ Electronic Serial Number/Sirius
Identification Number (ESN/SID) ......... 289▫
Selecting Uconnect™ Multimedia (Satellite)
Mode ............................. 289
▫ Satellite Antenna ..................... 289
▫ Reception Quality .................... 290
▫ Operating Instructions - Uconnect™
Multimedia (Satellite) Mode ............. 290
▫ Operating Instructions - Uconnect™ Phone
(If Equipped) ....................... 292
� Uconnect™ Multimedia
(Sirius Backseat TV™) — If Equipped ........ 293
� Video Entertainment System (VES)™ —
If Equipped .......................... 293
� Remote Sound System Controls —
If Equipped .......................... 295
▫ Radio Operation ..................... 296
4
UNDERSTANDING YOUR INSTRUMENT PANEL 221
ProCarManuals.com
Page 223 of 530
▫CD Player ......................... 296
� CD/DVD Disc Maintenance .............. 296
� Radio Operation And Cellular Phones ....... 297
� Climate Controls ...................... 297
▫ Manual Heating And Air Conditioning
System — If Equipped ................. 298
▫ Three-Zone Temperature Control —
If Equipped ........................ 302
▫ Rear Manual Climate Control —
If Equipped ........................ 304 ▫
Automatic Temperature Control (ATC) —
If Equipped ........................ 306
▫ Summer Operation ................... 314
▫ Winter Operation .................... 315
▫ Vacation/Storage .................... 315
▫ Window Fogging .................... 315
▫ Outside Air Intake ................... 315
▫ Operating Tips ...................... 316
▫ A/C Air Filter— If Equipped ............ 316
222 UNDERSTANDING YOUR INSTRUMENT PANEL
ProCarManuals.com