Page 283 of 538
window. Select the button (1–6) you wish to lock onto this
station and press and release that button. If a button is
not selected within five seconds after pressing the SET/
RND button, the station will continue to play but will not
be stored into pushbutton memory.
You may add a second station to each pushbutton by
repeating the above procedure with this exception: Press
the SET/RND button twice and SET 2 will show in the
display window. Each button can be set for SET 1 and
SET 2 in both AM and FM. This allows a total of 12 AM
and 12 FM stations to be stored into pushbutton memory.
The stations stored in SET 2 memory can be selected by
pressing the pushbutton twice.
Every time a preset button is used, a corresponding
button number will display.Buttons 1 - 6
These buttons tune the radio to the stations that you
commit to pushbutton memory (12 AM and 12 FM
stations).
DISC/AUX Button
Pressing the DISC/AUX button will allow you to switch
from AM/FM modes to DISC/AUX mode.
Operation Instructions — CD MODE for CD and
MP3 Audio Play
NOTE:
•The ignition switch must be in the ON/RUN or ACC
position to operate the radio.
•This radio is capable of playing compact discs (CD),
recordable compact discs (CD-R), rewritable compact
discs (CD-RW), compact discs with MP3 tracks and
multisession compact discs with CD and MP3 tracks.
282 UNDERSTANDING YOUR INSTRUMENT PANEL
Page 293 of 538
•RNDbutton (available on sales code RES radio only):
Pressing this button toggles between Shuffle ON and
Shuffle OFF modes for the iPod�.IftheRND icon is
showing on the radio display, then the shuffle mode is
ON.
List Or Browse Mode
During Play mode, pressing any of the buttons described
below, will bring up List mode. List mode enables
scrolling through the list of menus and tracks on the
iPod�.
•TUNE control knob: The TUNEcontrol knob functions
in a similar manner as the scroll wheel on the iPod�.
•Turning it clockwise (forward) and counterclock-
wise (backward) scrolls through the lists, displaying
the track detail on the radio display. Once the track
to be played is highlighted on the radio display,
press the TUNEcontrol knob to select and start
playing the track. Turning the TUNEcontrol knob fast will scroll through the list faster. During fast
scroll, a slight delay in updating the information on
the radio display may be noticed.
•During all List modes, the iPod�
displays all lists in
“wrap-around” mode. So if the track is at the
bottom of the list, just turn the wheel backwards
(counter-clockwise) to get to the track faster.
•In List mode, the radio PRESETbuttons are used as
shortcuts to the following lists on the iPod�.
•Preset 1 – Playlists
•Preset 2 – Artists
•Preset 3 – Albums
•Preset 4 – Genres
•Preset 5 – Audiobooks
•Preset 6 – Podcasts
292 UNDERSTANDING YOUR INSTRUMENT PANEL
Page 294 of 538
•Pressing a PRESET button will display the current
list on the top line and the first item in that list on
the second line.
•To Exit List mode without selecting a track, press the
samePRESET button again to go back to Play
mode.
•LIST button: The LISTbutton will display the top
level menu of the iPod�. Turn the TUNEcontrol knob
to list the top-menu item to be selected and press the
TUNE control knob. This will display the next sub-
menu list item on the iPod� then follow the same steps
to go to the desired track in that list. Not all iPod�
sub-menu levels are available on this system.
•MUSIC TYPE button: TheMUSIC TYPE button is
another shortcut button to the genre listing on your
iPod�.
CAUTION!
•Leaving the iPod� (or any supported device) any-
where in the vehicle in extreme heat or cold can
alter the operation or damage the device. Follow
the device manufacturer ’s guidelines.
•Placing items on the iPod�, or connections to the
iPod� in the vehicle, can cause damage to the
device and/or to the connectors.
WARNING!
Do not plug in or remove the iPod� while driving.
Failure to follow this warning could result in an
accident.
4
UNDERSTANDING YOUR INSTRUMENT PANEL 293
Page 298 of 538
MUSIC TYPE Button
Pressing this button once will turn on the Music Type
mode for five seconds. Pressing the MUSIC TYPE button
or turning the TUNE/SCROLL control knob within five
seconds will allow the program format type to be se-
lected.
Toggle the MUSIC TYPE button again to select the music
type.
By pressing the SEEK button when the Music Type
function is active, the radio will be tuned to the next
channel with the same selected Music Type name.
If a preset button is activated while in the Music Type
(Program Type) mode, the Music Type mode will be
exited and the radio will tune to the preset channel.
SETUP Button
Pressing the SETUP button allows you to select the
following items:
•Display Sirius ID number — Press the AUDIO/
SELECT button to display the Sirius ID number. This
number is used to activate, deactivate, or change the
Sirius subscription.
SET Button – To Set the Pushbutton Memory
When you are receiving a channel that you wish to
commit to pushbutton memory, press the SET button.
The symbol SET 1 will now show in the display window.
Select the button (1-6) you wish to lock onto this channel
and press and release that button. If a button is not
selected within five seconds after pressing the SET but-
ton, the channel will continue to play but will not be
stored into pushbutton memory.
You may add a second channel to each pushbutton by
repeating the above procedure with this exception: Press
the SET button twice and SET 2 will show in the display
window. Each button can be set for SET 1 and SET 2. This
allows a total of 12 Satellite channels to be stored into
4
UNDERSTANDING YOUR INSTRUMENT PANEL 297
Page 299 of 538
pushbutton memory. The channels stored in SET 2
memory can be selected by pressing the pushbutton
twice.
Every time a preset button is used, a corresponding
button number will display.
Buttons1-6
These buttons tune the radio to the channels that you
commit to pushbutton memory (12 Satellite stations).
Operating Instructions - Uconnect™ Phone (If
Equipped)
Refer to “Uconnect™ Phone” in the Uconnect™ User
Manual located on the DVD for further details.
Uconnect™ Multimedia (SIRIUS BACKSEAT TV™)
— IF EQUIPPED
Satellite video uses direct satellite receiver broadcasting
technology to provide streaming video. The subscriptionservice provider is SIRIUS Satellite Radio. SIRIUS Back-
seat TV™ offers three video channels for family enter-
tainment, directly from its satellites and broadcasting
studios.
NOTE:
SIRIUS service is not available in Hawaii or
Canada and has limited coverage in Alaska.
Refer to your Video Entertainment System (VES)™, RER
Navigation, RBZ Multimedia or REN Multimedia User
Manuals for detailed operating instructions.
VIDEO ENTERTAINMENT SYSTEM (VES)™ — IF
EQUIPPED
The optional Video Entertainment System (VES)™ is
available with:
•One or two video screens
•Third row swivel screen — If Equipped
298 UNDERSTANDING YOUR INSTRUMENT PANEL
Page 302 of 538
The right-hand rocker switch has a pushbutton in the
center, and controls the volume and mode of the sound
system. Pressing the top of the rocker switch will increase
the volume. Pressing the bottom of the rocker switch will
decrease the volume. Pressing the center button changes
the operation of the radio from AM to FM, or Tape to CD
mode, depending on which radio is in the vehicle.
The left-hand rocker switch has a pushbutton in the
center. The function of the left-hand switch is different,
depending on which mode you are in.
The following describes the left-hand rocker switch op-
eration in each mode.
Radio Operation
Pressing the top of the switch will SEEK up for the next
listenable station, and pressing the bottom of the switch
will SEEK down for the next listenable station.The button located in the center of the left-hand switch
will tune to the next preset station that you have pro-
grammed in the radio preset pushbutton.
CD Player
Pressing the top of the switch once will go to the next
track on the CD. Pressing the bottom of the switch once
will go to the beginning of the current track, or to the
beginning of the previous track if it is within one second
after the current track begins to play.
If you press the switch up or down twice it plays the
second track; three times, it will play the third, etc.
The button in the center of the left-hand switch has no
function in this mode.
4
UNDERSTANDING YOUR INSTRUMENT PANEL 301
Page 338 of 538
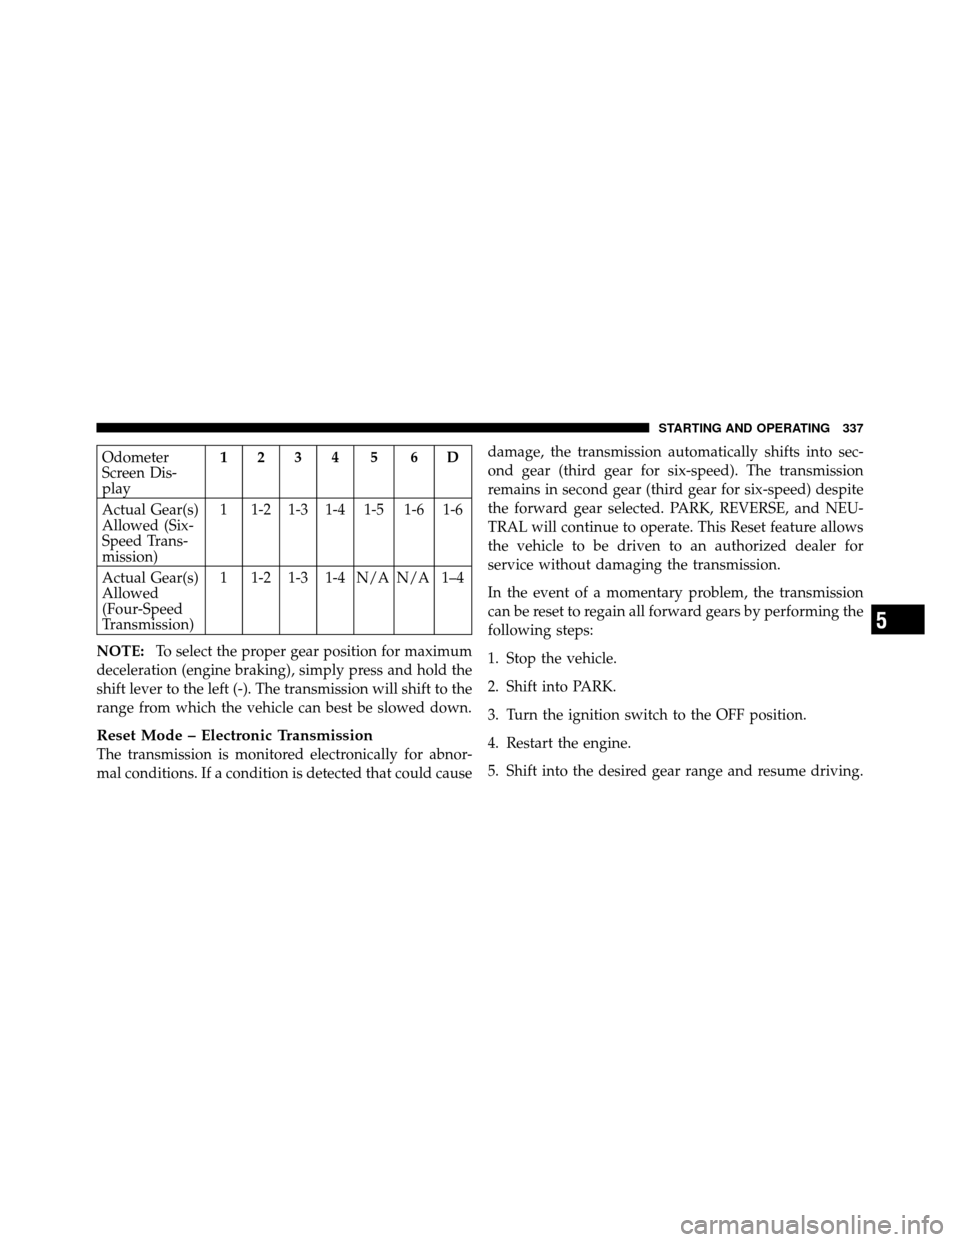
Odometer
Screen Dis-
play1234 5 6D
Actual Gear(s)
Allowed (Six-
Speed Trans-
mission) 1 1-2 1-3 1-4 1-5 1-6 1-6
Actual Gear(s)
Allowed
(Four-Speed
Transmission) 1 1-2 1-3 1-4 N/A N/A 1–4
NOTE: To select the proper gear position for maximum
deceleration (engine braking), simply press and hold the
shift lever to the left (-). The transmission will shift to the
range from which the vehicle can best be slowed down.
Reset Mode – Electronic Transmission
The transmission is monitored electronically for abnor-
mal conditions. If a condition is detected that could cause damage, the transmission automatically shifts into sec-
ond gear (third gear for six-speed). The transmission
remains in second gear (third gear for six-speed) despite
the forward gear selected. PARK, REVERSE, and NEU-
TRAL will continue to operate. This Reset feature allows
the vehicle to be driven to an authorized dealer for
service without damaging the transmission.
In the event of a momentary problem, the transmission
can be reset to regain all forward gears by performing the
following steps:
1. Stop the vehicle.
2. Shift into PARK.
3. Turn the ignition switch to the OFF position.
4. Restart the engine.
5. Shift into the desired gear range and resume driving.
5
STARTING AND OPERATING 337
Page 339 of 538
NOTE:Even if the transmission can be reset, it is
recommended that you visit an authorized dealer at your
earliest possible convenience.
If the transmission cannot be reset, authorized dealer
service is required.
DRIVING ON SLIPPERY SURFACES
Acceleration
Rapid acceleration on snow covered, wet, or other slip-
pery surfaces may cause the front wheels to pull errati-
cally to the right or left. This phenomenon occurs when
there is a difference in the surface traction under the front
(driving) wheels.
WARNING!
Rapid acceleration on slippery surfaces is dangerous.
Unequal traction can cause sudden pulling of the
front wheels. You could lose control of the vehicle
and possibly have an accident. Accelerate slowly and
carefully whenever there is likely to be poor traction
(ice, snow, wet mud, loose sand, etc.).
Traction
When driving on wet or slushy roads, it is possible for a
layer of water to build up between the tire and road
surface. This is known as hydroplaning and may cause
partial or complete loss of vehicle control and stopping
ability. To reduce this possibility, the following precau-
tions should be observed:
1. Slow down during rainstorms or when roads are
slushy.
338 STARTING AND OPERATING