Page 9 of 76
Indicators
- Turn Signal Indicators
- High Beam Indicator
- Front Fog Light Indicator
- Vehicle Security Indicator*
- Cruise Indicator
- Electronic Stability Control (ESC) Off Indicator
- Position Light Indicator
Odometer Messages
door - Door AjarCHAngE OIL* - Change Engine Oil
deck - Trunk Ajar gASCAP - Fuel Cap Fault
HOTOIL* - Transaxle Oil Temperature
Exceeds Safe Threshold LoW TirE* - Low Tire Pressure
* If equipped
** Bulb Check with Key On
7
CONTROLS AT A GLANCE
Page 10 of 76

KEY FOB
Locking And Unlocking The Doors
• Press the LOCK button once to lock all thedoors. Press the UNLOCK button once to
unlock the driver’s door only and twice
within five seconds to unlock all the doors.
• All doors can be programmed to unlock on the first press of the UNLOCK button.
Refer to Programmable Features in this
guide.
WARNING!
Leaving unattended children in a vehicle is dangerous for a number of reasons. A
child or others could be injured. Children should be warned not to touch the
parking brake, brake pedal, or the shift lever. Do not leave the key in the ignition. A
child could operate power windows, other controls, or move the vehicle.
Opening The Trunk
• Press the TRUNK button on the transmitter two times within five seconds to open
the trunk.
Remote Start
• Press the REMOTE START buttonx2twice within five seconds. Pressing the
REMOTE START button a third time shuts the engine off.
• To drive the vehicle, press the UNLOCK button, insert the key in the ignition and turn to the ON/RUN position.
• With remote start, the engine will only run for 15 minutes (timeout) unless the ignition key is placed in the ON/RUN position.
• The vehicle must be started with the key after two consecutive timeouts.
WARNING!
• Do not start or run an engine in a closed garage or confined area. Exhaust gas contains Carbon Monoxide (CO) which is odorless and colorless. Carbon
Monoxide is poisonous and can cause serious injury or death when inhaled.
• Keep Key Fob transmitters away from children. Operation of the Remote Start System, windows, door locks or other controls could cause serious injury or
death.
GETTING STARTED
8
Page 11 of 76

Panic Alarm
• Press the PANIC button once to turn the panic alarm on.
• Wait approximately three seconds and press the button a second time to turn thepanic alarm off.
THEFT ALARM
To Arm
• Press the Key Fob LOCK button or the power door lock switch while the door isopen.
To Disarm
• Press the Key Fob UNLOCK button and turn the ignition to the ON position.
SEAT BELT
• Be sure everyone in your vehicle is in a seat and using a seat belt properly.
WARNING!
In a collision, you and your passengers can suffer much greater injuries if you are
not properly buckled up. You can strike the interior of your vehicle or other
passengers, or you can be thrown out of the vehicle. Always be sure you and
others in your vehicle are buckled up properly.
CHILD RESTRAINTS
• Children 12 years and under should ride properly buckled up in a rear seat, ifavailable. According to crash statistics, children are safer when properly restrained
in the rear seats rather than in the front.
• Every state in the United States and all Canadian provinces require that small children ride in proper restraint systems. This is the law, and you can be prosecuted
for ignoring it.
WARNING!
• In a collision, an unrestrained child, even a tiny baby, can become a projectileinside the vehicle. The force required to hold even an infant on your lap could
become so great that you could not hold the child, no matter how strong you
are. The child and others could be badly injured. Any child riding in your vehicle
should be in a proper restraint for the child’s size.
• Rearward-facing child seats must NEVERbe used in the front seat of a vehicle
with a front passenger airbag. An airbag deployment could cause severe injury
or death to infants in this position.
9
GETTING STARTED
Page 12 of 76

Installing The LATCH-Compatible Child Restraint System
• Your vehicle’s second row passenger seats are equipped with the child restraintanchorage system called LATCH, which stands for Lower Anchors and Tether for
CHildren.
• Child seats with fixed lower attachments must be installed in the outboard positions only. Child seats with flexible lower attachments can be used in all three
seating positions.
• Never install LATCH-compatible child seats such that two seats share a common
lower anchorage. If you are installing LATCH-compatible child restraints in adjacent
rear seating positions, you can use either the lower anchors or the vehicle seat belt
in the outboard seating position, but the center seating position must use the
vehicle seat belt. Always use the top tether anchorage with a forward facing child
seat.
• The rear seat lower anchorages are roundbars, located at the rear of the seat
cushion where it meets the seatback. They
are just visible when you lean into the rear
seat to install the child restraint. You will
easily feel them if you run your finger
along the intersection of the seatback and
seat cushion surfaces.
• In addition, there are tether strap anchorages behind each rear seating position located in the panel between the rear seatback and the rear window. These tether
strap anchorages are under a plastic cover.
• Loosen the adjusters on the lower straps and tether straps so that you can attach the hook or connector to the lower and tether anchorages more easily.
• Attach the lower hooks or connectors over the top of the seat cover material.
• Then rotate the tether anchorage cover directly behind the seat where you are placing the child restraint and attach the tether strap to the anchorage, being
careful to route the tether strap to provide the most direct path between the
anchor and the child restraint.
• Tighten all three straps as you push the child restraint rearward and downward into the seat.
GETTING STARTED
10
Page 13 of 76

WARNING!
• Improper installation of a child restraint to the LATCH anchorages can lead tofailure of an infant or child restraint. The child could be badly injured or killed.
Follow the manufacturer’s directions exactly when installing an infant or child
restraint.
• An incorrectly anchored tether strap could lead to increased head motion and possible injury to the child. Use only the anchor positions directly behind the
child seat to secure a child restraint top tether strap.
Installing The Child Restraint Using The Vehicle Seat Belts
• To install a child restraint, first, pull enough of the seat belt webbing from theretractor to route it through the belt path of the child restraint and slide the latch
plate into the buckle.
• Next, extract all the seat belt webbing out of the retractor and then allow the belt to retract into the retractor. Finally, pull on any excess webbing to tighten the lap
portion around the child restraint. Any seat belt system will loosen with time, so
check the belt occasionally, and pull it tight if necessary.
• Rotate the cover over the anchor directly behind the seat where you are placing the child restraint. These tether strap anchorages are under a plastic cover.
• Route the tether strap to provide the most direct path for the strap between the anchor and the child seat.
• Attach the tether strap hook of the child restraint to the anchor and remove slack in the tether strap according to the child restraint manufacturer’s instructions.
11
GETTING STARTED
Page 14 of 76
FRONT SEATS
WARNING!
Adjusting a seat while the vehicle is moving is dangerous. The sudden movement
of the seat could cause you to lose control. The seat belt might not be properly
adjusted, and you could be injured. Only adjust a seat while the vehicle is parked.
Manual Seat Adjustment
Forward/Rearward
• Lift up on the adjusting bar located at thefront of the seat near the floor and release
at the desired position.
Recliner
• Lift the recliner lever located on theoutboard side of the seat, lean back and
release at the desired position.
WARNING!
Do not ride with the seatback reclined so that the seat belt is no longer resting
against your ch est. In a collision, you could slide under the seat belt and be
seriously or even fatally injured. Use the recliner only when the vehicle is parked.
GETTING STARTED
12
Page 15 of 76
Lumbar Support
• The lumbar adjust lever is on the outboardside of the seatback. Rotate the lumbar
adjust lever downward to increase the
lumbar support or upward to decrease the
lumbar support as desired.
Driver’s Seat Height Adjustment
• The height adjustment control lever islocated on the outboard side of the seat.
Raise the lever to raise the seat. Lower the
lever to lower the seat.
Power Seat
• The power seat switch, located on theoutboard side of the seat near the floor,
controls forward/back, up/down, and tilt
adjustment.
• The recline switch controls the seatback recliner.
13
GETTING STARTED
Page 16 of 76
CAUTION!
DO NOT place any article under a power seat or impede its ability to move as it
may cause damage to the seat controls. Seat travel may become limited if
movement is stopped by an obstruction in the seat’s path.
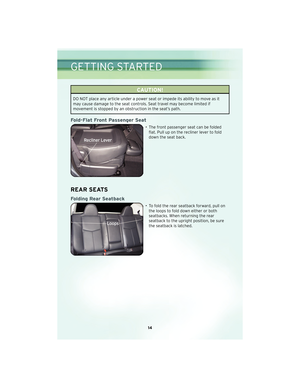
Fold-Flat Front Passenger Seat
• The front passenger seat can be foldedflat. Pull up on the recliner lever to fold
down the seat back.
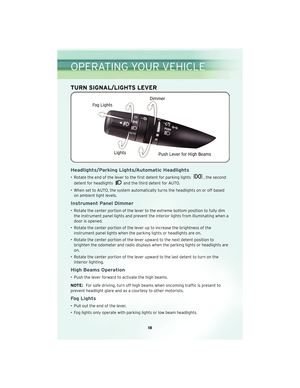
REAR SEATS
Folding Rear Seatback
• To fold the rear seatback forward, pull onthe loops to fold down either or both
seatbacks. When returning the rear
seatback to the upright position, be sure
the seatback is latched.
GETTING STARTED
14


 Off Indicator
- Position Lig")


