2010 CHRYSLER SEBRING SEDAN child lock
[x] Cancel search: child lockPage 37 of 436
TRUNK LOCK AND RELEASE
Use the Remote Keyless Entry
(RKE) transmitter to open the
trunk from outside the vehicle.
From inside the vehicle the trunk
lid can be released by pressing the
TRUNK RELEASE button located
on the instrument panel to the left
of the steering wheel.
NOTE: The shift lever must be in PARK for this button
to operate.
To unlatch the trunk lid from outside the vehicle, press
and release the TRUNK button on the RKE transmitter
two times.
With the ignition ON, the word “deck” will display in
place of the odometer display indicating that the trunk is
open. The odometer display will reappear once the trunk
is closed or if the trip button is depressed. With the ignition switch in the LOCK position or with the
key out, the word “deck” will display until the trunk is
closed.
On EVIC-equipped vehicles, the words “Trunk Ajar” will
display.
TRUNK SAFETY WARNING
WARNING!
Do not allow children to have access to the trunk,
either by climbing into the trunk from outside, or
through the inside of the vehicle. Always close the
trunk lid when your vehicle is unattended. Once in
the trunk, young children may not be able to escape,
even if they entered through the rear seat. If trapped
in the trunk, children can die from suffocation or
heat stroke.
2
THINGS TO KNOW BEFORE STARTING YOUR VEHICLE 37
Page 39 of 436

OCCUPANT RESTRAINTS
Some of the most important safety features in your
vehicle are the restraint systems. The following safety
features are standard on all vehicles:
•Three-point lap and shoulder belts for all seating
positions
•Advanced Front Airbags for driver and front passenger
•Supplemental Rear Impact Active Head Restraints
(AHR) located on top of the front seats (integrated into
the head restraint)
•Supplemental Side Airbag Inflatable Curtains (SABIC)
for the driver and passengers seated next to a window
— if equipped
•Supplemental Side Seat Airbags — if equipped
•An energy-absorbing steering column and steering
wheel
•Knee bolsters/blockers for front seat occupants
•Front seat belts incorporate pretensioners to enhance
occupant protection by managing occupant energy
during an impact event — if equipped
•All seat belt systems (except the driver’s) include
Automatic Locking Retractors (ALRs), which lock the
seat belt webbing into position by extending the belt
all the way out and then adjusting the belt to the
desired length to restrain a child seat or secure a large
item in a seat
If you will be carrying children too small for adult-sized
seat belts, the seat belts or the Lower Anchors and Tether
for CHildren (LATCH) feature also can be used to hold
infant and child restraint systems. For more information
on LATCH, see Lower Anchors and Tether for CHildren
(LATCH) in this section.
2
THINGS TO KNOW BEFORE STARTING YOUR VEHICLE 39
Page 47 of 436
Rear Seat Belts
The shoulder belt anchorages of the rear three-point belts
are nonadjustable for outboard and center rear passen-
gers on sedans. The center belt is mounted to the rear
shelf panel and exits through a bezel in the panel.
Automatic Locking Retractors (ALR) Mode — If
Equipped
In this mode, the shoulder belt is automatically pre-
locked. The belt will still retract to remove any slack in
the shoulder belt. The Automatic Locking Mode is avail-
able on all passenger-seating positions with a combina-
tion lap/shoulder belt.
When to Use the Automatic Locking Mode
Use the Automatic Locking Mode anytime a child safety
seat is installed in a passenger seating position. Children
12 years old and younger should always ride buckled up
in the rear seat.
How to Use the Automatic Locking Mode
1. Buckle the combination lap/shoulder belt.
2. Grasp the shoulder portion and pull downward until
the entire belt is extracted.
3. Allow the belt to retract. As the belt retracts, you will
hear a clicking sound. This indicates the safety belt is
now in the Automatic Locking Mode.
How to Disengage the Automatic Locking Mode
Disconnect the combination lap/shoulder belt and allow
it to retract completely to disengage the Automatic
Locking Mode and activate the Vehicle Sensitive (Emer-
gency) Locking mode.
2
THINGS TO KNOW BEFORE STARTING YOUR VEHICLE 47
Page 59 of 436

The system includes sensors adjacent to both front and
rear seat occupants that are calibrated to deploy the
SABIC airbags during impacts that require airbag occu-
pant protection.
WARNING!
•If your vehicle is equipped with left and right Side
Airbag Inflatable Curtain (SABIC), do not stack
luggage or other cargo up high enough to block
the location of the SABIC. The area where the side
curtain airbag is located should remain free from
any obstructions.
•Do not use accessory seat covers or place objects
between you and the side airbags; the performance
could be adversely affected and/or objects could
be pushed into you, causing serious injury.
Along with seat belts and pretensioners, Advanced Front
Airbags work with the knee bolsters to provide improved protection for the driver and front passenger. Side airbags
also work with seat belts to improve occupant protection.
Knee Impact Bolsters
The Knee Impact Bolsters help protect the knees of the
driver and the front passenger, and position everyone for
the best interaction with the Advanced Front airbag.
Here are some simple steps you can take to minimize the
risk of harm from a deploying airbag:
1.
Children 12 years old and younger should always
ride buckled up in a rear seat.
WARNING!
Infants in rear facing child restraints should NEVER
ride in the front seat of a vehicle with a passenger
front airbag. An airbag deployment can cause severe
injury or death to infants in that position.
2
THINGS TO KNOW BEFORE STARTING YOUR VEHICLE 59
Page 65 of 436

where the side curtain airbag inflates. This especially
applies to children. The side curtain airbag is only about
3-1/2 in (9 cm) thick when it is inflated.
Because airbag sensors estimate deceleration over time,
vehicle speed and damage are not good indicators of
whether or not an airbag should have deployed.
NOTE:In a rollover the pretensioners and/or SABIC
airbags may deploy on both sides of the vehicle.
Front and Side Impact Sensors
In front and side impacts, impact sensors aid the ORC in
determining appropriate response to impact events. Ad-
ditional sensors in the ORC determine the level of airbag
deployment and provide verification.
Enhanced Accident Response System
In the event of an impact causing airbag deployment, if
the communication network remains intact, and the
power remains intact, depending on the nature of the event the ORC will determine whether to have the
Enhanced Accident Response System to perform the
following functions:
•Cut off fuel to the engine.
•Flash hazard lights as long as the battery has power or
until the ignition key is turned off.
•Turn on the interior lights, which remain on as long as
the battery has power or until the ignition key is
removed.
•Unlock the doors automatically.
If a Deployment Occurs
The airbags are designed to deflate immediately after
deployment.
NOTE:
Front and/or side airbags will not deploy in all
collisions. This does not mean something is wrong with
the airbag system.
2
THINGS TO KNOW BEFORE STARTING YOUR VEHICLE 65
Page 73 of 436
Here are some tips on getting the most out of your
child restraints:
•
Children who are large enough to wear the shoulder
belt comfortably, and whose legs are long enough to
bend over the front of the seat when their back is
against the seatback, should use the lap/shoulder belt
in a rear seat.
•Before buying any restraint system, make sure that it
has a label certifying that it meets all applicable Safety
Standards. We also recommend that you make sure
that you can install the child restraint in the vehicle
where you will use it, before you buy it.
•The restraint must be appropriate for your child’s
weight and height. Check the label on the restraint for
weight and height limits.
•Carefully follow the instructions that come with the
restraint. If you install the restraint improperly, it may
not work when you need it.
•All passenger seating positions contain automatic
locking retractors. However, any seat belt system will
loosen with time, so check the belt occasionally and
pull it tight if necessary.
•In the rear seat, you may have trouble tightening the
lap/shoulder belt on the child restraint because the
buckle or latch plate is too close to the belt path
opening on the restraint. Disconnect the latch plate
from the buckle and twist the short buckle end of the
belt several times to shorten it. Insert the latch plate
into the buckle with the release button facing out.
2
THINGS TO KNOW BEFORE STARTING YOUR VEHICLE 73
Page 79 of 436
route the tether strap under the head restraint and
between the two posts. If not possible, lower the head
restraint and pass the tether strap around the outboard
side of the head restraint.
3. Attach the tether strap hook (A) of the child restraint
to the anchor (B) and remove slack in the tether strap
according to the child restraint manufacturer’s
instructions.
WARNING!
An incorrectly anchored tether strap could lead to
increased head motion and possible injury to the
child. Use only the anchor positions directly behind
the child seat to secure a child restraint top tether
strap.
Installing Child Restraints Using the Vehicle Seat
Belts
The passenger seat belts are equipped with Automatic
Locking Retractors (ALRs), which are designed to keep
the lap portion tight around the child restraint.
The seat belt must be in the Automatic Locking Mode in
order to enable a child restraint to be tightly installed.
Refer to “Automatic Locking Mode” in this section for
details. A locking clip should not be necessary once the
automatic locking feature is enabled. Position the shoul-
der and lap belt on the child restraint. The Automatic
Locking Retractor (ALR) is activated by first attaching
the child seat, then pulling all of the webbing out of the
retractor, then allowing the webbing to retract. As the
webbing retracts, you will hear a clicking sound. This
indicates the safety belt is now in the Automatic Locking
Mode. To release, simply unbuckle the seat belt by
depressing the button, and allow the webbing to retract
into the retractor.
2
THINGS TO KNOW BEFORE STARTING YOUR VEHICLE 79
Page 103 of 436
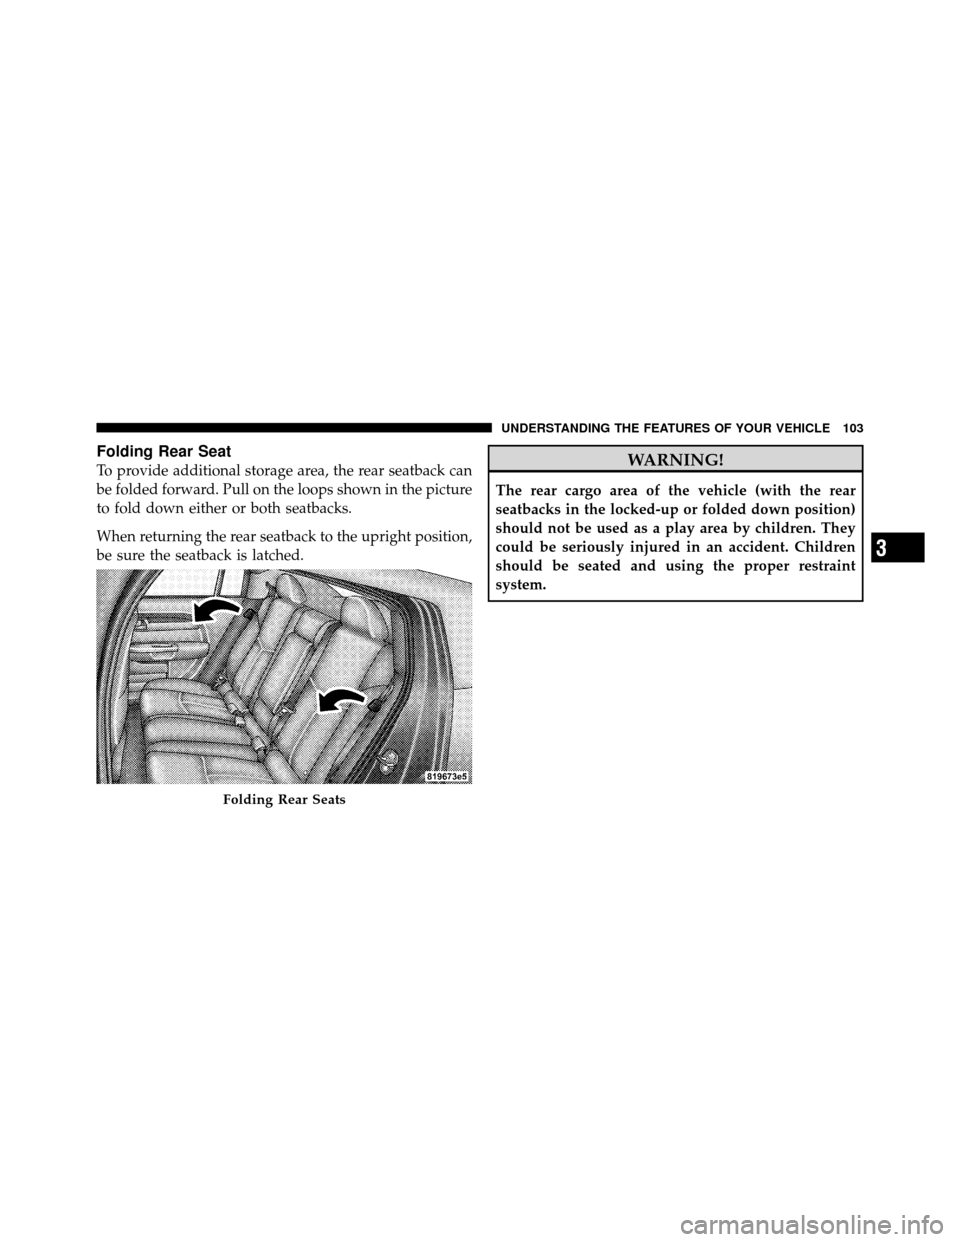
Folding Rear Seat
To provide additional storage area, the rear seatback can
be folded forward. Pull on the loops shown in the picture
to fold down either or both seatbacks.
When returning the rear seatback to the upright position,
be sure the seatback is latched.WARNING!
The rear cargo area of the vehicle (with the rear
seatbacks in the locked-up or folded down position)
should not be used as a play area by children. They
could be seriously injured in an accident. Children
should be seated and using the proper restraint
system.
Folding Rear Seats
3
UNDERSTANDING THE FEATURES OF YOUR VEHICLE 103