Page 17 of 76

CAUTION!
Repeated overheating of the seat could damage the heating element and/or
degrade the material of the seat.
TILT / TELESCOPING STEERING COLUMN
• The tilt/telescoping control lever is locatedbelow the steering wheel at the end of the
steering column.
• Push down on the lever to unlock the steering column.
• To tilt the steering column, move the steering wheel upward or downward as
desired. To lengthen or shorten the
steering column, pull the steering wheel
outward or push it inward as desired.
• Pull upward on the lever to lock the column firmly in place.
WARNING!
Do not adjust the steering wheel while driving. The tilt/telescoping adjustment
must be locked while driving. Adjusting the steering wheel while driving or driving
without the tilt/telescoping adjustment locked could cause the driver to lose
control of the vehicle. Failure to follow this warning may result in serious injury or
death.
PROGRAMMABLE FEATURES
Electronic Vehicle Information Center (EVIC) – If Equipped
• The EVIC can be used to program the following Personal Settings. Press and release the MENU button
until Personal Settings displays, then press the
STEP button
to scroll through the settings. Press the RESET
button
until ON or OFF appears.
• Language • Headlights With Wipers
• Auto Unlock On Exit • Headlamp Off Delay
• Remote Key Unlock • Key Off Power Delay
• Sound Horn With LOCK • ILLUMIN. Approach
• Flash Lights With LOCK • Display Units Of Measure In
15
GETTING STARTED
Page 18 of 76

Key Fob Programmable Features
• The following features may also be programmed by using the Key Fob transmitteror the ignition switch and driver’s door lock switch.
NOTE: Pressing the LOCK button while you are inside the vehicle will activate the
Vehicle Security Alarm. Opening a door with the Vehicle Security Alarm activated will
cause the alarm to sound. Press the UNLOCK button to deactivate the Vehicle
Security Alarm.
Unlock On First Press
• To unlock either the driver’s side, or all doors, on the first press of the UNLOCK button:
• Press and hold the LOCK button for at least 4 seconds, but no longer than 10 seconds. Then, press and hold the UNLOCK button while still holding the
LOCK button.
• Release both buttons at the same time.
Auto Unlock Doors On Exit
• To have all of the vehicle doors unlock when any door is opened: • Close all doors and place the key in the ignition.
• Within 15 seconds, cycle the ignition switch between LOCK and ON and then backto LOCK four times, ending up in the LOCK position (do not start the engine).
• Within 30 seconds, press the power door UNLOCK switch to unlock the doors.
Auto Door Lock
• To have the doors lock automatically when the vehicle’s speed exceeds 15 mph (24 km/h):
• The auto door lock feature can be enabled or disabled by your authorized dealer. See your authorized dealer for programming.
Sound Horn With Lock
• To turn the horn chirp on or off when the doors are locked:
• Press the LOCK button for at least 4 seconds, but no longer than 10 seconds.Then, press the PANIC button while still holding the LOCK button.
• Release both buttons at the same time.
Flashing Lights With Lock
• The turn signal lights flashing, when the doors are locked or unlocked, feature can be turned on or off. To turn this feature on or off:
• Press and hold the UNLOCK button for at least 4 seconds, but no longer than 10 seconds. Then, press and hold the LOCK button while still holding the
UNLOCK button.
• Release both buttons at the same time.
GETTING STARTED
16
Page 19 of 76

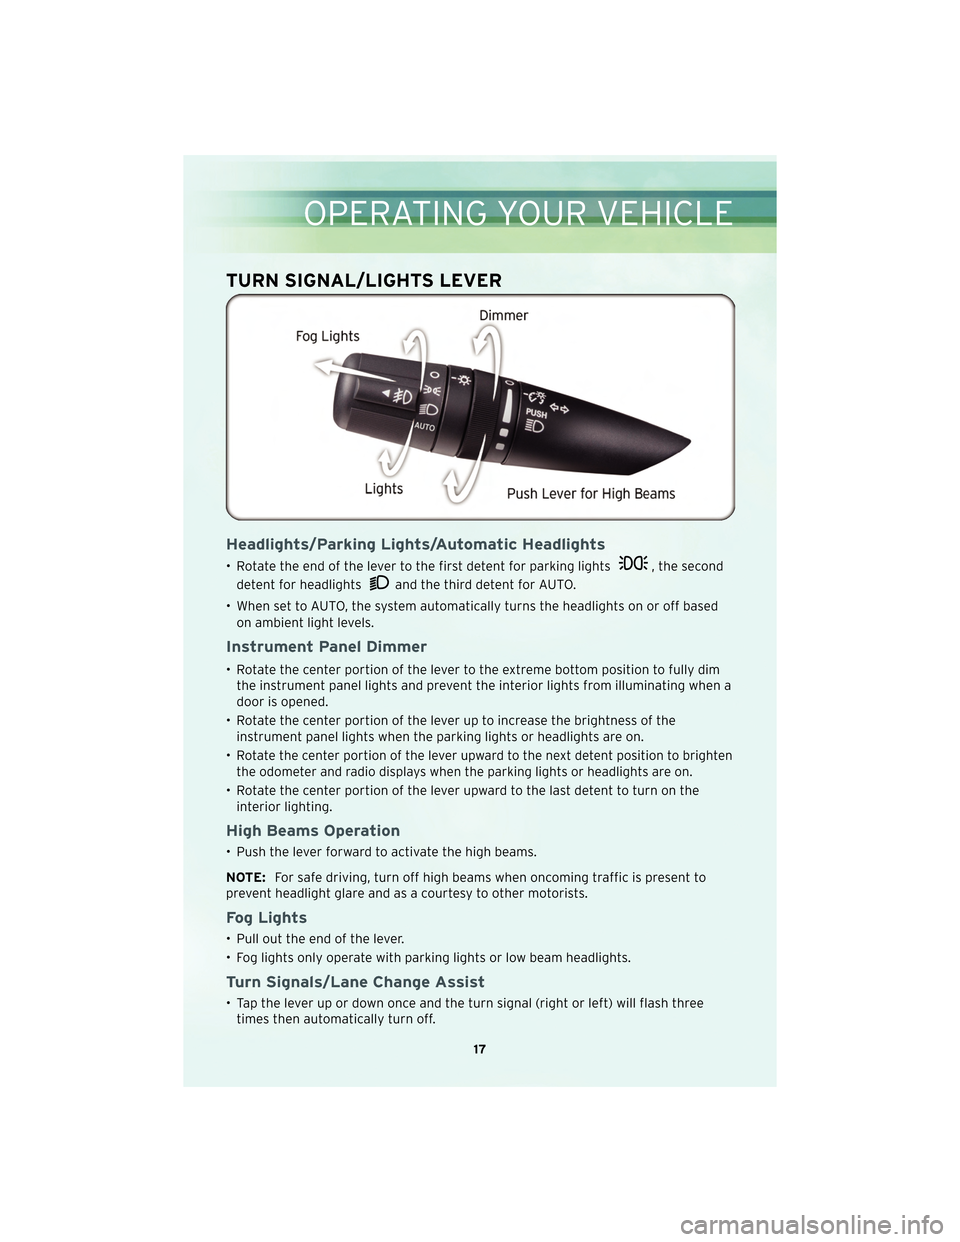
TURN SIGNAL/LIGHTS LEVER
Headlights/Parking Lights/Automatic Headlights
• Rotate the end of the lever to the first detent for parking lights, the second
detent for headlights
and the third detent for AUTO.
• When set to AUTO, the system automatically turns the headlights on or off based on ambient light levels.
Instrument Panel Dimmer
• Rotate the center portion of the lever to the extreme bottom position to fully dimthe instrument panel lights and prevent the interior lights from illuminating when a
door is opened.
• Rotate the center portion of the lever up to increase the brightness of the instrument panel lights when the parking lights or headlights are on.
•
Rotate the center portion of the lever upward to the next detent position to brighten
the odometer and radio displays when the parking lights or headlights are on.
• Rotate the center portion of the lever upward to the last detent to turn on the interior lighting.
High Beams Operation
• Push the lever forward to activate the high beams.
NOTE: For safe driving, turn off high beams when oncoming traffic is present to
prevent headlight glare and as a courtesy to other motorists.
Fog Lights
• Pull out the end of the lever.
• Fog lights only operate with parking lights or low beam headlights.
Turn Signals/Lane Change Assist
• Tap the lever up or down once and the turn signal (right or left) will flash three times then automatically turn off.
17
OPERATING YOUR VEHICLE
Page 20 of 76
WIPER/WASHER LEVER
Front Wipers
Intermittent, Low And High Operation
• Rotate the end of the lever to the first detent position for one of five intermittentsettings, the second for low wiper operation and the third detent for high wiper
operation.
Mist
• Pull down on the lever and release when a single wipe is desired.
Washer Operation
• Pull the lever toward you and hold for as long as spray is desired.
OPERATING YOUR VEHICLE
18
Page 21 of 76

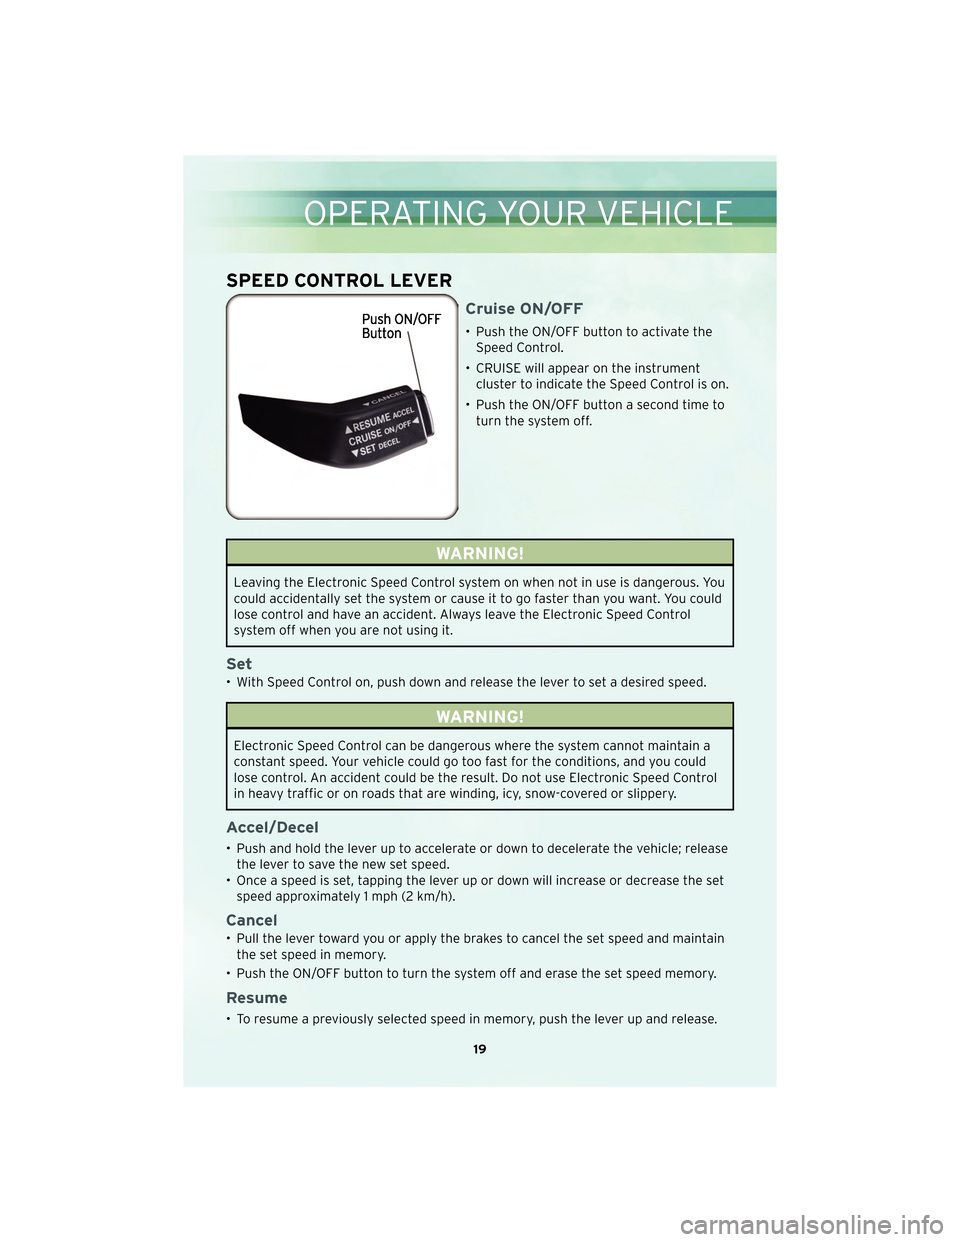
SPEED CONTROL LEVER
Cruise ON/OFF
• Push the ON/OFF button to activate theSpeed Control.
• CRUISE will appear on the instrument cluster to indicate the Speed Control is on.
• Push the ON/OFF button a second time to turn the system off.
WARNING!
Leaving the Electronic Speed Control system on when not in use is dangerous. You
could accidentally set the system or cause it to go faster than you want. You could
lose control and have an accident. Always leave the Electronic Speed Control
system off when you are not using it.
Set
• With Speed Control on, push down and release the lever to set a desired speed.
WARNING!
Electronic Speed Control can be dangerous where the system cannot maintain a
constant speed. Your vehicle could go too fast for the conditions, and you could
lose control. An accident could be the result. Do not use Electronic Speed Control
in heavy traffic or on roads that are winding, icy, snow-covered or slippery.
Accel/Decel
• Push and hold the lever up to accelerate or down to decelerate the vehicle; releasethe lever to save the new set speed.
• Once a speed is set, tapping the lever up or down will increase or decrease the set speed approximately 1 mph (2 km/h).
Cancel
• Pull the lever toward you or apply the brakes to cancel the set speed and maintainthe set speed in memory.
• Push the ON/OFF button to turn the system off and erase the set speed memory.
Resume
• To resume a previously selected speed in memory, push the lever up and release.
19
OPERATING YOUR VEHICLE
Page 22 of 76
MANUAL CLIMATE CONTROLS
Air Recirculation
• Use recirculation for maximum A/C operation.
• For window defogging, turn the recirculation button off.
• Recirculation is not allowed in defrost, floor, defrost/f loor (mix) modes.
AUTOMATIC TEMPERATURE CONTROLS (ATC)
Automatic Operation
• Turn the Mode and Blower Controls to the AUTO position.
• Select the desired temperature by rotating the Temperature Control.
• The system will maintain the set temperature automatically.
OPERATING YOUR VEHICLE
20
Page 23 of 76

Air Conditioning
• If the air conditioning button is pressedwhile in the AUTO mode, the indicator light
may flash three times to indicate the cabin air is being controlled automatically.
Air Recirculation
• Use recirculation for maximum A/C operation.
• For window defogging, turn the air recirculation button off.
• If the recirculation butto n is pressedwhile in the AUTO mode, the indicator light
may flash three times to indicate the cabin air is being controlled automatically.
POWER CONVERTIBLE TOP OPERATION
• Before lowering the top, verify the cargo shield is perfectly positioned in the trunk.
CAUTION!
Do not place objects on the cargo shield. Objects placed on the cargo shield will
interfere with the top during lowering and cause extensive damage.
Positioning The Cargo Shield For Top Operation
• Pull the cargo shield toward you to begin unfolding the panels. Grasp the handle in the center of the outermost (top) panel and raise the cargo shield. Then, align and
seat the tabs at each end of the cargo shield in the V slots in the trunk liner as
shown in the illustration.
21
OPERATING YOUR VEHICLE
Page 24 of 76

• The power top switch will operate when the ignition switch is turned to the ON orACC position and when in the p ower accessory delay.
Lowering
• The power top switch is located on the instrument panel to the left of the steering
column.
• The power top switch has two top down positions which affect window position when lowering the top.
• Press and hold the switch halfway down to the first detent position to lower the top and maintain the current window positions.
• Press and hold the switch fully down to the second detent position to lower the top and completely lower all four windows.
Raising
• Press and hold the switch in the top up position until the operation of raising thetop and latching is complete. “TOP DONE” will be displayed in the odometer or
“CONVERTIBLE TOP COMPLETE” in the Electronic Vehicle Information Center once
the convertible top is completely raised and latched.
• Continue to hold the switch in the up position to completely raise all four windows.
Emergency Bypass Mode (To Raise The Top Only)
• This procedure is only to be used to raise the top when the top cannot be returned to the UP (raised) position by pressing the POWER TOP switch or is in a position in
which the vehicle cannot be driven. Please follow these emergency bypass
instructions to return the top to the UP (raised) position.
• Press the POWER TOP switch in the Top Up direction five times within two seconds and hold the switch in the Top Up position for a minimum of two minutes.
CAUTION!
• Once this procedure has been completed and the top is in the UP (raised)position, see your authorized dealer. DO NOT exceed 40 mph (64 km/h).
• Using the Emergency Bypass Mode could potentially damage the convertible top and should only be used to raise the power top to the UP (raised) position when
the normal top operation is not functioning.
• If damage starts to occur while in the Emergency Bypass Mode, immediately release the POWER TOP switch and see your authorized dealer.
NOTE: This procedure may take more time to fully raise and close the power top. It
is not uncommon to see delays of up to 30 seconds before operation begins.
OPERATING YOUR VEHICLE
22