2010 CHRYSLER 300 navigation system
[x] Cancel search: navigation systemPage 22 of 88

PROGRAMMABLE FEATURES
Electronic Vehicle Information Center (EVIC) – If Equipped
• The EVIC can be used to program the following Personal Settings. Press andrelease the MENU button
until Personal Settings displays, then press the
SCROLL button
to scroll through the settings. Press the FUNCTION SELECT
button
to change the setting.
• Language • Key-Off Power Delay
• Auto Door Locks • AWD System Displays
• Auto UNLK On Exit • Display ECO
• RKE Unlock • Turn-by-Turn Navigation
• RKE Linked To Memory • Confirmation of Voice Commands
• Sound Horn With RKE Lock • Park ASST. System
• Flash Lamp Lock • Display Units of Measure
• Headlamp Off Delay • Automatic High Beams
• Easy Exit Seat • Rain Sensing Intermittent Wipers
• Tilt MIRR. In Reverse • Turn Headlamps On With Wipers
• Turn Headlamps On With Remote Key Unlock • Passive Entry
Key Fob Programmable Features
• The following features may also be programmed by using the Key Fob transmitter
or the ignition switch and driver’s door lock switch.
NOTE: Pressing the LOCK button while you are inside the vehicle will activate the
Vehicle Security Alarm. Opening a door with the Vehicle Security Alarm activated will
cause the alarm to sound. Press the UNLOCK button to deactivate the Vehicle
Security Alarm.
Unlock On First Press
• To unlock either the driver’s side, or all doors, on the first press of the UNLOCK button:
• Press and hold the LOCK button for at least 4 seconds, but no longer than 10 seconds. Then, press and hold the UNLOCK button while still holding the
LOCK button.
• Release both buttons at the same time.
Auto Unlock Doors On Exit
• To have all of the vehicle doors unlock when any door is opened: • Enter your vehicle and close all the doors.
• Within 15 seconds, cycle the ignition switch between LOCK and ON and then backto LOCK four times, ending up in the LOCK position (do not start the engine).
• Within 30 seconds, press the power door UNLOCK switch to unlock the doors. A single chime will indicate that programming is complete.
GETTING STARTED
20
Page 25 of 88

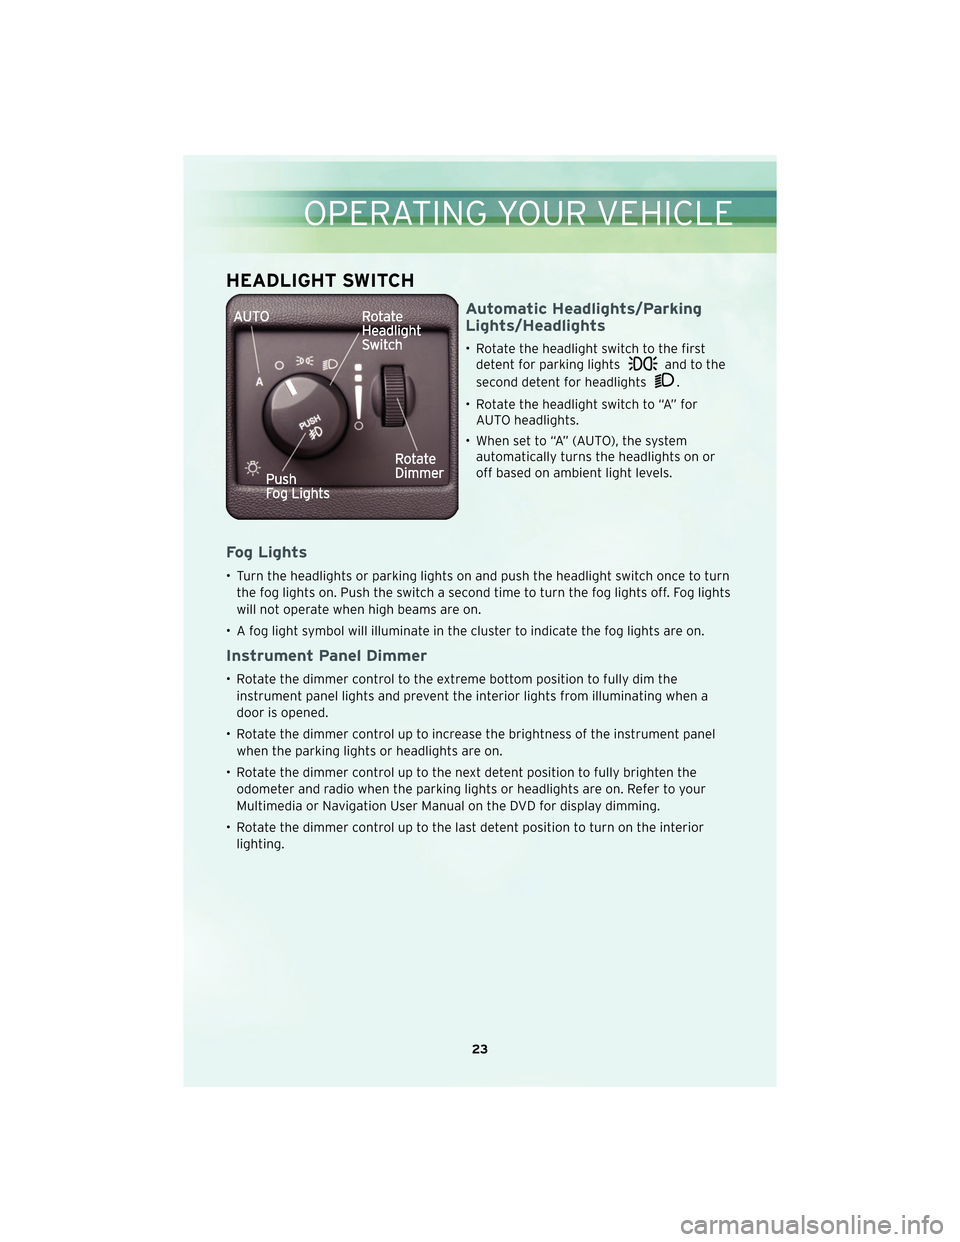
HEADLIGHT SWITCH
Automatic Headlights/Parking
Lights/Headlights
• Rotate the headlight switch to the firstdetent for parking lights
and to the
second detent for headlights
.
• Rotate the headlight switch to “A” for AUTO headlights.
• When set to “A” (AUTO), the system automatically turns the headlights on or
off based on ambient light levels.
Fog Lights
• Turn the headlights or parking lights on and push the headlight switch once to turn
the fog lights on. Push the switch a second time to turn the fog lights off. Fog lights
will not operate when high beams are on.
• A fog light symbol will illuminate in the cluster to indicate the fog lights are on.
Instrument Panel Dimmer
• Rotate the dimmer control to the extreme bottom position to fully dim the instrument panel lights and prevent the interior lights from illuminating when a
door is opened.
• Rotate the dimmer control up to increase the brightness of the instrument panel when the parking lights or headlights are on.
• Rotate the dimmer control up to the next detent position to fully brighten the odometer and radio when the parking lights or headlights are on. Refer to your
Multimedia or Navigation User Manual on the DVD for display dimming.
• Rotate the dimmer control up to the last detent position to turn on the interior lighting.
23
OPERATING YOUR VEHICLE
Page 37 of 88

• Select the folders or titles you would like to copy, then touch the DONE soft-key tostart the copy process.
Copy Pictures To The Hard-Drive
• Insert either a CD or a USB device containing your pictures.
• Touch the MY FILES soft-key, then go to the MANAGE MY FILES screen.
• Touch the MY PICTURES soft-key to get an overview of the currently stored images.
• Touch one of the ADD PICTURES soft-keys, then select the type of media inserted.
• Use the PAGE soft-keys to page through a list of pictures and press the picture youwould like to import.
• Confirm your selection by touching the YES soft-key. The imported picture is now available in the MANAGE MY PICTURES screen.
• In order to display the imported picture in the radio screen, touch the desired picture soft-key.
• Select this picture by pressing the PICTURE VIEW soft-key. A check mark indicates the currently used picture.
Cleaning Your Touch-Screen Radio
• Do not spray any liquid or caustic chemicals directly on the screen. Use a clean anddry micro fiber lens cleaning cloth in order to clean the touch-screen.
• If necessary, use a lint-free cloth dampened with a cleaning solution such as isopropyl alcohol or an isopropyl alcohol and water solution ratio of 50:50. Be sure
to follow the solvent manufacturer’s precautions and directions.
Navigation
Navigation Radio – RER Only
• Navigation radios require digital data from a navigation database. The data in thenavigation database is licensed from Navigation Technologies®. Not all roads are
digitized.
• For software updates, visit http://www.chrysler.com/en/owners/mygig/ website, visit http://www.navteq.com website, or contact your authorized dealer for the latest
available software.
NOTE: Many features of this radio are speed dependent. For your own safety, it is
not possible to use the touch-screen keyboard to enter a name (e.g., street name)
while the vehicle is in motion. Pull over at a safe location to complete your task.
• The Navigation system receives GPS signals from satellites to display the position of your vehicle.
New Destination
• Press the NAV hard-key to access the Navigation Main Menu.
• Touch the NEW DESTINATION soft-key to program a destination, then select thedestination soft-key of your choice.
35
ELECTRONICS
Page 40 of 88

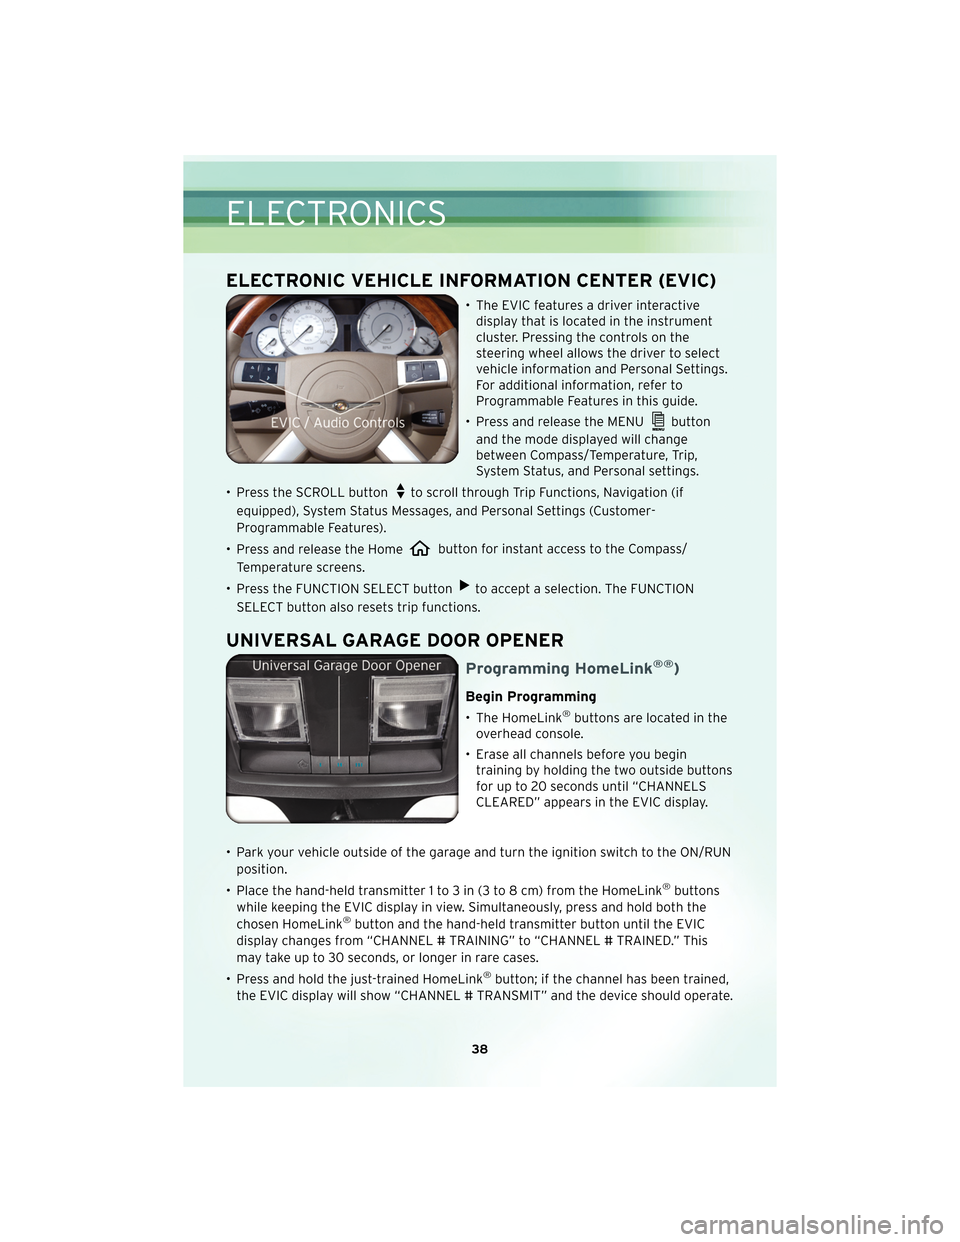
ELECTRONIC VEHICLE INFORMATION CENTER (EVIC)
• The EVIC features a driver interactivedisplay that is located in the instrument
cluster. Pressing the controls on the
steering wheel allows the driver to select
vehicle information and Personal Settings.
For additional information, refer to
Programmable Features in this guide.
• Press and release the MENU
button
and the mode displayed will change
between Compass/Temperature, Trip,
System Status, and Personal settings.
• Press the SCROLL button
to scroll through Trip Functions, Navigation (if
equipped), System Status Messages, and Personal Settings (Customer-
Programmable Features).
• Press and release the Home
button for instant access to the Compass/
Temperature screens.
• Press the FUNCTION SELECT button
to accept a selection. The FUNCTION
SELECT button also resets trip functions.
UNIVERSAL GARAGE DOOR OPENER
Programming HomeLink®®)
Begin Programming
• The HomeLink®buttons are located in the
overhead console.
• Erase all channels before you begin training by holding the two outside buttons
for up to 20 seconds until “CHANNELS
CLEARED” appears in the EVIC display.
• Park your vehicle outside of the garage and turn the ignition switch to the ON/RUN position.
• Place the hand-held transmitter 1 to 3 in (3 to 8 cm) from the HomeLink
®buttons
while keeping the EVIC display in view. Simultaneously, press and hold both the
chosen HomeLink
®button and the hand-held transmitter button until the EVIC
display changes from “CHANNEL # TRAINING” to “CHANNEL # TRAINED.” This
may take up to 30 seconds, or longer in rare cases.
• Press and hold the just-trained HomeLink
®button; if the channel has been trained,
the EVIC display will show “CHANNEL # TRANSMIT” and the device should operate.
ELECTRONICS
38
Page 85 of 88

MOPAR®ACCESSORIES
• The following highlights just some ofthe authentic Chrysler Accessories by
MOPAR®that have been engineered to customize your Chrysler 300.
• To see the full line of acc essories, stop by your Chry sler dealer or visit MOPAR.com.
CHROME:
• 17-Inch Chrome Aluminum Wheel • 18-Inch Chrome
Aluminum Wheel • 20-Inch Chrome
Aluminum Wheel
• Chrome Mesh Grille • Premium Chrome Grille
EXTERIOR:
• Side Window Air Deflectors • Sunroof Air Deflector • Front Air Deflector
• Fog Lights • Front End Cover • Molded Splash Guards
INTERIOR:
• Premium Carpet Floor Mats • Illuminated Door Sill
Guards • Premium Carpet Cargo
Mat
• Slush Mats • Ambient Light Kit • Katzkin Leather Seats
ELECTRONICS:
• Portable Navigation Systems • Uconnect™ Web (WiFi) • Uconnect™ Phone
•iPod
®Adapter • Media Center 430
(REN/RBZ Multimedia
Radio) • DVD Rear Seat Video™
• Kicker
®Sound System • Media Center 730 (RER Navigation Radio) • Head Restraint DVD Rear
Seat Video™
• Remote Start • Heated Seats
CARRIERS:
• Hitch-mount Bike Carrier • Roof Mount Bike Carrier • Roof Box Cargo Carrier
• Roof Mount Ski and Snowboard Carrier • Roof Mount Water
Sports Carrier • Roof Mount Canoe
Carrier
•iPod
®is a registered trademark of Apple, Inc.
• Kicker®is a registered trademark of Stillwater Designs and Audio, Inc.
83
MOPAR ACCESSORIES