Page 293 of 465

Shallow Standing Water
Although your vehicle is capable of driving through
shallow standing water, consider the following Caution
and Warning before doing so.
CAUTION!
•Always check the depth of the standing water
before driving through it. Never drive through
standing water that is deeper than the bottom of
the tire rims mounted on the vehicle.
•Determine the condition of the road or the path
that is under water and if there are any obstacles in
the way before driving through the standing wa-
ter.
•Do not exceed 5 mph (8 km/h) when driving
through standing water. This will minimize wave
effects.(Continued)
CAUTION! (Continued)
•Driving through standing water may cause dam-
age to your vehicle’s drivetrain components. Al-
ways inspect your vehicle’s fluids (i.e., engine oil,
transmission, axle, etc.) for signs of contamination
(i.e., fluid that is milky or foamy in appearance)
after driving through standing water. Do not con-
tinue to operate the vehicle if any fluid appears
contaminated, as this may result in further dam-
age. Such damage is not covered by the New
Vehicle Limited Warranty.
•Getting water inside your vehicle’s engine can
cause it to lock up and stall out, and cause serious
internal damage to the engine. Such damage is not
covered by the New Vehicle Limited Warranty.
292 STARTING AND OPERATING
Page 352 of 465
 and then remove the
yellow cap from the fitting at the end of the hose.
4. Place the TIREFIT kit flat on the ground next to the
deflated tire.
5. Remove the cap from the")
3. Uncoil the Sealant Hose (6) and then remove the
yellow cap from the fitting at the end of the hose.
4. Place the TIREFIT kit flat on the ground next to the
deflated tire.
5. Remove the cap from the valve stem and then screw
the fitting at the end of the Sealant Hose (6) onto the
valve stem.
6. Uncoil the Power Plug (8) and then insert the plug into
the vehicle’s 12 Volt power outlet.
NOTE:Do not remove foreign objects (e.g., screws or
nails) from the tire.
(C) Injecting TIREFIT Sealant into the deflated
tire:
•
Always start the engine before turning ON the TIRE-
FIT kit. NOTE:
Manual transmission vehicles must have the
parking brake engaged and the shifter in NEUTRAL.
•After pressing the Power Button (4), the sealant (white
fluid) will flow from the Sealant Bottle (1) through the
Sealant Hose (6) and into the tire.
NOTE: Sealant may leak out through the puncture in
the tire.
If the sealant (white fluid) does not flow within 0 –
10 seconds through the Sealant Hose (6):
1. Press the Power Button (4) to turn OFF the TIREFIT
kit. Disconnect the Sealant Hose (6) from the valve stem.
Make sure the valve stem is free of debris. Reconnect the
Sealant Hose (6) to the valve stem. Check that the Mode
Select Knob (5) is in the sealant mode position and not air
mode. Press the Power Button (4) to turn ON the TIREFIT
kit.
6
WHAT TO DO IN EMERGENCIES 351
Page 365 of 465
▫Cooling System ..................... 382
▫ Brake System ....................... 387
▫ Automatic Transmission ............... 390
▫ Rear Axle .......................... 391
▫ Appearance Care And Protection From
Corrosion .......................... 392
� Fuses .............................. 398
▫ Integrated Power Module .............. 398
▫ Rear Power Distribution Center .......... 400
� Vehicle Storage ....................... 405
� Replacement Bulbs .................... 406 �
Bulb Replacement ..................... 407
▫ Low Beam Headlamp, High Beam
Headlamp, And Park/Turn Lamp ......... 407
▫ Tail/Stop, Tail, Turn Signal Lamp, And
Backup Lamp ....................... 407
▫ License Lamp ....................... 410
� Fluid Capacities ...................... 412
� Fluids, Lubricants, And Genuine Parts ....... 413
▫ Engine ............................ 413
▫ Chassis ........................... 414
364 MAINTAINING YOUR VEHICLE
Page 371 of 465

•Your vehicle has been built with improved fluids
that protect the performance and durability of
your vehicle and also allow extended maintenance
intervals. Do not use chemical")
CAUTION! (Continued)
•Your vehicle has been built with improved fluids
that protect the performance and durability of
your vehicle and also allow extended maintenance
intervals. Do not use chemical flushes in these
components as the chemicals can damage your
engine, transmission, power steering or air condi-
tioning. Such damage is not covered by the New
Vehicle Limited Warranty. If a flush is needed
because of component malfunction, use only the
specified fluid for the flushing procedure.
Engine Oil
Checking Oil Level
To assure proper engine lubrication, the engine oil must
be maintained at the correct level. Check the oil level at
regular intervals, such as every fuel stop. The best time tocheck the engine oil level is about five minutes after a
fully warmed engine is shut off or before starting the
engine after it has sat overnight.
Checking the oil while the vehicle is on level ground will
improve the accuracy of the oil level readings. Maintain
the oil level in the “SAFE” range. Adding 1.0 qt (1.0 l) of
oil when the reading is at the bottom of the “SAFE” range
will result in an oil level at the top of the “SAFE” range
on these engines.
CAUTION!
Overfilling or underfilling will cause oil aeration or
loss of oil pressure. This could damage your engine.
Change Engine Oil
The oil change indicator system will remind you that it is
time to take your vehicle in for scheduled maintenance.
Refer to “Maintenance Schedule” for further information.
370 MAINTAINING YOUR VEHICLE
Page 391 of 465

•Do not allow petroleum based fluid to contami-
nate the brake fluid. Brake seal components could
be damaged, causing partial or complete brake
failure. This could result in an")
WARNING! (Continued)
•Do not allow petroleum based fluid to contami-
nate the brake fluid. Brake seal components could
be damaged, causing partial or complete brake
failure. This could result in an accident.
Automatic Transmission
Fluid Level Check
Regular automatic transmission fluid level checks are not
required. For this reason, the dipstick is omitted.
If you notice fluid loss or gear shift malfunction, have
your authorized dealer check the transmission fluid level.
CAUTION!
•Using a transmission fluid other than the manu-
facturer’s recommended fluid may cause deterio-
ration in transmission shift quality and/or torque
converter shudder. Using a transmission fluid
other than that recommended by the manufacturer
will result in more frequent fluid and filter
changes. Refer to “Fluids, Lubricants, and Genu-
ine Parts” in “Maintaining Your Vehicle” for fur-
ther information.
•The fluid level is preset at the factory and it does
not require adjustment under normal operating
conditions. If a transmission fluid leak occurs,
visit your authorized dealer immediately. Severe
damage to the transmission may occur. Your au-
thorized dealer has the proper tools to adjust the
fluid level accurately.
390 MAINTAINING YOUR VEHICLE
Page 392 of 465

Fluid and Filter Changes
Refer to “Maintenance Schedule” for further information.
If the transmission is disassembled for any reason, the
fluid and filter should be changed.
Selection of Lubricant
It is important that the proper lubricant is used in the
transmission to assure optimum transmission perfor-
mance. Use only manufacturer ’s recommended transmis-
sion fluid. Refer to “Fluids, Lubricants, and Genuine
Parts” in “Maintaining Your Vehicle” for further informa-
tion. It is important that the transmission fluid be main-
tained at the prescribed level using the recommended
fluid. No chemical flushes should be used in any trans-
mission; only the approved lubricant may be used.
Special Additives
Automatic Transmission Fluid (ATF) is an engineered
product and its performance may be impaired by supple-
mental additives. Therefore, do not add any fluid addi-
tives to the transmission. The only exception to this
policy is the use of special dyes to aid in detecting fluid
leaks. In addition, avoid using transmission sealers as
they may adversely affect seals.
CAUTION!
Do not use chemical flushes in your transmission as
the chemicals can damage your transmission compo-
nents. Such damage is not covered by the New
Vehicle Limited Warranty.
Rear Axle
For normal service, periodic fluid level checks are not
required. When the vehicle is serviced for other reasons
the exterior surfaces of the axle assembly should be
7
MAINTAINING YOUR VEHICLE 391
Page 415 of 465
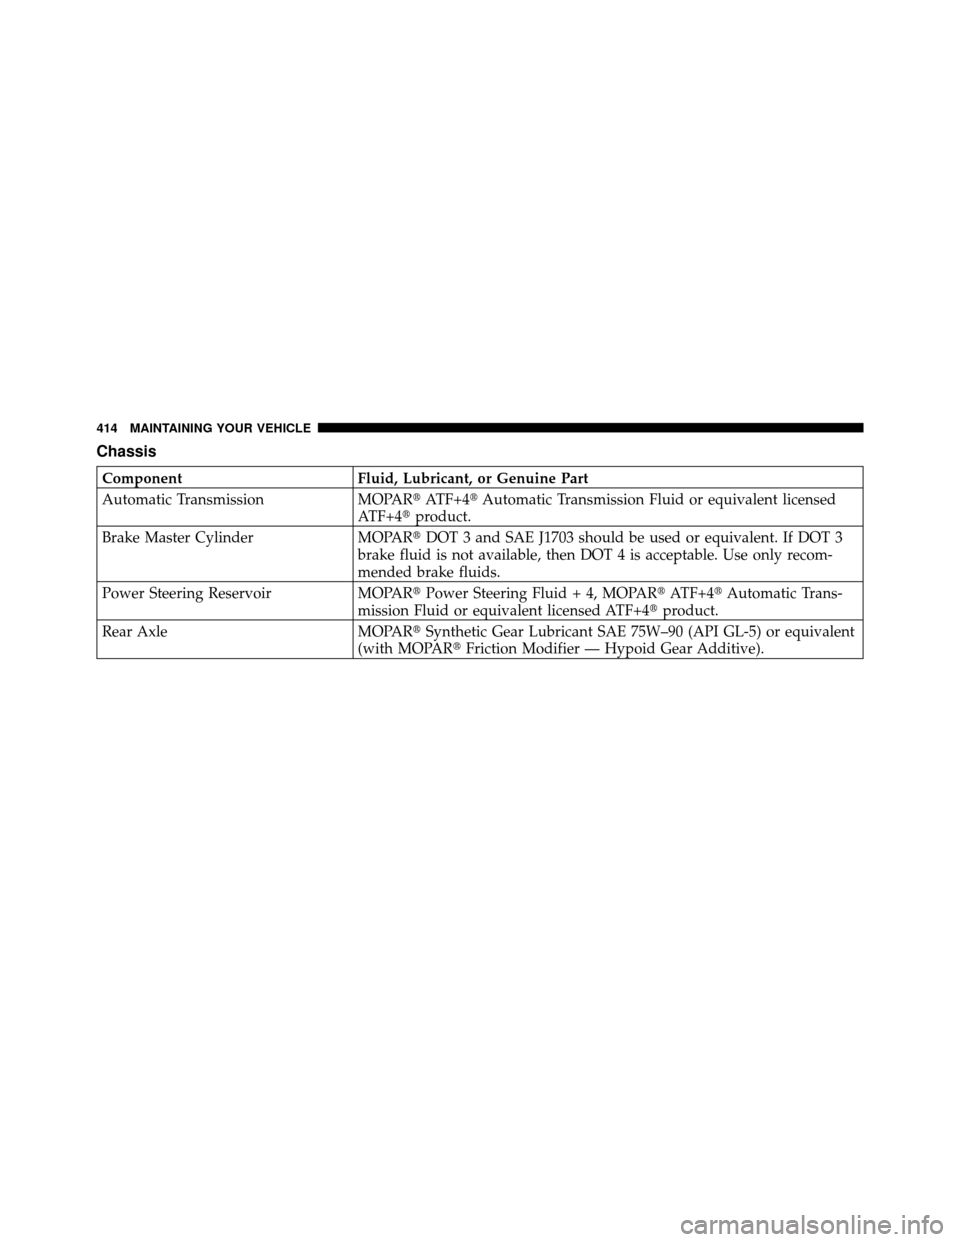
Chassis
ComponentFluid, Lubricant, or Genuine Part
Automatic Transmission MOPAR�ATF+4�Automatic Transmission Fluid or equivalent licensed
ATF+4� product.
Brake Master Cylinder MOPAR�DOT 3 and SAE J1703 should be used or equivalent. If DOT 3
brake fluid is not available, then DOT 4 is acceptable. Use only recom-
mended brake fluids.
Power Steering Reservoir MOPAR�Power Steering Fluid + 4, MOPAR� ATF+4�Automatic Trans-
mission Fluid or equivalent licensed ATF+4� product.
Rear Axle MOPAR�Synthetic Gear Lubricant SAE 75W–90 (API GL-5) or equivalent
(with MOPAR� Friction Modifier — Hypoid Gear Additive).
414 MAINTAINING YOUR VEHICLE
Page 424 of 465
 or
54 Months Maintenance
Service Schedule
❏Change the engine oil and engine oil
filter.
❏ Rotate tires.
❏ Inspect the rear axle fluid.
Odometer Reading Date
Repair Order")
54,000 Miles (90,000 km) or
54 Months Maintenance
Service Schedule
❏Change the engine oil and engine oil
filter.
❏ Rotate tires.
❏ Inspect the rear axle fluid.
Odometer Reading Date
Repair Order #Dealer Code
Signature Authorized Chrysler Dealer
60,000 Miles (100,000 km) or 60 Months Maintenance Service
Schedule
❏Change the engine oil and engine oil filter.
❏ Rotate tires.
❏ Replace the engine air cleaner filter.
❏ Replace the air conditioning filter.
❏ Inspect the brake linings, and replace if necessary.
❏ Adjust parking brake on vehicles equipped with four-wheel disc brakes.
❏ Inspect the CV joints.
❏ Inspect the exhaust system.
❏ Change the automatic transmission fluid and filter if using your vehicle for any of the
following: police, taxi, fleet, or frequent trailer towing.
❏ Flush and replace the engine coolant at 60 months if not done at 102,000 miles
(170 000 km).
❏ Inspect the front suspension, tie rod ends and boot seals for cracks or leaks and all parts for
damage, wear, improper looseness or end play; replace if necessary.
Odometer Reading Date
Repair Order #Dealer Code
Signature Authorized Chrysler Dealer
8
M
A I
N T
E
N A
N CE
S
C
H E
D
U L
E
SMAINTENANCE SCHEDULES 423