2010 CHEVROLET TAHOE brake
[x] Cancel search: brakePage 383 of 608
{WARNING:
If you do not shift down, the brakes could get so
hot that they would not work well. You would then
have poor braking or even none going down a hill.
You could crash. Shift down to let the engine
assist the brakes on a steep downhill slope.
{WARNING:
Coasting downhill in N (Neutral) or with the
ignition off is dangerous. The brakes will have to
do all the work of slowing down and they could
get so hot that they would not work well. You
would then have poor braking or even none going
down a hill. You could crash. Always have the
engine running and the vehicle in gear when
going downhill.
.Stay in your own lane. Do not swing wide or cut
across the center of the road. Drive at speeds that
let you stay in your own lane.
.Top of hills: Be alert—something could be in your
lane (stalled car, accident).
.Pay attention to special road signs (falling rocks
area, winding roads, long grades, passing or
no-passing zones) and take appropriate action.
See Off-Road Driving
on page 5‑11for information
about driving off-road.
Winter Driving
Driving on Snow or Ice
Drive carefully when there is snow or ice between the
tires and the road, creating less traction or grip. Wet ice
can occur at about 0°C (32°F) when freezing rain
begins to fall, resulting in even less traction. Avoid
driving on wet ice or in freezing rain until roads can be
treated with salt or sand.
Drive with caution, whatever the condition. Accelerate
gently so traction is not lost. Accelerating too quickly
causes the wheels to spin and makes the surface under
the tires slick, so there is even less traction.
Try not to break the fragile traction. If you accelerate too
fast, the drive wheels will spin and polish the surface
under the tires even more.
5-25
Page 384 of 608

TheStabiliTrak®Systemon page 5‑6improves the
ability to accelerate on slippery roads, but slow down
and adjust your driving to the road conditions. When
driving through deep snow, turn off the traction control
part of the StabiliTrak
®System to help maintain vehicle
motion at lower speeds.
The Antilock Brake System (ABS)
on page 5‑4improves vehicle stability during hard stops on a
slippery roads, but apply the brakes sooner than when
on dry pavement.
Allow greater following distance on any slippery road
and watch for slippery spots. Icy patches can occur
on otherwise clear roads in shaded areas. The surface
of a curve or an overpass can remain icy when the
surrounding roads are clear. Avoid sudden steering
maneuvers and braking while on ice.
Turn off cruise control, if equipped, on slippery surfaces.
Blizzard Conditions
Being stuck in snow can be in a serious situation. Stay
with the vehicle unless there is help nearby. If possible,
use the Roadside Assistance Program
on page 8‑7.
To get help and keep everyone in the vehicle safe:
.Turn on the Hazard Warning Flasherson
page 4‑3.
.Tie a red cloth to an outside mirror.
{WARNING:
Snow can trap engine exhaust under the vehicle.
This may cause exhaust gases to get inside.
Engine exhaust contains carbon monoxide (CO)
which cannot be seen or smelled. It can cause
unconsciousness and even death.
If the vehicle is stuck in the snow:
.Clear away snow from around the base of
your vehicle, especially any that is blocking
the exhaust pipe.
.Check again from time to time to be sure
snow does not collect there.
.Open a window about 5 cm (two inches) on
the side of the vehicle that is away from the
wind to bring in fresh air.
.Fully open the air outlets on or under the
instrument panel.
.Adjust the Climate Control system to a setting
that circulates the air inside the vehicle and
set the fan speed to the highest setting. See
Climate Control System in the Index.
(Continued)
5-26
Page 397 of 608
{WARNING:
On some vehicles that have certain front mounted
equipment, such as a snow plow, it may be
possible to load the front axle to the front gross
axle weight rating (GAWR) but not have enough
weight on the rear axle to have proper braking
performance. If your brakes can not work properly,
you could have a crash. To help your brakes work
properly when a snow plow is installed, always
follow the snow plow manufacturer or installer's
recommendation for rear ballast to ensure a
proper front and rear weight distribution ratio,
even though the actual front weight may be less
than the front GAWR, and the total vehicle weight
is less than the gross vehicle weight rating
(GVWR). Maintaining a proper front and rear
weight distribution ratio is necessary to provide
proper braking performance.Total vehicle reserve capacity is the difference between
your GVWR and the weight of your vehicle with full fuel
and passengers. It is the amount of weight you can add
to your vehicle before reaching your GVWR. Keep in
mind that reserve capacity numbers are intended as
a guide when selecting the amount of equipment or
cargo your vehicle can carry. If you are unsure of your
vehicle's front, rear, or total weight, go to a weigh
station and weigh your vehicle. Your dealer can also
help you with this.
The total vehicle reserve capacity for your vehicle can
be found in the lower right corner of the Certification/
Tire label as shown previously.
See your dealer for additional advice and information
about using a snow plow on your vehicle. Also, see
Loading the Vehicle on page 5‑29.
Emergency Roof Lamp Provisions
Vehicles with the RPO VYU snow plow prep package
also have an emergency roof lamp provision package,
RPO TRW. Wiring for the emergency roof lamp is
provided above the overhead console. See
Auxiliary
Roof-Mounted Lamp
on page 4‑14for switch location.
5-39
Page 400 of 608

Four-Wheel Drive Vehicles with a
Two Speed Automatic Transfer Case
Use the following procedure to dinghy tow a four-wheel
drive vehicle with a two speed automatic transfer case:1. Position the vehicle being towed behind the tow vehicle and shift the transmission to P (Park).
2. Turn the engine off and firmly set the parking brake.
3. Securely attach the vehicle being towed to the tow vehicle.
{WARNING:
Shifting a four-wheel-drive vehicle's transfer case
into N (Neutral) can cause the vehicle to roll even
if the transmission is in P (Park). The driver or
others could be injured. Make sure the parking
brake is firmly set before the transfer case is
shifted to N (Neutral).
4. Shift the transfer case to N (Neutral). See “Shifting
into Neutral” under“Four-Wheel Drive” for the
proper procedure to select the Neutral position for
the vehicle.
5. Release the parking brake only after the vehicle being towed is firmly attached to the towing
vehicle.
6. Turn the ignition to LOCK/OFF and remove the key —the steering wheel will still turn.
After towing, see “Shifting Out of Neutral” under
“Four-Wheel Drive” for the proper procedure to take the
vehicle out of the Neutral position.
5-42
Page 402 of 608
Four-Wheel Drive Vehicles with a
Two Speed Automatic Transfer Case
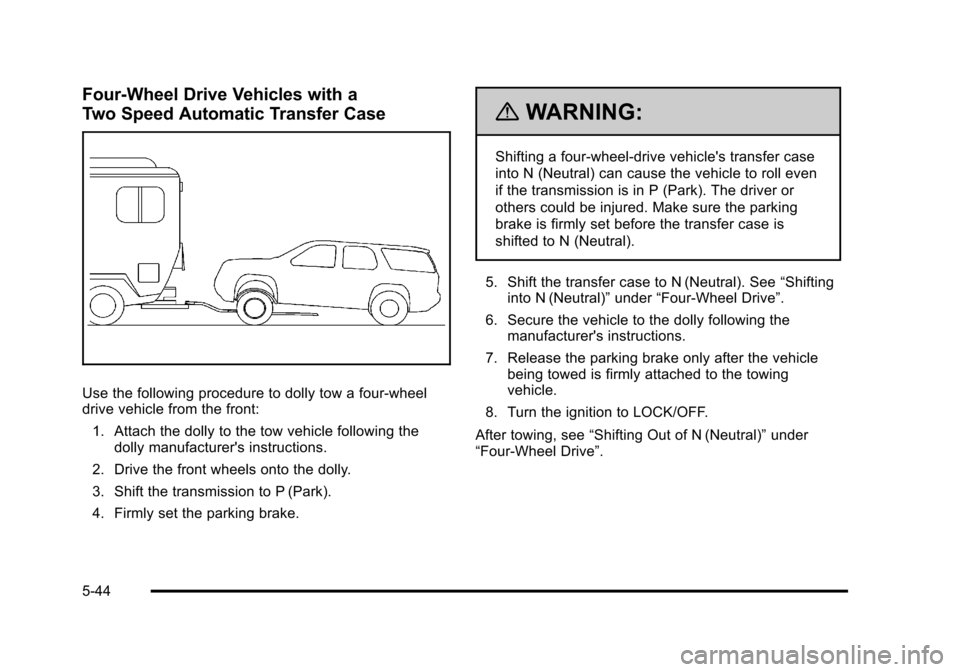
Use the following procedure to dolly tow a four-wheel
drive vehicle from the front:1. Attach the dolly to the tow vehicle following the dolly manufacturer's instructions.
2. Drive the front wheels onto the dolly.
3. Shift the transmission to P (Park).
4. Firmly set the parking brake.
{WARNING:
Shifting a four-wheel-drive vehicle's transfer case
into N (Neutral) can cause the vehicle to roll even
if the transmission is in P (Park). The driver or
others could be injured. Make sure the parking
brake is firmly set before the transfer case is
shifted to N (Neutral).
5. Shift the transfer case to N (Neutral). See “Shifting
into N (Neutral)” under“Four-Wheel Drive”.
6. Secure the vehicle to the dolly following the manufacturer's instructions.
7. Release the parking brake only after the vehicle being towed is firmly attached to the towing
vehicle.
8. Turn the ignition to LOCK/OFF.
After towing, see “Shifting Out of N (Neutral)” under
“Four-Wheel Drive”.
5-44
Page 403 of 608
Rear Towing (Rear Wheels Off the
Ground)
Two-Wheel-Drive Vehicles and Four-Wheel
Drive Vehicles with a Single Speed
Automatic Transfer Case
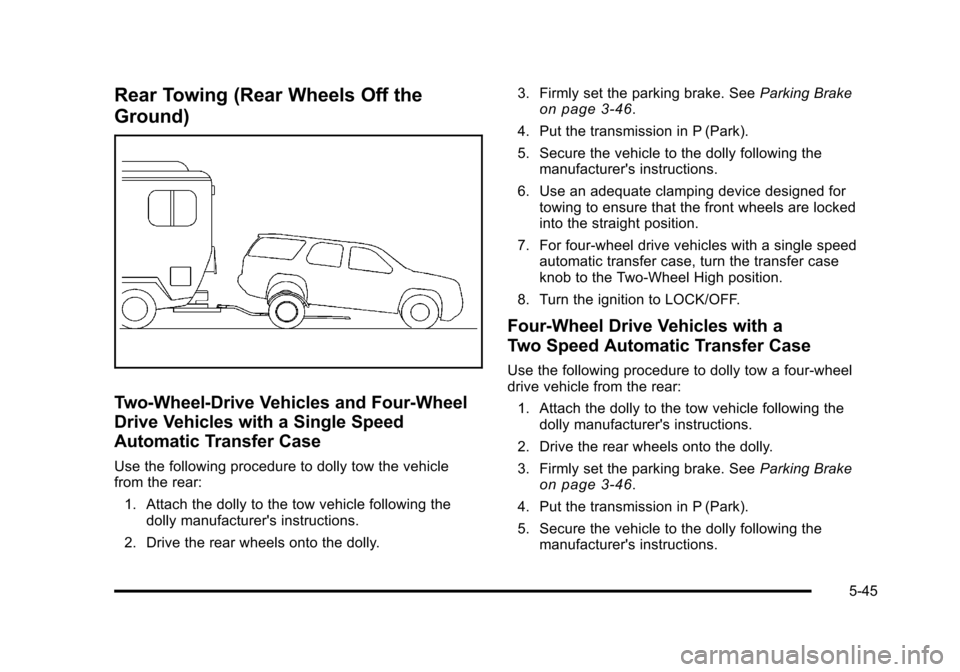
Use the following procedure to dolly tow the vehicle
from the rear:1. Attach the dolly to the tow vehicle following the dolly manufacturer's instructions.
2. Drive the rear wheels onto the dolly. 3. Firmly set the parking brake. See
Parking Brake
on page 3‑46.
4. Put the transmission in P (Park).
5. Secure the vehicle to the dolly following the manufacturer's instructions.
6. Use an adequate clamping device designed for towing to ensure that the front wheels are locked
into the straight position.
7. For four-wheel drive vehicles with a single speed automatic transfer case, turn the transfer case
knob to the Two-Wheel High position.
8. Turn the ignition to LOCK/OFF.
Four-Wheel Drive Vehicles with a
Two Speed Automatic Transfer Case
Use the following procedure to dolly tow a four-wheel
drive vehicle from the rear: 1. Attach the dolly to the tow vehicle following the dolly manufacturer's instructions.
2. Drive the rear wheels onto the dolly.
3. Firmly set the parking brake. See Parking Brake
on page 3‑46.
4. Put the transmission in P (Park).
5. Secure the vehicle to the dolly following the manufacturer's instructions.
5-45
Page 404 of 608

6. Use an adequate clamping device designed fortowing to ensure that the front wheels are locked
into the straight position.
{WARNING:
Shifting a four-wheel-drive vehicle's transfer case
into N (Neutral) can cause the vehicle to roll even
if the transmission is in P (Park). The driver or
others could be injured. Make sure the parking
brake is firmly set before the transfer case is
shifted to N (Neutral).
7. Shift the transfer case to N (Neutral). See “Shifting
into N (Neutral)” under“Four-Wheel Drive”.
8. Turn the ignition to LOCK/OFF.
After towing, see “Shifting Out of N (Neutral)” under
“Four-Wheel Drive”.
Level Control
Automatic Level Control
The automatic level control rear suspension is available
on light‐duty vehicles and comes as a part of the
Autoride
®suspension, if equipped. This type of level control is fully automatic and will
provide a better leveled riding position as well as better
handling under a variety of passenger and loading
conditions. An air compressor connected to the rear
shocks will raise or lower the rear of the vehicle to
maintain proper vehicle height. The system is activated
when the ignition key is turned to ON/RUN and will
automatically adjust vehicle height thereafter. The
system may exhaust (lower vehicle height) for up to
ten minutes after the ignition key has been turned off.
You may hear the air compressor operating when the
height is being adjusted.
If a weight‐distributing hitch is being used, it is
recommended to allow the shocks to inflate, thereby
leveling the vehicle prior to adjusting the hitch.
Autoride®
With this feature, improved vehicle ride and handling is
provided under a variety of passenger and loading
conditions.
The system is fully automatic and uses a computer
controller to continuously monitor vehicle speed, wheel
to body position, lift/dive and steering position of the
vehicle. The controller then sends signals to each shock
absorber to independently adjust the damping level to
provide the optimum vehicle ride.
5-46
Page 405 of 608
Autoride also interacts with the tow/haul mode that,
when activated, will provide additional control of the
shock absorbers. This additional control results in better
ride and handling characteristics when the vehicle is
loaded or towing a trailer. See“Tow/Haul Mode”under
Towing a Trailer
on page 5‑47for more information.
Towing a Trailer
If the vehicle has a two–mode hybrid engine, see the
Two–mode Hybrid manual for more information.
Do not tow a trailer during break‐in. See New Vehicle
Break-In
on page 3‑26for more information.
{WARNING:
The driver can lose control when pulling a trailer if
the correct equipment is not used or the vehicle is
not driven properly. For example, if the trailer is
too heavy, the brakes may not work well —or
even at all. The driver and passengers could be
seriously injured. The vehicle may also be
damaged; the resulting repairs would not be
covered by the vehicle warranty. Pull a trailer only
if all the steps in this section have been followed.
Ask your dealer for advice and information about
towing a trailer with the vehicle. Notice:
Pulling a trailer improperly can damage the
vehicle and result in costly repairs not covered by
the vehicle warranty. To pull a trailer correctly,
follow the advice in this section and see your dealer
for important information about towing a trailer with
the vehicle.
To identify the trailering capacity of the vehicle, read the
information in “Weight of the Trailer” that appears later
in this section.
Trailering is different than just driving the vehicle
by itself. Trailering means changes in handling,
acceleration, braking, durability and fuel economy.
Successful, safe trailering takes correct equipment,
and it has to be used properly.
The following information has many time-tested,
important trailering tips and safety rules. Many of
these are important for your safety and that of your
passengers. So please read this section carefully before
pulling a trailer.
5-47