2010 CHEVROLET SUBURBAN change wheel
[x] Cancel search: change wheelPage 29 of 608

Steering Wheel Controls
For vehicles with audio
steering wheel controls,
some audio controls can
be adjusted at the
steering wheel.
w/x:Press to change favorite radio stations, select
tracks on a CD/DVD, or to navigate tracks or folders on
an iPod
®or USB device.
b g:Press to silence the vehicle speakers only. Press
again to turn the sound on. Press and hold longer than
two seconds to interact with OnStar
®or Bluetooth
systems, if equipped.
+
e−e: Increases or decreases volume.
c:Press to reject an incoming call, or to end a call.
SRCE: Press to switch between the radio, CD, and for
vehicles with, DVD, front auxiliary, and rear auxiliary.
¨: Press to seek the next radio station, the next track
or chapter while sourced to the CD or DVD slot, or to
select tracks and folders on an iPod
®or USB device.
For more information, see Audio Steering Wheel
Controls on page 4‑136.
Bluetooth®
For vehicles with an in-vehicle Bluetooth system, it
allows users with a Bluetooth enabled cell phone to
make and receive hands-free calls using the vehicle’s
audio system and controls.
The Bluetooth enabled cell phone must be paired with
the in-vehicle Bluetooth system before it can be used in
the vehicle. Not all phones will support all functions. For
more information visit www.gm.com/bluetooth.
For more information, see Bluetooth
®on page 4‑114.
Navigation System
The vehicle's navigation system provides detailed
maps of most major freeways and roads throughout the
United States and Canada. After a destination has been
set, the system provides turn-by-turn instructions for
reaching the destination. In addition, the system can
help locate a variety of points of interest (POI), such as
banks, airports, restaurants, and more.
See the vehicle's Navigation System manual for more
information.
1-23
Page 137 of 608
Servicing Your Airbag-Equipped
Vehicle
Airbags affect how the vehicle should be serviced.
There are parts of the airbag system in several places
around the vehicle. Your dealer and the service manual
have information about servicing the vehicle and the
airbag system. To purchase a service manual, see
Service Publications Ordering Information
on
page 8‑16.
{WARNING:
For up to 10 seconds after the ignition is turned off
and the battery is disconnected, an airbag can still
inflate during improper service. You can be injured
if you are close to an airbag when it inflates. Avoid
yellow connectors. They are probably part of the
airbag system. Be sure to follow proper service
procedures, and make sure the person performing
work for you is qualified to do so.
Adding Equipment to Your
Airbag-Equipped Vehicle
Q: Is there anything I might add to or change about the vehicle that could keep the airbags from
working properly?
A: Yes. If you add things that change your vehicle's
frame, bumper system, height, front end or side
sheet metal, they may keep the airbag system from
working properly. Changing or moving any parts of
the front seats, safety belts, the airbag sensing and
diagnostic module, steering wheel, instrument panel,
roof-rail airbag modules, ceiling headliner or pillar
garnish trim, overhead console, front sensors, side
impact sensors, rollover sensor module, or airbag
wiring can affect the operation of the airbag system.
2-99
Page 138 of 608
In addition, the vehicle may have a passenger
sensing system for the right front passenger's
position, which includes sensors that are part of the
passenger's seat. The passenger sensing system
may not operate properly if the original seat trim is
replaced with non-GM covers, upholstery or trim,
or with GM covers, upholstery or trim designed for a
different vehicle. Any object, such as an aftermarket
seat heater or a comfort enhancing pad or device,
installed under or on top of the seat fabric, could
also interfere with the operation of the passenger
sensing system. This could either prevent proper
deployment of the passenger airbag(s) or prevent
the passenger sensing system from properly turning
off the passenger airbag(s). SeePassenger Sensing
System on page 2‑93.
If you have any questions about this, you should
contact Customer Assistance before you modify
your vehicle. The phone numbers and addresses
for Customer Assistance are in Step Two of the
Customer Satisfaction Procedure in this manual.
See Customer Satisfaction Procedure on page 8‑2.
If the vehicle has rollover roof-rail airbags, see
Different Size Tires and Wheels
on page 6‑82for
additional important information. Q: What if I added a snow plow? Will it keep the
airbags from working properly?
A: We have designed our airbag systems to work
properly under a wide range of conditions, including
snow plowing with vehicles that have the optional
Snow Plow Prep Package (RPO VYU). But do
not change or defeat the snow plow's “tripping
mechanism.” If you do, it can damage your snow
plow and your vehicle, and it may cause an airbag
inflation.
Q: Because I have a disability, I have to get my vehicle modified. How can I find out whether
this will affect my airbag system?
A: If you have questions, call Customer Assistance.
The phone numbers and addresses for Customer
Assistance are in Step Two of the Customer
Satisfaction Procedure in this manual. See
Customer Satisfaction Procedure on page 8‑2.
In addition, your dealer and the service manual have
information about the location of the airbag sensors,
sensing and diagnostic module and airbag wiring.
2-100
Page 175 of 608
The vehicle has a shift stabilization feature that
adjusts the transmission shifting to the current driving
conditions in order to reduce rapid upshifts and
downshifts. This shift stabilization feature is designed to
determine, before making an upshift, if the engine is
able to maintain vehicle speed by analyzing things such
as vehicle speed, throttle position, and vehicle load.
If the shift stabilization feature determines that a current
vehicle speed cannot be maintained, the transmission
does not upshift and instead holds the current gear. In
some cases, this could appear to be a delayed shift,
however the transmission is operating normally.
The vehicle's transmission uses adaptive shift controls.
Adaptive shift controls continually compares key shift
parameters to pre-programmed ideal shifts stored in the
transmissions computer. The transmission constantly
makes adjustments to improve vehicle performance
according to how the vehicle is being used, such as
with a heavy load or when the temperature changes.
During this adaptive shift control process, shifting might
feel different as the transmission determines the best
settings.
When temperatures are very cold, the Hydra-Matic
®
6-Speed transmission's gear shifting could be delayed
providing more stable shifts until the engine warms
up. Shifts could be more noticeable with a cold
transmission. This difference in shifting is normal.M (Manual Mode):
This position is available on vehicles
with the Hydra-Matic
®6-Speed transmission. It lets
drivers select the range of gears appropriate for current
driving conditions. If the vehicle has this feature,
see Range Select Mode (Hydra-Matic
®6-Speed
transmission) later in this section.
3 (Third): This position is also used for normal driving.
It reduces vehicle speed more than D (Drive) without
using the brakes. You might choose 3 (Third) instead of
D (Drive) when driving on hilly, winding roads, when
towing a trailer, so there is less shifting between gears
and when going down a steep hill.
2 (Second): This position reduces vehicle speed even
more than 3 (Third) without using the brakes. You can
use 2 (Second) on hills. It can help control vehicle
speed as you go down steep mountain roads, but then
you would also want to use the brakes off and on.
If you manually select 2 (Second) in an automatic
transmission, the transmission will start in second gear.
You can use this feature for reducing the speed of the
rear wheels when you are trying to start the vehicle
from a stop on slippery road surfaces.
3-35
Page 177 of 608
To use this feature, do the following:1. Move the shift lever to M (Manual Mode).
2. Press the plus/minus buttons, located on the steering column shift lever, to select the desired
range of gears for the current driving conditions.
When M (Manual Mode) is selected a number displays
next to the M, indicating the current gear.
This number is the highest gear that can be used.
However, the vehicle can automatically shift to lower
gears as it adjusts to driving conditions. This means
that all gears below that number are available. When
5 (Fifth) is selected, 1 (First) through 5 (Fifth) gears are
automatically shifted by the vehicle, but 6 (Sixth) cannot
be used until the plus/minus button located on the
steering column lever is used to change to the gear. Grade Braking is not available when Range Selection
Mode is active. See
Tow/Haul Mode on page 3‑38.
While using Range Selection Mode, cruise control and
the Tow/Haul mode can be used.
Notice: Spinning the tires or holding the vehicle in
one place on a hill using only the accelerator pedal
may damage the transmission. The repair will not be
covered by the vehicle warranty. If you are stuck, do
not spin the tires. When stopping on a hill, use the
brakes to hold the vehicle in place.
Low Traction Mode
If the vehicle has the Hydra-Matic®6-Speed Automatic
Transmission, it has a Low Traction Mode that assists in
vehicle acceleration when road conditions are slippery,
such as with ice or snow. While the vehicle is at a stop,
select the second gear range using Range Selection
Mode. This will limit torque to the wheels after it detects
wheel slip, preventing the tires from spinning.
3-37
Page 219 of 608

Section 4 Instrument Panel
Instrument Panel Overview. . . . . . . . . . . . . . . . . . . . . . . . 4-3
Hazard Warning Flashers . . . . . . . . . . . . . . . . . . . . . . . 4-3
Horn . . . . . . . . . . . . . . . . . . . . . . . . . . . . . . . . . . . . . . . . . . . . 4-3
Tilt Wheel . . . . . . . . . . . . . . . . . . . . . . . . . . . . . . . . . . . . . . . 4-3
Turn Signal/Multifunction Lever . . . . . . . . . . . . . . . . . . 4-4
Turn and Lane-Change Signals . . . . . . . . . . . . . . . . . 4-4
Headlamp High/Low-Beam Changer . . . . . . . . . . . . 4-5
Flash-to-Pass . . . . . . . . . . . . . . . . . . . . . . . . . . . . . . . . . . . 4-5
Windshield Wipers . . . . . . . . . . . . . . . . . . . . . . . . . . . . . . 4-6
Windshield Washer . . . . . . . . . . . . . . . . . . . . . . . . . . . . . 4-6
Rear Window Wiper/Washer . . . . . . . . . . . . . . . . . . . . 4-7
Cruise Control . . . . . . . . . . . . . . . . . . . . . . . . . . . . . . . . . . 4-8
Exterior Lamps . . . . . . . . . . . . . . . . . . . . . . . . . . . . . . . . . 4-11
Headlamps on Reminder . . . . . . . . . . . . . . . . . . . . . . 4-12
Daytime Running Lamps (DRL) . . . . . . . . . . . . . . . . 4-12
Automatic Headlamp System . . . . . . . . . . . . . . . . . . 4-12
Fog Lamps . . . . . . . . . . . . . . . . . . . . . . . . . . . . . . . . . . . . 4-13
Auxiliary Roof-Mounted Lamp . . . . . . . . . . . . . . . . . 4-14
Instrument Panel Brightness . . . . . . . . . . . . . . . . . . . 4-14
Dome Lamps . . . . . . . . . . . . . . . . . . . . . . . . . . . . . . . . . . 4-14
Dome Lamp Override . . . . . . . . . . . . . . . . . . . . . . . . . . 4-15
Entry Lighting . . . . . . . . . . . . . . . . . . . . . . . . . . . . . . . . . . 4-15
Exit Lighting . . . . . . . . . . . . . . . . . . . . . . . . . . . . . . . . . . . 4-15
Reading Lamps . . . . . . . . . . . . . . . . . . . . . . . . . . . . . . . . 4-15
Electric Power Management . . . . . . . . . . . . . . . . . . . 4-15 Battery Run-Down Protection . . . . . . . . . . . . . . . . . . 4-16
Accessory Power Outlet(s) . . . . . . . . . . . . . . . . . . . . . 4-16
Ashtray(s) and Cigarette Lighter . . . . . . . . . . . . . . . 4-17
Climate Controls . . . . . . . . . . . . . . . . . . . . . . . . . . . . . . . . . . 4-18
Climate Control System . . . . . . . . . . . . . . . . . . . . . . . . 4-18
Dual Automatic Climate Control System . . . . . . . 4-20
Outlet Adjustment . . . . . . . . . . . . . . . . . . . . . . . . . . . . . . 4-26
Rear Air Conditioning and Heating System . . . . 4-26
Rear Air Conditioning and Heating System and
Electronic Climate Controls . . . . . . . . . . . . . . . . . . 4-28
Warning Lights, Gauges, and Indicators . . . . . . . . 4-29
Instrument Panel Cluster . . . . . . . . . . . . . . . . . . . . . . . 4-30
Speedometer and Odometer . . . . . . . . . . . . . . . . . . . 4-31
Trip Odometer . . . . . . . . . . . . . . . . . . . . . . . . . . . . . . . . . 4-31
Tachometer . . . . . . . . . . . . . . . . . . . . . . . . . . . . . . . . . . . . 4-31
Safety Belt Reminders . . . . . . . . . . . . . . . . . . . . . . . . . 4-31
Airbag Readiness Light . . . . . . . . . . . . . . . . . . . . . . . . 4-32
Passenger Airbag Status Indicator . . . . . . . . . . . . . 4-33
Charging System Light . . . . . . . . . . . . . . . . . . . . . . . . 4-34
Voltmeter Gauge . . . . . . . . . . . . . . . . . . . . . . . . . . . . . . . 4-35
Brake System Warning Light . . . . . . . . . . . . . . . . . . . 4-36
Antilock Brake System (ABS) Warning Light . . . 4-37
StabiliTrak
®Indicator Light . . . . . . . . . . . . . . . . . . . . . 4-37
Engine Coolant Temperature Gauge . . . . . . . . . . . 4-38
4-1
Page 226 of 608
Cruise Control
{WARNING:
Cruise control can be dangerous where you
cannot drive safely at a steady speed. So, do not
use the cruise control on winding roads or in
heavy traffic.
Cruise control can be dangerous on slippery
roads. On such roads, fast changes in tire traction
can cause excessive wheel slip, and you could
lose control. Do not use cruise control on slippery
roads.
With cruise control, a speed of about 40 km/h (25 mph)
or more can be maintained without keeping your foot on
the accelerator. Cruise control does not work at speeds
below about 40 km/h (25 mph).
When the brakes are applied, cruise control is
turned off.
If the vehicle has StabiliTrak
®, and the system begins
to limit wheel spin, cruise control will automatically
disengage. See StabiliTrak
®Systemon page 5‑6.
When road conditions allow the cruise control to be
safely used again, it can be turned back on.
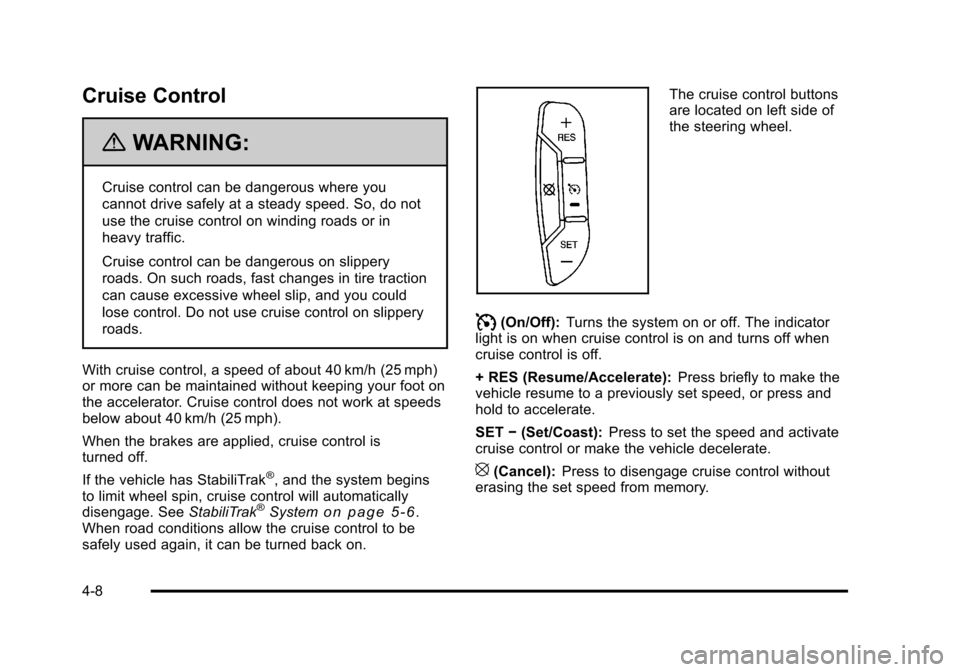
The cruise control buttons
are located on left side of
the steering wheel.
I(On/Off): Turns the system on or off. The indicator
light is on when cruise control is on and turns off when
cruise control is off.
+ RES (Resume/Accelerate): Press briefly to make the
vehicle resume to a previously set speed, or press and
hold to accelerate.
SET −(Set/Coast): Press to set the speed and activate
cruise control or make the vehicle decelerate.
[(Cancel): Press to disengage cruise control without
erasing the set speed from memory.
4-8
Page 236 of 608
Climate Controls
Climate Control System
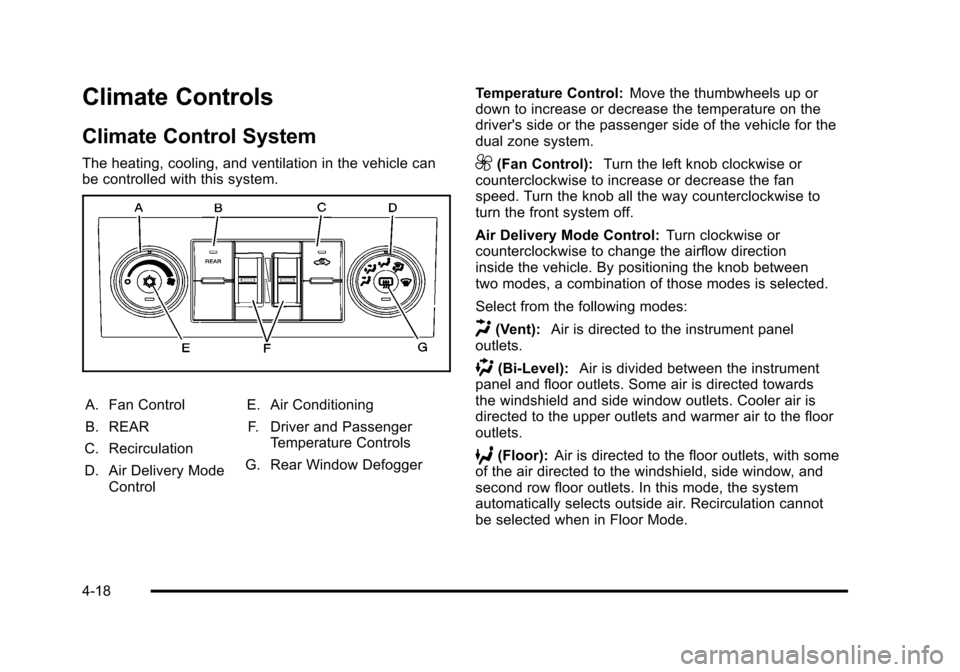
The heating, cooling, and ventilation in the vehicle can
be controlled with this system.
A. Fan Control
B. REAR
C. Recirculation
D. Air Delivery Mode Control E. Air Conditioning
F. Driver and Passenger Temperature Controls
G. Rear Window Defogger Temperature Control:
Move the thumbwheels up or
down to increase or decrease the temperature on the
driver's side or the passenger side of the vehicle for the
dual zone system.
9(Fan Control): Turn the left knob clockwise or
counterclockwise to increase or decrease the fan
speed. Turn the knob all the way counterclockwise to
turn the front system off.
Air Delivery Mode Control: Turn clockwise or
counterclockwise to change the airflow direction
inside the vehicle. By positioning the knob between
two modes, a combination of those modes is selected.
Select from the following modes:
H(Vent): Air is directed to the instrument panel
outlets.
)(Bi-Level): Air is divided between the instrument
panel and floor outlets. Some air is directed towards
the windshield and side window outlets. Cooler air is
directed to the upper outlets and warmer air to the floor
outlets.
6(Floor): Air is directed to the floor outlets, with some
of the air directed to the windshield, side window, and
second row floor outlets. In this mode, the system
automatically selects outside air. Recirculation cannot
be selected when in Floor Mode.
4-18