2010 CHEVROLET SUBURBAN change wheel
[x] Cancel search: change wheelPage 513 of 608
If a Tire Goes Flat
It is unusual for a tire to blowout while you are driving,
especially if you maintain your vehicle's tires properly.
If air goes out of a tire, it is much more likely to leak out
slowly. But if you should ever have a blowout, here are
a few tips about what to expect and what to do:
If a front tire fails, the flat tire creates a drag that pulls
the vehicle toward that side. Take your foot off the
accelerator pedal and grip the steering wheel firmly.
Steer to maintain lane position, and then gently brake to
a stop well out of the traffic lane.
A rear blowout, particularly on a curve, acts much like a
skid and may require the same correction you would
use in a skid. In any rear blowout remove your foot from
the accelerator pedal. Get the vehicle under control by
steering the way you want the vehicle to go. It may be
very bumpy and noisy, but you can still steer. Gently
brake to a stop, well off the road if possible.{WARNING:
Lifting a vehicle and getting under it to do
maintenance or repairs is dangerous without the
appropriate safety equipment and training. If a
jack is provided with the vehicle, it is designed
only for changing a flat tire. If it is used for
anything else, you or others could be badly
injured or killed if the vehicle slips off the jack.
If a jack is provided with the vehicle, only use it
for changing a flat tire.
If a tire goes flat, the next part shows how to use the
jacking equipment to change a flat tire safely.
6-87
Page 514 of 608
Changing a Flat Tire
If your vehicle is a Two-mode Hybrid, see the
Two-mode Hybrid manual for more information.
If a tire goes flat, avoid further tire and wheel damage
by driving slowly to a level place. Turn on the hazard
warning flashers. SeeHazard Warning Flashers
on
page 4‑3.
{WARNING:
Changing a tire can be dangerous. The vehicle
can slip off the jack and roll over or fall on you or
other people. You and they could be badly injured
or even killed. Find a level place to change your
tire. To help prevent the vehicle from moving:
1. Set the parking brake firmly.
2. Put the shift lever in P (Park). (Continued)
WARNING: (Continued)
3. If you have a four-wheel-drive vehicle with aN (Neutral) transfer case position, be sure the
transfer case is in a drive gear —not in
N (Neutral).
4. Turn off the engine and do not restart while the vehicle is raised.
5. Do not allow passengers to remain in the vehicle.
6. Put the wheel blocks at the front and rear of the tire farthest away from the one being
changed. That would be the tire on the other
side, at the opposite end of the vehicle.
6-88
Page 515 of 608
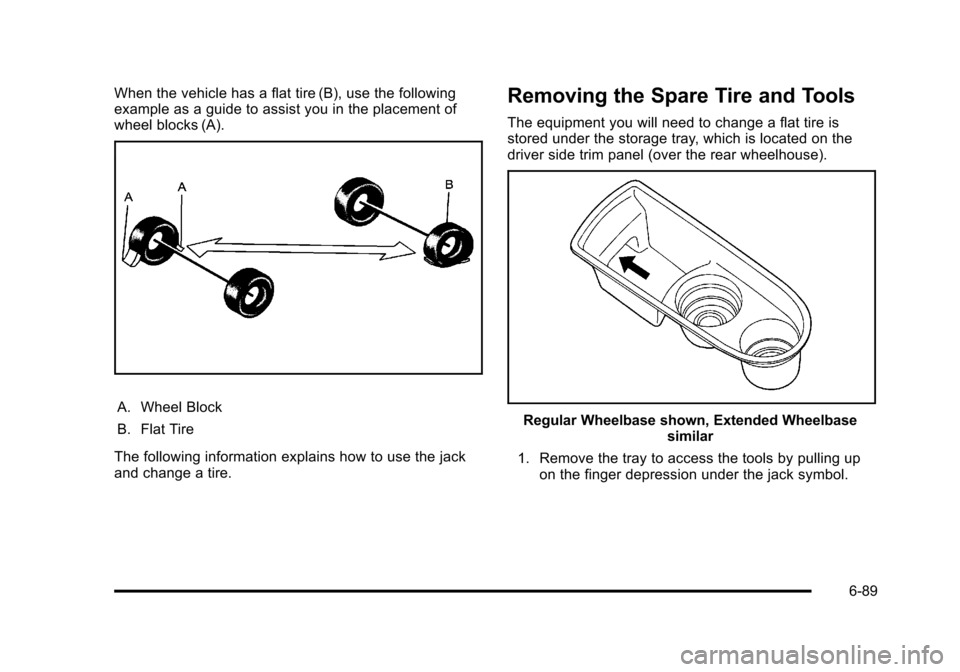
When the vehicle has a flat tire (B), use the following
example as a guide to assist you in the placement of
wheel blocks (A).
A. Wheel Block
B. Flat Tire
The following information explains how to use the jack
and change a tire.
Removing the Spare Tire and Tools
The equipment you will need to change a flat tire is
stored under the storage tray, which is located on the
driver side trim panel (over the rear wheelhouse).
Regular Wheelbase shown, Extended Wheelbase similar
1. Remove the tray to access the tools by pulling up on the finger depression under the jack symbol.
6-89
Page 552 of 608
ApplicationCapacities
English Metric
Fuel Tank
Regular 26.0 gal98.4 L
Extended 1500 Series 31.5 gal119.2 L
Extended 2500 Series 39.0 gal147.6 L
Transmission Fluid (Pan Removal and Filter Replacement) 6L80-E Transmission 6.0 qt5.7 L
6L90-E Transmission 6.3 qt6.0 L
Transfer Case Fluid 1.6 qt1.5 L
Wheel Nut Torque 140 lb ft190Y
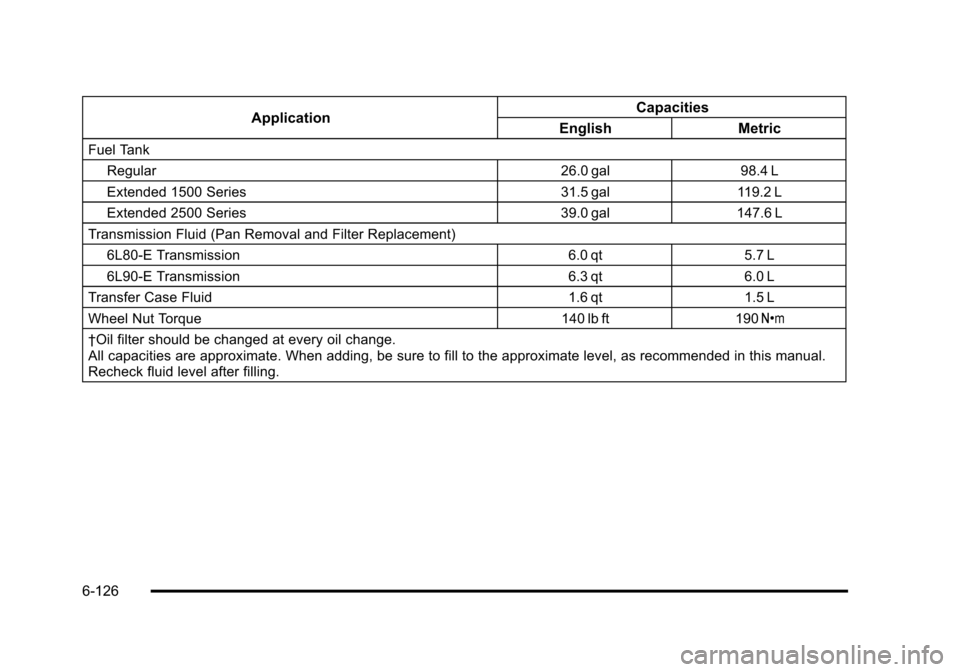
†Oil filter should be changed at every oil change.
All capacities are approximate. When adding, be sure to fill to the approximate level, as recommended in this manual.
Recheck fluid level after filling.
6-126
Page 561 of 608

.Four‐wheel drive only: Transfer case fluid change
(severe service) for vehicles mainly driven when
frequently towing a trailer, or used for taxi, police,
or delivery service. Check vent hose at transfer
case for kinks and proper installation. Check to be
sure vent hose is unobstructed, clear, and free of
debris. During any maintenance, if a power washer
is used to clean mud and dirt from the underbody,
care should be taken to not directly spray the
transfer case output seals. High pressure water
can overcome the seals and contaminate the
transfer case fluid. Contaminated fluid will
decrease the life of the transfer case and should
be replaced..Evaporative control system inspection. Check all
fuel and vapor lines and hoses for proper hook‐up,
routing, and condition. Check that the purge valve,
if the vehicle has one, works properly. Replace as
needed.An Emission Control Service. The U.S.
Environmental Protection Agency or the California
Air Resources Board has determined that the
failure to perform this maintenance item will not
nullify the emission warranty or limit recall liability
prior to the completion of the vehicle's useful life.
We, however, urge that all recommended
maintenance services be performed at the
indicated intervals and the maintenance be
recorded.
7-7
Page 562 of 608
First Engine Oil Change After Every
160 000 km/100,000 Miles
.Automatic transmission fluid change (normal
service). SeeAutomatic Transmission Fluid
(4-Speed Transmission)
on page 6‑23or
Automatic Transmission Fluid (6-Speed
Transmission) on page 6‑26.
.Four‐wheel drive only: Transfer case fluid change
(normal service). Check vent hose at transfer case
for kinks and proper installation. Check to be sure
vent hose is unobstructed, clear, and free of
debris. During any maintenance, if a power washer
is used to clean mud and dirt from the underbody,
care should be taken to not directly spray the
transfer case output seals. High pressure water
can overcome the seals and contaminate the
transfer case fluid. Contaminated fluid will
decrease the life of the transfer case and should
be replaced.
.Spark plug replacement and spark plug wires
inspection. An Emission Control Service.
First Engine Oil Change After Every
240 000 km/150,000 Miles
.Engine cooling system drain, flush, and refill,
cooling system and cap pressure check, and
cleaning of outside of radiator and air conditioning
condenser (or every 5 years, whichever occurs
first). SeeEngine Coolant
on page 6‑31.An
Emission Control Service.
.Engine accessory drive belt inspection for fraying,
excessive cracks, or obvious damage and
replacement, if needed. An Emission Control
Service.
7-8
Page 563 of 608
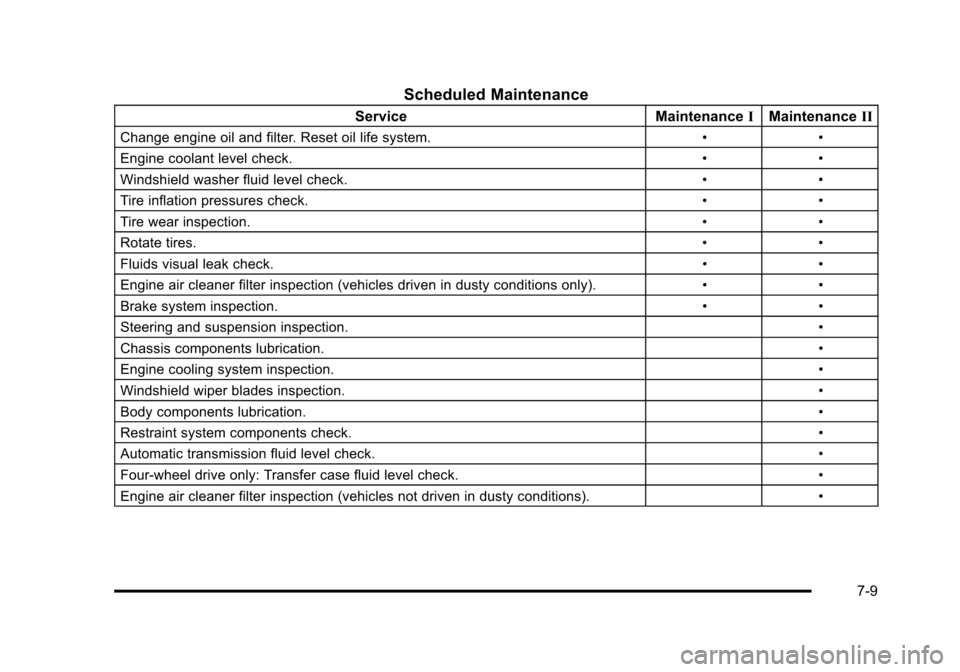
Scheduled Maintenance
ServiceMaintenanceIMaintenance II
Change engine oil and filter. Reset oil life system. ••
Engine coolant level check. ••
Windshield washer fluid level check. ••
Tire inflation pressures check. ••
Tire wear inspection. ••
Rotate tires. ••
Fluids visual leak check. ••
Engine air cleaner filter inspection (vehicles driven in dusty conditions only). ••
Brake system inspection. ••
Steering and suspension inspection. •
Chassis components lubrication. •
Engine cooling system inspection. •
Windshield wiper blades inspection. •
Body components lubrication. •
Restraint system components check. •
Automatic transmission fluid level check. •
Four‐wheel drive only: Transfer case fluid level check. •
Engine air cleaner filter inspection (vehicles not driven in dusty conditions). •
7-9
Page 605 of 608

Seats60/40 Split Bench Seat . . . . . . . . . . . . . . . . . . . . . . . . . . . 2-16
Bucket Seats, Rear . . . . . . . . . . . . . . . . . . . . . . . . . . . . . . . 2-21
Center Seat . . . . . . . . . . . . . . . . . . . . . . . . . . . . . . . . . . . . . . 2-15
Head Restraints . . . . . . . . . . . . . . . . . . . . . . . . . . . . . . . . . . . 2-3
Heated and Cooled Seats . . . . . . . . . . . . . . . . . . . . . . . . . 2-9
Heated Seats . . . . . . . . . . . . . . . . . . . . . . . . . . . . . . . . . . . . . . 2-8
Heated Seats - Rear . . . . . . . . . . . . . . . . . . . . . . . . . . . . . . 2-15
Manual Lumbar . . . . . . . . . . . . . . . . . . . . . . . . . . . . . . . . . . . . 2-6
Memory, Mirrors and Pedals . . . . . . . . . . . . . . . . . . . . . . 2-10
Power Lumbar . . . . . . . . . . . . . . . . . . . . . . . . . . . . . . . . . . . . . 2-7
Power Seats . . . . . . . . . . . . . . . . . . . . . . . . . . . . . . . . . . . . . . . 2-5
Reclining Seatbacks . . . . . . . . . . . . . . . . . . . . . . . . . . . . . . 2-12
Third Row Seat . . . . . . . . . . . . . . . . . . . . . . . . . . . . . . . . . . . 2-27
Secondary Latch System . . . . . . . . . . . . . . . . . . . . . . . . . 6-101
Securing a Child Restraint Center Front Seat Position . . . . . . . . . . . . . . . . . . . . . . . 2-79
Rear Seat Position . . . . . . . . . . . . . . . . . . . . . . . . . . . . . . . 2-75
Right Front Seat Position . . . . . . . . . . . . . . . . . . . . . . . . . 2-80
Security Light . . . . . . . . . . . . . . . . . . . . . . . . . . . . . . . . . . . . . . . . . . . . . . 4-44
Service . . . . . . . . . . . . . . . . . . . . . . . . . . . . . . . . . . . . . . . . . . . . . .6-4 Accessories and Modifications . . . . . . . . . . . . . . . . . . . . . 6-4
Adding Equipment to the Outside of the Vehicle . . . 6-6
Doing Your Own Work . . . . . . . . . . . . . . . . . . . . . . . . . . . . . 6-5
Engine Soon Light . . . . . . . . . . . . . . . . . . . . . . . . . . . . . . . . 4-39 Service (cont.)
Parts Identification Label . . . . . . . . . . . . . . . . . . . . . . . . 6-116
Publications Ordering Information . . . . . . . . . . . . . . . . . 8-16
Scheduling Appointments . . . . . . . . . . . . . . . . . . . . . . . . . 8-10
Servicing Your Airbag-Equipped Vehicle . . . . . . . . . . . 2-99
Setting the Clock . . . . . . . . . . . . . . . . . . . . . . . . . . . . . . . . . . 4-81
Sheet Metal Damage . . . . . . . . . . . . . . . . . . . . . . . . . . . . . 6-115
Shifting Out of Park . . . . . . . . . . . . . . . . . . . . . . . . . . . . . . . . . . . . . . . 3-49
Shifting Into Park . . . . . . . . . . . . . . . . . . . . . . . . . . . . . . . . . . 3-47
Side Blind Zone Alert . . . . . . . . . . . . . . . . . . . . . . . . . . . . . . 3-58
Signals, Turn and Lane-Change . . . . . . . . . . . . . . . . . . . . .4-4
Snow Plow . . . . . . . . . . . . . . . . . . . . . . . . . . . . . . . . . . . . . . . . 5-36
Spare Tire . . . . . . . . . . . . . . . . . . . . . . . . . . . . . . . . . . . . . . . . 6-107 Installing . . . . . . . . . . . . . . . . . . . . . . . . . . . . . . . . . . . . . . . . . . 6-94
Removing . . . . . . . . . . . . . . . . . . . . . . . . . . . . . . . . . . . . . . . . 6-89
Storing . . . . . . . . . . . . . . . . . . . . . . . . . . . . . . . . . . . . . . . . . .6-104
Specifications and Capacities . . . . . . . . . . . . . . . . . . . . . 6-125
Speedometer . . . . . . . . . . . . . . . . . . . . . . . . . . . . . . . . . . . . . . 4-31
Split Bench Seat (60/40) . . . . . . . . . . . . . . . . . . . . . . . . . . . 2-16
StabiliTrak
®Indicator Light . . . . . . . . . . . . . . . . . . . . . . . . 4-37
StabiliTrak®System . . . . . . . . . . . . . . . . . . . . . . . . . . . . . . . . .5-6
Start Vehicle, Remote . . . . . . . . . . . . . . . . . . . . . . . . . . . . . . .3-7
Starting the Engine . . . . . . . . . . . . . . . . . . . . . . . . . . . . . . . . 3-28
Steering . . . . . . . . . . . . . . . . . . . . . . . . . . . . . . . . . . . . . . . . . . . . .5-8
Steering Wheel Controls, Audio . . . . . . . . . . . . . . . . . . 4-136
Steering Wheel, Tilt Wheel . . . . . . . . . . . . . . . . . . . . . . . . . .4-3
i - 13