2010 CHEVROLET SUBURBAN ECO mode
[x] Cancel search: ECO modePage 88 of 608
Safety Belt Pretensioners
This vehicle has safety belt pretensioners for front
outboard occupants. Although the safety belt
pretensioners cannot be seen, they are part of the
safety belt assembly. They can help tighten the safety
belts during the early stages of a moderate to severe
frontal, near frontal, or rear crash if the threshold
conditions for pretensioner activation are met. And,
if the vehicle has side impact airbags, safety belt
pretensioners can help tighten the safety belts in a
side crash or a rollover event.
Pretensioners work only once. If the pretensioners
activate in a crash, they will need to be replaced, and
probably other new parts for the vehicle's safety belt
system. SeeReplacing Restraint System Parts After a
Crash on page 2‑102.
Rear Safety Belt Comfort Guides
This vehicle may have rear shoulder belt comfort
guides. If not, they are available through your dealer.
The guides may provide added safety belt comfort for
older children who have outgrown booster seats and for
some adults. When installed and properly adjusted, the
comfort guide positions the belt away from the neck
and head. There is one guide, if equipped, for each outside
passenger position in the second row seat and the
third row, if the vehicle has one. Here is how to install
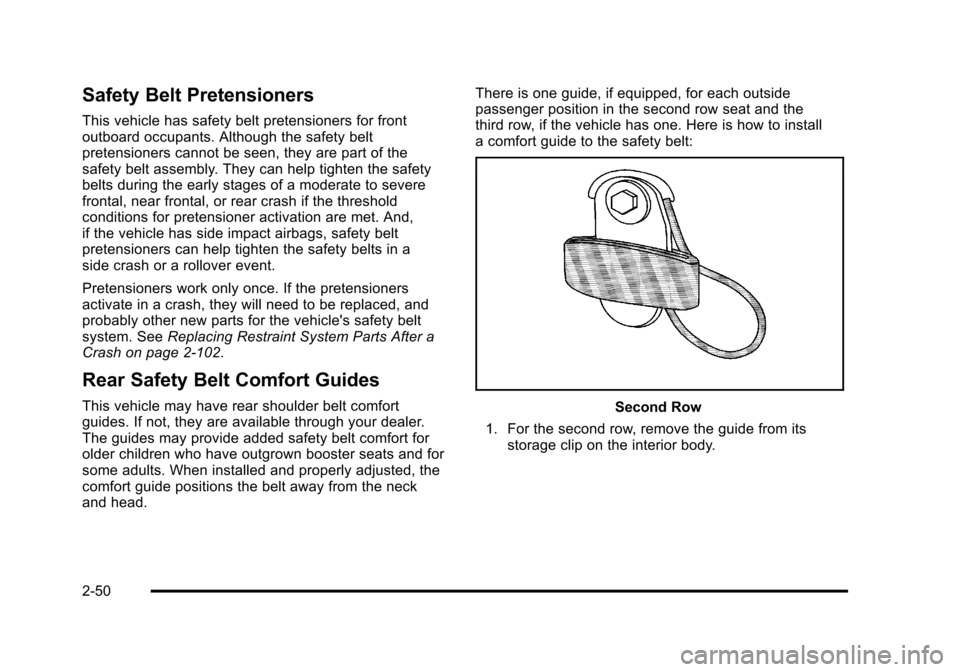
a comfort guide to the safety belt:Second Row
1. For the second row, remove the guide from its storage clip on the interior body.
2-50
Page 108 of 608
For models with a three passenger third row seat, see
the information following for installing a child restraint
with a top tether in the third row, if your vehicle has one.
Never install two top tethers using the same top tether
anchor.
For models with 60/40 second row seating, the rear
right side passenger and center seating positions have
exposed metal anchors located in the crease between
the seatback and the seat cushion.
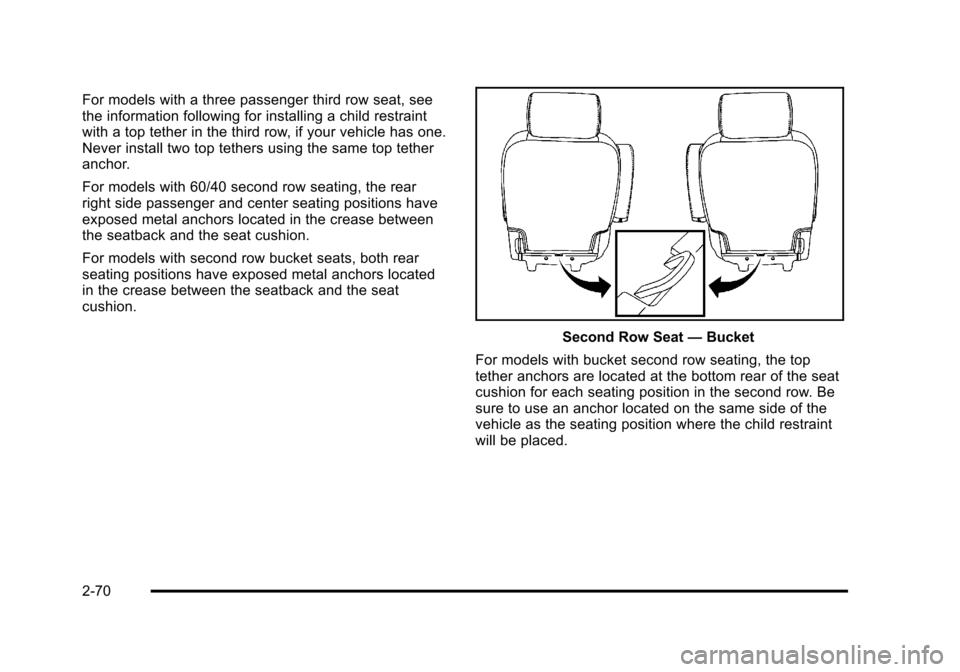
For models with second row bucket seats, both rear
seating positions have exposed metal anchors located
in the crease between the seatback and the seat
cushion.
Second Row Seat—Bucket
For models with bucket second row seating, the top
tether anchors are located at the bottom rear of the seat
cushion for each seating position in the second row. Be
sure to use an anchor located on the same side of the
vehicle as the seating position where the child restraint
will be placed.
2-70
Page 109 of 608
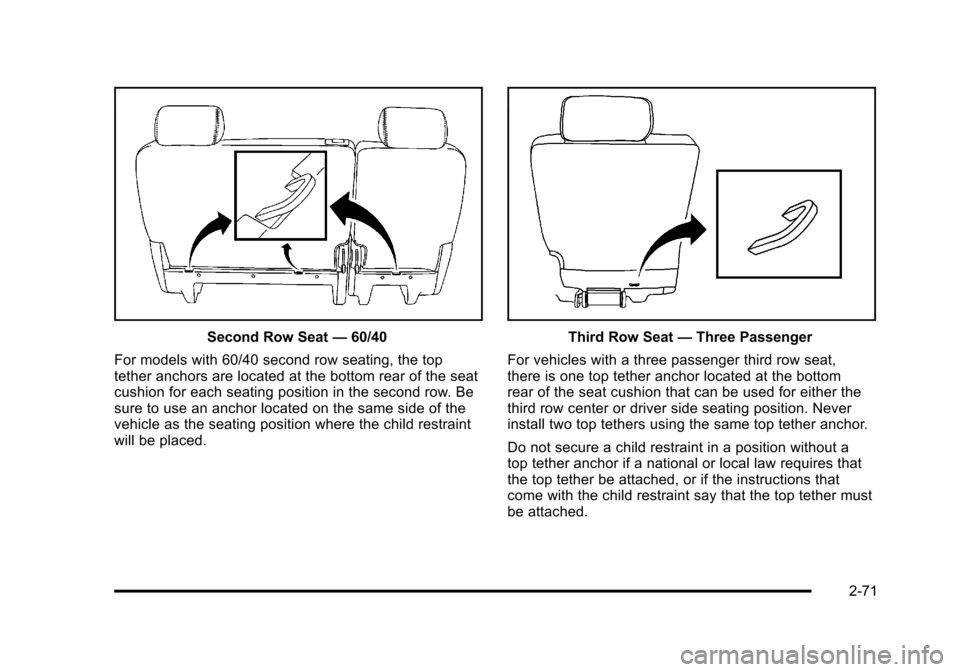
Second Row Seat—60/40
For models with 60/40 second row seating, the top
tether anchors are located at the bottom rear of the seat
cushion for each seating position in the second row. Be
sure to use an anchor located on the same side of the
vehicle as the seating position where the child restraint
will be placed.Third Row Seat —Three Passenger
For vehicles with a three passenger third row seat,
there is one top tether anchor located at the bottom
rear of the seat cushion that can be used for either the
third row center or driver side seating position. Never
install two top tethers using the same top tether anchor.
Do not secure a child restraint in a position without a
top tether anchor if a national or local law requires that
the top tether be attached, or if the instructions that
come with the child restraint say that the top tether must
be attached.
2-71
Page 129 of 608
How Does an Airbag Restrain?
In moderate to severe frontal or near frontal collisions,
even belted occupants can contact the steering wheel
or the instrument panel. In moderate to severe side
collisions, even belted occupants can contact the inside
of the vehicle.
Airbags supplement the protection provided by safety
belts. Frontal airbags distribute the force of the impact
more evenly over the occupant's upper body, stopping
the occupant more gradually. Seat‐mounted side impact
and roof-rail airbags distribute the force of the impact
more evenly over the occupant's upper body.
Rollover capable roof-rail airbags are designed to
help contain the head and chest of occupants in the
outboard seating positions in the first, second, and
third rows, if equipped with a third row seat. The rollover
capable roof-rail airbags are designed to help reduce
the risk of full or partial ejection in rollover events,
although no system can prevent all such ejections.But airbags would not help in many types of collisions,
primarily because the occupant's motion is not toward
those airbags. See
When Should an Airbag Inflate?on
page 2‑89for more information.
Airbags should never be regarded as anything more
than a supplement to safety belts.
What Will You See After an Airbag
Inflates?
After the frontal airbags and seat-mounted side impact
airbags inflate, they quickly deflate, so quickly that
some people may not even realize an airbag inflated.
Roof-rail airbags may still be at least partially inflated for
some time after they deploy. Some components of the
airbag module may be hot for several minutes. For
location of the airbag modules, see What Makes an
Airbag Inflate? on page 2‑90.
2-91
Page 160 of 608
Express-Down/Up Windows
Windows with the express feature allow the windows to
be raised and lowered all the way without holding the
switch.
Press or pull the switch fully and release it to activate
the express feature.
The express mode can be canceled at any time by
briefly pressing or pulling the switch.
Express Window Anti-Pinch Feature
If any object is in the path of the window when the
express‐up is active, the window will stop at the
obstruction and auto‐reverse to a preset factory
position. Weather conditions such as severe icing
may also cause the window to auto‐reverse. The
window will return to normal operation once the
obstruction or condition is removed.
Express Window Anti‐Pinch Override
{WARNING:
If express override is activated, the window will
not reverse automatically. You or others could
be injured and the window could be damaged.
Before you use express override, make sure
that all people and obstructions are clear of the
window path.
In an emergency, the anti‐pinch feature can be
overridden in a supervised mode. Hold the window
switch all the way up to the second position. The
window will rise for as long as the switch is held.
Once the switch is released, the express mode is
re‐activated.
In this mode, the window can still close on an object in
its path. Use care when using the override mode.
3-20
Page 171 of 608
{WARNING:
Plugging the cord into an ungrounded outlet could
cause an electrical shock. Also, the wrong kind of
extension cord could overheat and cause a fire.
You could be seriously injured. Plug the cord into
a properly grounded three-prong 110-volt AC
outlet. If the cord will not reach, use a heavy-duty
three-prong extension cord rated for at least
15 amps.
4. Before starting the engine, be sure to unplug and store the cord as it was before to keep it away from
moving engine parts. If you do not, it could be
damaged.
The length of time the heater should remain plugged in
depends on several factors. Ask a dealer in the area
where you will be parking the vehicle for the best advice
on this.
Active Fuel Management™
Vehicles with V8 engines may have Active Fuel
Management™. This system allows the engine to
operate on either all or half of its cylinders, depending
on the driving conditions.
When less power is required, such as cruising at a
constant vehicle speed, the system will operate in the
half cylinder mode, allowing the vehicle to achieve
better fuel economy. When greater power demands are
required, such as accelerating from a stop, passing,
or merging onto a freeway, the system will maintain
full-cylinder operation.
If the vehicle has an Active Fuel Management™
indicator, see DIC Operation and Displays (With DIC
Buttons)
on page 4‑47or DIC Operation and Displays
(Without DIC Buttons)on page 4‑55for more
information on using this display .
3-31
Page 175 of 608
The vehicle has a shift stabilization feature that
adjusts the transmission shifting to the current driving
conditions in order to reduce rapid upshifts and
downshifts. This shift stabilization feature is designed to
determine, before making an upshift, if the engine is
able to maintain vehicle speed by analyzing things such
as vehicle speed, throttle position, and vehicle load.
If the shift stabilization feature determines that a current
vehicle speed cannot be maintained, the transmission
does not upshift and instead holds the current gear. In
some cases, this could appear to be a delayed shift,
however the transmission is operating normally.
The vehicle's transmission uses adaptive shift controls.
Adaptive shift controls continually compares key shift
parameters to pre-programmed ideal shifts stored in the
transmissions computer. The transmission constantly
makes adjustments to improve vehicle performance
according to how the vehicle is being used, such as
with a heavy load or when the temperature changes.
During this adaptive shift control process, shifting might
feel different as the transmission determines the best
settings.
When temperatures are very cold, the Hydra-Matic
®
6-Speed transmission's gear shifting could be delayed
providing more stable shifts until the engine warms
up. Shifts could be more noticeable with a cold
transmission. This difference in shifting is normal.M (Manual Mode):
This position is available on vehicles
with the Hydra-Matic
®6-Speed transmission. It lets
drivers select the range of gears appropriate for current
driving conditions. If the vehicle has this feature,
see Range Select Mode (Hydra-Matic
®6-Speed
transmission) later in this section.
3 (Third): This position is also used for normal driving.
It reduces vehicle speed more than D (Drive) without
using the brakes. You might choose 3 (Third) instead of
D (Drive) when driving on hilly, winding roads, when
towing a trailer, so there is less shifting between gears
and when going down a steep hill.
2 (Second): This position reduces vehicle speed even
more than 3 (Third) without using the brakes. You can
use 2 (Second) on hills. It can help control vehicle
speed as you go down steep mountain roads, but then
you would also want to use the brakes off and on.
If you manually select 2 (Second) in an automatic
transmission, the transmission will start in second gear.
You can use this feature for reducing the speed of the
rear wheels when you are trying to start the vehicle
from a stop on slippery road surfaces.
3-35
Page 176 of 608
1 (First):For the Hydra-Matic®4-Speed transmission
this position reduces vehicle speed even more than
2 (Second) without using the brakes. You can use it on
very steep hills, or in deep snow or mud. If the shift
lever is put in 1 (First) while the vehicle is moving
forward, the transmission does not shift into first gear
until the vehicle is going slowly enough.
For a Hydra-Matic
®6-Speed transmission, this position
reduces vehicle speed without using the brakes. You
can use it for major/severe downgrades and off-road
driving where the vehicle would otherwise accelerate
due to steepness of grade. When you shift to 1 (First) it
provides the lowest gear appropriate to the vehicle's
current road speed and continues to downshift as the
vehicle slows, eventually downshifting to 1 (First) gear.
Notice: Spinning the tires or holding the vehicle in
one place on a hill using only the accelerator pedal
may damage the transmission. The repair will not be
covered by the vehicle warranty. If you are stuck, do
not spin the tires. When stopping on a hill, use the
brakes to hold the vehicle in place.
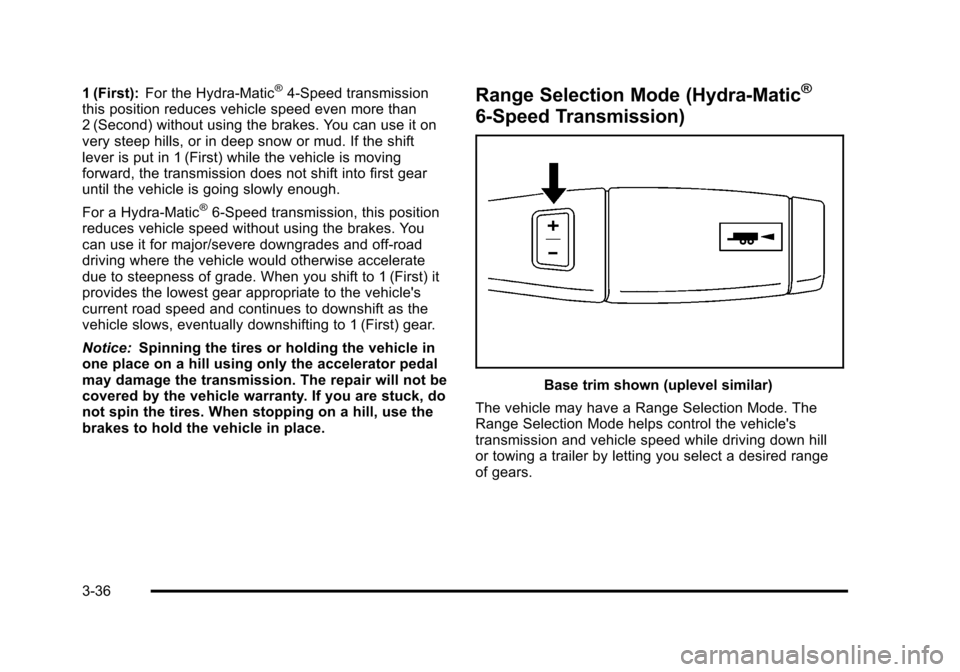
Range Selection Mode (Hydra-Matic®
6-Speed Transmission)
Base trim shown (uplevel similar)
The vehicle may have a Range Selection Mode. The
Range Selection Mode helps control the vehicle's
transmission and vehicle speed while driving down hill
or towing a trailer by letting you select a desired range
of gears.
3-36