2010 CHEVROLET SUBURBAN flat tire
[x] Cancel search: flat tirePage 529 of 608
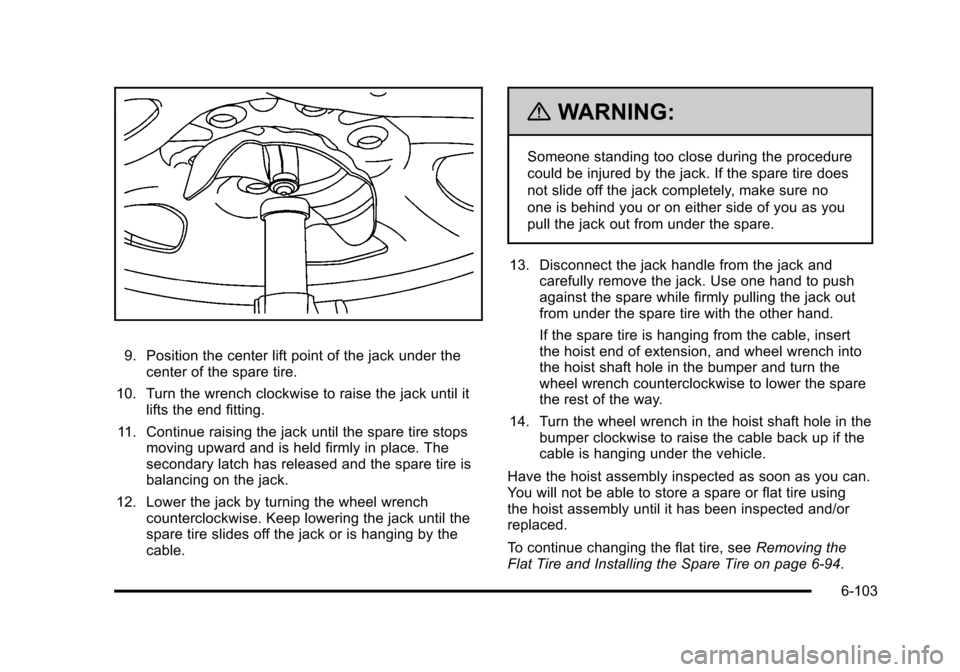
9. Position the center lift point of the jack under thecenter of the spare tire.
10. Turn the wrench clockwise to raise the jack until it lifts the end fitting.
11. Continue raising the jack until the spare tire stops moving upward and is held firmly in place. The
secondary latch has released and the spare tire is
balancing on the jack.
12. Lower the jack by turning the wheel wrench counterclockwise. Keep lowering the jack until the
spare tire slides off the jack or is hanging by the
cable.
{WARNING:
Someone standing too close during the procedure
could be injured by the jack. If the spare tire does
not slide off the jack completely, make sure no
one is behind you or on either side of you as you
pull the jack out from under the spare.
13. Disconnect the jack handle from the jack and carefully remove the jack. Use one hand to push
against the spare while firmly pulling the jack out
from under the spare tire with the other hand.
If the spare tire is hanging from the cable, insert
the hoist end of extension, and wheel wrench into
the hoist shaft hole in the bumper and turn the
wheel wrench counterclockwise to lower the spare
the rest of the way.
14. Turn the wheel wrench in the hoist shaft hole in the bumper clockwise to raise the cable back up if the
cable is hanging under the vehicle.
Have the hoist assembly inspected as soon as you can.
You will not be able to store a spare or flat tire using
the hoist assembly until it has been inspected and/or
replaced.
To continue changing the flat tire, see Removing the
Flat Tire and Installing the Spare Tire on page 6‑94.
6-103
Page 530 of 608
Storing a Flat or Spare Tire and
Tools
{WARNING:
Storing a jack, a tire, or other equipment in the
passenger compartment of the vehicle could
cause injury. In a sudden stop or collision, loose
equipment could strike someone. Store all these
in the proper place.
Notice: Storing an aluminum wheel with a flat tire
under your vehicle for an extended period of time or
with the valve stem pointing up can damage the
wheel. Always stow the wheel with the valve stem
pointing down and have the wheel/tire repaired as
soon as possible. Store the tire under the rear of the vehicle in the spare
tire carrier. Refer to the following graphics and
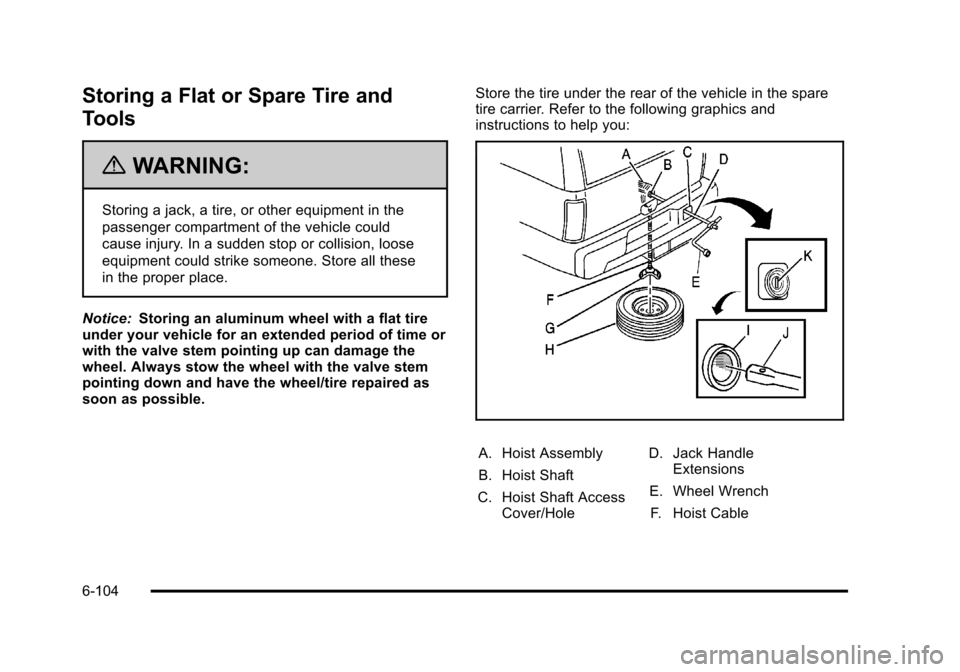
instructions to help you:
A. Hoist Assembly
B. Hoist Shaft
C. Hoist Shaft Access Cover/Hole D. Jack Handle
Extensions
E. Wheel Wrench F. Hoist Cable
6-104
Page 531 of 608
G. Tire/WheelRetainer
H. Spare Tire/Flat Tire (Valve Stem
Pointed Down) I. Hoist Shaft
Access Hole
J. Hoist End of Extension Tool
K. Spare Tire Lock
1. Put the tire (H) on the ground at the rear of the vehicle with the valve stem pointed down, and to
the rear.
2. Tilt the tire toward the vehicle. Separate thetire/wheel retainer (G) from the guide pin. Pull the
pin through the center of the wheel. Tilt the retainer
down through the center wheel opening.
Make sure the retainer is fully seated across the
underside of the wheel.
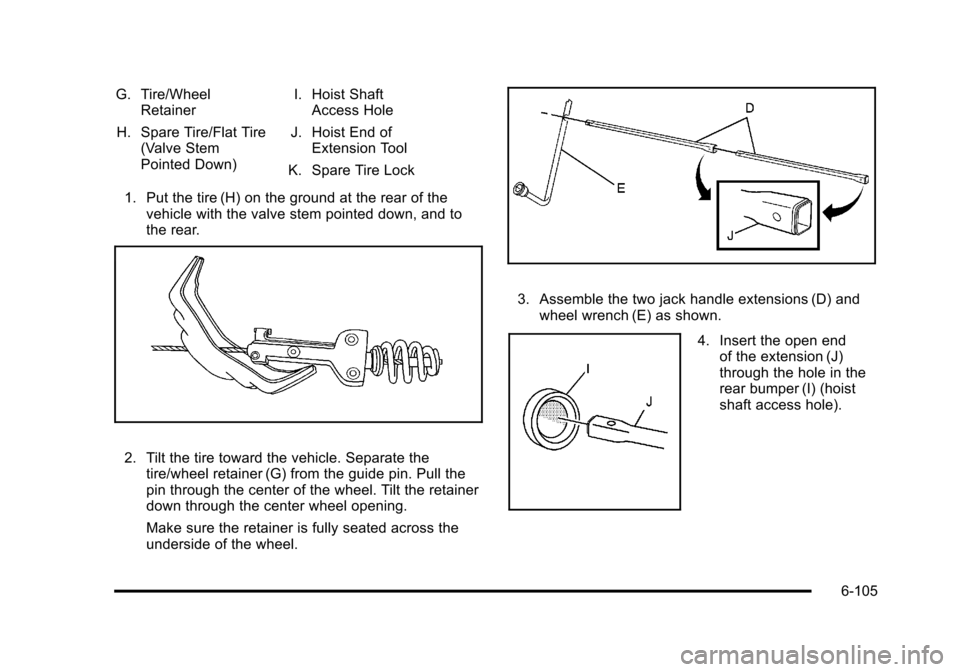
3. Assemble the two jack handle extensions (D) andwheel wrench (E) as shown.
4. Insert the open endof the extension (J)
through the hole in the
rear bumper (I) (hoist
shaft access hole).
6-105
Page 533 of 608
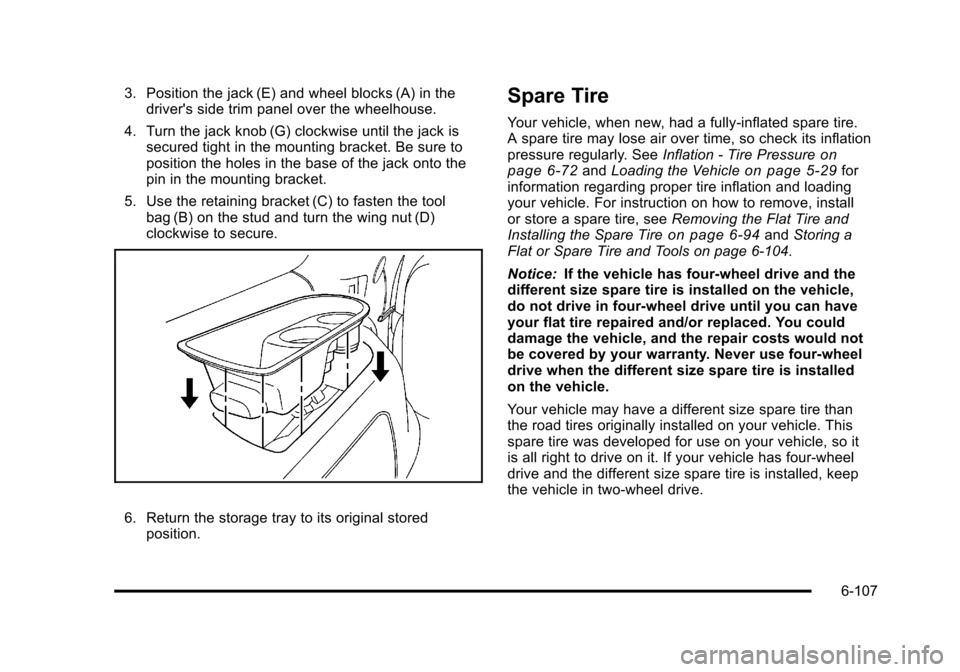
3. Position the jack (E) and wheel blocks (A) in thedriver's side trim panel over the wheelhouse.
4. Turn the jack knob (G) clockwise until the jack is secured tight in the mounting bracket. Be sure to
position the holes in the base of the jack onto the
pin in the mounting bracket.
5. Use the retaining bracket (C) to fasten the tool bag (B) on the stud and turn the wing nut (D)
clockwise to secure.
6. Return the storage tray to its original storedposition.
Spare Tire
Your vehicle, when new, had a fully-inflated spare tire.
A spare tire may lose air over time, so check its inflation
pressure regularly. See Inflation - Tire Pressure
on
page 6‑72and Loading the Vehicleon page 5‑29for
information regarding proper tire inflation and loading
your vehicle. For instruction on how to remove, install
or store a spare tire, see Removing the Flat Tire and
Installing the Spare Tire
on page 6‑94and Storing a
Flat or Spare Tire and Tools on page 6‑104.
Notice: If the vehicle has four-wheel drive and the
different size spare tire is installed on the vehicle,
do not drive in four-wheel drive until you can have
your flat tire repaired and/or replaced. You could
damage the vehicle, and the repair costs would not
be covered by your warranty. Never use four-wheel
drive when the different size spare tire is installed
on the vehicle.
Your vehicle may have a different size spare tire than
the road tires originally installed on your vehicle. This
spare tire was developed for use on your vehicle, so it
is all right to drive on it. If your vehicle has four-wheel
drive and the different size spare tire is installed, keep
the vehicle in two-wheel drive.
6-107
Page 534 of 608
After installing the spare tire on your vehicle, you should
stop as soon as possible and make sure the spare tire
is correctly inflated. Have the damaged or flat road tire
repaired or replaced as soon as you can and installed
back onto your vehicle. This way, the spare tire will be
available in case you need it again.
Do not mix tires and wheels of different sizes, because
they will not fit. Keep your spare tire and its wheel
together. If your vehicle has a spare tire that does not
match your vehicle's original road tires and wheels in
size and type, do not include the spare in the tire
rotation.
Appearance Care
Interior Cleaning
The vehicle's interior will continue to look its best if it is
cleaned often. Although not always visible, dust and dirt
can accumulate on the upholstery. Dirt can damage
carpet, fabric, leather, and plastic surfaces. Regular
vacuuming is recommended to remove particles from
the upholstery. It is important to keep the upholstery
from becoming and remaining heavily soiled. Soils
should be removed as quickly as possible. The
vehicle's interior may experience extremes of heat that
could cause stains to set rapidly.Lighter colored interiors may require more frequent
cleaning. Use care because newspapers and garments
that transfer color to home furnishings may also transfer
color to the vehicle's interior.
When cleaning the vehicle's interior, only use cleaners
specifically designed for the surfaces being cleaned.
Permanent damage may result from using cleaners
on surfaces for which they were not intended. Use
glass cleaner only on glass. Remove any accidental
over-spray from other surfaces immediately. To prevent
over-spray, apply cleaner directly to the cleaning cloth.
Notice:
Using abrasive cleaners when cleaning
glass surfaces on the vehicle, could scratch the
glass and/or cause damage to the rear window
defogger. When cleaning the glass on the vehicle,
use only a soft cloth and glass cleaner.
Many cleaners contain solvents that may become
concentrated in the vehicle's breathing space.
Before using cleaners, read and adhere to all safety
instructions on the label. While cleaning the vehicle's
interior, maintain adequate ventilation by opening the
vehicle's doors and windows.
Dust may be removed from small buttons and knobs
using a small brush with soft bristles.
Products that remove odors from the vehicle's
upholstery and clean the vehicle's glass can be
obtained from your dealer.
6-108
Page 558 of 608
When the Change Engine Oil Soon message displays,
certain services, checks, and inspections are required.
The services described for MaintenanceIshould be
performed at every engine oil change. The services
described for Maintenance IIshould be
performed when:
.Maintenance Iwas performed the last time the
engine oil was changed.
.It has been 10 months or more since the Change
Engine Oil Soon message has displayed or since
the last service.
Maintenance I
.Change engine oil and filter. See Engine Oilon
page 6‑17. An Emission Control Service.
.Engine coolant level check. See Engine Coolanton page 6‑31.
.Windshield washer fluid level check. See
Windshield Washer Fluid on page 6‑41.
.Tire inflation check. SeeInflation - Tire Pressureon page 6‑72.
.Tire wear inspection. See Tire Inspection and
Rotation on page 6‑78.
.Rotate tires. See Tire Inspection and Rotationon
page 6‑78.
.Fluids visual leak check (or every 12 months,
whichever occurs first). A leak in any system must
be repaired and the fluid level checked.
.Engine air cleaner filter inspection (vehicles driven
in dusty conditions only). See Engine Air Cleaner/
Filter on page 6‑21.
.Brake system inspection (or every 12 months,
whichever occurs first).
Maintenance II
.Perform all services described in Maintenance I.
.Steering and suspension inspection. Visual
inspection for damaged, loose, or missing parts or
signs of wear.
.Lubricate the front suspension, steering linkage,
and parking brake cable guides. Control arm ball
joints on 2500 series vehicles require lubrication
but should not be lubricated unless their
temperature is−12°C (10°F) or higher, or they
could be damaged. Control arm ball joints on
1500 series vehicles are maintenance‐free.
.Engine cooling system inspection. Visual
inspection of hoses, pipes, fittings, and clamps
and replacement, if needed.
7-4
Page 559 of 608
.Windshield wiper blade inspection for wear,
cracking, or contamination and windshield and
wiper blade cleaning, if contaminated. See
Windshield, Backglass, and Wiper Blades
on
page 6‑113. Worn or damaged wiper blade
replacement. See Windshield Wiper Blade
Replacement on page 6‑61.
.Body hinges and latches, key lock cylinders,
folding seat hardware, and liftgate hinges,
linkage, and handle pivot points lubrication.
See Recommended Fluids and Lubricants
on
page 7‑12. More frequent lubrication may be
required when vehicle is exposed to a corrosive
environment. Applying silicone grease on
weatherstrips with a clean cloth makes them last
longer, seal better, and not stick or squeak.
.Restraint system component check. See Checking
the Restraint Systems on page 2‑101.
.Automatic transmission fluid level check
and adding fluid, if needed. See Automatic
Transmission Fluid (4-Speed Transmission)
on
page 6‑23or Automatic Transmission Fluid
(6-Speed Transmission) on page 6‑26.
.Four‐wheel drive vehicles: Transfer case fluid level
check and adding fluid, if needed.
.Engine air cleaner filter inspection. See Engine Air
Cleaner/Filter on page 6‑21.
Additional Required Services
At Each Fuel Stop
.Engine oil level check. See Engine Oilon
page 6‑17.
.Engine coolant level check. See Engine Coolanton page 6‑31.
.Windshield washer fluid level check. See
Windshield Washer Fluid on page 6‑41.
Once a Month
.Tire inflation check. SeeInflation - Tire Pressureon page 6‑72.
.Tire wear inspection. See Tire Inspection and
Rotation on page 6‑78.
7-5
Page 563 of 608
Scheduled Maintenance
ServiceMaintenanceIMaintenance II
Change engine oil and filter. Reset oil life system. ••
Engine coolant level check. ••
Windshield washer fluid level check. ••
Tire inflation pressures check. ••
Tire wear inspection. ••
Rotate tires. ••
Fluids visual leak check. ••
Engine air cleaner filter inspection (vehicles driven in dusty conditions only). ••
Brake system inspection. ••
Steering and suspension inspection. •
Chassis components lubrication. •
Engine cooling system inspection. •
Windshield wiper blades inspection. •
Body components lubrication. •
Restraint system components check. •
Automatic transmission fluid level check. •
Four‐wheel drive only: Transfer case fluid level check. •
Engine air cleaner filter inspection (vehicles not driven in dusty conditions). •
7-9