2010 CHEVROLET SUBURBAN wheel
[x] Cancel search: wheelPage 185 of 608
Automatic Transfer Case
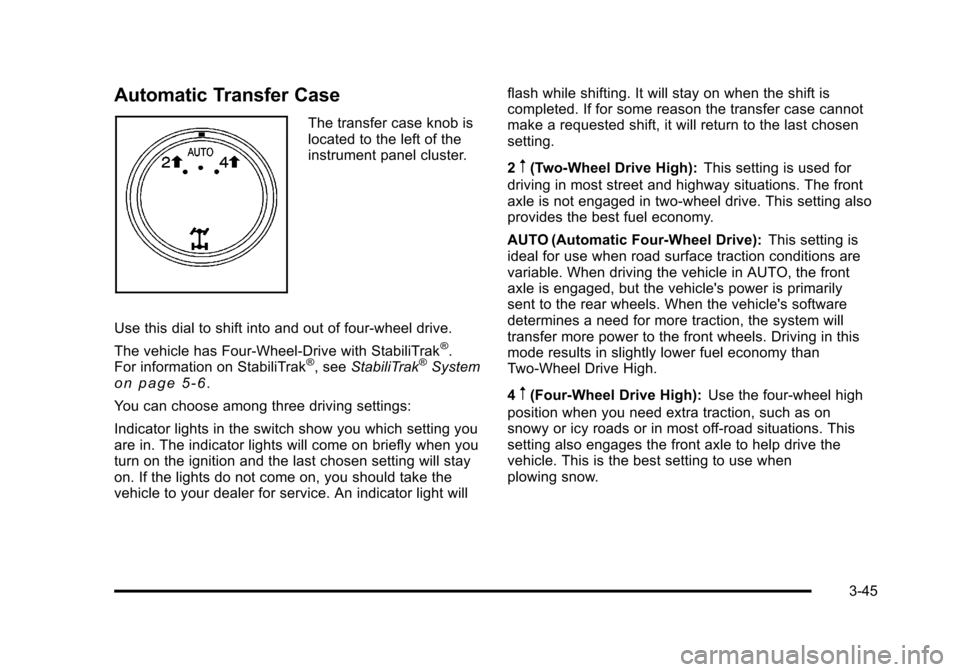
The transfer case knob is
located to the left of the
instrument panel cluster.
Use this dial to shift into and out of four-wheel drive.
The vehicle has Four-Wheel-Drive with StabiliTrak
®.
For information on StabiliTrak®, see StabiliTrak®Systemon page 5‑6.
You can choose among three driving settings:
Indicator lights in the switch show you which setting you
are in. The indicator lights will come on briefly when you
turn on the ignition and the last chosen setting will stay
on. If the lights do not come on, you should take the
vehicle to your dealer for service. An indicator light will flash while shifting. It will stay on when the shift is
completed. If for some reason the transfer case cannot
make a requested shift, it will return to the last chosen
setting.
2
m(Two-Wheel Drive High):
This setting is used for
driving in most street and highway situations. The front
axle is not engaged in two-wheel drive. This setting also
provides the best fuel economy.
AUTO (Automatic Four-Wheel Drive): This setting is
ideal for use when road surface traction conditions are
variable. When driving the vehicle in AUTO, the front
axle is engaged, but the vehicle's power is primarily
sent to the rear wheels. When the vehicle's software
determines a need for more traction, the system will
transfer more power to the front wheels. Driving in this
mode results in slightly lower fuel economy than
Two-Wheel Drive High.
4
m(Four-Wheel Drive High): Use the four-wheel high
position when you need extra traction, such as on
snowy or icy roads or in most off-road situations. This
setting also engages the front axle to help drive the
vehicle. This is the best setting to use when
plowing snow.
3-45
Page 186 of 608
Service Four Wheel Drive
If the SERVICE 4 WHEEL DRIVE message stays on,
you should take the vehicle to your dealer for service.
See“SERVICE 4 WHEEL DRIVE message” underDIC
Warnings and Messages on page 4‑61.
Shifting Into Four-Wheel Drive High or
AUTO (Automatic Four-Wheel Drive)
Turn the knob to the Four-Wheel High or AUTO
position. This can be done at any speed. The indicator
light will flash while shifting. It will remain on when the
shift is completed.
Shifting Into Two-Wheel Drive High
Turn the knob to the Two-Wheel High position. This can
be done at any speed. The indicator light will flash while
shifting. It will remain on when the shift is completed.
Excessively shifting the transfer case into or out of the
different modes may cause the transfer case to enter
the shift protection mode. This will protect the transfer
case from possible damage and will only allow the
transfer case to respond to one shift per 10 seconds.
The transfer case may stay in this mode for up to
three minutes.
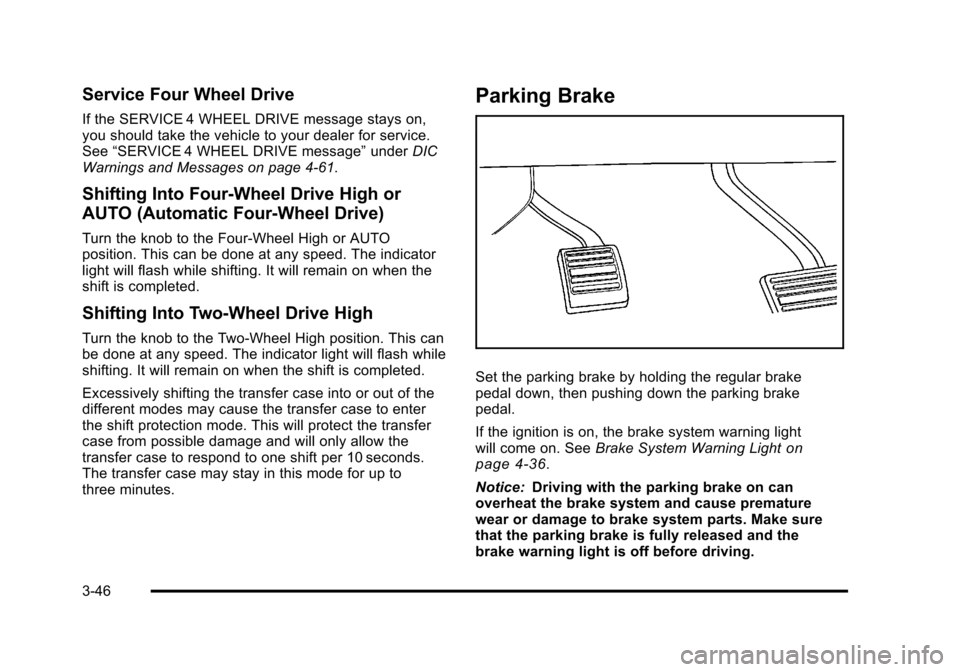
Parking Brake
Set the parking brake by holding the regular brake
pedal down, then pushing down the parking brake
pedal.
If the ignition is on, the brake system warning light
will come on. See Brake System Warning Light
on
page 4‑36.
Notice: Driving with the parking brake on can
overheat the brake system and cause premature
wear or damage to brake system parts. Make sure
that the parking brake is fully released and the
brake warning light is off before driving.
3-46
Page 187 of 608
To release the parking brake, hold the regular brake
pedal down, then push down momentarily on the
parking brake pedal until you feel the pedal release.
Slowly pull your foot up off the park brake pedal. If the
parking brake is not released when you begin to drive,
the brake system warning light will flash and a chime
will sound warning you that the parking brake is still on.
If you are towing a trailer and are parking on a hill, see
Towing a Trailer on page 5‑47.
Shifting Into Park
{WARNING:
It can be dangerous to get out of the vehicle if the
shift lever is not fully in P (Park) with the parking
brake firmly set. The vehicle can roll. If you have
left the engine running, the vehicle can move
suddenly. You or others could be injured. To be
sure the vehicle will not move, even when you are
on fairly level ground, use the steps that follow.
If you have a four-wheel drive transfer case with a
N (Neutral) position, and the transfer case is in
N (Neutral), the vehicle will be free to roll, even if(Continued)
WARNING: (Continued)
the shift lever is in P (Park). So, be sure the
transfer case is in a drive gear—not in
N (Neutral). If you are pulling a trailer, see Towing
a Trailer
on page 5‑47. Always set the parking
brake.
1. Hold the brake pedal down, then set the parking brake.
See Parking Brake
on page 3‑46for more
information.
2. Move the shift lever into the P (Park) position by pulling the shift lever toward you and moving it up
as far as it will go.
3. Be sure the transfer case is in a drive gear —not
in N (Neutral).
4. Turn the ignition key to LOCK/OFF.
5. Remove the key and take it with you. If you can leave the vehicle with the ignition key in your hand,
the vehicle is in P (Park).
3-47
Page 188 of 608
Leaving the Vehicle With the Engine
Running
{WARNING:
It can be dangerous to leave the vehicle with the
engine running. The vehicle could move suddenly
if the shift lever is not fully in P (Park) with the
parking brake firmly set.
If you have four-wheel drive and the transfer case
is in N (Neutral), the vehicle will be free to roll,
even if the shift lever is in P (Park). So be sure
the transfer case is in a drive gear—not in
N (Neutral).
And, if you leave the vehicle with the engine
running, it could overheat and even catch fire.
You or others could be injured. Do not leave the
vehicle with the engine running unless you
have to. If you have to leave the vehicle with the engine running,
be sure your vehicle is in P (Park) and the parking
brake is firmly set before you leave it. After you move
the shift lever into P (Park), hold the regular brake pedal
down. Then, see if you can move the shift lever away
from P (Park) without first pulling it toward you. If you
can, it means that the shift lever was not fully locked
into P (Park).
Torque Lock
If you are parking on a hill and you do not shift your
transmission into P (Park) properly, the weight of the
vehicle may put too much force on the parking pawl
in the transmission. You may find it difficult to pull the
shift lever out of P (Park). This is called torque lock. To
prevent torque lock, set the parking brake and then shift
into P (Park) properly before you leave the driver seat.
To find out how, see
Shifting Into Park on page 3‑47.
When you are ready to drive, move the shift lever out of
P (Park) before you release the parking brake.
If torque lock does occur, you may need to have
another vehicle push yours a little uphill to take some of
the pressure from the parking pawl in the transmission,
then you will be able to pull the shift lever out of
P (Park).
3-48
Page 191 of 608
Running the Vehicle While Parked
It is better not to park with the engine running. But if you
ever have to, here are some things to know.
{WARNING:
Idling a vehicle in an enclosed area with poor
ventilation is dangerous. Engine exhaust may
enter the vehicle. Engine exhaust contains
Carbon Monoxide (CO) which cannot be seen
or smelled. It can cause unconsciousness and
even death. Never run the engine in an enclosed
area that has no fresh air ventilation. For more
information, seeEngine Exhaust on page 3‑50.
{WARNING:
It can be dangerous to get out of the vehicle if the
automatic transmission shift lever is not fully in
P (Park) with the parking brake firmly set. The
vehicle can roll. Do not leave the vehicle when the
engine is running unless you have to. If you have
(Continued)
WARNING: (Continued)
left the engine running, the vehicle can move
suddenly. You or others could be injured. To be
sure the vehicle will not move, even when you
are on fairly level ground, always set the parking
brake and move the shift lever to P (Park).
{WARNING:
If the vehicle has a four-wheel drive transfer
case with a N (Neutral) position, and the transfer
case is in N (Neutral), the vehicle may roll, even
if the automatic transmission shift lever is in
P (Park). So, be sure the transfer case is in a
drive gear—not in N (Neutral). Always set the
parking brake.
Follow the proper steps to be sure the vehicle will not
move. See Shifting Into Park on page 3‑47.
If pulling a trailer, see Towing a Trailer on page 5‑47.
3-51
Page 216 of 608
Cargo Cover
{WARNING:
An improperly stored cargo cover could be thrown
about the vehicle during a collision or sudden
maneuver. Someone could be injured. If the cover
is removed, always store it in the proper storage
location. When it is replaced, always be sure that
it is securely reattached.
To use the cargo cover, if equipped: 1. Pull the cover handle toward the rear of the vehicle.
2. Latch the cover posts into the retaining sockets on the cargo area trim panels.
To return the cover to the retracted position: 1. Pull up on the cover handle to release the cover posts from the retaining sockets.
2. Let the cover move forward to the full retracted position. To remove the cover from a regular wheelbase model:
1. Let the cover go all the way into the holder.
2. Then, grasping the driver's side cover end cap, push the cover end cap toward the passenger side
of the vehicle.
3. Swing the cover rearward and take it out of the vehicle.
To put the cover in the vehicle: 1. Make sure the cover slot in the holder faces rearward with the round surface facing down.
2. Then, hold the cover at an angle and place the cover end cap into the slot in the passenger side
trim panel.
3. Move the other end of the cover forward and hold it next to the driver's side trim panel slot.
4. Press the end caps in, to allow the cover to fit into the trim slot.
5. Pull lightly on the cover holder to make sure it is secure.
On extended wheelbase models there are
two cover positions. The slots furthest forward
allow the cover to be used if the third seat is
removed or folded down. The cover can be
installed and removed from either side.
3-76
Page 219 of 608

Section 4 Instrument Panel
Instrument Panel Overview. . . . . . . . . . . . . . . . . . . . . . . . 4-3
Hazard Warning Flashers . . . . . . . . . . . . . . . . . . . . . . . 4-3
Horn . . . . . . . . . . . . . . . . . . . . . . . . . . . . . . . . . . . . . . . . . . . . 4-3
Tilt Wheel . . . . . . . . . . . . . . . . . . . . . . . . . . . . . . . . . . . . . . . 4-3
Turn Signal/Multifunction Lever . . . . . . . . . . . . . . . . . . 4-4
Turn and Lane-Change Signals . . . . . . . . . . . . . . . . . 4-4
Headlamp High/Low-Beam Changer . . . . . . . . . . . . 4-5
Flash-to-Pass . . . . . . . . . . . . . . . . . . . . . . . . . . . . . . . . . . . 4-5
Windshield Wipers . . . . . . . . . . . . . . . . . . . . . . . . . . . . . . 4-6
Windshield Washer . . . . . . . . . . . . . . . . . . . . . . . . . . . . . 4-6
Rear Window Wiper/Washer . . . . . . . . . . . . . . . . . . . . 4-7
Cruise Control . . . . . . . . . . . . . . . . . . . . . . . . . . . . . . . . . . 4-8
Exterior Lamps . . . . . . . . . . . . . . . . . . . . . . . . . . . . . . . . . 4-11
Headlamps on Reminder . . . . . . . . . . . . . . . . . . . . . . 4-12
Daytime Running Lamps (DRL) . . . . . . . . . . . . . . . . 4-12
Automatic Headlamp System . . . . . . . . . . . . . . . . . . 4-12
Fog Lamps . . . . . . . . . . . . . . . . . . . . . . . . . . . . . . . . . . . . 4-13
Auxiliary Roof-Mounted Lamp . . . . . . . . . . . . . . . . . 4-14
Instrument Panel Brightness . . . . . . . . . . . . . . . . . . . 4-14
Dome Lamps . . . . . . . . . . . . . . . . . . . . . . . . . . . . . . . . . . 4-14
Dome Lamp Override . . . . . . . . . . . . . . . . . . . . . . . . . . 4-15
Entry Lighting . . . . . . . . . . . . . . . . . . . . . . . . . . . . . . . . . . 4-15
Exit Lighting . . . . . . . . . . . . . . . . . . . . . . . . . . . . . . . . . . . 4-15
Reading Lamps . . . . . . . . . . . . . . . . . . . . . . . . . . . . . . . . 4-15
Electric Power Management . . . . . . . . . . . . . . . . . . . 4-15 Battery Run-Down Protection . . . . . . . . . . . . . . . . . . 4-16
Accessory Power Outlet(s) . . . . . . . . . . . . . . . . . . . . . 4-16
Ashtray(s) and Cigarette Lighter . . . . . . . . . . . . . . . 4-17
Climate Controls . . . . . . . . . . . . . . . . . . . . . . . . . . . . . . . . . . 4-18
Climate Control System . . . . . . . . . . . . . . . . . . . . . . . . 4-18
Dual Automatic Climate Control System . . . . . . . 4-20
Outlet Adjustment . . . . . . . . . . . . . . . . . . . . . . . . . . . . . . 4-26
Rear Air Conditioning and Heating System . . . . 4-26
Rear Air Conditioning and Heating System and
Electronic Climate Controls . . . . . . . . . . . . . . . . . . 4-28
Warning Lights, Gauges, and Indicators . . . . . . . . 4-29
Instrument Panel Cluster . . . . . . . . . . . . . . . . . . . . . . . 4-30
Speedometer and Odometer . . . . . . . . . . . . . . . . . . . 4-31
Trip Odometer . . . . . . . . . . . . . . . . . . . . . . . . . . . . . . . . . 4-31
Tachometer . . . . . . . . . . . . . . . . . . . . . . . . . . . . . . . . . . . . 4-31
Safety Belt Reminders . . . . . . . . . . . . . . . . . . . . . . . . . 4-31
Airbag Readiness Light . . . . . . . . . . . . . . . . . . . . . . . . 4-32
Passenger Airbag Status Indicator . . . . . . . . . . . . . 4-33
Charging System Light . . . . . . . . . . . . . . . . . . . . . . . . 4-34
Voltmeter Gauge . . . . . . . . . . . . . . . . . . . . . . . . . . . . . . . 4-35
Brake System Warning Light . . . . . . . . . . . . . . . . . . . 4-36
Antilock Brake System (ABS) Warning Light . . . 4-37
StabiliTrak
®Indicator Light . . . . . . . . . . . . . . . . . . . . . 4-37
Engine Coolant Temperature Gauge . . . . . . . . . . . 4-38
4-1
Page 220 of 608

Section 4 Instrument Panel
Tire Pressure Light . . . . . . . . . . . . . . . . . . . . . . . . . . . . 4-38
Malfunction Indicator Lamp . . . . . . . . . . . . . . . . . . . . 4-39
Oil Pressure Gauge . . . . . . . . . . . . . . . . . . . . . . . . . . . . 4-42
Oil Pressure Light . . . . . . . . . . . . . . . . . . . . . . . . . . . . . 4-43
Security Light . . . . . . . . . . . . . . . . . . . . . . . . . . . . . . . . . . 4-44
Fog Lamp Light . . . . . . . . . . . . . . . . . . . . . . . . . . . . . . . . 4-44
Cruise Control Light . . . . . . . . . . . . . . . . . . . . . . . . . . . 4-44
Highbeam On Light . . . . . . . . . . . . . . . . . . . . . . . . . . . . 4-44
Tow/Haul Mode Light . . . . . . . . . . . . . . . . . . . . . . . . . . 4-45
Fuel Gauge . . . . . . . . . . . . . . . . . . . . . . . . . . . . . . . . . . . . 4-45
Low Fuel Warning Light . . . . . . . . . . . . . . . . . . . . . . . . 4-46
Driver Information Center (DIC) . . . . . . . . . . . . . . . . . . 4-47
DIC Operation and Displays (With DIC Buttons) . . . . . . . . . . . . . . . . . . . . . . . . . . . . . . . . . . . . . 4-47
DIC Operation and Displays (Without DIC Buttons) . . . . . . . . . . . . . . . . . . . . . . . . . . . . . . . . . . . . . 4-55
DIC Compass . . . . . . . . . . . . . . . . . . . . . . . . . . . . . . . . . . 4-58
DIC Warnings and Messages . . . . . . . . . . . . . . . . . . 4-61
DIC Vehicle Customization (With DIC Buttons) . . . . . . . . . . . . . . . . . . . . . . . . . . . . . . . . . . . . . 4-71 Audio System(s)
. . . . . . . . . . . . . . . . . . . . . . . . . . . . . . . . . . 4-80
Setting the Clock . . . . . . . . . . . . . . . . . . . . . . . . . . . . . . 4-81
Radio(s) . . . . . . . . . . . . . . . . . . . . . . . . . . . . . . . . . . . . . . . 4-82
Using an MP3 (Radios with CD) . . . . . . . . . . . . . . . 4-99
Using an MP3 (Radios with CD and DVD) . . . . 4-106
XM Radio Messages . . . . . . . . . . . . . . . . . . . . . . . . . 4-113
Navigation/Radio System . . . . . . . . . . . . . . . . . . . . . 4-114
Bluetooth
®. . . . . . . . . . . . . . . . . . . . . . . . . . . . . . . . . . . . 4-114
Rear Seat Entertainment (RSE) System . . . . . . 4-125
Rear Seat Audio (RSA) . . . . . . . . . . . . . . . . . . . . . . . 4-134
Theft-Deterrent Feature . . . . . . . . . . . . . . . . . . . . . . 4-135
Audio Steering Wheel Controls . . . . . . . . . . . . . . . 4-136
Radio Reception . . . . . . . . . . . . . . . . . . . . . . . . . . . . . . 4-138
Rear Side Window Antenna . . . . . . . . . . . . . . . . . . 4-139
XM™ Satellite Radio Antenna System . . . . . . . . 4-139
4-2