2010 CHEVROLET SUBURBAN audio
[x] Cancel search: audioPage 53 of 608
Power Reclining Seatbacks
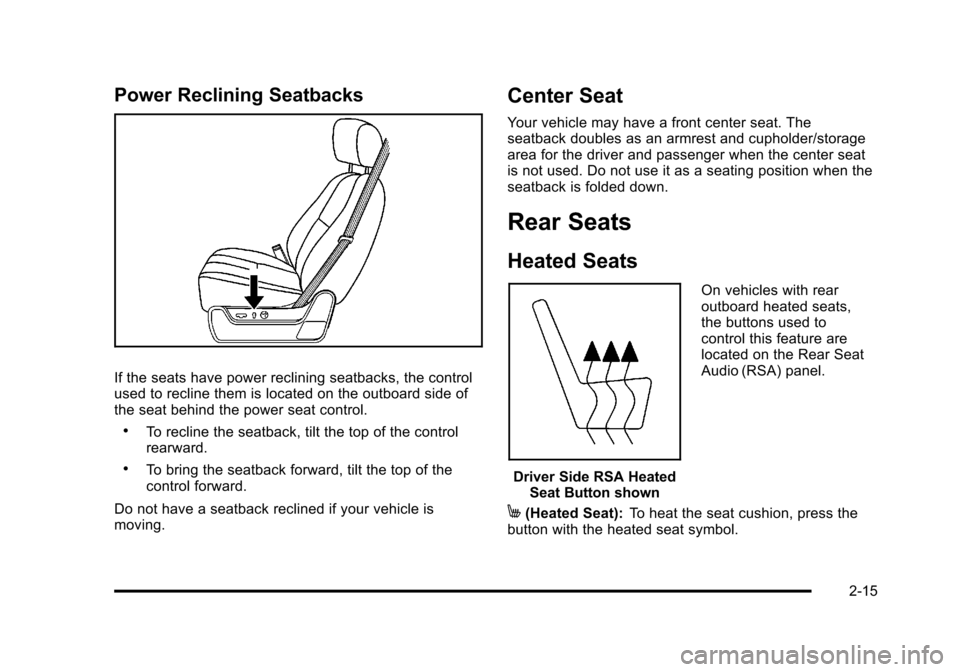
If the seats have power reclining seatbacks, the control
used to recline them is located on the outboard side of
the seat behind the power seat control.
.To recline the seatback, tilt the top of the control
rearward.
.To bring the seatback forward, tilt the top of the
control forward.
Do not have a seatback reclined if your vehicle is
moving.
Center Seat
Your vehicle may have a front center seat. The
seatback doubles as an armrest and cupholder/storage
area for the driver and passenger when the center seat
is not used. Do not use it as a seating position when the
seatback is folded down.
Rear Seats
Heated Seats
Driver Side RSA Heated Seat Button shown On vehicles with rear
outboard heated seats,
the buttons used to
control this feature are
located on the Rear Seat
Audio (RSA) panel.
M(Heated Seat):
To heat the seat cushion, press the
button with the heated seat symbol.
2-15
Page 168 of 608
D (START):This is the position that starts the engine.
When the engine starts, release the key. The ignition
switch returns to ON/RUN for driving.
A warning tone will sound when the driver door is
opened, the ignition is in ACC/ACCESSORY or
LOCK/OFF and the key is in the ignition.
Retained Accessory Power (RAP)
The following vehicle accessories can be used for up to
10 minutes after the engine is turned off:
.Audio System
.Power Windows
.OnStar®System (if equipped)
.Sunroof (if equipped)
These features work when the key is in ON/RUN or
ACC/ACCESSORY. Once the key is turned from
ON/RUN to LOCK/OFF, the windows and sunroof
continue to work up to 10 minutes until any door is
opened. The radio continues to work for up to
10 minutes or until the driver door is opened.
Starting the Engine
If the vehicle is a Two-mode Hybrid, see the Two-mode
Hybrid manual for more information.
Move the shift lever to P (Park) or N (Neutral). The
engine will not start in any other position. To restart the
engine when the vehicle is are already moving, use
N (Neutral) only.
Notice: Do not try to shift to P (Park) if the vehicle
is moving. If you do, you could damage the
transmission. Shift to P (Park) only when the vehicle
is stopped.
Starting Procedure
1. With your foot off the accelerator pedal, turn the ignition key to START. When the engine starts,
let go of the key. The idle speed will go down as
the engine gets warm. Do not race the engine
immediately after starting it. Operate the engine
and transmission gently to allow the oil to warm up
and lubricate all moving parts.
3-28
Page 220 of 608

Section 4 Instrument Panel
Tire Pressure Light . . . . . . . . . . . . . . . . . . . . . . . . . . . . 4-38
Malfunction Indicator Lamp . . . . . . . . . . . . . . . . . . . . 4-39
Oil Pressure Gauge . . . . . . . . . . . . . . . . . . . . . . . . . . . . 4-42
Oil Pressure Light . . . . . . . . . . . . . . . . . . . . . . . . . . . . . 4-43
Security Light . . . . . . . . . . . . . . . . . . . . . . . . . . . . . . . . . . 4-44
Fog Lamp Light . . . . . . . . . . . . . . . . . . . . . . . . . . . . . . . . 4-44
Cruise Control Light . . . . . . . . . . . . . . . . . . . . . . . . . . . 4-44
Highbeam On Light . . . . . . . . . . . . . . . . . . . . . . . . . . . . 4-44
Tow/Haul Mode Light . . . . . . . . . . . . . . . . . . . . . . . . . . 4-45
Fuel Gauge . . . . . . . . . . . . . . . . . . . . . . . . . . . . . . . . . . . . 4-45
Low Fuel Warning Light . . . . . . . . . . . . . . . . . . . . . . . . 4-46
Driver Information Center (DIC) . . . . . . . . . . . . . . . . . . 4-47
DIC Operation and Displays (With DIC Buttons) . . . . . . . . . . . . . . . . . . . . . . . . . . . . . . . . . . . . . 4-47
DIC Operation and Displays (Without DIC Buttons) . . . . . . . . . . . . . . . . . . . . . . . . . . . . . . . . . . . . . 4-55
DIC Compass . . . . . . . . . . . . . . . . . . . . . . . . . . . . . . . . . . 4-58
DIC Warnings and Messages . . . . . . . . . . . . . . . . . . 4-61
DIC Vehicle Customization (With DIC Buttons) . . . . . . . . . . . . . . . . . . . . . . . . . . . . . . . . . . . . . 4-71 Audio System(s)
. . . . . . . . . . . . . . . . . . . . . . . . . . . . . . . . . . 4-80
Setting the Clock . . . . . . . . . . . . . . . . . . . . . . . . . . . . . . 4-81
Radio(s) . . . . . . . . . . . . . . . . . . . . . . . . . . . . . . . . . . . . . . . 4-82
Using an MP3 (Radios with CD) . . . . . . . . . . . . . . . 4-99
Using an MP3 (Radios with CD and DVD) . . . . 4-106
XM Radio Messages . . . . . . . . . . . . . . . . . . . . . . . . . 4-113
Navigation/Radio System . . . . . . . . . . . . . . . . . . . . . 4-114
Bluetooth
®. . . . . . . . . . . . . . . . . . . . . . . . . . . . . . . . . . . . 4-114
Rear Seat Entertainment (RSE) System . . . . . . 4-125
Rear Seat Audio (RSA) . . . . . . . . . . . . . . . . . . . . . . . 4-134
Theft-Deterrent Feature . . . . . . . . . . . . . . . . . . . . . . 4-135
Audio Steering Wheel Controls . . . . . . . . . . . . . . . 4-136
Radio Reception . . . . . . . . . . . . . . . . . . . . . . . . . . . . . . 4-138
Rear Side Window Antenna . . . . . . . . . . . . . . . . . . 4-139
XM™ Satellite Radio Antenna System . . . . . . . . 4-139
4-2
Page 246 of 608
Rear Air Conditioning and Heating
System and Electronic Climate
Controls
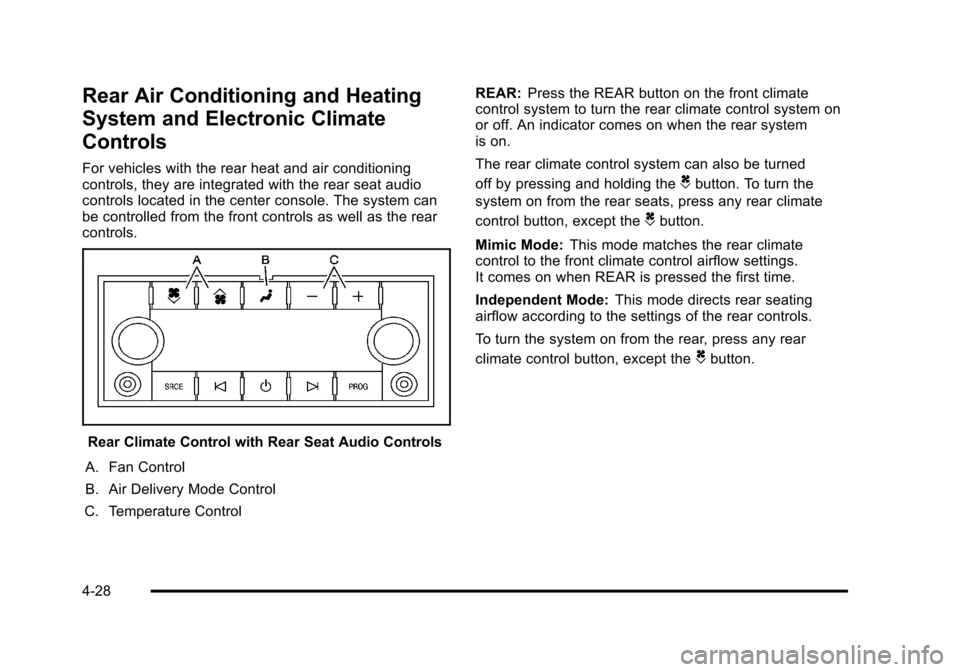
For vehicles with the rear heat and air conditioning
controls, they are integrated with the rear seat audio
controls located in the center console. The system can
be controlled from the front controls as well as the rear
controls.
Rear Climate Control with Rear Seat Audio Controls
A. Fan Control
B. Air Delivery Mode Control
C. Temperature Control REAR:
Press the REAR button on the front climate
control system to turn the rear climate control system on
or off. An indicator comes on when the rear system
is on.
The rear climate control system can also be turned
off by pressing and holding the
Cbutton. To turn the
system on from the rear seats, press any rear climate
control button, except the
Cbutton.
Mimic Mode: This mode matches the rear climate
control to the front climate control airflow settings.
It comes on when REAR is pressed the first time.
Independent Mode: This mode directs rear seating
airflow according to the settings of the rear controls.
To turn the system on from the rear, press any rear
climate control button, except the
Cbutton.
4-28
Page 247 of 608
Automatic Operation, If Equipped.
AUTO:Press the air delivery mode button until this
setting is selected to control the inside temperature, air
delivery, and fan speed. AUTO appears in the display
when automatic operation is active.
+/− (Increase/Decrease Temperature) : Press
the + or −buttons to increase or decrease the cabin
temperature. The rear control temperature display will
show the temperature setting increasing or decreasing.
The display only indicates climate control functions
when the system is in rear independent mode.
Manual Operation
D C(Fan Control): Press these buttons on the rear
seat audio control panel to increase or decrease the
airflow. Pressing the fan up button when the system is
off will turn the system on. The air delivery mode will
remain under automatic control.
+/− (Temperature Control): Press these buttons to
adjust the temperature of the air flowing into the
passenger area. Press the + button for warmer air
and press the −button for cooler air.
N(Air Delivery Mode Control): Press the mode
button to change the direction of the airflow in the
vehicle. Repeatedly press the button until the desired
mode appears on the display. Multiple presses will cycle
through the delivery selections.
Warning Lights, Gauges, and
Indicators
Warning lights and gauges can signal that something is
wrong before it becomes serious enough to cause an
expensive repair or replacement. Paying attention to the
warning lights and gauges could prevent injury.
Warning lights come on when there might be or there is
a problem with one of the vehicle's functions. Some
warning lights come on briefly when the engine is
started to indicate they are working.
Gauges can indicate when there might be or there is
a problem with one of the vehicle's functions. Often
gauges and warning lights work together to indicate a
problem with the vehicle.
When one of the warning lights comes on and stays on
while driving, or when one of the gauges shows there
could be a problem, check the section that explains
what to do. Follow this manual's advice. Waiting to do
repairs can be costly and even dangerous.
4-29
Page 279 of 608
DIC Warnings and Messages
Messages are displayed on the DIC to notify the driver
that the status of the vehicle has changed and that
some action may be needed by the driver to correct the
condition. Multiple messages may appear one after
another.
Some messages may not require immediate action, but
you can press any of the DIC buttons on the instrument
panel or the trip odometer reset stem on the instrument
panel cluster to acknowledge that you received the
messages and to clear them from the display.
Some messages cannot be cleared from the DIC
display because they are more urgent. These
messages require action before they can be cleared.
You should take any messages that appear on the
display seriously and remember that clearing the
messages will only make the messages disappear, not
correct the problem.
The following are the possible messages that can be
displayed and some information about them.
If your vehicle is a Two-mode Hybrid, see the
Two-mode Hybrid manual for more information.
BATTERY LOW START VEHICLE
When the vehicle’s battery is severely discharged, this
message will display and four chimes will sound. Start
the vehicle immediately. If the vehicle is not started and
the battery continues to discharge, the climate controls,
heated seats, and audio systems will shut off and the
vehicle may require a jump start. These systems will
function again after the vehicle is started.
CHANGE ENGINE OIL SOON
This message displays when the engine oil needs to
be changed. When you change the engine oil, be sure
to reset the CHANGE ENGINE OIL SOON message.
See Engine Oil Life System
on page 6‑20for
information on how to reset the message. See Engine
Oil
on page 6‑17and Scheduled Maintenanceon
page 7‑3for more information.
4-61
Page 298 of 608
EXIT FEATURE SETTINGS
This feature allows you to exit the feature
settings menu.
Press the customization button until PRESS
VTO EXIT
FEATURE SETTINGS appears in the DIC display.
Press the set/reset button once to exit the menu.
If you do not exit, pressing the customization button
again will return you to the beginning of the feature
settings menu.
Exiting the Feature Settings Menu
The feature settings menu will be exited when any of
the following occurs:
.The vehicle is no longer in ON/RUN.
.The trip/fuel or vehicle information DIC buttons are
pressed.
.The end of the feature settings menu is reached
and exited.
.A 40 second time period has elapsed with no
selection made.
Audio System(s)
Determine which radio the vehicle has and read the
following pages to become familiar with its features.
{WARNING:
Taking your eyes off the road for extended periods
could cause a crash resulting in injury or death to
you or others. Do not give extended attention to
entertainment tasks while driving.
This system provides access to many audio and non
audio listings.
To minimize taking your eyes off the road while driving,
do the following while the vehicle is parked:
.Become familiar with the operation and controls of
the audio system.
.Set up the tone, speaker adjustments, and preset
radio stations.
For more information, see Defensive Driving
on
page 5‑2.
4-80
Page 299 of 608
Notice:Contact your dealer before adding any
equipment.
Adding audio or communication equipment could
interfere with the operation of the vehicle's engine,
radio, or other systems, and could damage them.
Follow federal rules covering mobile radio and
telephone equipment.
The vehicle has Retained Accessory Power (RAP). With
RAP, the audio system can be played even after the
ignition is turned off. See Retained Accessory Power
(RAP)
on page 3‑28for more information.
Setting the Clock
To set the time and date:
1. Turn the ignition key to ACC/ACCESSORY or ON/RUN, then press the
Obutton to turn the
radio on.
2. Press the
Hbutton to display HR, MIN, MM, DD,
YYYY (hour, minute, month, day, and year).
3. Press the softkey located under any one of the tabs to change that setting. 4. To increase the time or date, do one of the
following:
.Press the softkey below the selected tab.
.Press the¨SEEK button.
.Press the\FWD button.
.Turn thefknob clockwise.
5. To decrease the time or date, do one of the following:
.Press the©SEEK button.
.Press thesREV button.
.Turn thefknob counterclockwise.
To change the time default setting from 12 hour to
24 hour or to change the date default setting from
month/day/year to day/month/year:
1. Press the
Hbutton and then the softkey located
below the forward arrow tab. 12H, 24H, the date
MM/DD (month and day), and DD/MM/ (day and
month) displays.
2. Press the softkey located below the desired option.
3. Press the
Hbutton again to apply the desired
option, or let the screen time out.
4-81