Page 460 of 626
Engine Compartment Overview
If the vehicle has a diesel engine and/or an Allison Transmission, see the DURAMAX®Diesel manual.
5.3 L V8 Engine (4.3 L V6 Engine, 4.8 L V6 Engine, 6.0 L V8 Engine and 6.2 L V8 Engine similar):
6-16
Page 461 of 626

A.Engine Air Cleaner/Filter on page 6‑21.
B. Coolant Surge Tank and Pressure Cap. See Cooling System on page 6‑29.
C. Positive (+) Terminal. See Jump Starting
on
page 6‑44.
D. Battery on page 6‑43.
E. Engine Oil Fill Cap. See “When to Add Engine Oil”
under Engine Oil on page 6‑18.
F. Automatic Transmission Dipstick. See “Checking
the Fluid Level” underAutomatic Transmission
Fluid (4-Speed Transmission)
on page 6‑23or
Automatic Transmission Fluid (6-Speed
Transmission) on page 6‑26.
G. Remote Negative (−) Terminal (Out of View). See Jump Starting on page 6‑44. H. Engine Oil Dipstick (Out of View). See
“Checking
Engine Oil” underEngine Oil on page 6‑18.
I. Engine Cooling Fan. See Cooling System
on
page 6‑29.
J. Power Steering Fluid Reservoir. See Power
Steering Fluid on page 6‑37.
K. Brake Master Cylinder Reservoir. See “Brake
Fluid” under Brakes on page 6‑39.
L. Underhood Fuse Block on page 6‑122.
M. Windshield Washer Fluid Reservoir. See “Adding
Washer Fluid” underWindshield Washer Fluid
on
page 6‑38.
6-17
Page 467 of 626
3. Remove the engine air cleaner/filter from thehousing. Care should be taken to dislodge as little
dirt as possible.
4. Clean the engine air cleaner/filter sealing surfaces and the housing.
5. Inspect or replace the engine air cleaner/filter.
6. Reinstall the cover and tighten the screws.
{WARNING:
Operating the engine with the air cleaner/filter off
can cause you or others to be burned. The air
cleaner not only cleans the air; it helps to stop
flames if the engine backfires. Use caution when
working on the engine and do not drive with the
air cleaner/filter off.
Automatic Transmission Fluid
(4-Speed Transmission)
When to Check and Change Automatic
Transmission Fluid
A good time to check the automatic transmission fluid
level is when the engine oil is changed.
Change the fluid and filter at the intervals listed in
Scheduled Maintenance
on page 7‑3and be sure to
use the transmission fluid listed in Recommended
Fluids and Lubricants on page 7‑13.
6-23
Page 468 of 626
How to Check Automatic Transmission
Fluid
Because this operation can be a little difficult, you may
choose to have this done at the dealer service
department.
If you do it yourself, be sure to follow all the instructions
here or you could get a false reading on the dipstick.
Notice:Too much or too little fluid can damage the
transmission. Too much can mean that some of the
fluid could come out and fall on hot engine parts or
exhaust system parts, starting a fire. Too little fluid
could cause the transmission to overheat. Be sure
to get an accurate reading if checking the
transmission fluid.
Wait at least 30 minutes before checking the
transmission fluid level if you have been driving:
.When outside temperatures are above
32°C (90°F).
.At high speed for quite a while.
.In heavy traffic —especially in hot weather.
.While pulling a trailer.
To get the right reading, the fluid should be at normal
operating temperature, which is 82°C to 93°C
(180°F to 200°F). Get the vehicle warmed up by driving about 24 km
(15 miles) when outside temperatures are above 10°C
(50°F). If it is colder than 10°C (50°F), drive the vehicle
in 3 (Third) until the engine temperature gauge moves
and then remains steady for 10 minutes.
A cold fluid check can be made after the vehicle has
been sitting for eight hours or more with the engine off,
but this is used only as a reference. Let the engine run
at idle for five minutes if outside temperatures are 10°C
(50°F) or more. If it is colder than 10°C (50°F), you may
have to idle the engine longer. Should the fluid level be
low during this cold check, you must check the fluid hot
before adding fluid. Checking the fluid hot will give you
a more accurate reading of the fluid level.
Checking the Fluid Level
Prepare the vehicle as follows:
1. Park the vehicle on a level place. Keep the engine running.
2. With the parking brake applied, place the shift lever in P (Park).
3. With your foot on the brake pedal, move the shift lever through each gear range, pausing for about
three seconds in each range. Then, position the
shift lever in P (Park).
4. Let the engine run at idle for three minutes or more.
6-24
Page 469 of 626
Then, without shutting off the engine, follow these
steps:
1. Locate thetransmission dipstick
handle with this
graphic which is
located at the rear of
the engine
compartment, on the
passenger side of the
vehicle.
See Engine Compartment Overview
on page 6‑16for more information on location.
2. Flip the handle up and then pull out the dipstick and wipe it with a clean rag or paper towel.
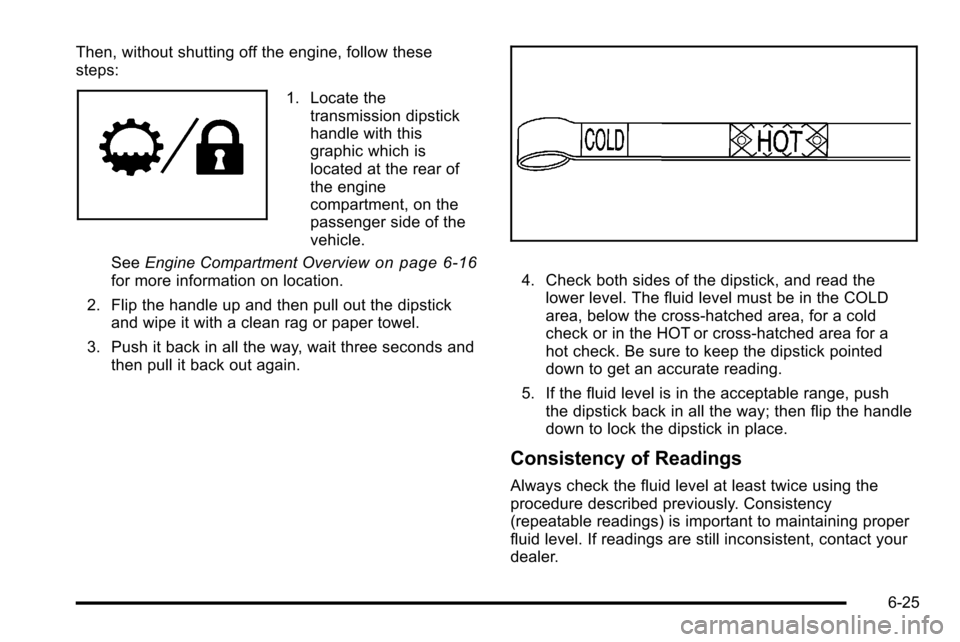
3. Push it back in all the way, wait three seconds and then pull it back out again.4. Check both sides of the dipstick, and read the
lower level. The fluid level must be in the COLD
area, below the cross-hatched area, for a cold
check or in the HOT or cross-hatched area for a
hot check. Be sure to keep the dipstick pointed
down to get an accurate reading.
5. If the fluid level is in the acceptable range, push the dipstick back in all the way; then flip the handle
down to lock the dipstick in place.
Consistency of Readings
Always check the fluid level at least twice using the
procedure described previously. Consistency
(repeatable readings) is important to maintaining proper
fluid level. If readings are still inconsistent, contact your
dealer.
6-25
Page 470 of 626
How to Add Automatic Transmission
Fluid
Refer to the Maintenance Schedule to determine what
kind of transmission fluid to use. SeeRecommended
Fluids and Lubricants on page 7‑13.
Using a funnel, add fluid down the transmission dipstick
tube only after checking the transmission fluid while it is
hot. A cold check is used only as a reference. If the fluid
level is low, add only enough of the proper fluid to bring
the level up to the HOT area for a hot check. It does not
take much fluid, generally less than 0.5 Liter (1 Pint). Do
not overfill.
Notice: Use of the incorrect automatic transmission
fluid may damage the vehicle, and the damages may
not be covered by the vehicle's warranty. Always
use the automatic transmission fluid listed in
Recommended Fluids and Lubricants on page 7‑13.
.After adding fluid, recheck the fluid level as
described under “How to Check Automatic
Transmission Fluid,” earlier in this section.
.When the correct fluid level is obtained, push the
dipstick back in all the way; then flip the handle
down to lock the dipstick in place.
Automatic Transmission Fluid
(6-Speed Transmission)
When to Check and Change Automatic
Transmission Fluid
It is usually not necessary to check the transmission
fluid level. The only reason for fluid loss is a
transmission leak or overheating the transmission.
If you suspect a small leak, then use the following
checking procedures to check the fluid level. However,
if there is a large leak, then it may be necessary to have
the vehicle towed to a dealer service department and
have it repaired before driving the vehicle further.
Notice:Use of the incorrect automatic transmission
fluid may damage the vehicle, and the damages may
not be covered by the vehicle's warranty. Always
use the automatic transmission fluid listed in
Recommended Fluids and Lubricants on page 7‑13.
Change the fluid and filter at the intervals listed in the
Maintenance Schedule. See Scheduled Maintenance
on page 7‑3. Be sure to use the transmission fluid
listed in Recommended Fluids and Lubricantson
page 7‑13.
6-26
Page 471 of 626
How to Check Automatic Transmission
Fluid
Notice:Too much or too little fluid can damage the
transmission. Too much can mean that some of the
fluid could come out and fall on hot engine parts or
exhaust system parts, starting a fire. Too little fluid
could cause the transmission to overheat. Be sure
to get an accurate reading if checking the
transmission fluid.
Before checking the fluid level, prepare the vehicle as
follows:
1. Start the engine and park the vehicle on a level surface. Keep the engine running.
2. Apply the parking brake and place the shift lever in P (Park).
3. With your foot on the brake pedal, move the shift lever through each gear range, pausing for about
three seconds in each range. Then, move the shift
lever back to P (Park).
4. Allow the engine to idle (500 –800 rpm) for at least
one minute. Slowly release the brake pedal.
5. Keep the engine running and press the Trip/Fuel button or trip odometer reset stem until TRANS
TEMP (Transmission Temperature) displays on the
Driver Information Center (DIC). 6. Using the TRANS TEMP reading, determine and
perform the appropriate check procedure. If the
TRANS TEMP reading is not within the required
temperature ranges, allow the vehicle to cool,
or operate the vehicle until the appropriate
transmission fluid temperature is reached.
Cold Check Procedure
Use this procedure only as a reference to determine if
the transmission has enough fluid to be operated safely
until a hot check procedure can be made. The hot
check procedure is the most accurate method to check
the fluid level. Perform the hot check procedure at the
first opportunity. Use this cold check procedure to check
fluid level when the transmission temperature is
between 27°C and 32°C (80°F and 90°F).
1. Locate the
transmission dipstick at
the rear of the engine
compartment, on the
passenger side of the
vehicle.
See Engine Compartment Overview
on page 6‑16for more information.
2. Flip the handle up, and then pull out the dipstick and wipe it with a clean rag or paper towel.
6-27
Page 472 of 626
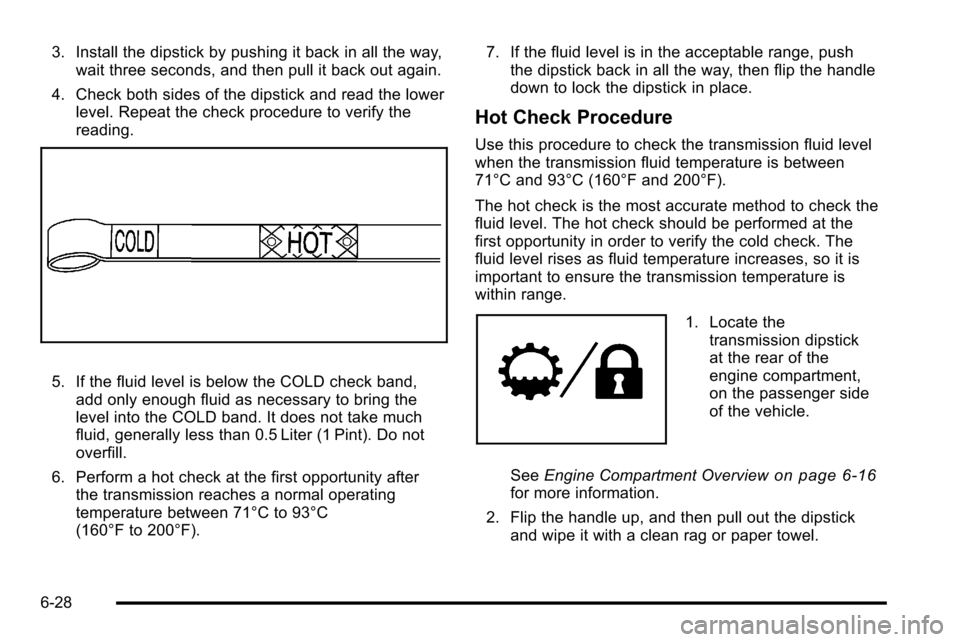
3. Install the dipstick by pushing it back in all the way,wait three seconds, and then pull it back out again.
4. Check both sides of the dipstick and read the lower level. Repeat the check procedure to verify the
reading.
5. If the fluid level is below the COLD check band,add only enough fluid as necessary to bring the
level into the COLD band. It does not take much
fluid, generally less than 0.5 Liter (1 Pint). Do not
overfill.
6. Perform a hot check at the first opportunity after the transmission reaches a normal operating
temperature between 71°C to 93°C
(160°F to 200°F). 7. If the fluid level is in the acceptable range, push
the dipstick back in all the way, then flip the handle
down to lock the dipstick in place.
Hot Check Procedure
Use this procedure to check the transmission fluid level
when the transmission fluid temperature is between
71°C and 93°C (160°F and 200°F).
The hot check is the most accurate method to check the
fluid level. The hot check should be performed at the
first opportunity in order to verify the cold check. The
fluid level rises as fluid temperature increases, so it is
important to ensure the transmission temperature is
within range.
1. Locate the
transmission dipstick
at the rear of the
engine compartment,
on the passenger side
of the vehicle.
See Engine Compartment Overview
on page 6‑16for more information.
2. Flip the handle up, and then pull out the dipstick and wipe it with a clean rag or paper towel.
6-28