2010 CHEVROLET SILVERADO tire pressure
[x] Cancel search: tire pressurePage 522 of 626
.One or more TPMS sensors are missing or
damaged. The DIC message and the TPMS
malfunction light should go off when the TPMS
sensors are installed and the sensor matching
process is performed successfully. See your dealer
for service.
.Replacement tires or wheels do not match your
vehicle's original equipment tires or wheels. Tires
and wheels other than those recommended for
your vehicle could prevent the TPMS from
functioning properly. SeeBuying New Tires
on
page 6‑83.
.Operating electronic devices or being near facilities
using radio wave frequencies similar to the TPMS
could cause the TPMS sensors to malfunction.
If the TPMS is not functioning it cannot detect or signal
a low tire condition. See your dealer for service if the
TPMS malfunction light and DIC message comes on
and stays on.
TPMS Sensor Matching Process
Each TPMS sensor has a unique identification code.
Any time you rotate your vehicle's tires or replace one
or more of the TPMS sensors, the identification codes
will need to be matched to the new tire/wheel position.
The sensors are matched to the tire/wheel positions in
the following order: driver side front tire, passenger side
front tire, passenger side rear tire, and driver side rear
tire using a TPMS diagnostic tool. See your dealer for
service.
The TPMS sensors can also be matched to each tire/
wheel position by increasing or decreasing the tire's air
pressure. If increasing the tire's air pressure, do not
exceed the maximum inflation pressure indicated on the
tire's sidewall.
To decrease air-pressure out of a tire you can use the
pointed end of the valve cap, a pencil-style air pressure
gauge, or a key.
You have two minutes to match the first tire/wheel
position, and five minutes overall to match all four tire/
wheel positions. If it takes longer than two minutes, to
match the first tire and wheel, or more than five minutes
to match all four tire and wheel positions the matching
process stops and you need to start over.
6-78
Page 523 of 626

The TPMS sensor matching process is outlined below:1. Set the parking brake.
2. Turn the ignition switch to ON/RUN with the engine off.
3. Press the Remote Keyless Entry (RKE) transmitter's LOCK and UNLOCK buttons at the
same time for approximately five seconds. The
horn sounds twice to signal the receiver is in
relearn mode and TIRE LEARNING ACTIVE
message displays on the DIC screen.
If your vehicle does not have RKE, press the
Driver Information Center (DIC) vehicle information
button until the PRESS
VTO RELEARN TIRE
POSITIONS message displays. The horn sounds
twice to signal the receiver is in relearn mode and
TIRE LEARNING ACTIVE message displays on
the DIC screen.
If your vehicle does not have RKE or DIC buttons,
press the trip odometer reset stem located on the
instrument panel cluster until the PRESS
VTO
RELEARN TIRE POSITIONS message displays.
The horn sounds twice to signal the receiver is in
relearn mode and TIRE LEARNING ACTIVE
message displays on the DIC screen.
4. Start with the driver side front tire. 5. Remove the valve cap from the valve cap stem.
Activate the TPMS sensor by increasing or
decreasing the tire's air pressure for five seconds,
or until a horn chirp sounds. The horn chirp, which
may take up to 30 seconds to sound, confirms that
the sensor identification code has been matched to
this tire and wheel position.
6. Proceed to the passenger side front tire, and repeat the procedure in Step 5.
7. Proceed to the passenger side rear tire, and repeat the procedure in Step 5.
8. Proceed to the driver side rear tire, and repeat the procedure in Step 5. The horn sounds two times to
indicate the sensor identification code has been
matched to the driver side rear tire, and that the
TPMS sensor matching process is no longer
active. The TIRE LEARNING ACTIVE message on
the DIC display screen goes off.
9. Turn the ignition switch to LOCK/OFF.
10. Set all four tires to the recommended air pressure level as indicated on the Tire and Loading
Information label.
11. Put the valve caps back on the valve stems.
6-79
Page 525 of 626
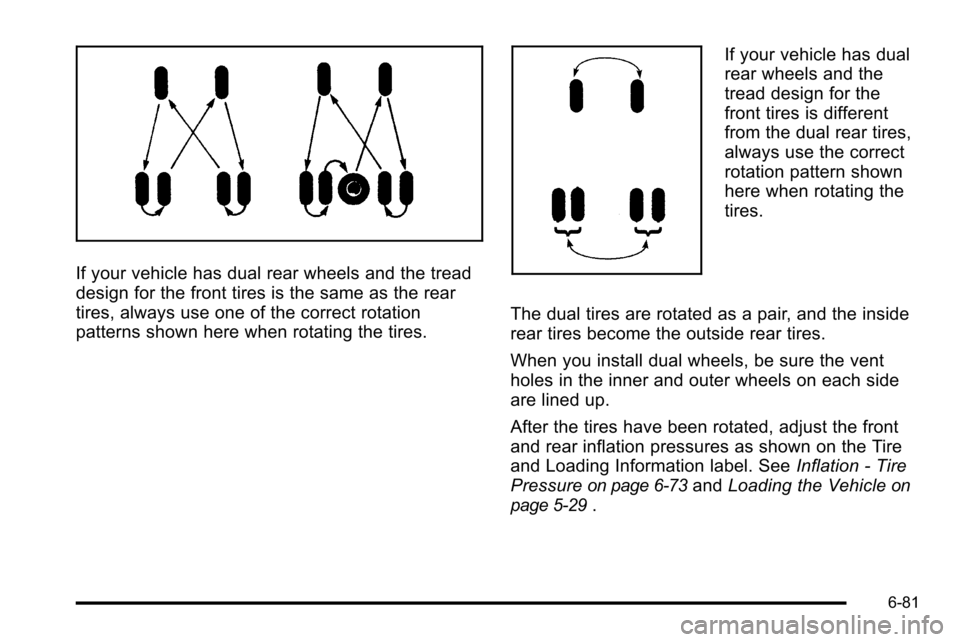
If your vehicle has dual rear wheels and the tread
design for the front tires is the same as the rear
tires, always use one of the correct rotation
patterns shown here when rotating the tires.
If your vehicle has dual
rear wheels and the
tread design for the
front tires is different
from the dual rear tires,
always use the correct
rotation pattern shown
here when rotating the
tires.
The dual tires are rotated as a pair, and the inside
rear tires become the outside rear tires.
When you install dual wheels, be sure the vent
holes in the inner and outer wheels on each side
are lined up.
After the tires have been rotated, adjust the front
and rear inflation pressures as shown on the Tire
and Loading Information label. See Inflation - Tire
Pressure
on page 6‑73and Loading the Vehicleon
page 5‑29
.
6-81
Page 526 of 626

Make certain that all wheel nuts are properly
tightened. See“Wheel Nut Torque” under
Capacities and Specifications
on page 6‑126.
{WARNING:
Rust or dirt on a wheel, or on the parts to
which it is fastened, can make wheel nuts
become loose after time. The wheel could
come off and cause an accident. When you
change a wheel, remove any rust or dirt from
places where the wheel attaches to the
vehicle. In an emergency, you can use a
cloth or a paper towel to do this; but be sure
to use a scraper or wire brush later,
if needed, to get all the rust or dirt off. See
Changing a Flat Tire
on page 6‑90.
If your vehicle has a Tire Pressure Monitor
System (TPMS), reset the TPMS sensors after
rotating the tires. See Tire Pressure Monitor
Operation
on page 6‑76. Make sure the spare tire, if your vehicle has one,
is stored securely. Push, pull, and then try to
rotate or turn the tire. If it moves, tighten the
cable. See
Storing a Flat or Spare Tire and Tools
on page 6‑106.
When It Is Time for New Tires
Various factors, such as maintenance, temperatures,
driving speeds, vehicle loading, and road conditions,
influence when you need new tires.
One way to tell when it is
time for new tires is to
check the treadwear
indicators, which appear
when your tires have only
1/16 inch (1.6 mm) or less
of tread remaining. Some
commercial truck tires
may not have treadwear
indicators.
6-82
Page 527 of 626
You need new tires if any of the following statements
are true:
.You can see the indicators at three or more places
around the tire.
.You can see cord or fabric showing through the
tire's rubber.
.The tread or sidewall is cracked, cut, or snagged
deep enough to show cord or fabric.
.The tire has a bump, bulge, or split.
.The tire has a puncture, cut, or other damage that
cannot be repaired well because of the size or
location of the damage.
The rubber in tires degrades over time, even if they are
not being used. This is also true for the spare tire,
if your vehicle has one. Multiple conditions affect how
fast this aging takes place, including temperatures,
loading conditions, and inflation pressure maintenance.
With proper care and maintenance tires will typically
wear out before they degrade due to age. If you are
unsure about the need to replace your tires as they get
older, consult the tire manufacturer for more information.
Buying New Tires
GM has developed and matched specific tires for your
vehicle. The original equipment tires installed on your
vehicle, when it was new, were designed to meet
General Motors Tire Performance Criteria Specification
(TPC spec) system rating. If you need replacement
tires, GM strongly recommends that you get tires with
the same TPC Spec rating. This way, your vehicle will
continue to have tires that are designed to give the
same performance and vehicle safety, during normal
use, as the original tires.
GM's exclusive TPC Spec system considers over a
dozen critical specifications that impact the overall
performance of your vehicle, including brake system
performance, ride and handling, traction control, and tire
pressure monitoring performance. GM's TPC Spec
number is molded onto the tire's sidewall near the tire
size. If the tires have an all‐season tread design, the
TPC spec number will be followed by a MS, for mud
and snow. See Tire Sidewall Labeling
on page 6‑65for
additional information.
6-83
Page 528 of 626
GM recommends replacing tires in sets of four (or six if
your vehicle has dual rear wheels). This is because
uniform tread depth on all tires will help keep your
vehicle performing most like it did when the tires were
new. Replacing less than a full set of tires can affect the
braking and handling performance of your vehicle. See
Tire Inspection and Rotation
on page 6‑80for
information on proper tire rotation.
{WARNING:
Mixing tires could cause you to lose control
while driving. If you mix tires of different
sizes, brands, or types (radial and
bias-belted tires) the vehicle may not handle
properly, and you could have a crash. Using
tires of different sizes, brands, or types may
also cause damage to your vehicle. Be sure
to use the correct size, brand, and type of
tires on your vehicle's wheels.
{WARNING:
If you use bias-ply tires on the vehicle, the
wheel rim flanges could develop cracks after
many miles of driving. A tire and/or wheel
could fail suddenly, causing a crash. Use
only radial-ply tires with the wheels on the
vehicle.
If you must replace your vehicle's tires with those that
do not have a TPC Spec number, make sure they are
the same size, load range, speed rating, and
construction type (radial and bias‐belted tires) as your
vehicle's original tires.
Vehicles that have a tire pressure monitoring system
could give an inaccurate low‐pressure warning if
non‐TPC Spec rated tires are installed on your vehicle.
Non‐TPC Spec rated tires may give a low‐pressure
warning that is higher or lower than the proper warning
level you would get with TPC Spec rated tires. See Tire
Pressure Monitor System on page 6‑75.
Your vehicle's original equipment tires are listed on the
Tire and Loading Information label. See Loading the
Vehicle
on page 5‑29, for more information about the
Tire and Loading Information label and its location on
your vehicle.
6-84
Page 532 of 626

If you need to replace any of the wheels, wheel bolts,
wheel nuts or Tire Pressure Monitor System (TPMS)
sensors, replace them only with new GM original
equipment parts. This way, you will be sure to have the
right wheel, wheel bolts, wheel nuts, and TPMS sensors
for the vehicle.
{WARNING:
Using the wrong replacement wheels, wheel bolts,
or wheel nuts on your vehicle can be dangerous.
It could affect the braking and handling of your
vehicle, make your tires lose air and make you
lose control. You could have a collision in which
you or others could be injured. Always use the
correct wheel, wheel bolts, and wheel nuts for
replacement.
Notice: The wrong wheel can also cause problems
with bearing life, brake cooling, speedometer or
odometer calibration, headlamp aim, bumper height,
vehicle ground clearance, and tire or tire chain
clearance to the body and chassis. Whenever a wheel, wheel bolt or wheel nut is replaced
on a dual wheel setup, check the wheel nut torque after
100, 1,000 and 6,000 miles (160, 1 600 and 10 000 km)
of driving. For proper torque, see
“Wheel Nut Torque”
under Capacities and Specifications on page 6‑126.
See Changing a Flat Tire
on page 6‑90for more
information.
Used Replacement Wheels
{WARNING:
Putting a used wheel on the vehicle is dangerous.
You cannot know how it has been used or how far
it has been driven. It could fail suddenly and
cause a crash. If you have to replace a wheel, use
a new GM original equipment wheel.
6-88
Page 553 of 626
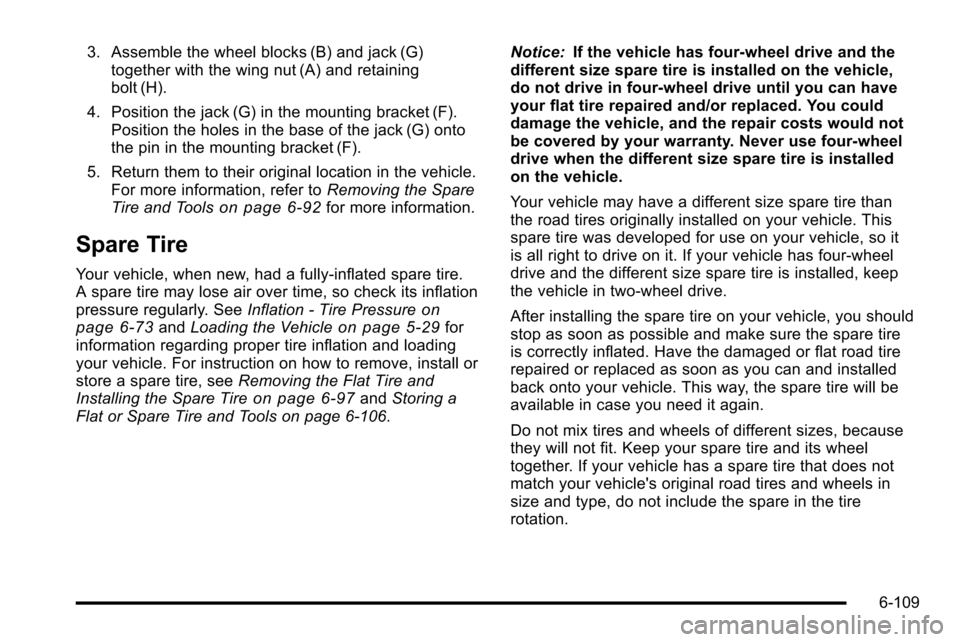
3. Assemble the wheel blocks (B) and jack (G)together with the wing nut (A) and retaining
bolt (H).
4. Position the jack (G) in the mounting bracket (F). Position the holes in the base of the jack (G) onto
the pin in the mounting bracket (F).
5. Return them to their original location in the vehicle. For more information, refer to Removing the Spare
Tire and Tools
on page 6‑92for more information.
Spare Tire
Your vehicle, when new, had a fully-inflated spare tire.
A spare tire may lose air over time, so check its inflation
pressure regularly. See Inflation - Tire Pressure
on
page 6‑73and Loading the Vehicleon page 5‑29for
information regarding proper tire inflation and loading
your vehicle. For instruction on how to remove, install or
store a spare tire, see Removing the Flat Tire and
Installing the Spare Tire
on page 6‑97and Storing a
Flat or Spare Tire and Tools on page 6‑106. Notice:
If the vehicle has four-wheel drive and the
different size spare tire is installed on the vehicle,
do not drive in four-wheel drive until you can have
your flat tire repaired and/or replaced. You could
damage the vehicle, and the repair costs would not
be covered by your warranty. Never use four-wheel
drive when the different size spare tire is installed
on the vehicle.
Your vehicle may have a different size spare tire than
the road tires originally installed on your vehicle. This
spare tire was developed for use on your vehicle, so it
is all right to drive on it. If your vehicle has four-wheel
drive and the different size spare tire is installed, keep
the vehicle in two-wheel drive.
After installing the spare tire on your vehicle, you should
stop as soon as possible and make sure the spare tire
is correctly inflated. Have the damaged or flat road tire
repaired or replaced as soon as you can and installed
back onto your vehicle. This way, the spare tire will be
available in case you need it again.
Do not mix tires and wheels of different sizes, because
they will not fit. Keep your spare tire and its wheel
together. If your vehicle has a spare tire that does not
match your vehicle's original road tires and wheels in
size and type, do not include the spare in the tire
rotation.
6-109