2010 CHEVROLET SILVERADO climate control
[x] Cancel search: climate controlPage 239 of 626
Climate Control System (With
Heater Only)
With this system the heating and ventilation can be
controlled.
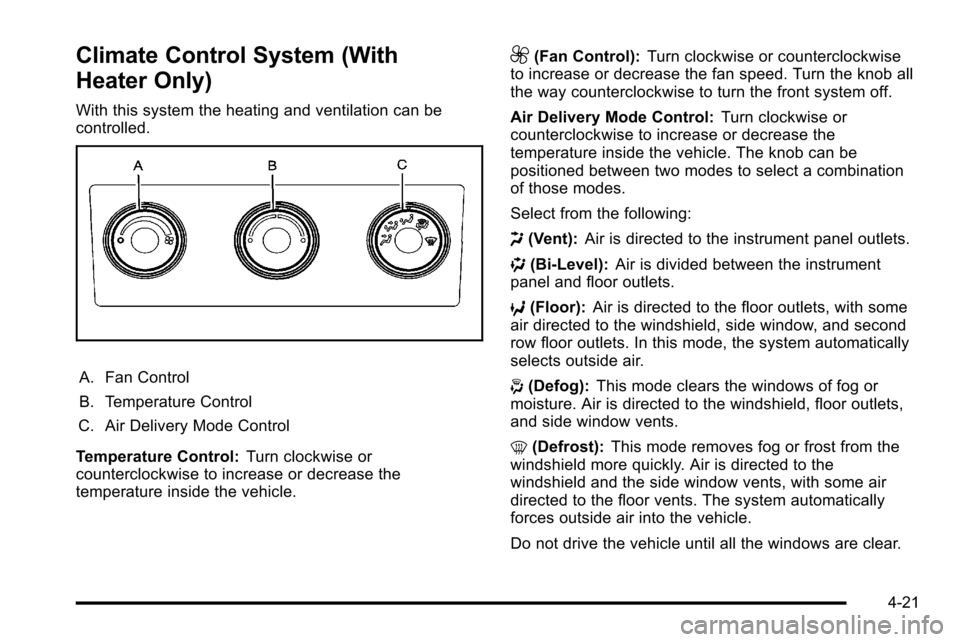
A. Fan Control
B. Temperature Control
C. Air Delivery Mode Control
Temperature Control: Turn clockwise or
counterclockwise to increase or decrease the
temperature inside the vehicle.
9(Fan Control): Turn clockwise or counterclockwise
to increase or decrease the fan speed. Turn the knob all
the way counterclockwise to turn the front system off.
Air Delivery Mode Control: Turn clockwise or
counterclockwise to increase or decrease the
temperature inside the vehicle. The knob can be
positioned between two modes to select a combination
of those modes.
Select from the following:
H (Vent): Air is directed to the instrument panel outlets.
) (Bi-Level): Air is divided between the instrument
panel and floor outlets.
6 (Floor): Air is directed to the floor outlets, with some
air directed to the windshield, side window, and second
row floor outlets. In this mode, the system automatically
selects outside air.
- (Defog): This mode clears the windows of fog or
moisture. Air is directed to the windshield, floor outlets,
and side window vents.
0 (Defrost): This mode removes fog or frost from the
windshield more quickly. Air is directed to the
windshield and the side window vents, with some air
directed to the floor vents. The system automatically
forces outside air into the vehicle.
Do not drive the vehicle until all the windows are clear.
4-21
Page 240 of 626
Dual Automatic Climate Control
System
The heating, cooling, and ventilation in the vehicle can
be controlled with this system. The vehicle also has a
flow-through ventilation system described later in this
section.
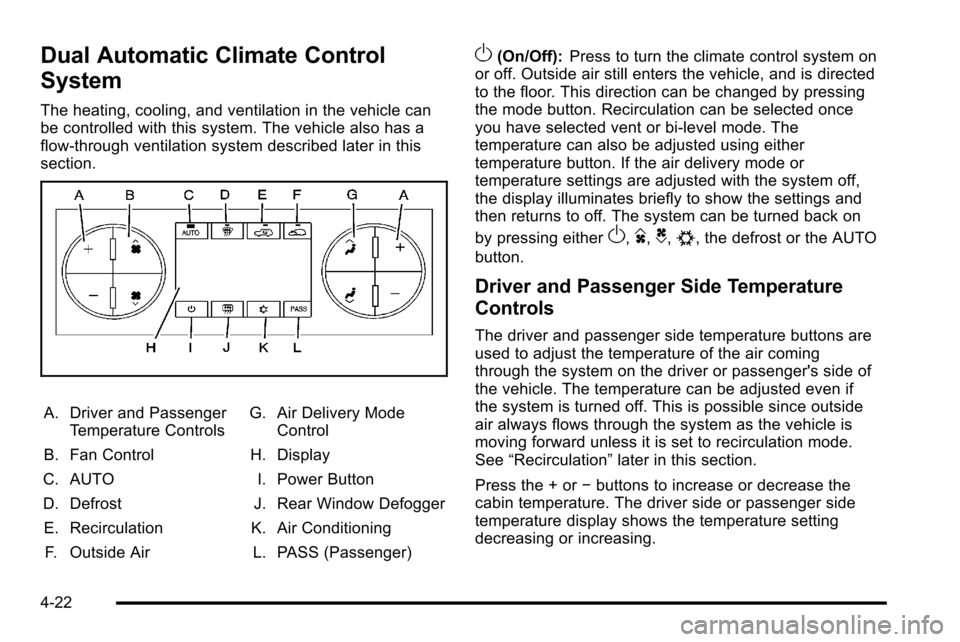
A. Driver and PassengerTemperature Controls
B. Fan Control
C. AUTO
D. Defrost E. Recirculation F. Outside Air G. Air Delivery Mode
Control
H. Display
I. Power Button
J. Rear Window Defogger
K. Air Conditioning L. PASS (Passenger)
O(On/Off): Press to turn the climate control system on
or off. Outside air still enters the vehicle, and is directed
to the floor. This direction can be changed by pressing
the mode button. Recirculation can be selected once
you have selected vent or bi-level mode. The
temperature can also be adjusted using either
temperature button. If the air delivery mode or
temperature settings are adjusted with the system off,
the display illuminates briefly to show the settings and
then returns to off. The system can be turned back on
by pressing either
O,D,C,#, the defrost or the AUTO
button.
Driver and Passenger Side Temperature
Controls
The driver and passenger side temperature buttons are
used to adjust the temperature of the air coming
through the system on the driver or passenger's side of
the vehicle. The temperature can be adjusted even if
the system is turned off. This is possible since outside
air always flows through the system as the vehicle is
moving forward unless it is set to recirculation mode.
See “Recirculation” later in this section.
Press the + or −buttons to increase or decrease the
cabin temperature. The driver side or passenger side
temperature display shows the temperature setting
decreasing or increasing.
4-22
Page 243 of 626

0(Defrost):This mode removes fog or frost from the
windshield more quickly. Air is directed to the
windshield and side window vents, with some directed
to the floor vents. In this mode, the system
automatically forces outside air into the vehicle and
runs the air conditioning compressor unless the outside
temperature is close to freezing. The recirculation mode
cannot be selected while in the defrost mode.
The passenger temperature control cannot be activated
while in defrost mode. If the PASS button is pressed,
the button indicator flashes three times and will not
work. If the passenger temperature buttons are
adjusted, the driver temperature indicator changes. The
passenger temperature will not be displayed.
If vent, bi-level, or floor mode is selected again, the
climate control system displays the previous
temperature settings.
Do not drive the vehicle until all the windows are clear.
#(Air Conditioning): Press to turn the air
conditioning (A/C) compressor on and off. An indicator
light comes on to show that the air conditioning is on. If this button is pressed when the air conditioning
compressor is unavailable due to outside conditions, the
indicator flashes three times and then turns off. If the air
conditioning is on and the outside temperature drops
below a temperature which is too cool for air
conditioning to be effective, the air conditioning light
turns off to show that the air conditioning mode has
been canceled.
On hot days, open the windows long enough to let hot
inside air escape. This helps to reduce the time it takes
for the vehicle to cool down. It also helps the system to
operate more efficiently.
The air conditioning system removes moisture from the
air, so a small amount of water might drip under the
vehicle while idling or after turning off the engine. This
is normal.
@(Recirculation):
Press to turn the recirculation
mode on. An indicator light comes on to show that the
recirculation is on.
This mode recirculates and helps to quickly cool the air
inside the vehicle. It can be used to help prevent
outside air and odors from entering the vehicle.
4-25
Page 245 of 626

Sensors
The solar sensor, located in the defrost grille, in the
middle of the instrument panel, monitors the solar heat.
Do not cover the solar sensor or the system will not
work properly.
The interior temperature
sensor, located in the
headliner, measures the
temperature of the air
inside the vehicle.
There is also an exterior temperature sensor located
behind the front grille. This sensor reads the outside air
temperature and helps maintain the temperature inside
the vehicle. Any cover on the front of the vehicle could
cause a false reading in the displayed temperature.
The climate control system uses the information from
these sensors to maintain your comfort setting by
adjusting the outlet temperature, fan speed, and the air
delivery mode. The system may also supply cooler air
to the side of the vehicle facing the sun. The
recirculation mode will also be used as needed to
maintain cool outlet temperatures.
4-27
Page 280 of 626
Compass Calibration
The compass can be manually calibrated. Only calibrate
the compass in a magnetically clean and safe location,
such as an open parking lot, where driving the vehicle
in circles is not a danger. It is suggested to calibrate
away from tall buildings, utility wires, manhole covers,
or other industrial structures, if possible.
If CAL should ever appear in the DIC display, the
compass should be calibrated.
If the DIC display does not show a heading, for
example, N for North, or the heading does not change
after making turns, there may be a strong magnetic field
interfering with the compass. Such interference may be
caused by a magnetic CB or cell phone antenna mount,
a magnetic emergency light, magnetic note pad holder,
or any other magnetic item. Turn off the vehicle, move
the magnetic item, then turn on the vehicle and calibrate
the compass.To calibrate the compass, use the following procedure:Compass Calibration Procedure
1. Before calibrating the compass, make sure the
compass zone is set to the variance zone in which
the vehicle is located. See “Compass Variance
(Zone) Procedure” earlier in this section.
Do not operate any switches such as window,
sunroof, climate controls, seats, etc. during the
calibration procedure.
2. Press the vehicle information button until PRESS
VTO CALIBRATE COMPASS displays. Or, if the
vehicle does not have DIC buttons, press the trip
odometer reset stem until CALIBRATE COMPASS
displays.
3. Press the set/reset button to start the compass calibration. Or, if the vehicle does not have DIC
buttons, press and hold the trip odometer reset
stem for two seconds to start the compass
calibration.
4. The DIC will display CALIBRATING: DRIVE IN CIRCLES. Drive the vehicle in tight circles at less
than 5 mph (8 km/h) to complete the calibration.
The DIC will display CALIBRATION COMPLETE
for a few seconds when the calibration is complete.
The DIC display will then return to the
previous menu.
4-62
Page 281 of 626
DIC Warnings and Messages
Messages are displayed on the DIC to notify the driver
that the status of the vehicle has changed and that
some action may be needed by the driver to correct the
condition. Multiple messages may appear one after
another.
Some messages may not require immediate action, but
you can press any of the DIC buttons on the instrument
panel or the trip odometer reset stem on the instrument
panel cluster to acknowledge that you received the
messages and to clear them from the display.
Some messages cannot be cleared from the DIC
display because they are more urgent. These
messages require action before they can be cleared.
You should take any messages that appear on the
display seriously and remember that clearing the
messages will only make the messages disappear, not
correct the problem.
The following are the possible messages that can be
displayed and some information about them.
If your vehicle has the DURAMAX
®Diesel engine, see
the DURAMAX Diesel manual for more information.
BATTERY LOW START VEHICLE
When the vehicle’ s battery is severely discharged, this
message will display and four chimes may sound. Start
the vehicle immediately. If the vehicle is not started and
the battery continues to discharge, the climate controls,
heated seats, and audio systems will shut off and the
vehicle may require a jump start. These systems will
function again after the vehicle is started.
CHANGE ENGINE OIL SOON
This message displays when the engine oil needs to be
changed. When you change the engine oil, be sure to
reset the CHANGE ENGINE OIL SOON message. See
Engine Oil Life System
on page 6‑20for information on
how to reset the message. See Engine Oilon
page 6‑18and Scheduled Maintenanceon page 7‑3for more information.
4-63
Page 373 of 626
The traction control
disable button is located
on the instrument panel
below the climate
controls.
The traction control part of StabiliTrak can be turned off
by pressing and releasing the StabiliTrak button if both
systems (traction control and StabiliTrak) were
previously on. To disable both TCS and StabiliTrak,
press and hold the button for five seconds.
TCS and StabiliTrak can be turned on by pressing and
releasing the StabiliTrak button if not automatically shut
off for any other reason.
When TCS or StabiliTrak is turned off, the StabiliTrak
light and the appropriate message will be displayed on
the DIC to warn the driver. The vehicle will still have
brake-traction control when traction control is off, but
will not be able to use the engine speed management
system. See “Traction Control Operation” next for more
information.
When the traction control system has been turned off,
system noises may still be heard as a result of the
brake-traction control coming on. It is recommended to leave the system on for normal
driving conditions, but it may be necessary to turn the
system off if the vehicle is stuck in sand, mud, ice or
snow, and you want to
“rock”the vehicle to attempt to
free it. It may also be necessary to turn off the system
when driving in extreme off-road conditions where high
wheel spin is required. See If Your Vehicle is Stuck in
Sand, Mud, Ice, or Snow on page 5‑27.
When the transfer case is in 4LO, the stability system is
automatically disabled, the StabiliTrak light comes on
and the STABILITRAK OFF message will appear on the
DIC. Both traction control and StabiliTrak are
automatically disabled in this condition.
Traction Control Operation
The traction control system is part of the StabiliTrak
system. Traction control limits wheel spin by reducing
engine power to the wheels (engine speed
management) and by applying brakes to each individual
wheel (brake-traction control) as necessary.
The traction control system is enabled automatically
when the vehicle is started. It will activate and the
StabiliTrak light will flash if it senses that any of the
wheels are spinning or beginning to lose traction while
driving. If traction control is turned off, only the
brake-traction control portion of traction control will
work. The engine speed management will be disabled.
5-7
Page 392 of 626
Blizzard Conditions
Being stuck in snow can be in a serious situation. Stay
with the vehicle unless there is help nearby. If possible,
use theRoadside Assistance Program
on page 8‑7.
To get help and keep everyone in the vehicle safe:
.Turn on the Hazard Warning Flasherson
page 4‑3.
.Tie a red cloth to an outside mirror.
{WARNING:
Snow can trap engine exhaust under the vehicle.
This may cause exhaust gases to get inside.
Engine exhaust contains carbon monoxide (CO)
which cannot be seen or smelled. It can cause
unconsciousness and even death.
If the vehicle is stuck in the snow:
.Clear away snow from around the base of
your vehicle, especially any that is blocking
the exhaust pipe.
.Check again from time to time to be sure
snow does not collect there.
(Continued)
WARNING: (Continued)
.Open a window about 5 cm (two inches) on
the side of the vehicle that is away from the
wind to bring in fresh air.
.Fully open the air outlets on or under the
instrument panel.
.Adjust the Climate Control system to a setting
that circulates the air inside the vehicle and
set the fan speed to the highest setting. See
Climate Control System in the Index.
For more information about carbon monoxide, see
Engine Exhaust on page 3‑54.
Snow can trap exhaust gases under your vehicle.
This can cause deadly CO (carbon monoxide) gas
to get inside. CO could overcome you and kill you.
You cannot see it or smell it, so you might not
know it is in your vehicle. Clear away snow from
around the base of your vehicle, especially any
that is blocking the exhaust.
Run the engine for short periods only as needed to
keep warm, but be careful.
5-26