2010 CHEVROLET SILVERADO flat tire
[x] Cancel search: flat tirePage 390 of 626
Hill and Mountain Roads
Driving on steep hills or through mountains is different
than driving on flat or rolling terrain. Tips for driving in
these conditions include:
.Keep the vehicle serviced and in good shape.
.Check all fluid levels and brakes, tires, cooling
system, and transmission.
.Going down steep or long hills, shift to a
lower gear.
{WARNING:
If you do not shift down, the brakes could get so
hot that they would not work well. You would then
have poor braking or even none going down a hill.
You could crash. Shift down to let the engine
assist the brakes on a steep downhill slope.
{WARNING:
Coasting downhill in N (Neutral) or with the
ignition off is dangerous. The brakes will have to
do all the work of slowing down and they could
get so hot that they would not work well. You
would then have poor braking or even none going
down a hill. You could crash. Always have the
engine running and the vehicle in gear when
going downhill.
.Stay in your own lane. Do not swing wide or cut
across the center of the road. Drive at speeds that
let you stay in your own lane.
.Top of hills: Be alert—something could be in your
lane (stalled car, accident).
.Pay attention to special road signs (falling rocks
area, winding roads, long grades, passing or
no-passing zones) and take appropriate action.
See Off-Road Driving
on page 5‑11for information
about driving off-road.
5-24
Page 396 of 626
Tire and Loading Information Label
Label Example
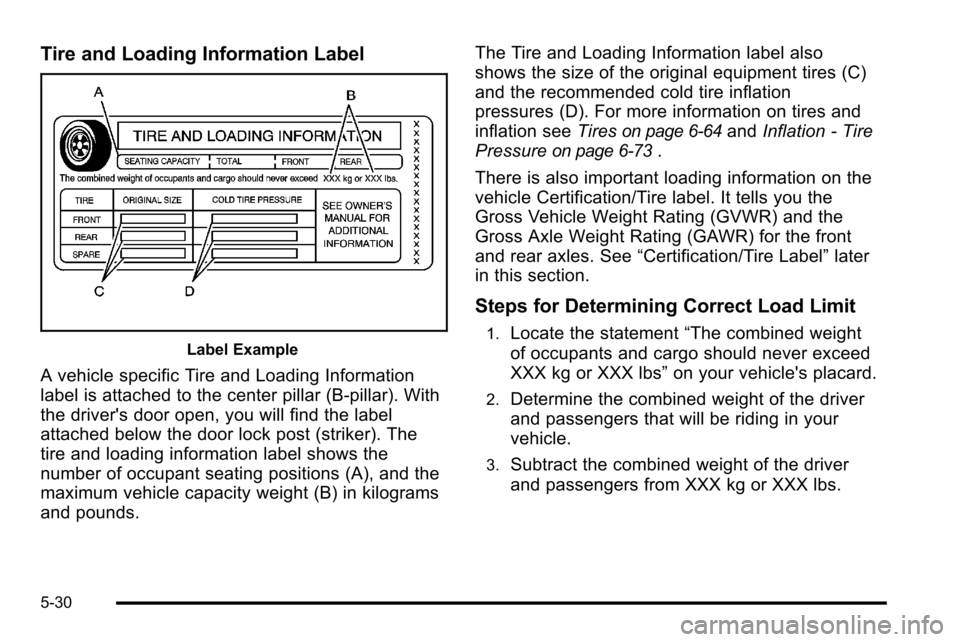
A vehicle specific Tire and Loading Information
label is attached to the center pillar (B-pillar). With
the driver's door open, you will find the label
attached below the door lock post (striker). The
tire and loading information label shows the
number of occupant seating positions (A), and the
maximum vehicle capacity weight (B) in kilograms
and pounds.The Tire and Loading Information label also
shows the size of the original equipment tires (C)
and the recommended cold tire inflation
pressures (D). For more information on tires and
inflation see
Tires
on page 6‑64andInflation - Tire
Pressure
on page 6‑73.
There is also important loading information on the
vehicle Certification/Tire label. It tells you the
Gross Vehicle Weight Rating (GVWR) and the
Gross Axle Weight Rating (GAWR) for the front
and rear axles. See “Certification/Tire Label” later
in this section.
Steps for Determining Correct Load Limit
1.Locate the statement “The combined weight
of occupants and cargo should never exceed
XXX kg or XXX lbs” on your vehicle's placard.
2.Determine the combined weight of the driver
and passengers that will be riding in your
vehicle.
3.Subtract the combined weight of the driver
and passengers from XXX kg or XXX lbs.
5-30
Page 399 of 626
Refer to your vehicle's tire and loading information
label for specific information about your vehicle's
capacity weight and seating positions. The
combined weight of the driver, passengers, and
cargo should never exceed your vehicle's capacity
weight.
Certification/Tire Label
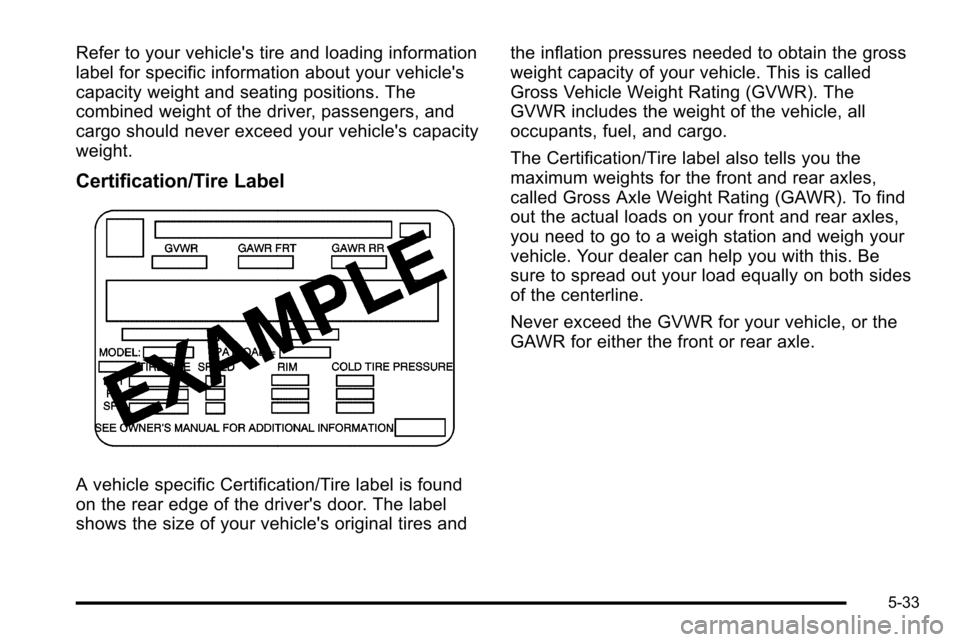
A vehicle specific Certification/Tire label is found
on the rear edge of the driver's door. The label
shows the size of your vehicle's original tires andthe inflation pressures needed to obtain the gross
weight capacity of your vehicle. This is called
Gross Vehicle Weight Rating (GVWR). The
GVWR includes the weight of the vehicle, all
occupants, fuel, and cargo.
The Certification/Tire label also tells you the
maximum weights for the front and rear axles,
called Gross Axle Weight Rating (GAWR). To find
out the actual loads on your front and rear axles,
you need to go to a weigh station and weigh your
vehicle. Your dealer can help you with this. Be
sure to spread out your load equally on both sides
of the centerline.
Never exceed the GVWR for your vehicle, or the
GAWR for either the front or rear axle.
5-33
Page 428 of 626
Vehicle Series Hitch TypeMaximum
Tongue Weight
3500 Single
Rear Wheels Fifth Wheel
Gooseneck1 360 kg
(3,000 lbs)
3500 Dual Rear
Wheels Fifth Wheel
Gooseneck1 587 kg
(3,500 lbs)
Do not exceed the maximum allowable tongue weight
for the vehicle. Choose the shortest hitch extension that
will position the hitch ball closest to the vehicle. This will
help reduce the effect of trailer tongue weight on the
rear axle.
Trailering may be limited by the vehicle's ability to carry
tongue weight. Tongue or kingpin weight cannot cause
the vehicle to exceed the GVWR (Gross Vehicle Weight
Rating) or the RGAWR (Rear Gross Axle Weight
Rating). See “Total Weight on the Vehicle's Tires” later
in this section for more information.
After loading the trailer, weigh the trailer and then the
tongue, separately, to see if the weights are proper.
If they are not, adjustments might be made by moving
some items around in the trailer.
Total Weight on the Vehicle's Tires
Be sure the vehicle's tires are inflated to the inflation
pressures found on the Certification label on the drivers
door or see Loading the Vehicle
on page 5‑29for more
information. Make sure not to exceed the GVWR limit
for the vehicle, or the RGAWR, with the tow vehicle and
trailer fully loaded for the trip including the weight of the
trailer tongue. If using a weight distributing hitch, make
sure not to exceed the RGAWR before applying the
weight distribution spring bars.
Weight of the Trailering Combination
It is important that the combination of the tow vehicle
and trailer does not exceed any of its weight
ratings —GCWR, GVWR, RGAWR, Trailer Weight
Rating or Tongue Weight. The only way to be sure it is
not exceeding any of these ratings is to weigh the tow
vehicle and trailer combination, fully loaded for the trip,
getting individual weights for each of these items.
5-62
Page 446 of 626
Section 6 Service and Appearance Care
Bulb Replacement. . . . . . . . . . . . . . . . . . . . . . . . . . . . . . . . 6-57
Halogen Bulbs . . . . . . . . . . . . . . . . . . . . . . . . . . . . . . . . . 6-57
Headlamps . . . . . . . . . . . . . . . . . . . . . . . . . . . . . . . . . . . . 6-57
Center High-Mounted Stoplamp (CHMSL) and Cargo Lamp . . . . . . . . . . . . . . . . . . . . . . . . . . . . . . . . . 6-58
Pickup Box Identification and Fender Marker Lamps . . . . . . . . . . . . . . . . . . . . . . . . . . . . . . . . . . . . . . . 6-59
Taillamps, Turn Signal, Stoplamps and Back-up Lamps . . . . . . . . . . . . . . . . . . . . . . . . . . . . . . . . . . . . . . . 6-60
License Plate Lamp . . . . . . . . . . . . . . . . . . . . . . . . . . . . 6-62
Replacement Bulbs . . . . . . . . . . . . . . . . . . . . . . . . . . . . 6-62
Windshield Wiper Blade Replacement . . . . . . . . . . .6-63
Tires . . . . . . . . . . . . . . . . . . . . . . . . . . . . . . . . . . . . . . . . . . . . . . . 6-64
Tire Sidewall Labeling . . . . . . . . . . . . . . . . . . . . . . . . . 6-65
Tire Terminology and Definitions . . . . . . . . . . . . . . . 6-70
Inflation - Tire Pressure . . . . . . . . . . . . . . . . . . . . . . . . 6-73
High-Speed Operation . . . . . . . . . . . . . . . . . . . . . . . . . 6-74
Dual Tire Operation . . . . . . . . . . . . . . . . . . . . . . . . . . . . 6-75
Tire Pressure Monitor System . . . . . . . . . . . . . . . . . 6-75
Tire Pressure Monitor Operation . . . . . . . . . . . . . . . 6-76
Tire Inspection and Rotation . . . . . . . . . . . . . . . . . . . 6-80
When It Is Time for New Tires . . . . . . . . . . . . . . . . . 6-82
Buying New Tires . . . . . . . . . . . . . . . . . . . . . . . . . . . . . . 6-83
Different Size Tires and Wheels . . . . . . . . . . . . . . . 6-85 Uniform Tire Quality Grading . . . . . . . . . . . . . . . . . . . 6-85
Wheel Alignment and Tire Balance . . . . . . . . . . . . 6-87
Wheel Replacement . . . . . . . . . . . . . . . . . . . . . . . . . . . 6-87
Tire Chains . . . . . . . . . . . . . . . . . . . . . . . . . . . . . . . . . . . . 6-89
If a Tire Goes Flat . . . . . . . . . . . . . . . . . . . . . . . . . . . . . 6-89
Changing a Flat Tire . . . . . . . . . . . . . . . . . . . . . . . . . . . 6-90
Removing the Spare Tire and Tools . . . . . . . . . . . . 6-92
Removing the Flat Tire and Installing the
Spare Tire . . . . . . . . . . . . . . . . . . . . . . . . . . . . . . . . . . . 6-97
Secondary Latch System . . . . . . . . . . . . . . . . . . . . . 6-103
Storing a Flat or Spare Tire and Tools . . . . . . . . 6-106
Spare Tire . . . . . . . . . . . . . . . . . . . . . . . . . . . . . . . . . . . . 6-109
Appearance Care . . . . . . . . . . . . . . . . . . . . . . . . . . . . . . . . 6-110
Interior Cleaning . . . . . . . . . . . . . . . . . . . . . . . . . . . . . 6-110
Fabric/Carpet . . . . . . . . . . . . . . . . . . . . . . . . . . . . . . . . . 6-111
Leather . . . . . . . . . . . . . . . . . . . . . . . . . . . . . . . . . . . . . . . 6-112
Instrument Panel, Vinyl, and Other Plastic Surfaces . . . . . . . . . . . . . . . . . . . . . . . . . . . . . . . . . . . . 6-112
Care of Safety Belts . . . . . . . . . . . . . . . . . . . . . . . . . . 6-112
Weatherstrips . . . . . . . . . . . . . . . . . . . . . . . . . . . . . . . . . 6-113
Washing Your Vehicle . . . . . . . . . . . . . . . . . . . . . . . . 6-113
Cleaning Exterior Lamps/Lenses . . . . . . . . . . . . . 6-113
Finish Care . . . . . . . . . . . . . . . . . . . . . . . . . . . . . . . . . . . 6-114
Windshield and Wiper Blades . . . . . . . . . . . . . . . . . 6-114
6-2
Page 499 of 626
The vehicle should:
.Be placed so the headlamps are 25 ft. (7.6 m) from
a light colored wall.
.Have all four tires on a level surface which is level
all the way to the wall.
.Be placed so it is perpendicular to the wall.
.Not have any snow, ice, or mud on it.
.Be fully assembled and all other work stopped
while headlamp aiming is being performed.
.Be normally loaded with a full tank of fuel and one
person or 160 lbs (75 kg) sitting on the driver seat.
.Have tires properly inflated.
.Have the spare tire is in its proper location in the
vehicle.
Headlamp aiming is done with the vehicle's low-beam
headlamps. The high-beam headlamps will be correctly
aimed if the low-beam headlamps are aimed properly. To adjust the vertical aim:
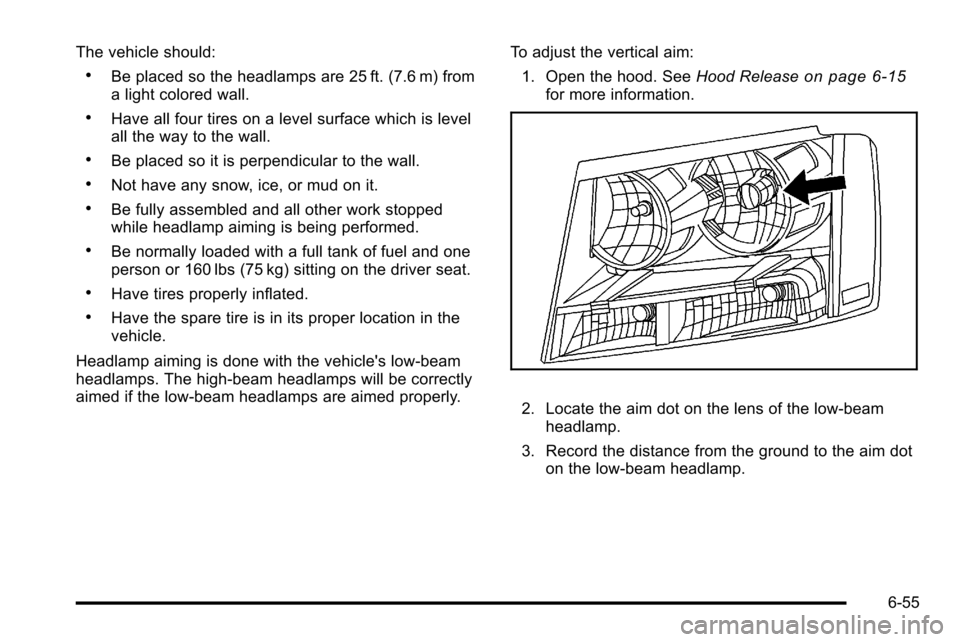
1. Open the hood. See Hood Release
on page 6‑15for more information.
2. Locate the aim dot on the lens of the low‐beam
headlamp.
3. Record the distance from the ground to the aim dot on the low‐beam headlamp.
6-55
Page 508 of 626
Tires
Your new vehicle comes with high-quality tires
made by a leading tire manufacturer. If you ever
have questions about your tire warranty and
where to obtain service, see your vehicle
Warranty booklet for details. For additional
information refer to the tire manufacturer.
{CAUTION:
Poorly maintained and improperly used tires
are dangerous.
.Overloading your vehicle's tires can
cause overheating as a result of too
much flexing. You could have an air-out
and a serious accident. SeeLoading the
Vehicle
on page 5‑29.
.Underinflated tires pose the same danger
as overloaded tires. The resulting
accident could cause serious injury.
Check all tires frequently to maintain the
recommended pressure. Tire pressure
(Continued)
CAUTION: (Continued)
should be checked when your vehicle's
tires are cold. See Inflation - Tire
Pressure
on page 6‑73.
.Overinflated tires are more likely to be
cut, punctured, or broken by a sudden
impact —such as when you hit a pothole.
Keep tires at the recommended pressure.
.Worn, old tires can cause accidents.
If the tire's tread is badly worn, or if your
vehicle's tires have been damaged,
replace them.
20‐Inch Tires
If your vehicle has the optional 20‐inch P275/
55R20 size tires, they are classified as touring
tires and are designed for on road use. The low‐
profile, wide tread design is not recommended for
“off‐road” driving or commercial uses such as
snow plowing. See Off-Road Driving
on page 5‑11
andAdding a Snow Plow or Similar Equipmenton
page 5‑37
for additional information.
6-64
Page 509 of 626
Notice:If the vehicle has low‐profile tires, they
are more susceptible to damage from road
hazards or curb impact than standard profile
tires. Tire and/or wheel assembly damage can
occur when coming into contact with road
hazards like, potholes, or sharp edged objects,
or when sliding into a curb. The vehicle
warranty does not cover this type of damage.
Keep tires set to the correct inflation pressure
and, when possible avoid contact with curbs,
potholes, and other road hazards.
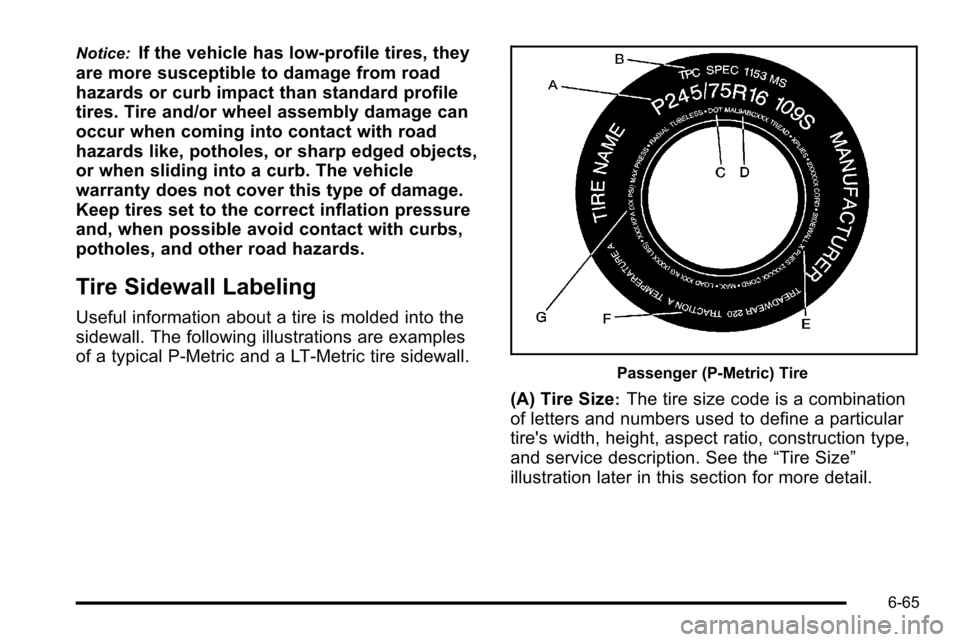
Tire Sidewall Labeling
Useful information about a tire is molded into the
sidewall. The following illustrations are examples
of a typical P‐Metric and a LT‐Metric tire sidewall.
Passenger (P‐Metric) Tire
(A) Tire Size:The tire size code is a combination
of letters and numbers used to define a particular
tire's width, height, aspect ratio, construction type,
and service description. See the “Tire Size”
illustration later in this section for more detail.
6-65