2010 CHEVROLET SILVERADO service
[x] Cancel search: servicePage 512 of 626
(F) Tire Ply Material:The type of cord and
number of plies in the sidewall and under the
tread.
(G) Single Tire Maximum Load
:Maximum load
that can be carried and the maximum pressure
needed to support that load when used as a
single. For information on recommended tire
pressure see Inflation - Tire Pressure
on page 6‑73
andLoading the Vehicleon page 5‑29.
Tire Size
The following examples show the different parts of
a tire size.
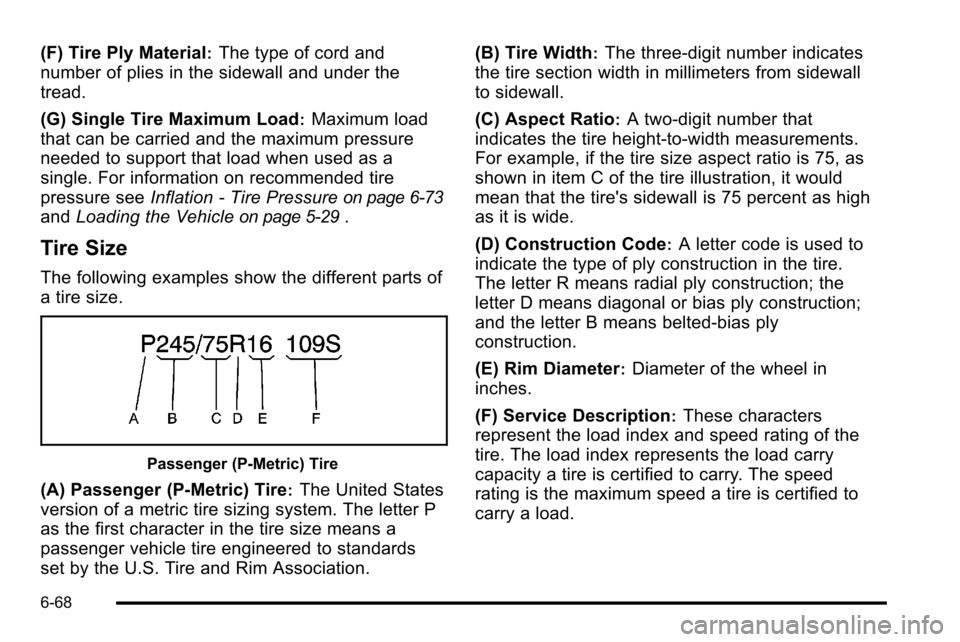
Passenger (P‐Metric) Tire
(A) Passenger (P‐Metric) Tire:The United States
version of a metric tire sizing system. The letter P
as the first character in the tire size means a
passenger vehicle tire engineered to standards
set by the U.S. Tire and Rim Association. (B) Tire Width
:The three‐digit number indicates
the tire section width in millimeters from sidewall
to sidewall.
(C) Aspect Ratio
:A two‐digit number that
indicates the tire height‐to‐width measurements.
For example, if the tire size aspect ratio is 75, as
shown in item C of the tire illustration, it would
mean that the tire's sidewall is 75 percent as high
as it is wide.
(D) Construction Code
:A letter code is used to
indicate the type of ply construction in the tire.
The letter R means radial ply construction; the
letter D means diagonal or bias ply construction;
and the letter B means belted‐bias ply
construction.
(E) Rim Diameter
:Diameter of the wheel in
inches.
(F) Service Description
:These characters
represent the load index and speed rating of the
tire. The load index represents the load carry
capacity a tire is certified to carry. The speed
rating is the maximum speed a tire is certified to
carry a load.
6-68
Page 513 of 626
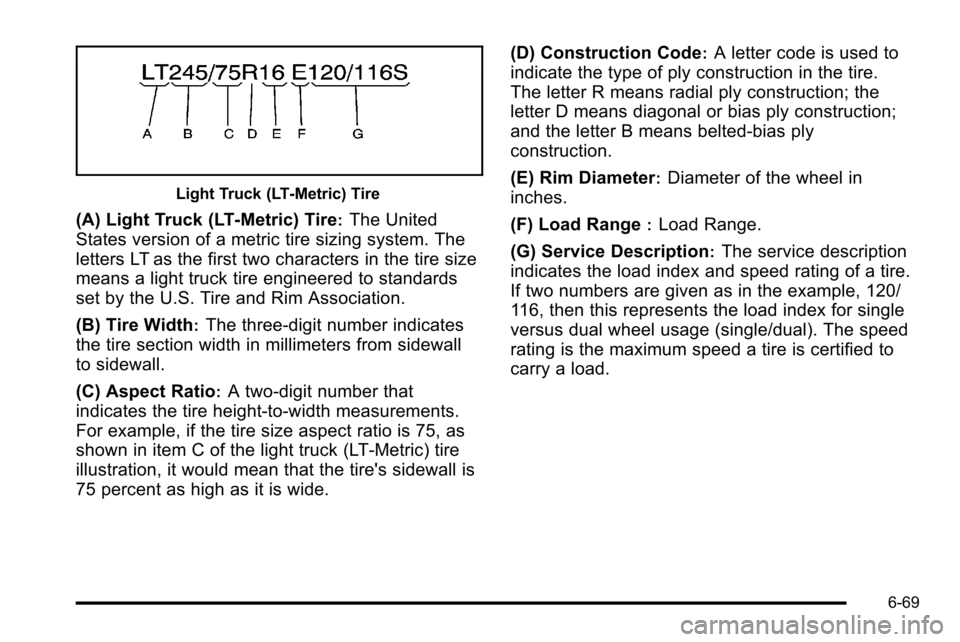
Light Truck (LT‐Metric) Tire
(A) Light Truck (LT‐Metric) Tire:The United
States version of a metric tire sizing system. The
letters LT as the first two characters in the tire size
means a light truck tire engineered to standards
set by the U.S. Tire and Rim Association.
(B) Tire Width
:The three‐digit number indicates
the tire section width in millimeters from sidewall
to sidewall.
(C) Aspect Ratio
:A two‐digit number that
indicates the tire height‐to‐width measurements.
For example, if the tire size aspect ratio is 75, as
shown in item C of the light truck (LT‐Metric) tire
illustration, it would mean that the tire's sidewall is
75 percent as high as it is wide. (D) Construction Code
:A letter code is used to
indicate the type of ply construction in the tire.
The letter R means radial ply construction; the
letter D means diagonal or bias ply construction;
and the letter B means belted‐bias ply
construction.
(E) Rim Diameter
:Diameter of the wheel in
inches.
(F) Load Range
:Load Range.
(G) Service Description
:The service description
indicates the load index and speed rating of a tire.
If two numbers are given as in the example, 120/
116, then this represents the load index for single
versus dual wheel usage (single/dual). The speed
rating is the maximum speed a tire is certified to
carry a load.
6-69
Page 522 of 626
.One or more TPMS sensors are missing or
damaged. The DIC message and the TPMS
malfunction light should go off when the TPMS
sensors are installed and the sensor matching
process is performed successfully. See your dealer
for service.
.Replacement tires or wheels do not match your
vehicle's original equipment tires or wheels. Tires
and wheels other than those recommended for
your vehicle could prevent the TPMS from
functioning properly. SeeBuying New Tires
on
page 6‑83.
.Operating electronic devices or being near facilities
using radio wave frequencies similar to the TPMS
could cause the TPMS sensors to malfunction.
If the TPMS is not functioning it cannot detect or signal
a low tire condition. See your dealer for service if the
TPMS malfunction light and DIC message comes on
and stays on.
TPMS Sensor Matching Process
Each TPMS sensor has a unique identification code.
Any time you rotate your vehicle's tires or replace one
or more of the TPMS sensors, the identification codes
will need to be matched to the new tire/wheel position.
The sensors are matched to the tire/wheel positions in
the following order: driver side front tire, passenger side
front tire, passenger side rear tire, and driver side rear
tire using a TPMS diagnostic tool. See your dealer for
service.
The TPMS sensors can also be matched to each tire/
wheel position by increasing or decreasing the tire's air
pressure. If increasing the tire's air pressure, do not
exceed the maximum inflation pressure indicated on the
tire's sidewall.
To decrease air-pressure out of a tire you can use the
pointed end of the valve cap, a pencil-style air pressure
gauge, or a key.
You have two minutes to match the first tire/wheel
position, and five minutes overall to match all four tire/
wheel positions. If it takes longer than two minutes, to
match the first tire and wheel, or more than five minutes
to match all four tire and wheel positions the matching
process stops and you need to start over.
6-78
Page 530 of 626
While the tires available on General Motors
passenger cars and light trucks may vary with
respect to these grades, they must also conform
to federal safety requirements and additional
General Motors Tire Performance Criteria (TPC)
standards.
All Passenger Car Tires Must Conform to Federal
Safety Requirements In Addition To These
Grades.
Treadwear
The treadwear grade is a comparative rating
based on the wear rate of the tire when tested
under controlled conditions on a specified
government test course. For example, a tire
graded 150 would wear one and a half (1½) times
as well on the government course as a tire graded
100. The relative performance of tires depends
upon the actual conditions of their use, however,
and may depart significantly from the norm due to
variations in driving habits, service practices and
differences in road characteristics and climate.
Traction–AA, A, B, C
The traction grades, from highest to lowest, are
AA, A, B, and C. Those grades represent the tire's
ability to stop on wet pavement as measured
under controlled conditions on specified
government test surfaces of asphalt and concrete.
A tire marked C may have poor traction
performance. Warning: The traction grade
assigned to this tire is based on straight-ahead
braking traction tests, and does not include
acceleration, cornering, hydroplaning, or peak
traction characteristics.
Temperature –A, B, C
The temperature grades are A (the highest), B,
and C, representing the tire's resistance to the
generation of heat and its ability to dissipate heat
when tested under controlled conditions on a
specified indoor laboratory test wheel. Sustained
high temperature can cause the material of the
tire to degenerate and reduce tire life, and
excessive temperature can lead to sudden tire
failure. The grade C corresponds to a level of
performance which all passenger car tires must
meet under the Federal Motor Safety Standard
No. 109. Grades B and A represent higher levels
of performance on the laboratory test wheel than
6-86
Page 546 of 626
{WARNING:
Wheel nuts that are improperly or incorrectly
tightened can cause the wheels to become loose
or come off. The wheel nuts should be tightened
with a torque wrench to the proper torque
specification after replacing. Follow the torque
specification supplied by the aftermarket
manufacturer when using accessory locking wheel
nuts. SeeCapacities and Specifications
on
page 6‑126
for original equipment wheel nut
torque specifications.
Notice: Improperly tightened wheel nuts can lead to
brake pulsation and rotor damage. To avoid
expensive brake repairs, evenly tighten the wheel
nuts in the proper sequence and to the proper
torque specification. See Capacities and
Specifications
on page 6‑126for the wheel nut torque
specification.
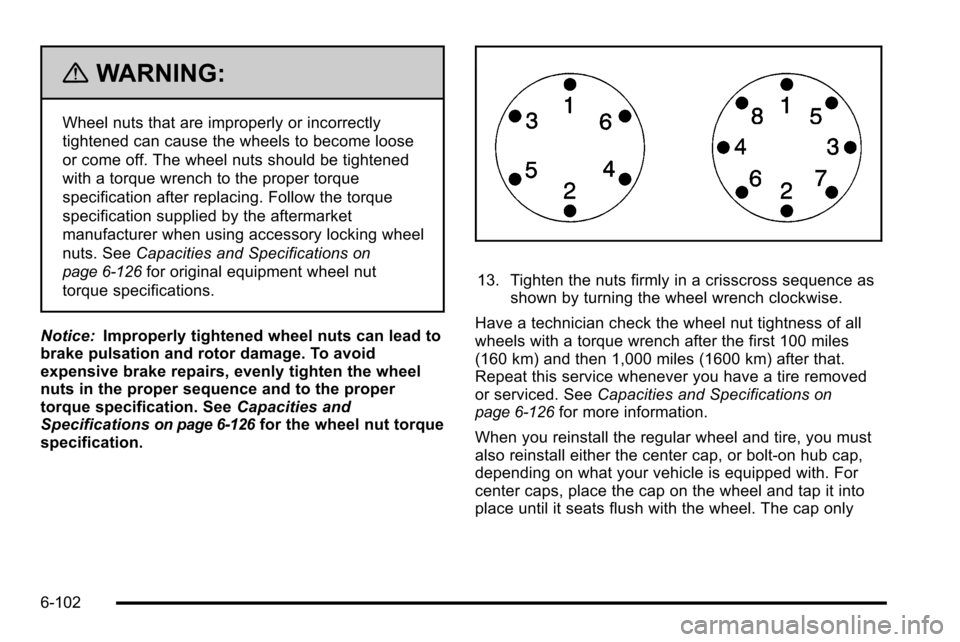
13. Tighten the nuts firmly in a crisscross sequence as
shown by turning the wheel wrench clockwise.
Have a technician check the wheel nut tightness of all
wheels with a torque wrench after the first 100 miles
(160 km) and then 1,000 miles (1600 km) after that.
Repeat this service whenever you have a tire removed
or serviced. See Capacities and Specifications
on
page 6‑126for more information.
When you reinstall the regular wheel and tire, you must
also reinstall either the center cap, or bolt-on hub cap,
depending on what your vehicle is equipped with. For
center caps, place the cap on the wheel and tap it into
place until it seats flush with the wheel. The cap only
6-102
Page 561 of 626
Vehicle Identification
Vehicle Identification Number (VIN)
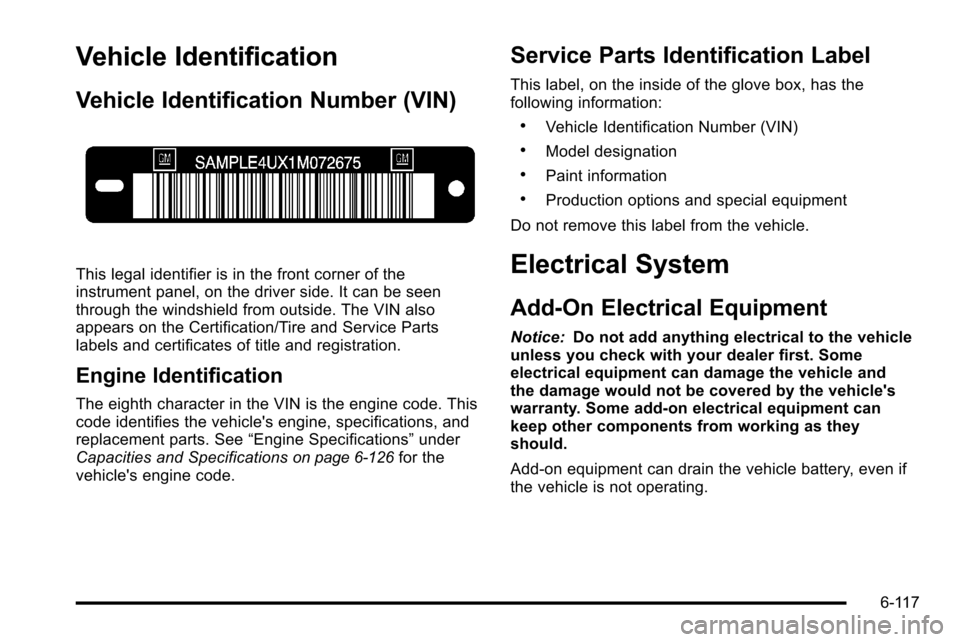
This legal identifier is in the front corner of the
instrument panel, on the driver side. It can be seen
through the windshield from outside. The VIN also
appears on the Certification/Tire and Service Parts
labels and certificates of title and registration.
Engine Identification
The eighth character in the VIN is the engine code. This
code identifies the vehicle's engine, specifications, and
replacement parts. See“Engine Specifications”under
Capacities and Specifications
on page 6‑126for the
vehicle's engine code.
Service Parts Identification Label
This label, on the inside of the glove box, has the
following information:
.Vehicle Identification Number (VIN)
.Model designation
.Paint information
.Production options and special equipment
Do not remove this label from the vehicle.
Electrical System
Add-On Electrical Equipment
Notice: Do not add anything electrical to the vehicle
unless you check with your dealer first. Some
electrical equipment can damage the vehicle and
the damage would not be covered by the vehicle's
warranty. Some add-on electrical equipment can
keep other components from working as they
should.
Add-on equipment can drain the vehicle battery, even if
the vehicle is not operating.
6-117
Page 573 of 626
Section 7 Maintenance Schedule
Maintenance Schedule. . . . . . . . . . . . . . . . . . . . . . . . . . . . 7-2
Introduction . . . . . . . . . . . . . . . . . . . . . . . . . . . . . . . . . . . . . 7-2
Scheduled Maintenance . . . . . . . . . . . . . . . . . . . . . . . . 7-3
Owner Checks and Services . . . . . . . . . . . . . . . . . . . 7-11 Recommended Fluids and Lubricants . . . . . . . . . . 7-13
Maintenance Replacement Parts . . . . . . . . . . . . . . 7-15
Engine Drive Belt Routing . . . . . . . . . . . . . . . . . . . . . 7-16
Maintenance Record . . . . . . . . . . . . . . . . . . . . . . . . . . . 7-17
7-1
Page 574 of 626
Maintenance Schedule
Introduction
This maintenance section applies to vehicles with a
gasoline engine. For diesel engine vehicles, see the
maintenance schedule section in the DURAMAX Diesel
manual.
Notice:Maintenance intervals, checks, inspections,
recommended fluids, and lubricants are necessary
to keep this vehicle in good working condition.
Damage caused by failure to follow scheduled
maintenance might not be covered by the vehicle
warranty.
As the vehicle owner, you are responsible for the
scheduled maintenance in this section. We recommend
having your dealer perform these services. Proper
vehicle maintenance helps to keep the vehicle in good
working condition, improves fuel economy, and reduces
vehicle emissions for better air quality.
Because of all the different ways people use vehicles,
maintenance needs vary. The vehicle might need more
frequent checks and services. Please read the
information under Scheduled Maintenance. To keep the
vehicle in good condition, see your dealer. The maintenance schedule is for vehicles that:
.carry passengers and cargo within recommended
limits on the Tire and Loading Information label.
See
Loading the Vehicle on page 5‑29.
.are driven on reasonable road surfaces within legal
driving limits.
.are driven off‐road in the recommended manner.
SeeOff-Road Driving on page 5‑11.
.use the recommended fuel. See Gasoline Octaneon page 6‑7.
{WARNING:
Performing maintenance work on a vehicle can be
dangerous. In trying to do some jobs, you can be
seriously injured. Do your own maintenance work
only if you have the required know-how and the
proper tools and equipment for the job. If you
have any doubt, see your dealer to have a
qualified technician do the work. See Doing Your
Own Service Work on page 6‑5.
7-2