2010 CHEVROLET IMPALA check engine
[x] Cancel search: check enginePage 285 of 432

A. Windshield Washer Fluid Reservoir. See “Adding
Washer Fluid” underWindshield Washer Fluid
on page 6-33.
B. Battery. SeeBattery on page 6-38.
C. Underhood Fuse Block. SeeUnderhood Fuse Block
on page 6-97.
D. Remote Positive (+) Terminal. SeeJump Starting on
page 6-39.
E. Coolant Recovery Tank. See “Checking Coolant”
underCooling System on page 6-24.
F. Pressure Cap. SeeCooling System on page 6-24.
G. Power Steering Fluid Cap. SeePower Steering Fluid
on page 6-32.
H. Engine Oil Fill Cap. See “When to Add Engine Oil”
underEngine Oil on page 6-15.
I. Engine Oil Dipstick. See “Checking Engine Oil”
underEngine Oil on page 6-15.
J. Automatic Transmission Fluid Dipstick (Out of View).
See “Checking the Fluid Level” underAutomatic
Transmission Fluid on page 6-22.
K. Brake Master Cylinder Reservoir. See “Brake Fluid”
underBrakes on page 6-35.
L. Engine Air Cleaner/Filter. SeeEngine Air
Cleaner/Filter on page 6-19.
Engine OilChecking Engine OilIt is a good idea to check the engine oil level at each
fuel fill. In order to get an accurate reading, the oil must
be warm and the vehicle must be on level ground.
The engine oil dipstick handle is a yellow loop.
SeeEngine Compartment Overview on page 6-14
for the location of the engine oil dipstick.
1. Turn off the engine and give the oil several minutes
to drain back into the oil pan. If this is not done, the
oil dipstick might not show the actual level.
2. Pull out the dipstick and clean it with a paper towel
or cloth, then push it back in all the way. Remove it
again, keeping the tip down, and check the level.
6-15
Page 288 of 432

Engine Oil Additives / Engine Oil
FlushesDo not add anything to the oil. The recommended oils
with the starburst symbol that meet GM Standard
GM6094M are all that is needed for good performance
and engine protection.
Engine oil system flushes are not recommended and
could cause engine damage not covered by the vehicle
warranty.Engine Oil Life SystemWhen to Change Engine OilThis vehicle has a computer system that indicates when
to change the engine oil and filter. This is based on
engine revolutions and engine temperature, and not on
mileage. Based on driving conditions, the mileage at
which an oil change is indicated can vary considerably.
For the oil life system to work properly, the system
must be reset every time the oil is changed.When the system has calculated that oil life has been
diminished, it indicates that an oil change is necessary.
A CHANGE ENGINE OIL SOON message comes on.
SeeDIC Warnings and Messages on page 4-44.
Change the oil as soon as possible within the next
600 miles (1 000 km). It is possible that, if driving under
the best conditions, the oil life system might not
indicate that an oil change is necessary for over a year.
However, the engine oil and filter must be changed
at least once a year and at this time the system must
be reset. Your dealer/retailer has trained service people
who will perform this work using genuine parts and
reset the system. It is also important to check the oil
regularly and keep it at the proper level.
If the system is ever reset accidentally, the oil must be
changed at 3,000 miles (5 000 km) since the last oil
change. Remember to reset the oil life system whenever
the oil is changed.
6-18
Page 292 of 432

Automatic Transmission FluidWhen to Check and Change Automatic
Transmission FluidA good time to check your automatic transmission fluid
level is when the engine oil is changed.
Change the fluid and filter at the intervals listed in
Scheduled Maintenance on page 7-3, and be sure to
use the transmission fluid listed inRecommended Fluids
and Lubricants on page 7-10.How to Check Automatic Transmission
FluidBecause this operation can be a little difficult, you may
choose to have this done at the dealer/retailer service
department.
If you do it yourself, be sure to follow all the instructions
here, or you could get a false reading on the dipstick.Notice:Too much or too little fluid can damage
your transmission. Too much can mean that some
of the fluid could come out and fall on hot engine
parts or exhaust system parts, starting a fire.
Too little fluid could cause the transmission to
overheat. Be sure to get an accurate reading if you
check your transmission fluid.
Wait at least 30 minutes before checking the
transmission fluid level if you have been driving:
•
When outside temperatures are above 32°C (90°F).
•
At high speed for quite a while.
•
In heavy traffic — especially in hot weather.
•
While pulling a trailer.
To get the right reading, the fluid should be at normal
operating temperature, which is 82°C to 93°C
(180°F to 200°F).
Get the vehicle warmed up by driving about 24 km
(15 miles) when outside temperatures are above 10°C
(50°F). If it is colder than 10°C (50°F), you may have to
drive longer.
6-22
Page 293 of 432

Checking the Fluid LevelPrepare your vehicle as follows:
1. Park your vehicle on a level place. Keep the engine
running.
2. With the parking brake applied, place the shift lever
in P (Park).
3. With your foot on the brake pedal, move the shift
lever through each gear range, pausing for about
three seconds in each range. Then, position
the shift lever in P (Park).
4. Let the engine run at idle for three to five minutes.
Then, without shutting off the engine, follow these steps:
1. Pull out the dipstick and wipe it with a clean rag or
paper towel.
The transmission fluid
dipstick handle is the black
loop with this symbol on it.
It is located near the rear of
the engine compartment.
SeeEngine Compartment Overview on page 6-14
for more information on location.
2. Push it back in all the way, wait three seconds and
then pull it back out again.3. Check both sides of the dipstick, and read the
lower level. The fluid level must be in the
cross-hatched area.
4. If the fluid level is in the acceptable range, push the
dipstick back in all the way.
V6 Engines
6-23
Page 294 of 432

How to Add FluidRefer to the Maintenance Schedule to determine what
kind of transmission fluid to use. SeeRecommended
Fluids and Lubricants on page 7-10.
If the fluid level is low, add only enough of the proper
fluid to bring the level into the cross-hatched area on the
dipstick.
1. Pull out the dipstick.
2. Using a long-neck funnel, add enough fluid at the
dipstick hole to bring it to the proper level.
It does not take much fluid, generally less than
one pint (0.5 L). Do not overfill.
Notice:Use of the incorrect automatic transmission
fluid may damage the vehicle, and the damages
may not be covered by the vehicle’s warranty.
Always use the automatic transmission fluid listed
inRecommended Fluids and Lubricants on
page 7-10.
3. After adding fluid, recheck the fluid level as
described under “How to Check Automatic
Transmission Fluid,” earlier in this section.
4. When the correct fluid level is obtained, push the
dipstick back in all the way.
Cooling SystemThe Cooling System allows the engine to maintain the
correct working temperature.
A. Coolant Recovery Tank
B. Pressure Cap
C. Electric Engine Cooling Fans3.5L V6 Engine shown, 3.9L Engine similar
6-24
Page 295 of 432

{
WARNING:
An electric engine cooling fan under the hood can
start up even when the engine is not running and
can cause injury. Keep hands, clothing, and tools
away from any underhood electric fan.{
WARNING:
Heater and radiator hoses, and other engine parts,
can be very hot. Do not touch them. If you do, you
can be burned.
Do not run the engine if there is a leak. If you run
the engine, it could lose all coolant. That could
cause an engine fire, and you could be burned.
Get any leak fixed before you drive the vehicle.Notice:Using coolant other than DEX-COOL
®
can
cause premature engine, heater core, or radiator
corrosion. In addition, the engine coolant could
require changing sooner, at 50 000 km (30,000 miles)
or 24 months, whichever occurs first. Any repairs
would not be covered by the vehicle warranty.
Always use DEX-COOL
®
(silicate-free) coolant in the
vehicle.
Engine CoolantThe cooling system in the vehicle is filled with
DEX-COOL
®engine coolant. This coolant is designed
to remain in the vehicle for five years or 150,000 miles
(240 000 km), whichever occurs first.
The following explains the cooling system and how to
check and add coolant when it is low. If there is a
problem with engine overheating, seeEngine
Overheating on page 6-29
6-25
Page 297 of 432

Checking CoolantThe vehicle must be on a level surface when checking
the coolant level.
Check to see if coolant is visible in the coolant recovery
tank. If the coolant inside the coolant recovery tank
is boiling, do not do anything else until it cools down.
If coolant is visible but the coolant level is not at or above
the COLD FILL line, add a 50/50 mixture of clean,
drinkable water and DEX-COOL
®coolant at the coolant
recovery tank, but be sure the cooling system is cool
before this is done. See Engine Coolant Engine Coolant
for more information.
If your vehicle has one of the V6 engines, the coolant
recovery tank is located in the rear of the engine
compartment on the passenger’s side of the vehicle.
If your vehicle has the 5.3L V8 engine, the coolant
recovery tank is located in the rear of the engine
compartment on the driver’s side of the vehicle.
SeeEngine Compartment Overview on page 6-14.
When the engine is cold, the coolant level should be at
or above the COLD FILL line on the coolant recovery
tank. To check the coolant level, look for the COLD FILL
line on the side of the coolant recovery tank that
faces the engine. If the level is not correct, there may
be a leak in the cooling system.
How to Add Coolant to the
Recovery Tank
{
WARNING:
You can be burned if you spill coolant on hot
engine parts. Coolant contains ethylene glycol
and it will burn if the engine parts are hot enough.
Do not spill coolant on a hot engine.
Notice:This vehicle has a specific coolant fill
procedure. Failure to follow this procedure could
cause the engine to overheat and be severely
damaged.
If coolant is needed, add the proper DEX-COOL
®
coolant mixture at the coolant recovery tank.
When the coolant level in the coolant recovery tank is at
the COLD FILL line, start the vehicle.
If the overheat warning continues, there is one more
thing you can try. You can add the proper coolant
mixture directly to the cooling system through the
coolant fill neck on the engine, but be sure the system
is cool before you do it.
6-27
Page 299 of 432

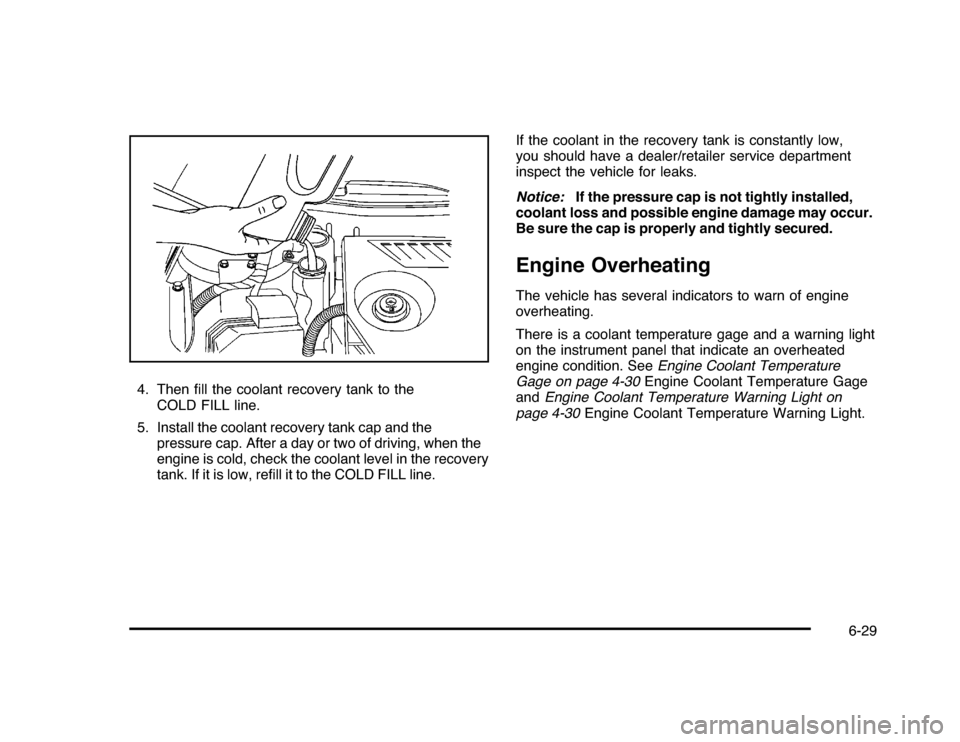
4. Then fill the coolant recovery tank to the
COLD FILL line.
5. Install the coolant recovery tank cap and the
pressure cap. After a day or two of driving, when the
engine is cold, check the coolant level in the recovery
tank. If it is low, refill it to the COLD FILL line.If the coolant in the recovery tank is constantly low,
you should have a dealer/retailer service department
inspect the vehicle for leaks.
Notice:If the pressure cap is not tightly installed,
coolant loss and possible engine damage may occur.
Be sure the cap is properly and tightly secured.
Engine OverheatingThe vehicle has several indicators to warn of engine
overheating.
There is a coolant temperature gage and a warning light
on the instrument panel that indicate an overheated
engine condition. SeeEngine Coolant Temperature
Gage on page 4-30Engine Coolant Temperature Gage
andEngine Coolant Temperature Warning Light on
page 4-30Engine Coolant Temperature Warning Light.
6-29