2010 CHEVROLET IMPALA battery
[x] Cancel search: batteryPage 310 of 432
Notice:If you leave the radio or other accessories
on during the jump starting procedure, they could be
damaged. The repairs would not be covered by the
warranty. Always turn off the radio and other
accessories when jump starting the vehicle.
3. Turn off the ignition on both vehicles. Unplug
unnecessary accessories plugged into the cigarette
lighter or the accessory power outlets. Turn off the
radio and all lamps that are not needed. This will
avoid sparks and help save both batteries. And it
could save the radio!
4. Open the hoods and locate the batteries. Find the
positive (+) and negative (−) terminal locations on
each vehicle.
You will not need to access your battery for jump
starting. Your vehicle has a remote positive (+) jump
starting terminal for that purpose. The remote
positive (+) terminal is located in the engine
compartment on the passenger’s side of the
vehicle, on the underhood fuse block. SeeEngine
Compartment Overview on page 6-14for more
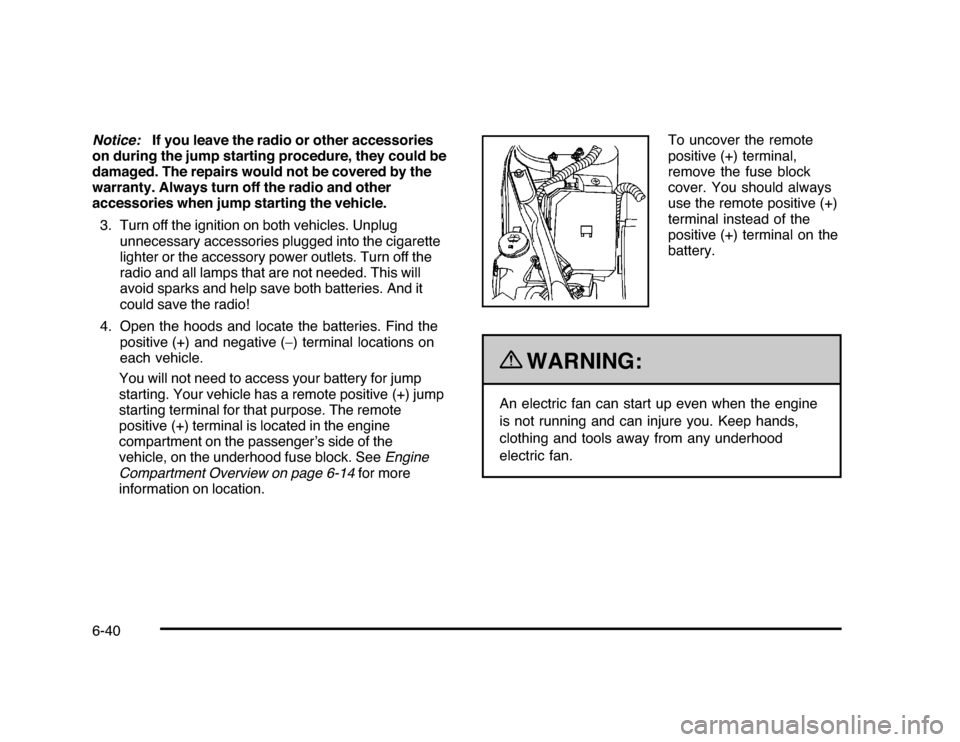
information on location.To uncover the remote
positive (+) terminal,
remove the fuse block
cover. You should always
use the remote positive (+)
terminal instead of the
positive (+) terminal on the
battery.
{
WARNING:
An electric fan can start up even when the engine
is not running and can injure you. Keep hands,
clothing and tools away from any underhood
electric fan.
6-40
Page 311 of 432
{
WARNING:
Using a match near a battery can cause battery
gas to explode. People have been hurt doing this,
and some have been blinded. Use a flashlight if
you need more light.
Be sure the battery has enough water. You do not
need to add water to the battery installed in your
new vehicle. But if a battery has filler caps, be
sure the right amount of fluid is there. If it is low,
add water to take care of that first. If you do not,
explosive gas could be present.
Battery fluid contains acid that can burn you.
Do not get it on you. If you accidentally get it in
your eyes or on your skin, flush the place with
water and get medical help immediately.
{
WARNING:
Fans or other moving engine parts can injure you
badly. Keep your hands away from moving parts
once the engine is running.
5. Check that the jumper cables do not have loose
or missing insulation. If they do, you could get a
shock. The vehicles could be damaged too.
Before you connect the cables, here are some
basic things you should know. Positive (+) will go to
positive (+) or to a remote positive (+) terminal if
the vehicle has one. Negative (−) will go to a heavy,
unpainted metal engine part or to a remote
negative (−) terminal if the vehicle has one.
Do not connect positive (+) to negative (−), or you
will get a short that would damage the battery
and maybe other parts too. And do not connect the
negative (−) cable to the negative (−) terminal on
the dead battery because this can cause sparks.
6-41
Page 312 of 432
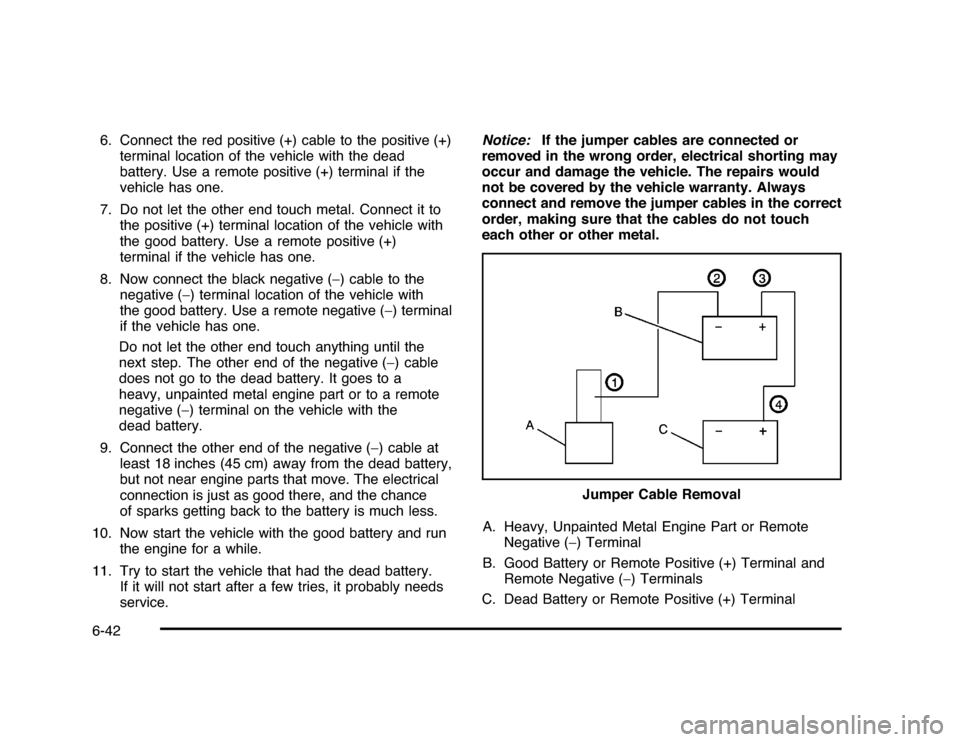
6. Connect the red positive (+) cable to the positive (+)
terminal location of the vehicle with the dead
battery. Use a remote positive (+) terminal if the
vehicle has one.
7. Do not let the other end touch metal. Connect it to
the positive (+) terminal location of the vehicle with
the good battery. Use a remote positive (+)
terminal if the vehicle has one.
8. Now connect the black negative (−) cable to the
negative (−) terminal location of the vehicle with
the good battery. Use a remote negative (−) terminal
if the vehicle has one.
Do not let the other end touch anything until the
next step. The other end of the negative (−) cable
does not go to the dead battery. It goes to a
heavy, unpainted metal engine part or to a remote
negative (−) terminal on the vehicle with the
dead battery.
9. Connect the other end of the negative (−) cable at
least 18 inches (45 cm) away from the dead battery,
but not near engine parts that move. The electrical
connection is just as good there, and the chance
of sparks getting back to the battery is much less.
10. Now start the vehicle with the good battery and run
the engine for a while.
11. Try to start the vehicle that had the dead battery.
If it will not start after a few tries, it probably needs
service.Notice:If the jumper cables are connected or
removed in the wrong order, electrical shorting may
occur and damage the vehicle. The repairs would
not be covered by the vehicle warranty. Always
connect and remove the jumper cables in the correct
order, making sure that the cables do not touch
each other or other metal.
A. Heavy, Unpainted Metal Engine Part or Remote
Negative (−) Terminal
B. Good Battery or Remote Positive (+) Terminal and
Remote Negative (−) Terminals
C. Dead Battery or Remote Positive (+) TerminalJumper Cable Removal6-42
Page 313 of 432
To disconnect the jumper cables from both vehicles, do
the following:
1. Disconnect the black negative (−) cable from the
vehicle that had the dead battery.
2. Disconnect the black negative (−) cable from the
vehicle with the good battery.
3. Disconnect the red positive (+) cable from the
vehicle with the good battery.
4. Disconnect the red positive (+) cable from the other
vehicle.
5. Return the fuse block cover to its original position.Headlamp AimingHeadlamp aim has been preset at the factory and
should need no further adjustment.
However, if your vehicle is damaged in a crash, the
headlamp aim may be affected. Aim adjustment to the
low-beam headlamps may be necessary if oncoming
drivers flash their high-beam headlamps at you
(for vertical aim).
If the headlamps need to be re-aimed, it is
recommended that you take the vehicle to your
dealer/retailer for service.
Bulb ReplacementFor the proper type of replacement bulbs, see
Replacement Bulbs on page 6-49.
For any bulb changing procedure not listed in this
section, contact your dealer/retailer.Halogen Bulbs
{
WARNING:
Halogen bulbs have pressurized gas inside and
can burst if you drop or scratch the bulb. You or
others could be injured. Be sure to read and follow
the instructions on the bulb package.
6-43
Page 365 of 432
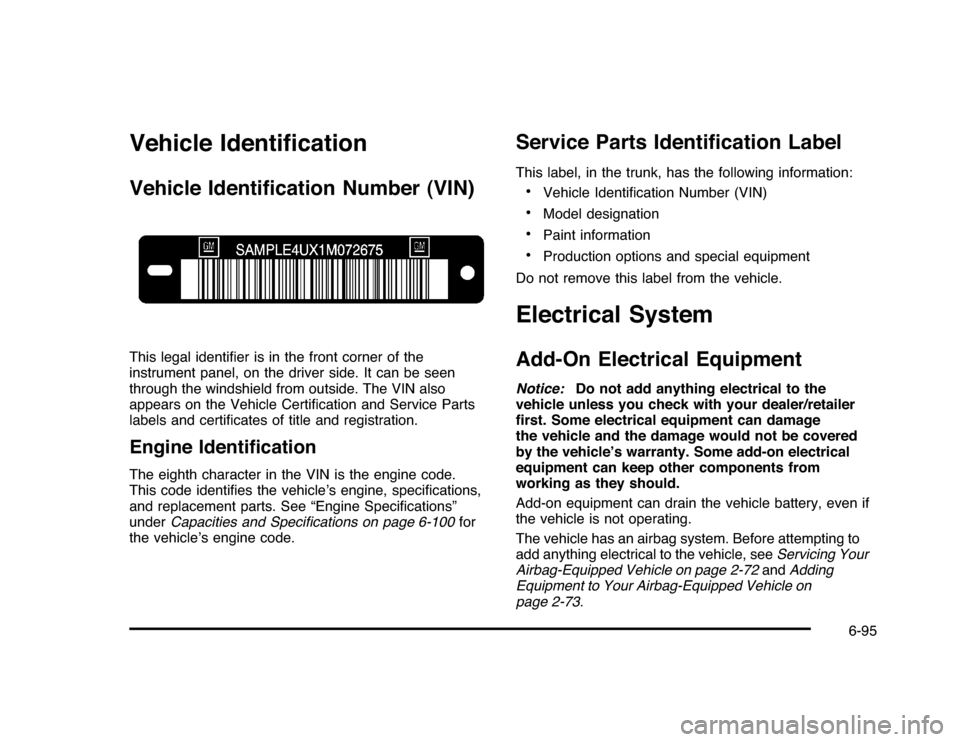
Vehicle IdentificationVehicle Identification Number (VIN)This legal identifier is in the front corner of the
instrument panel, on the driver side. It can be seen
through the windshield from outside. The VIN also
appears on the Vehicle Certification and Service Parts
labels and certificates of title and registration.Engine IdentificationThe eighth character in the VIN is the engine code.
This code identifies the vehicle’s engine, specifications,
and replacement parts. See “Engine Specifications”
underCapacities and Specifications on page 6-100for
the vehicle’s engine code.
Service Parts Identification LabelThis label, in the trunk, has the following information:•
Vehicle Identification Number (VIN)
•
Model designation
•
Paint information
•
Production options and special equipment
Do not remove this label from the vehicle.
Electrical SystemAdd-On Electrical EquipmentNotice:Do not add anything electrical to the
vehicle unless you check with your dealer/retailer
first. Some electrical equipment can damage
the vehicle and the damage would not be covered
by the vehicle’s warranty. Some add-on electrical
equipment can keep other components from
working as they should.
Add-on equipment can drain the vehicle battery, even if
the vehicle is not operating.
The vehicle has an airbag system. Before attempting to
add anything electrical to the vehicle, seeServicing Your
Airbag-Equipped Vehicle on page 2-72andAdding
Equipment to Your Airbag-Equipped Vehicle on
page 2-73.
6-95
Page 368 of 432
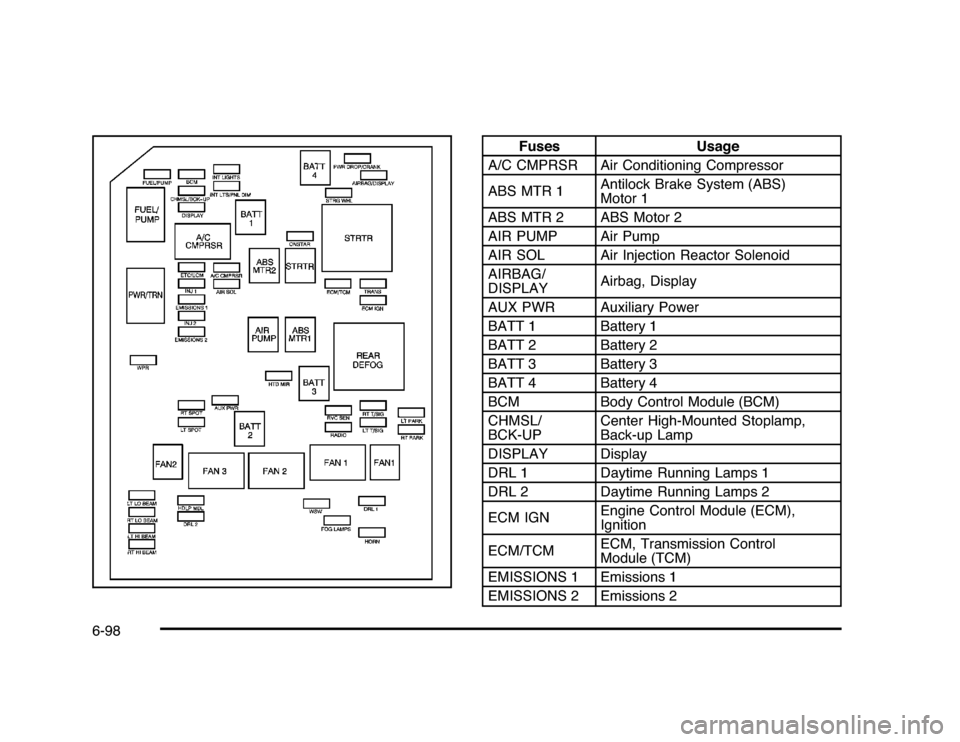
Fuses Usage
A/C CMPRSR Air Conditioning Compressor
ABS MTR 1Antilock Brake System (ABS)
Motor 1
ABS MTR 2 ABS Motor 2
AIR PUMP Air Pump
AIR SOL Air Injection Reactor Solenoid
AIRBAG/
DISPLAYAirbag, Display
AUX PWR Auxiliary Power
BATT 1 Battery 1
BATT 2 Battery 2
BATT 3 Battery 3
BATT 4 Battery 4
BCM Body Control Module (BCM)
CHMSL/
BCK-UPCenter High-Mounted Stoplamp,
Back-up Lamp
DISPLAY Display
DRL 1 Daytime Running Lamps 1
DRL 2 Daytime Running Lamps 2
ECM IGNEngine Control Module (ECM),
Ignition
ECM/TCMECM, Transmission Control
Module (TCM)
EMISSIONS 1 Emissions 1
EMISSIONS 2 Emissions 2
6-98
Page 397 of 432
Services Provided•
Emergency Fuel Delivery:Delivery of enough fuel
for the vehicle to get to the nearest service station.
•
Lock-Out Service:Service is provided to unlock the
vehicle if you are locked out. A remote unlock may
be available if you have OnStar
®. For security
reasons, the driver must present identification
before this service is given.
•
Emergency Tow From a Public Road or
Highway:Tow to the nearest Chevrolet dealer for
warranty service, or if the vehicle was in a crash
and cannot be driven. Assistance is also given when
the vehicle is stuck in the sand, mud, or snow.
•
Flat Tire Change:Service is provided to change a
flat tire with the spare tire. The spare tire, if equipped,
must be in good condition and properly inflated.
It is the owner’s responsibility for the repair or
replacement of the tire if it is not covered by the
warranty.
•
Battery Jump Start:Service is provided to jump
start a dead battery.
Services Not Included in Roadside
Assistance•
Impound towing caused by violation of any laws.
•
Legal fines.
•
Mounting, dismounting or changing of snow tires,
chains, or other traction devices.
•
Towing or services for vehicles driven on a
non-public road or highway.
8-9
Page 410 of 432
Automatic Door Lock.......................................3-10
Automatic Transmission
Fluid . . . . . . . . . .................................................6-22
Operation . . . . . . . ............................................3-24
B
Backglass Antenna..........................................4-86
Battery . . . . . . . ...................................................6-38
Electric Power Management..........................4-13
Run-Down Protection...................................4-14
Belt Routing, Engine.......................................7-12
Bluetooth
®
.....................................................4-74
Brake
Emergencies................................................ 5-6
Brakes . . . . . . . ...................................................6-35
Antilock....................................................... 5-5
Parking......................................................3-27
System Warning Light..................................4-27
Braking . . . . . ...................................................... 5-4
Braking in Emergencies..................................... 5-6
Break-In, New Vehicle.....................................3-19
Bulb Replacement...........................................6-49
Fog Lamps . . . . . . ...........................................4-11
Halogen Bulbs............................................6-43
Headlamp Aiming........................................6-43
Headlamps . . . . . . ...........................................6-43Bulb Replacement (cont.)
Headlamps, Front Turn Signal, Sidemarker,
and Parking Lamps..................................6-44
License Plate Lamps....................................6-49
Taillamps, Turn Signal, Sidemarker,
Stoplamps, and Back-Up Lamps.................6-47
Buying New Tires...........................................6-68
C
Calibration.....................................................4-42
California
Perchlorate Materials Requirements................. 6-4
Warning....................................................... 6-4
California Fuel.................................................. 6-6
Canadian Owners............................................... iii
Capacities and Specifications..........................6-100
Carbon Monoxide
Engine Exhaust...........................................3-31
Trunk.........................................................3-12
Winter Driving.............................................5-17
Care of
Safety Belts................................................6-90
CD, MP3 .......................................................4-68
Center Console Storage...................................3-42
Center Seat..................................................... 2-9
Chains, Tire...................................................6-73
2