2010 CHEVROLET HHR fuel
[x] Cancel search: fuelPage 366 of 480
How to Check
Use a good quality pocket-type gauge to check
tire pressure. You cannot tell if your tires are
properly inflated simply by looking at them.
Radial tires may look properly inflated even
when they are under‐inflated. Check the tire's
inflation pressure when the tires are cold.
Cold means your vehicle has been sitting for
at least three hours or driven no more than
1 mile (1.6 km).
Remove the valve cap from the tire valve stem.
Press the tire gauge firmly onto the valve to get a
pressure measurement. If the cold tire inflation
pressure matches the recommended pressure on
the Tire and Loading Information label, no further
adjustment is necessary. If the inflation pressure
is low, add air until you reach the recommended
amount.
If you overfill the tire, release air by pushing on
the metal stem in the center of the tire valve.
Re‐check the tire pressure with the tire gauge.
Be sure to put the valve caps back on the valve
stems. They help prevent leaks by keeping out dirt
and moisture.
Tire Pressure Monitor System
The Tire Pressure Monitor System (TPMS) uses radio
and sensor technology to check tire pressure levels.
The TPMS sensors monitor the air pressure in your
vehicle's tires and transmit tire pressure readings to a
receiver located in the vehicle.
Each tire, including the spare (if provided), should be
checked monthly when cold and inflated to the inflation
pressure recommended by the vehicle manufacturer
on the vehicle placard or tire inflation pressure label.
(If your vehicle has tires of a different size than the size
indicated on the vehicle placard or tire inflation pressure
label, you should determine the proper tire inflation
pressure for those tires.)
As an added safety feature, your vehicle has been
equipped with a tire pressure monitoring system
(TPMS) that illuminates a low tire pressure telltale when
one or more of your tires is significantly under‐inflated.
Accordingly, when the low tire pressure telltale
illuminates, you should stop and check your tires as
soon as possible, and inflate them to the proper
pressure. Driving on a significantly under‐inflated tire
causes the tire to overheat and can lead to tire failure.
Under‐inflation also reduces fuel efficiency and tire
tread life, and may affect the vehicle's handling and
stopping ability.
6-64
Page 419 of 480
Tires
To clean the tires, use a stiff brush with tire cleaner.
Notice:Using petroleum-based tire dressing
products on the vehicle may damage the paint finish
and/or tires. When applying a tire dressing, always
wipe off any overspray from all painted surfaces on
the vehicle.
Sheet Metal Damage
If the vehicle is damaged and requires sheet metal
repair or replacement, make sure the body repair shop
applies anti-corrosion material to parts repaired or
replaced to restore corrosion protection.
Original manufacturer replacement parts will provide the
corrosion protection while maintaining the vehicle
warranty.
Finish Damage
Any stone chips, fractures or deep scratches in the
finish should be repaired right away. Bare metal will
corrode quickly and may develop into major repair
expense.
Minor chips and scratches can be repaired with
touch-up materials available from your dealer/retailer.
Larger areas of finish damage can be corrected in
your dealer's/retailer's body and paint shop.
Underbody Maintenance
Chemicals used for ice and snow removal and dust
control can collect on the underbody. If these are not
removed, corrosion and rust can develop on the
underbody parts such as fuel lines, frame, floor pan,
and exhaust system even though they have corrosion
protection.
At least every spring, flush these materials from the
underbody with plain water. Clean any areas where
mud and debris can collect. Dirt packed in close areas
of the frame should be loosened before being flushed.
Your dealer/retailer or an underbody car washing
system can do this.
Chemical Paint Spotting
Some weather and atmospheric conditions can create a
chemical fallout. Airborne pollutants can fall upon and
attack painted surfaces on the vehicle. This damage
can take two forms: blotchy, ring-shaped discolorations,
and small, irregular dark spots etched into the paint
surface.
Although no defect in the paint job causes this, we will
repair, at no charge to the owner, the surfaces of new
vehicles damaged by this fallout condition within
12 months or 12,000 miles (20 000 km) of purchase,
whichever occurs first.
6-117
Page 424 of 480
Engine Compartment Fuse Block
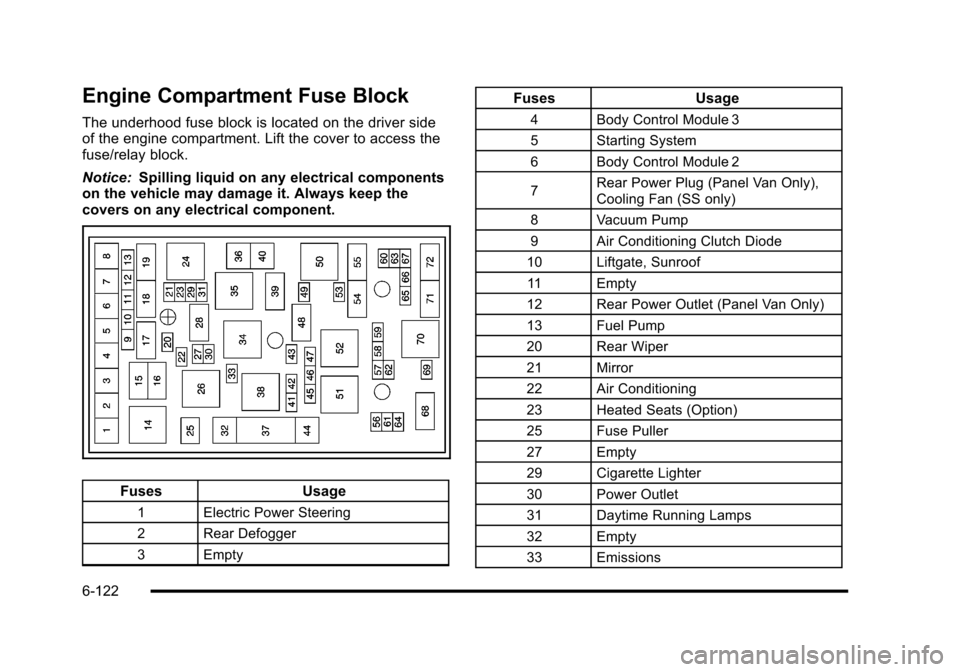
The underhood fuse block is located on the driver side
of the engine compartment. Lift the cover to access the
fuse/relay block.
Notice:Spilling liquid on any electrical components
on the vehicle may damage it. Always keep the
covers on any electrical component.
Fuses Usage
1 Electric Power Steering
2 Rear Defogger
3 Empty
FusesUsage
4 Body Control Module 3
5 Starting System
6 Body Control Module 2
7Rear Power Plug (Panel Van Only),
Cooling Fan (SS only)
8 Vacuum Pump
9 Air Conditioning Clutch Diode
10 Liftgate, Sunroof 11 Empty
12 Rear Power Outlet (Panel Van Only)
13 Fuel Pump
20 Rear Wiper
21 Mirror
22 Air Conditioning
23 Heated Seats (Option)
25 Fuse Puller
27 Empty
29 Cigarette Lighter
30 Power Outlet
31 Daytime Running Lamps
32 Empty
33 Emissions
6-122
Page 426 of 480
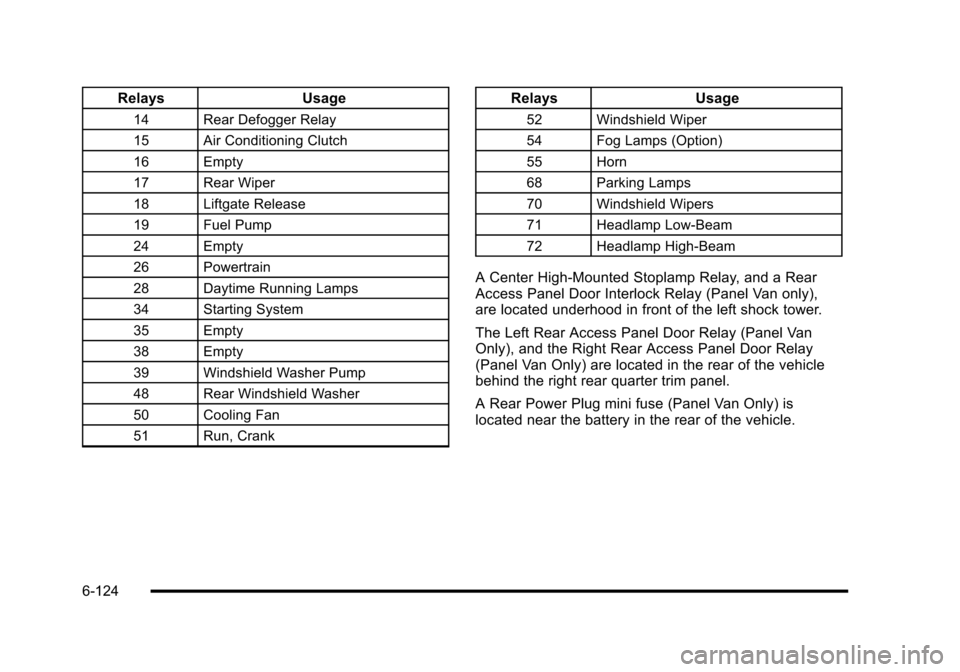
RelaysUsage
14 Rear Defogger Relay
15 Air Conditioning Clutch
16 Empty
17 Rear Wiper
18 Liftgate Release
19 Fuel Pump
24 Empty
26 Powertrain
28 Daytime Running Lamps
34 Starting System
35 Empty
38 Empty
39 Windshield Washer Pump
48 Rear Windshield Washer
50 Cooling Fan
51 Run, Crank
RelaysUsage
52 Windshield Wiper
54 Fog Lamps (Option)
55 Horn
68 Parking Lamps
70 Windshield Wipers
71 Headlamp Low-Beam
72 Headlamp High-Beam
A Center High-Mounted Stoplamp Relay, and a Rear
Access Panel Door Interlock Relay (Panel Van only),
are located underhood in front of the left shock tower.
The Left Rear Access Panel Door Relay (Panel Van
Only), and the Right Rear Access Panel Door Relay
(Panel Van Only) are located in the rear of the vehicle
behind the right rear quarter trim panel.
A Rear Power Plug mini fuse (Panel Van Only) is
located near the battery in the rear of the vehicle.
6-124
Page 427 of 480
Capacities and Specifications
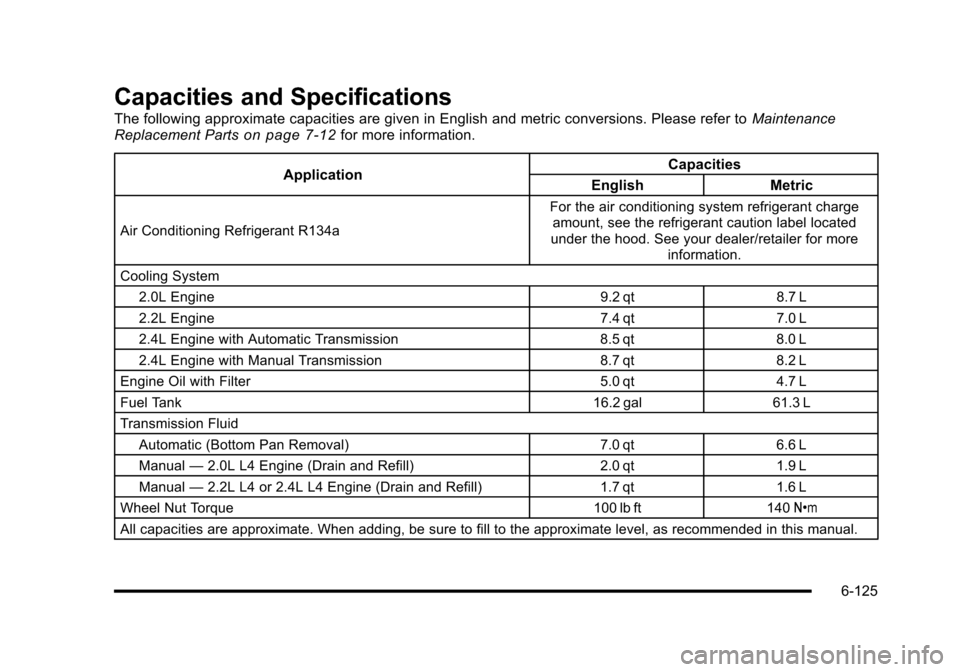
The following approximate capacities are given in English and metric conversions. Please refer toMaintenance
Replacement Partson page 7‑12for more information.
Application Capacities
English Metric
Air Conditioning Refrigerant R134a For the air conditioning system refrigerant charge
amount, see the refrigerant caution label located
under the hood. See your dealer/retailer for more
information.
Cooling System 2.0L Engine 9.2 qt8.7 L
2.2L Engine 7.4 qt7.0 L
2.4L Engine with Automatic Transmission 8.5 qt8.0 L
2.4L Engine with Manual Transmission 8.7 qt8.2 L
Engine Oil with Filter 5.0 qt4.7 L
Fuel Tank 16.2 gal61.3 L
Transmission Fluid Automatic (Bottom Pan Removal) 7.0 qt6.6 L
Manual —2.0L L4 Engine (Drain and Refill) 2.0 qt1.9 L
Manual —2.2L L4 or 2.4L L4 Engine (Drain and Refill) 1.7 qt1.6 L
Wheel Nut Torque 100 lb ft140Y
All capacities are approximate. When adding, be sure to fill to the approximate level, as recommended in this manual.
6-125
Page 430 of 480
Maintenance Schedule
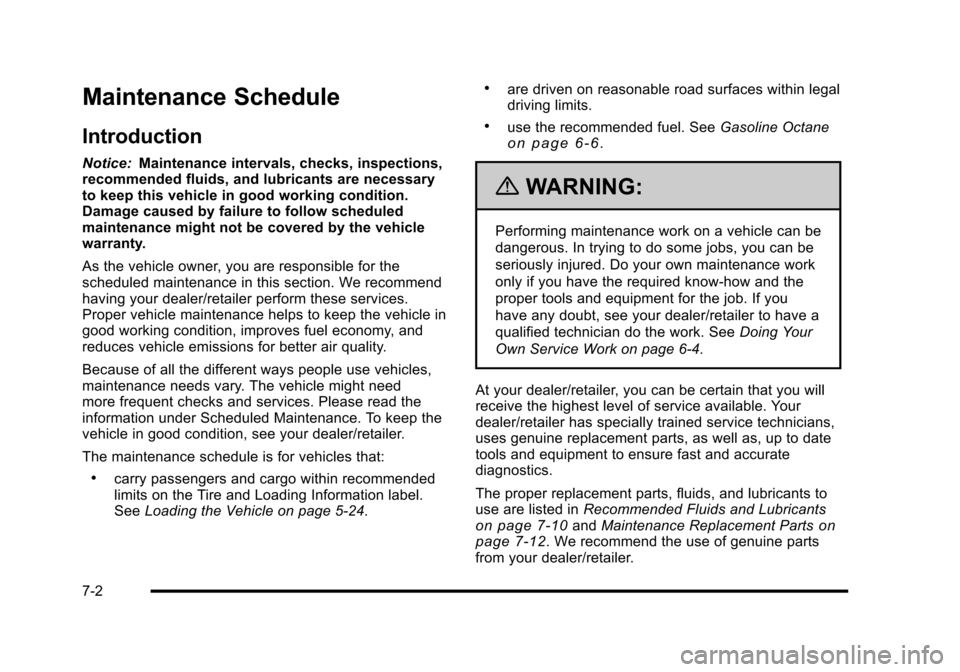
Introduction
Notice:Maintenance intervals, checks, inspections,
recommended fluids, and lubricants are necessary
to keep this vehicle in good working condition.
Damage caused by failure to follow scheduled
maintenance might not be covered by the vehicle
warranty.
As the vehicle owner, you are responsible for the
scheduled maintenance in this section. We recommend
having your dealer/retailer perform these services.
Proper vehicle maintenance helps to keep the vehicle in
good working condition, improves fuel economy, and
reduces vehicle emissions for better air quality.
Because of all the different ways people use vehicles,
maintenance needs vary. The vehicle might need
more frequent checks and services. Please read the
information under Scheduled Maintenance. To keep the
vehicle in good condition, see your dealer/retailer.
The maintenance schedule is for vehicles that:
.carry passengers and cargo within recommended
limits on the Tire and Loading Information label.
See Loading the Vehicle on page 5‑24.
.are driven on reasonable road surfaces within legal
driving limits.
.use the recommended fuel. See Gasoline Octaneon page 6‑6.
{WARNING:
Performing maintenance work on a vehicle can be
dangerous. In trying to do some jobs, you can be
seriously injured. Do your own maintenance work
only if you have the required know-how and the
proper tools and equipment for the job. If you
have any doubt, see your dealer/retailer to have a
qualified technician do the work. See Doing Your
Own Service Work on page 6‑4.
At your dealer/retailer, you can be certain that you will
receive the highest level of service available. Your
dealer/retailer has specially trained service technicians,
uses genuine replacement parts, as well as, up to date
tools and equipment to ensure fast and accurate
diagnostics.
The proper replacement parts, fluids, and lubricants to
use are listed in Recommended Fluids and Lubricants
on page 7‑10andMaintenance Replacement Partson
page 7‑12. We recommend the use of genuine parts
from your dealer/retailer.
7-2
Page 433 of 480
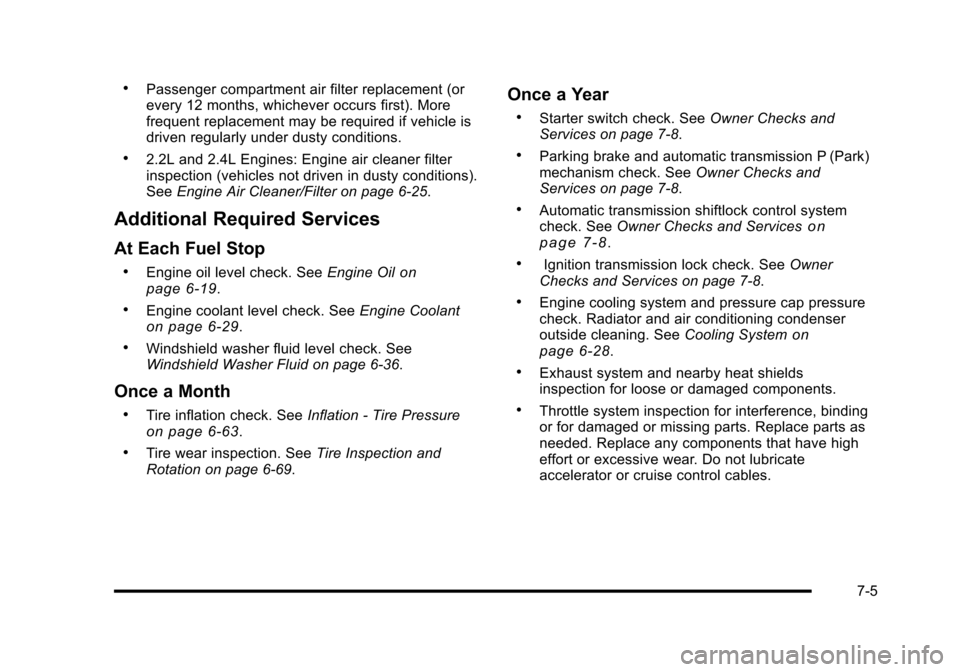
.Passenger compartment air filter replacement (or
every 12 months, whichever occurs first). More
frequent replacement may be required if vehicle is
driven regularly under dusty conditions.
.2.2L and 2.4L Engines: Engine air cleaner filter
inspection (vehicles not driven in dusty conditions).
SeeEngine Air Cleaner/Filter on page 6‑25.
Additional Required Services
At Each Fuel Stop
.Engine oil level check. See Engine Oilon
page 6‑19.
.Engine coolant level check. See Engine Coolanton page 6‑29.
.Windshield washer fluid level check. See
Windshield Washer Fluid on page 6‑36.
Once a Month
.Tire inflation check. SeeInflation - Tire Pressureon page 6‑63.
.Tire wear inspection. See Tire Inspection and
Rotation on page 6‑69.
Once a Year
.Starter switch check. See Owner Checks and
Services on page 7‑8.
.Parking brake and automatic transmission P (Park)
mechanism check. See Owner Checks and
Services on page 7‑8.
.Automatic transmission shiftlock control system
check. See Owner Checks and Serviceson
page 7‑8.
.Ignition transmission lock check. See Owner
Checks and Services on page 7‑8.
.Engine cooling system and pressure cap pressure
check. Radiator and air conditioning condenser
outside cleaning. See Cooling System
on
page 6‑28.
.Exhaust system and nearby heat shields
inspection for loose or damaged components.
.Throttle system inspection for interference, binding
or for damaged or missing parts. Replace parts as
needed. Replace any components that have high
effort or excessive wear. Do not lubricate
accelerator or cruise control cables.
7-5
Page 434 of 480
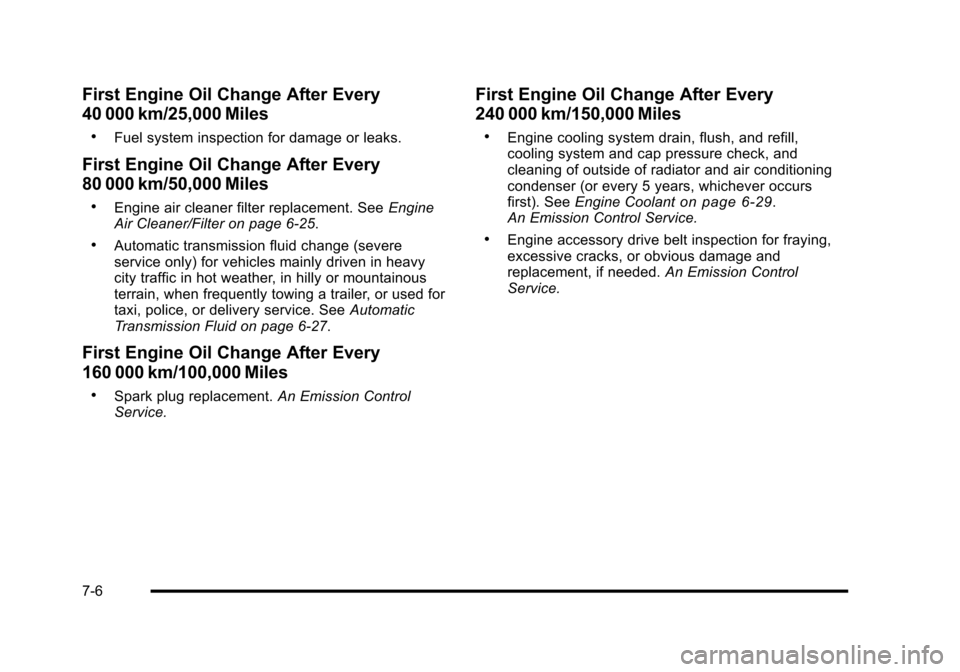
First Engine Oil Change After Every
40 000 km/25,000 Miles
.Fuel system inspection for damage or leaks.
First Engine Oil Change After Every
80 000 km/50,000 Miles
.Engine air cleaner filter replacement. SeeEngine
Air Cleaner/Filter on page 6‑25.
.Automatic transmission fluid change (severe
service only) for vehicles mainly driven in heavy
city traffic in hot weather, in hilly or mountainous
terrain, when frequently towing a trailer, or used for
taxi, police, or delivery service. See Automatic
Transmission Fluid on page 6‑27.
First Engine Oil Change After Every
160 000 km/100,000 Miles
.Spark plug replacement. An Emission Control
Service.
First Engine Oil Change After Every
240 000 km/150,000 Miles
.Engine cooling system drain, flush, and refill,
cooling system and cap pressure check, and
cleaning of outside of radiator and air conditioning
condenser (or every 5 years, whichever occurs
first). See Engine Coolant
on page 6‑29.
An Emission Control Service.
.Engine accessory drive belt inspection for fraying,
excessive cracks, or obvious damage and
replacement, if needed. An Emission Control
Service.
7-6