2010 CHEVROLET HHR automatic transmission
[x] Cancel search: automatic transmissionPage 275 of 480
transmission is shifted to L (Low) or R (Reverse) to turn
the system off, the indicator/warning light and
TRACTION OFF will come on in L (Low). But the
system will not turn off right away. It will wait until there
is no longer a current need to limit wheel spin. SeeDIC
Warnings and Messages
on page 4‑48for more
information on the messages associated with this light.
The system can be turned back on at any time by
shifting to D (Automatic Overdive) or I (Intermediate).
The ETS indicator/warning light should go off.
Adding non‐dealer/non‐retailer accessories can affect
the vehicle's performance. See Accessories and
Modifications
on page 6‑3for more information.
Limited-Slip Differential
Vehicles with a limited-slip differential can give more
traction on snow, mud, ice, sand or gravel. It works like
a standard axle most of the time, but when traction is
low, this feature allows the drive wheel with the most
traction to move the vehicle. The limited slip design has
minimal impact to the steering feel, but boosts the
traction performance under all conditions.
Steering
Electric Power Steering
If the engine stalls while driving, the power steering
assist system will continue to operate until you are
able to stop the vehicle. If power steering assist is lost
because the electric power steering system is not
functioning, the vehicle can be steered but it will take
more effort.
If you turn the steering wheel in either direction several
times until it stops, or hold the steering wheel in the
stopped position for an extended amount of time, you
may notice a reduced amount of power steering assist.
The normal amount of power steering assist should
return shortly after a few normal steering movements.
The electric power steering system does not require
regular maintenance. If you suspect steering system
problems and/or the POWER STEERING message
comes on, contact your dealer/retailer for service
repairs. See DIC Warnings and Messages
on
page 4‑48.
5-13
Page 288 of 480
4.The resulting figure equals the available
amount of cargo and luggage load capacity.
For example, if the“XXX”amount equals
1400 lbs and there will be five 150 lb
passengers in your vehicle, the amount of
available cargo and luggage load capacity is
650 lbs (1400 −750 (5 x 150) = 650 lbs).
5.Determine the combined weight of luggage
and cargo being loaded on the vehicle. That
weight may not safely exceed the available
cargo and luggage load capacity calculated in
Step 4.
6.If your vehicle will be towing a trailer, the load
from your trailer will be transferred to your
vehicle. Consult this manual to determine
how this reduces the available cargo and
luggage load capacity for your vehicle.
If your vehicle can tow a trailer, see Towing a
Trailer (Automatic Transmission)
on page 5‑32or
Towing a Trailer (Manual Transmission)
on
page 5‑40
for important information on towing a
trailer, towing safety rules, and trailering tips.
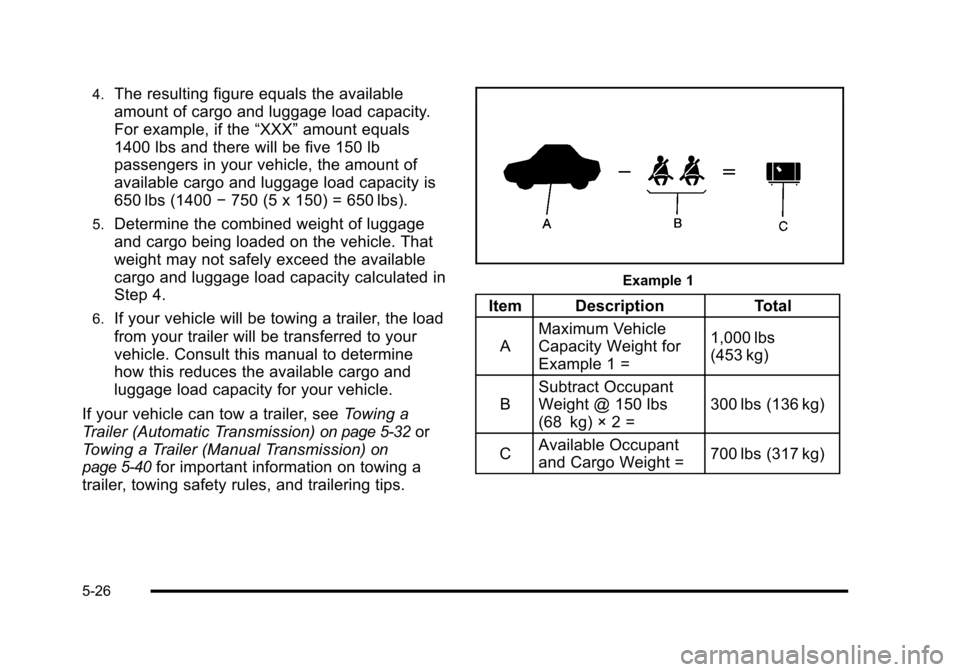
Example 1
Item Description Total
A Maximum Vehicle
Capacity Weight for
Example 1 = 1,000 lbs
(453 kg)
B Subtract Occupant
Weight @ 150 lbs
(68 kg) × 2 = 300 lbs (136 kg)
C Available Occupant
and Cargo Weight =
700 lbs (317 kg)
5-26
Page 294 of 480
Towing a Trailer
(Automatic Transmission)
{WARNING:
The driver can lose control when pulling a trailer if
the correct equipment is not used or the vehicle is
not driven properly. For example, if the trailer is
too heavy, the brakes may not work well—or
even at all. The driver and passengers could be
seriously injured. The vehicle may also be
damaged; the resulting repairs would not be
covered by the vehicle warranty. Pull a trailer only
if all the steps in this section have been followed.
Ask your dealer/retailer for advice and information
about towing a trailer with the vehicle.
The vehicle can tow a trailer if it is equipped with an
automatic transmission and the proper trailer towing
equipment. If the vehicle is not equipped as stated
above, do not tow a trailer. To identify the trailering
capacity of the vehicle, read the information in “Weight
of the Trailer” that appears later in this section. Trailering is different than just driving the vehicle by
itself. Trailering means changes in handling,
acceleration, braking, cooling, durability and fuel
economy. Successful, safe trailering takes correct
equipment, and it has to be used properly.
The following information has many time-tested,
important trailering tips and safety rules. Many of
these are important for your safety and that of your
passengers. So please read this section carefully
before pulling a trailer.
Load-pulling components such as the engine,
transmission, wheel assemblies and tires are forced to
work harder against the drag of the added weight. The
engine is required to operate at relatively higher speeds
and under greater loads, generating extra heat. Also,
the trailer adds considerably to wind resistance,
increasing the pulling requirements.
SS Package
If the vehicle has the SS package, it is neither designed
nor intended to tow a trailer.
5-32
Page 302 of 480

Maintenance When Trailer Towing
The vehicle needs service more often when pulling a
trailer. See this manual's Maintenance Schedule or
Index for more information. Things that are especially
important in trailer operation are automatic transmission
fluid, engine oil, axle lubricant, belts, cooling system
and brake system. It is a good idea to inspect these
before and during the trip.
Check periodically to see that all hitch nuts and bolts
are tight.
Engine Cooling When Trailer Towing
The cooling system may temporarily overheat during
severe operating conditions. SeeEngine Overheating
on page 6‑34.
Towing a Trailer
(Manual Transmission)
Do not tow a trailer if the vehicle is equipped with a
manual transmission.
5-40
Page 303 of 480
Section 6 Service and Appearance Care
Service. . . . . . . . . . . . . . . . . . . . . . . . . . . . . . . . . . . . . . . . . . . . . 6-3
Accessories and Modifications . . . . . . . . . . . . . . . . . . 6-3
California Proposition 65 Warning . . . . . . . . . . . . . . . 6-4
California Perchlorate Materials Requirements . . . . . . . . . . . . . . . . . . . . . . . . . . . . . . . . . 6-4
Doing Your Own Service Work . . . . . . . . . . . . . . . . . . 6-4
Adding Equipment to the Outside of the Vehicle . . . . . . . . . . . . . . . . . . . . . . . . . . . . . . . . . . . . . . . . 6-5
Fuel . . . . . . . . . . . . . . . . . . . . . . . . . . . . . . . . . . . . . . . . . . . . . . . . . 6-5
Gasoline Octane . . . . . . . . . . . . . . . . . . . . . . . . . . . . . . . . 6-6
Gasoline Specifications . . . . . . . . . . . . . . . . . . . . . . . . . 6-6
California Fuel . . . . . . . . . . . . . . . . . . . . . . . . . . . . . . . . . . 6-7
Additives . . . . . . . . . . . . . . . . . . . . . . . . . . . . . . . . . . . . . . . . 6-7
Fuel E85 (85% Ethanol) . . . . . . . . . . . . . . . . . . . . . . . . . 6-8
Fuels in Foreign Countries . . . . . . . . . . . . . . . . . . . . . . 6-9
Filling the Tank . . . . . . . . . . . . . . . . . . . . . . . . . . . . . . . . 6-10
Filling a Portable Fuel Container . . . . . . . . . . . . . . . 6-13
Checking Things Under the Hood . . . . . . . . . . . . . . . 6-14
Hood Release . . . . . . . . . . . . . . . . . . . . . . . . . . . . . . . . . 6-15
Engine Compartment Overview . . . . . . . . . . . . . . . . 6-16
Engine Oil . . . . . . . . . . . . . . . . . . . . . . . . . . . . . . . . . . . . . 6-19
Engine Oil Life System . . . . . . . . . . . . . . . . . . . . . . . . 6-23
Engine Air Cleaner/Filter . . . . . . . . . . . . . . . . . . . . . . . 6-25
Automatic Transmission Fluid . . . . . . . . . . . . . . . . . . 6-27
Manual Transmission Fluid . . . . . . . . . . . . . . . . . . . . 6-28
Hydraulic Clutch . . . . . . . . . . . . . . . . . . . . . . . . . . . . . . . 6-28 Cooling System . . . . . . . . . . . . . . . . . . . . . . . . . . . . . . . . 6-28
Engine Coolant . . . . . . . . . . . . . . . . . . . . . . . . . . . . . . . . 6-29
Engine Overheating . . . . . . . . . . . . . . . . . . . . . . . . . . . 6-34
Windshield Washer Fluid . . . . . . . . . . . . . . . . . . . . . . 6-36
Brakes . . . . . . . . . . . . . . . . . . . . . . . . . . . . . . . . . . . . . . . . . 6-37
Battery . . . . . . . . . . . . . . . . . . . . . . . . . . . . . . . . . . . . . . . . . 6-40
Jump Starting . . . . . . . . . . . . . . . . . . . . . . . . . . . . . . . . . . 6-41
Headlamp Aiming . . . . . . . . . . . . . . . . . . . . . . . . . . . . . . . . 6-45
Bulb Replacement . . . . . . . . . . . . . . . . . . . . . . . . . . . . . . . . 6-48
Halogen Bulbs . . . . . . . . . . . . . . . . . . . . . . . . . . . . . . . . . 6-48
Headlamps, Front Turn Signal, and Parking Lamps . . . . . . . . . . . . . . . . . . . . . . . . . . . . . . . . . . . . . . . 6-48
Center High-Mounted Stoplamp (CHMSL) . . . . . 6-50
Taillamps, Turn Signal, Stoplamps and Back-up Lamps . . . . . . . . . . . . . . . . . . . . . . . . . . . . . . . . . . . . . . . 6-51
License Plate Lamp . . . . . . . . . . . . . . . . . . . . . . . . . . . . 6-52
Replacement Bulbs . . . . . . . . . . . . . . . . . . . . . . . . . . . . 6-53
Windshield Wiper Blade Replacement . . . . . . . . . . . 6-53
Tires . . . . . . . . . . . . . . . . . . . . . . . . . . . . . . . . . . . . . . . . . . . . . . . 6-54
Tire Sidewall Labeling . . . . . . . . . . . . . . . . . . . . . . . . . 6-56
Tire Terminology and Definitions . . . . . . . . . . . . . . . 6-60
Inflation - Tire Pressure . . . . . . . . . . . . . . . . . . . . . . . . 6-63
Tire Pressure Monitor System . . . . . . . . . . . . . . . . . 6-64
Tire Pressure Monitor Operation . . . . . . . . . . . . . . . 6-65
Tire Inspection and Rotation . . . . . . . . . . . . . . . . . . . 6-69
6-1
Page 329 of 480
To inspect or replace the filter, do the following:1. Remove the screws that hold the housing and cover together and lift off the cover.
2. Inspect or replace the engine air cleaner/filter.
3. Reverse the steps to reinstall the system. Be sure to reinstall the housing tightly.
{WARNING:
Operating the engine with the air cleaner/filter off
can cause you or others to be burned. The air
cleaner not only cleans the air; it helps to stop
flames if the engine backfires. Use caution when
working on the engine and do not drive with the
air cleaner/filter off.
Notice: If the air cleaner/filter is off, dirt can easily
get into the engine, which could damage it. Always
have the air cleaner/filter in place when you are
driving.
Automatic Transmission Fluid
It is not necessary to check the transmission fluid level.
A transmission fluid leak is the only reason for fluid
loss. If a leak occurs, take your vehicle to a dealer/
retailer and have it repaired as soon as possible.
Change the fluid and filter at the intervals listed in the
Maintenance Schedule. See Scheduled Maintenance
on page 7‑3. Be sure to use the transmission fluid
listed in Recommended Fluids and Lubricantson
page 7‑10.
Notice: Use of the incorrect automatic transmission
fluid may damage the vehicle, and the damages may
not be covered by the vehicle's warranty. Always
use the automatic transmission fluid listed in
Recommended Fluids and Lubricants on page 7‑10.
6-27
Page 343 of 480
Jump Starting
If the vehicle's battery has run down, you may want to
use another vehicle and some jumper cables to start the
vehicle. Be sure to use the following steps to do it
safely.
{WARNING:
Batteries can hurt you. They can be dangerous
because:
.They contain acid that can burn you.
.They contain gas that can explode or ignite.
.They contain enough electricity to burn you.
If you do not follow these steps exactly, some or
all of these things can hurt you.
Notice: Ignoring these steps could result in costly
damage to the vehicle that would not be covered by
the warranty.
Trying to start the vehicle by pushing or pulling it
will not work, and it could damage the vehicle.
1. Check the other vehicle. It must have a 12-volt battery with a negative ground system. Notice:
If the other vehicle's system is not a 12-volt
system with a negative ground, both vehicles can
be damaged. Only use vehicles with 12-volt systems
with negative grounds to jump start your vehicle.
2. Get the vehicles close enough so the jumper cables can reach, but be sure the vehicles are not
touching each other. If they are, it could cause a
ground connection you do not want. You would not
be able to start the vehicle, and the bad grounding
could damage the electrical systems.
To avoid the possibility of the vehicles rolling, set
the parking brake firmly on both vehicles involved
in the jump start procedure. Put an automatic
transmission in P (Park) or a manual transmission
in N (Neutral) before setting the parking brake.
Notice: If you leave the radio or other accessories
on during the jump starting procedure, they could
be damaged. The repairs would not be covered by
the warranty. Always turn off the radio and other
accessories when jump starting the vehicle.
3. Turn off the ignition on both vehicles. Unplug unnecessary accessories plugged into the
cigarette lighter or the accessory power outlet.
Turn off the radio and all lamps that are not
needed. This will avoid sparks and help save
both batteries. And it could save the radio!
6-41
Page 362 of 480
Tire Terminology and Definitions
Air Pressure:The amount of air inside the tire
pressing outward on each square inch of the tire.
Air pressure is expressed in pounds per square
inch (psi) or kilopascal (kPa).
Accessory Weight
:This means the combined
weight of optional accessories. Some examples of
optional accessories are, automatic transmission,
power steering, power brakes, power windows,
power seats, and air conditioning.
Aspect Ratio
:The relationship of a tire's height to
its width.
Belt
:A rubber coated layer of cords that is
located between the plies and the tread. Cords
may be made from steel or other reinforcing
materials.
Bead
:The tire bead contains steel wires wrapped
by steel cords that hold the tire onto the rim.
Bias Ply Tire
:A pneumatic tire in which the plies
are laid at alternate angles less than 90 degrees
to the centerline of the tread. Cold Tire Pressure
:The amount of air pressure
in a tire, measured in pounds per square inch (psi)
or kilopascals (kPa) before a tire has built up heat
from driving. See Inflation - Tire Pressure
on
page 6‑63
.
Curb Weight
:The weight of a motor vehicle with
standard and optional equipment including the
maximum capacity of fuel, oil, and coolant, but
without passengers and cargo.
DOT Markings
:A code molded into the sidewall
of a tire signifying that the tire is in compliance
with the U.S. Department of Transportation (DOT)
motor vehicle safety standards. The DOT code
includes the Tire Identification Number (TIN), an
alphanumeric designator which can also identify
the tire manufacturer, production plant, brand, and
date of production.
GVWR
:Gross Vehicle Weight Rating. See
Loading the Vehicle
on page 5‑24.
GAWR FRT
:Gross Axle Weight Rating for the
front axle. See Loading the Vehicle
on page 5‑24.
6-60