2010 CHEVROLET HHR high beam
[x] Cancel search: high beamPage 205 of 480
Notice:Lack of proper engine oil maintenance
can damage the engine. The repairs would not be
covered by the vehicle warranty. Always follow the
maintenance schedule in this manual for changing
engine oil.
This light comes on briefly while starting the engine.
If it does not, have the vehicle serviced by your dealer/
retailer. If the system is working normally the indicator
light then goes off.
If the light comes on and stays on, it means that oil is
not flowing through the engine properly. The vehicle
could be low on oil and it might have some other
system problem.
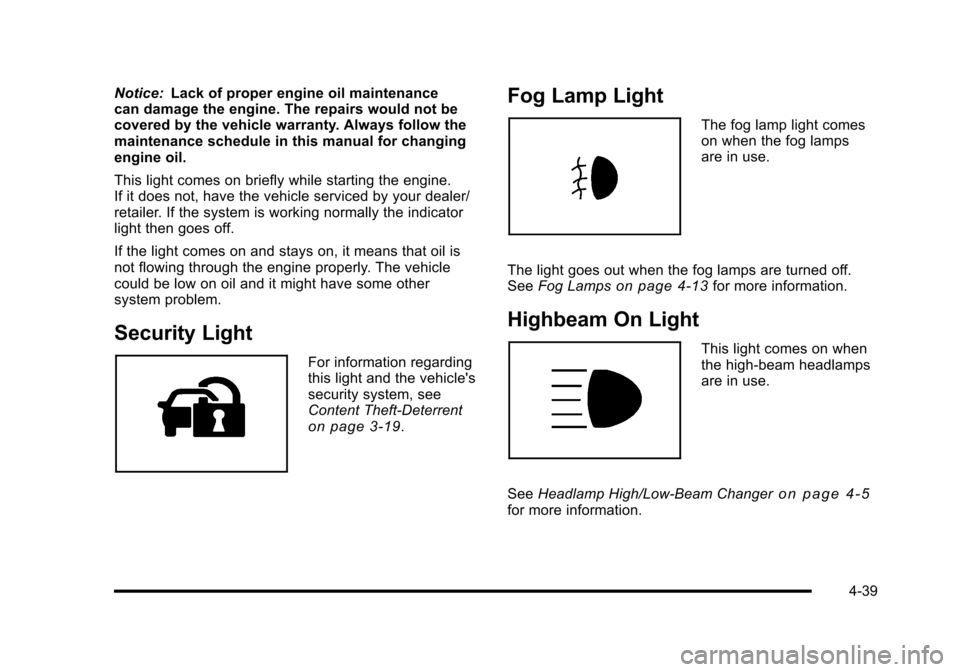
Security Light
For information regarding
this light and the vehicle's
security system, see
Content Theft-Deterrent
on page 3‑19.
Fog Lamp Light
The fog lamp light comes
on when the fog lamps
are in use.
The light goes out when the fog lamps are turned off.
See Fog Lamps
on page 4‑13for more information.
Highbeam On Light
This light comes on when
the high-beam headlamps
are in use.
See Headlamp High/Low-Beam Changer
on page 4‑5for more information.
4-39
Page 347 of 480
To disconnect the jumper cables from both vehicles:1. Disconnect the black negative (−) cable from the vehicle that had the dead battery.
2. Disconnect the black negative (−) cable from the vehicle with the good battery.
3. Disconnect the red positive (+) cable from the vehicle with the good battery.
4. Disconnect the red positive (+) cable from the other vehicle.
5. Return the positive (+) terminal cover to its original position.
Headlamp Aiming
The vehicle has a visual optical headlamp aiming
system. The aim has been preset at the factory and
should need no further adjustment.
However, if the vehicle is damaged in a crash, the
headlamp aim may be affected and adjustment may be
necessary.
If oncoming vehicles flash their high beams at you, this
may also mean the vertical aim needs to be adjusted. It is recommended that the vehicle is taken to your
dealer/retailer for service if the headlamps need to be
re-aimed. It is possible however, to re-aim the
headlamps as described.
The vehicle should:
.Be placed so the headlamps are 25 ft. (7.6 m) from
a light colored wall.
.Have all four tires on a level surface which is level
all the way to the wall.
.Be placed so it is perpendicular to the wall or other
flat surface.
.Not have any snow, ice, or mud on it.
.Be fully assembled and all other work stopped
while headlamp aiming is being performed.
.Normally loaded with a full tank of fuel and one
person or 160 lbs (75 kg) sitting on the driver seat.
.Have all tires properly inflated.
.Have the spare tire is in its original location in the
vehicle.
6-45
Page 348 of 480
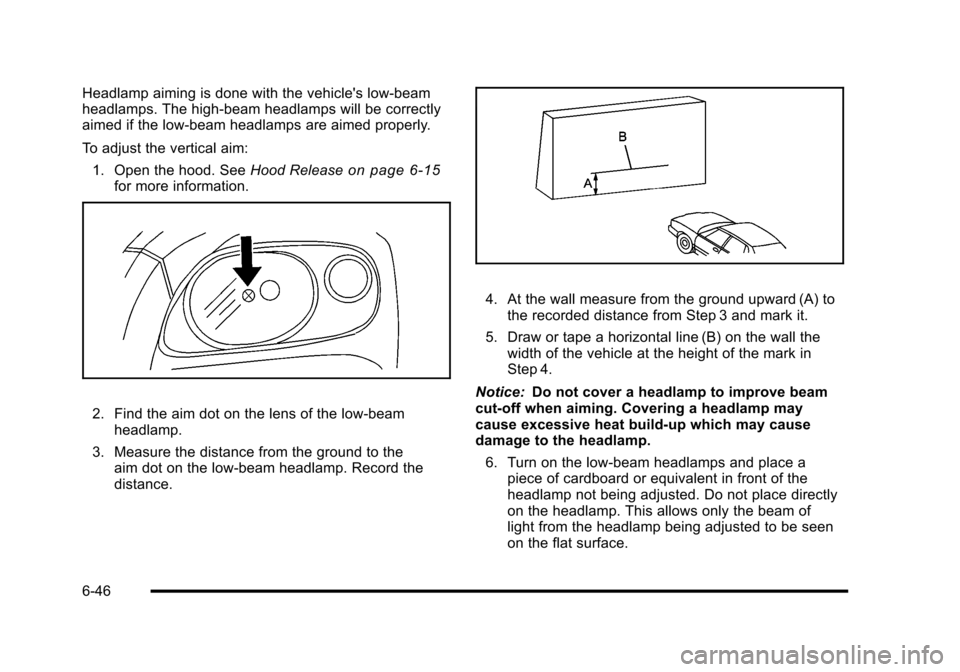
Headlamp aiming is done with the vehicle's low-beam
headlamps. The high-beam headlamps will be correctly
aimed if the low-beam headlamps are aimed properly.
To adjust the vertical aim:1. Open the hood. See Hood Release
on page 6‑15for more information.
2. Find the aim dot on the lens of the low‐beam
headlamp.
3. Measure the distance from the ground to the aim dot on the low‐beam headlamp. Record the
distance.
4. At the wall measure from the ground upward (A) tothe recorded distance from Step 3 and mark it.
5. Draw or tape a horizontal line (B) on the wall the width of the vehicle at the height of the mark in
Step 4.
Notice: Do not cover a headlamp to improve beam
cut-off when aiming. Covering a headlamp may
cause excessive heat build-up which may cause
damage to the headlamp.
6. Turn on the low-beam headlamps and place a piece of cardboard or equivalent in front of the
headlamp not being adjusted. Do not place directly
on the headlamp. This allows only the beam of
light from the headlamp being adjusted to be seen
on the flat surface.
6-46
Page 355 of 480
5. Push and turn the license plate back through thefascia opening.
6. Reinstall the two screws holding the license plate lamps to the fascia.
Replacement Bulbs
Exterior Lamp Bulb Number
Back-up Lamp and CHMSL 921
Front Turn Signal and Parking
Lamp (Amber) 5702KA
Front Turn Signal and Parking
Lamp (Clear) B2N
Headlamp High/Low-Beam H13
Stoplamp/Taillamp/Turn Signal 3057KX
For replacement bulbs not listed here, contact your
dealer/retailer.
Windshield Wiper Blade
Replacement
Windshield wiper blades should be inspected for wear
or cracking. SeeScheduled Maintenanceon page 7‑3for more information on wiper blade inspection. Replacement blades come in different types and are
removed in different ways. For the proper type and
length, see
Maintenance Replacement Parts
on
page 7‑12. Here's how to remove the wiper blade:
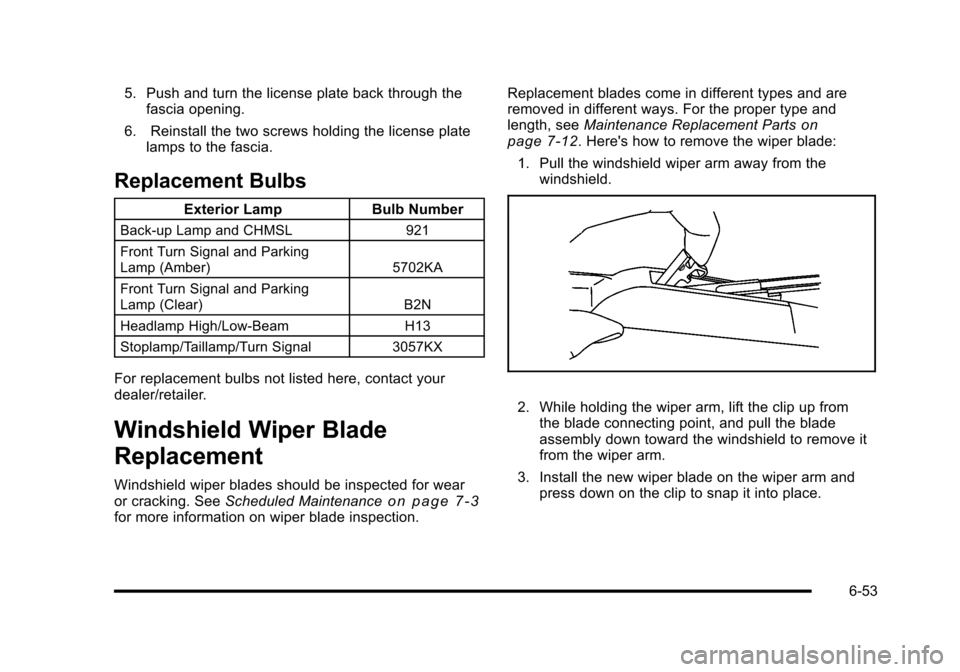
1. Pull the windshield wiper arm away from the windshield.
2. While holding the wiper arm, lift the clip up fromthe blade connecting point, and pull the blade
assembly down toward the windshield to remove it
from the wiper arm.
3. Install the new wiper blade on the wiper arm and press down on the clip to snap it into place.
6-53
Page 425 of 480
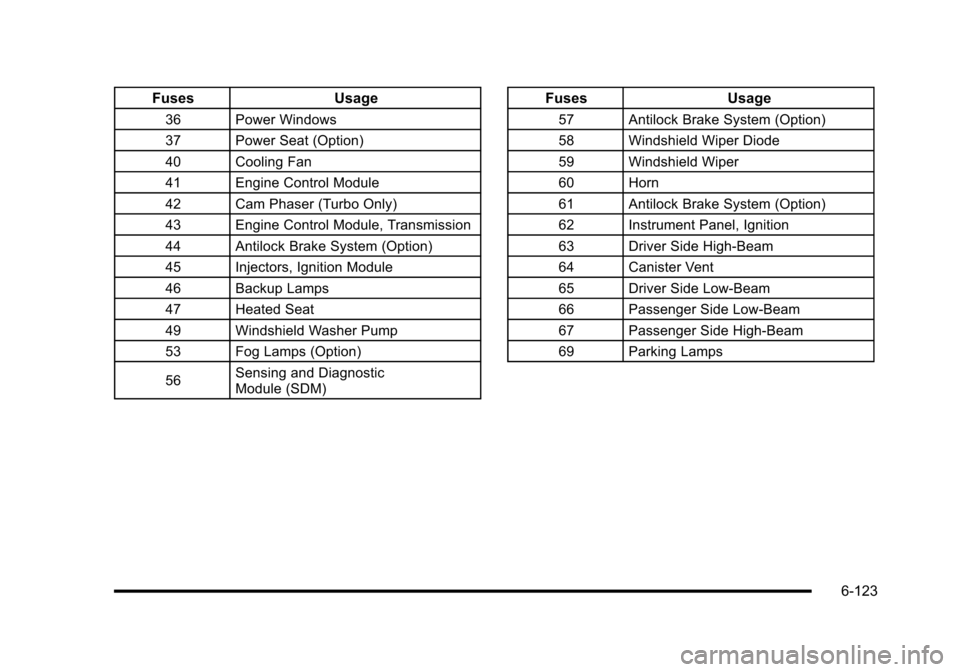
FusesUsage
36 Power Windows
37 Power Seat (Option)
40 Cooling Fan
41 Engine Control Module
42 Cam Phaser (Turbo Only)
43 Engine Control Module, Transmission
44 Antilock Brake System (Option)
45 Injectors, Ignition Module
46 Backup Lamps
47 Heated Seat
49 Windshield Washer Pump
53 Fog Lamps (Option)
56Sensing and Diagnostic
Module (SDM)
Fuses
Usage
57 Antilock Brake System (Option)
58 Windshield Wiper Diode
59 Windshield Wiper
60 Horn
61 Antilock Brake System (Option)
62 Instrument Panel, Ignition
63 Driver Side High-Beam
64 Canister Vent
65 Driver Side Low-Beam
66 Passenger Side Low-Beam
67 Passenger Side High-Beam
69 Parking Lamps
6-123
Page 426 of 480
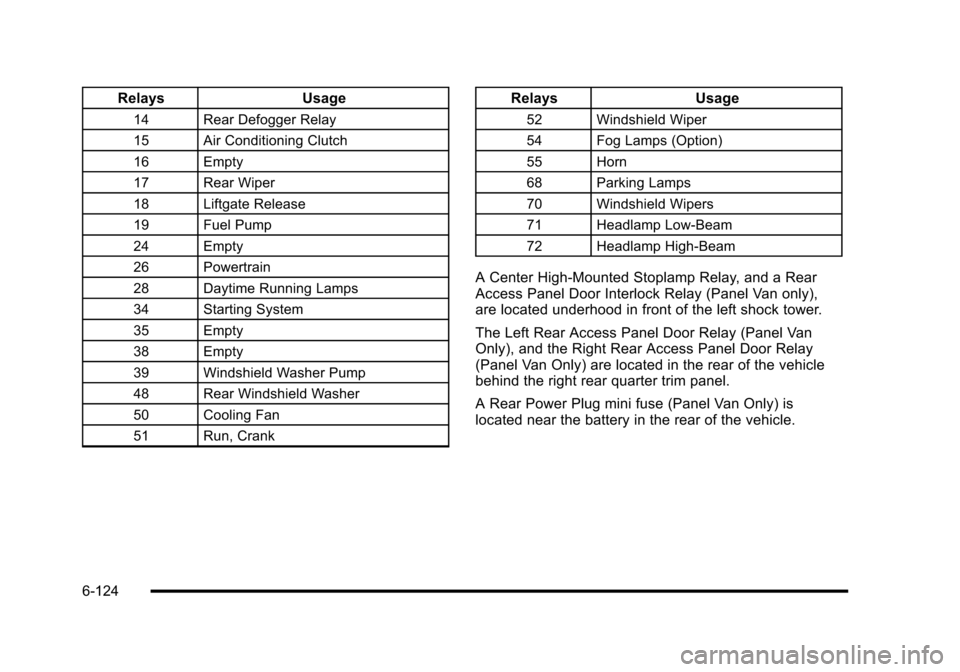
RelaysUsage
14 Rear Defogger Relay
15 Air Conditioning Clutch
16 Empty
17 Rear Wiper
18 Liftgate Release
19 Fuel Pump
24 Empty
26 Powertrain
28 Daytime Running Lamps
34 Starting System
35 Empty
38 Empty
39 Windshield Washer Pump
48 Rear Windshield Washer
50 Cooling Fan
51 Run, Crank
RelaysUsage
52 Windshield Wiper
54 Fog Lamps (Option)
55 Horn
68 Parking Lamps
70 Windshield Wipers
71 Headlamp Low-Beam
72 Headlamp High-Beam
A Center High-Mounted Stoplamp Relay, and a Rear
Access Panel Door Interlock Relay (Panel Van only),
are located underhood in front of the left shock tower.
The Left Rear Access Panel Door Relay (Panel Van
Only), and the Right Rear Access Panel Door Relay
(Panel Van Only) are located in the rear of the vehicle
behind the right rear quarter trim panel.
A Rear Power Plug mini fuse (Panel Van Only) is
located near the battery in the rear of the vehicle.
6-124
Page 469 of 480

Headlamps (cont.)High/Low Beam Changer . . . . . . . . . . . . . . . . . . . . . . . . . . 4-5
On Reminder . . . . . . . . . . . . . . . . . . . . . . . . . . . . . . . . . . . . . 4-12
Wiper Activated . . . . . . . . . . . . . . . . . . . . . . . . . . . . . . . . . . . 4-11
Heated Seats . . . . . . . . . . . . . . . . . . . . . . . . . . . . . . . . . . . . . . . .2-6
Heater . . . . . . . . . . . . . . . . . . . . . . . . . . . . . . . . . . . . . . . . . . . . . 4-18 Engine Coolant . . . . . . . . . . . . . . . . . . . . . . . . . . . . . . . . . . . 3-27
Height Adjuster, Driver Seat . . . . . . . . . . . . . . . . . . . . . . . . .2-5
Hideaway Rear Storage Bins . . . . . . . . . . . . . . . . . . . . . . 3-51
Highbeam On Light . . . . . . . . . . . . . . . . . . . . . . . . . . . . . . . . 4-39
Highway Hypnosis . . . . . . . . . . . . . . . . . . . . . . . . . . . . . . . . . 5-19
Hill and Mountain Roads . . . . . . . . . . . . . . . . . . . . . . . . . . . 5-20
Hood Checking Things Under . . . . . . . . . . . . . . . . . . . . . . . . . . . 6-14
Release . . . . . . . . . . . . . . . . . . . . . . . . . . . . . . . . . . . . . . . . . . 6-15
Horn . . . . . . . . . . . . . . . . . . . . . . . . . . . . . . . . . . . . . . . . . . . . . . . . .4-3
How to Wear Safety Belts Properly . . . . . . . . . . . . . . . . 2-19
Hydraulic Clutch . . . . . . . . . . . . . . . . . . . . . . . . . . . . . . . . . . . 6-28
I
Ignition Positions . . . . . . . . . . . . . . . . . . . . . . . . . . . . . . . . . . 3-23
Indicator/Warning LIghts Enhanced Traction System (ETS) . . . . . . . . . . . . . . . . 4-32
Infants and Young Children, Restraints . . . . . . . . . . . . 2-38
Inflation - Tire Pressure . . . . . . . . . . . . . . . . . . . . . . . . . . . . 6-63 Instrument Panel
Brightness . . . . . . . . . . . . . . . . . . . . . . . . . . . . . . . . . . . . . . . . 4-14
Storage Area . . . . . . . . . . . . . . . . . . . . . . . . . . . . . . . . . . . . . 3-47
Instrument Panel Cluster . . . . . . . . . . . . . . . . . . . . . . . . . . 4-24
Integrated Trailer Brake Control System (ITBC) . . . . . . . . . . . . . . . . . . . . . . . . . . . . . 5-32, 5-40
Introduction . . . . . . . . . . . . . . . . . . . . . . . . . . . . . . . . . . . . . . . . . .7-2
J
Jump Starting . . . . . . . . . . . . . . . . . . . . . . . . . . . . . . . . . . . . . . 6-41
K
Keyless Entry
Remote (RKE) System . . . . . . . . . . . . . . . . . . . . . . . . . . . . 3-4
Keyless Entry System . . . . . . . . . . . . . . . . . . . . . . . . . . . . . . .3-4
Keys . . . . . . . . . . . . . . . . . . . . . . . . . . . . . . . . . . . . . . . . . . . . . . . . .3-3
L
Labeling, Tire Sidewall . . . . . . . . . . . . . . . . . . . . . . . . . . . . . 6-56
Lamps Daytime Running (DRL) . . . . . . . . . . . . . . . . . . . . . . . . . . 4-12
Dome . . . . . . . . . . . . . . . . . . . . . . . . . . . . . . . . . . . . . . . . . . . . . 4-14
License Plate . . . . . . . . . . . . . . . . . . . . . . . . . . . . . . . . . . . . . 6-52
Malfunction Indicator . . . . . . . . . . . . . . . . . . . . . . . . . . . . . 4-35
Reading . . . . . . . . . . . . . . . . . . . . . . . . . . . . . . . . . . . . . . . . . . 4-14
i - 7
Page 470 of 480

Lap-Shoulder Belt . . . . . . . . . . . . . . . . . . . . . . . . . . . . . . . . . 2-28
LATCH System for Child Restraints . . . . . . . . . . . . . . . . 2-45
LiftgateCarbon Monoxide . . . . . . . . . . . . . . . . . . . . . . . . . . . . . . . . . 3-13
Lighting Entry/Exit . . . . . . . . . . . . . . . . . . . . . . . . . . . . . . . . . . . . . . . . . 4-14
Lights . . . . . . . . . . . . . . . . . . . . . . . . . . . . . . . . . . . . . . . . . . . . . . 4-11
Airbag Readiness . . . . . . . . . . . . . . . . . . . . . . . . . . . . . . . . . 4-27
Antilock Brake System (ABS) Warning . . . . . . . . . . . . 4-31
Brake System Warning . . . . . . . . . . . . . . . . . . . . . . . . . . . 4-30
Charging System . . . . . . . . . . . . . . . . . . . . . . . . . . . . . . . . . 4-29
Engine Coolant Temperature Warning . . . . . . . . . . . . 4-34
Enhanced Traction System (ETS) Active . . . . . . . . . 5-11
Flash-to-Pass . . . . . . . . . . . . . . . . . . . . . . . . . . . . . . . . . . . . . . 4-5
Fog Lamps . . . . . . . . . . . . . . . . . . . . . . . . . . . . . . . . . . . . . . . 4-39
High/Low Beam Changer . . . . . . . . . . . . . . . . . . . . . . . . . . 4-5
Highbeam On . . . . . . . . . . . . . . . . . . . . . . . . . . . . . . . . . . . . . 4-39
Oil Pressure . . . . . . . . . . . . . . . . . . . . . . . . . . . . . . . . . . . . . . 4-38
On Reminder . . . . . . . . . . . . . . . . . . . . . . . . . . . . . . . . . . . . . 4-12
Passenger Airbag Status Indicator . . . . . . . . . . . . . . . . 4-28
Safety Belt Reminders . . . . . . . . . . . . . . . . . . . . . . . . . . . . 4-26
Security . . . . . . . . . . . . . . . . . . . . . . . . . . . . . . . . . . . . . . . . . . 4-39
Tire Pressure . . . . . . . . . . . . . . . . . . . . . . . . . . . . . . . . . . . . . 4-35
Up-Shift . . . . . . . . . . . . . . . . . . . . . . . . . . . . . . . . . . . . . . . . . . 4-29
Limited-Slip Differential . . . . . . . . . . . . . . . . . . . . . . . . . . . . 5-13
Loading Your Vehicle . . . . . . . . . . . . . . . . . . . . . . . . . . . . . . 5-24 Locks
Automatic Door Lock . . . . . . . . . . . . . . . . . . . . . . . . . . . . . 3-11
Delayed Locking . . . . . . . . . . . . . . . . . . . . . . . . . . . . . . . . . . 3-10
Door . . . . . . . . . . . . . . . . . . . . . . . . . . . . . . . . . . . . . . . . . . . . . . . 3-9
Lockout Protection . . . . . . . . . . . . . . . . . . . . . . . . . . . . . . . . 3-12
Power Door . . . . . . . . . . . . . . . . . . . . . . . . . . . . . . . . . . . . . . . 3-10
Programmable Automatic Door Unlock . . . . . . . . . . . 3-11
Rear Door Security Locks . . . . . . . . . . . . . . . . . . . . . . . . 3-11
Loss of Control . . . . . . . . . . . . . . . . . . . . . . . . . . . . . . . . . . . . 5-15
Lower Anchors and Tethers for Children . . . . . . . . . . . 2-45
Lumbar Power Controls . . . . . . . . . . . . . . . . . . . . . . . . . . . . . . . . . . . . 2-6
M
Maintenance ScheduleMaintenance Record . . . . . . . . . . . . . . . . . . . . . . . . . . . . . 7-14
Maintenance Replacement Parts . . . . . . . . . . . . . . . . . 7-12
Owner Checks and Services . . . . . . . . . . . . . . . . . . . . . . . 7-8
Recommended Fluids and Lubricants . . . . . . . . . . . . 7-10
Scheduled Maintenance . . . . . . . . . . . . . . . . . . . . . . . . . . . 7-3
Malfunction Indicator Lamp . . . . . . . . . . . . . . . . . . . . . . . . 4-35
Manual Seats . . . . . . . . . . . . . . . . . . . . . . . . . . . . . . . . . . . . . . . .2-4
Manual Transmission Fluid . . . . . . . . . . . . . . . . . . . . . . . . . . . . . . . . . . . . . . . . . . . . . . 6-28
Operation . . . . . . . . . . . . . . . . . . . . . . . . . . . . . . . . . . . . . . . . . 3-31
Message DIC Warnings and Messages . . . . . . . . . . . . . . . . . . . . . 4-48
i - 8