2010 CHEVROLET HHR air condition
[x] Cancel search: air conditionPage 119 of 480
Remote Vehicle Start
Your vehicle may have a remote start feature. This
feature allows you to start the engine from outside the
vehicle. It may also start the vehicle's heating or air
conditioning systems. SeeClimate Control System
on
page 4‑18for additional information.
Laws in some local communities may restrict the use of
remote starters. For example, some laws may require a
person using remote start to have the vehicle in view
when doing so. Check local regulations for any
requirements on remote starting of vehicles.
Do not use the remote start feature if your vehicle is low
on fuel. Your vehicle may run out of fuel.
If your vehicle has the remote start feature, the RKE
transmitter functions will have an increased range of
operation. However, the range may be less while the
vehicle is running.
There are other conditions which can affect the
performance of the transmitter, see Remote Keyless
Entry (RKE) System
on page 3‑4for additional
information. /
(Remote Vehicle Start): This button will be on the
RKE transmitter if you have remote start.
To start the engine using the remote start feature:
1. Aim the RKE transmitter at the vehicle.
2. Press and release the transmitter's lock button, then immediately press and hold the remote
vehicle start button for four seconds or until the
vehicle's turn signal lamps flash.
When the vehicle's engine starts, the parking
lamps will turn on and remain on while the engine
is running. The vehicle's doors will be locked.
3. If it is the first remote start since the vehicle has been driven, repeat these steps, while the engine
is still running, to extend the engine running time
by 10 minutes. Remote start can be extended
one time.
After entering the vehicle during a remote start, insert
and turn the key to ON/RUN to drive the vehicle.
After a remote start, the engine will automatically shut
off after 10 minutes unless a time extension has been
done or the vehicle's key is inserted into the ignition
switch and turned to ON/RUN.
The maximum number of remote starts between ignition
cycles with the key is two.
3-7
Page 142 of 480
D (Drive):This position is for normal driving with the
automatic transmission. It provides the best fuel
economy. If you need more power for passing and
you are:
.Going less than about 35 mph (55 km/h), push
the accelerator pedal about halfway down.
.Going about 35 mph (55 km/h), push the
accelerator all the way down.
Downshifting the transmission in slippery road
conditions could result in skidding, see “Skidding”
under Loss of Control on page 5‑15.
I (Intermediate): This position is also used for normal
driving. However, it reduces vehicle speed without using
the brakes for slight downgrades where the vehicle
would otherwise accelerate due to steepness of grade.
If constant upshifting or downshifting occurs while
driving up steep hills, this position can be used to
prevent repetitive types of shifts. You might choose
I (Intermediate) instead of D (Drive) when driving on
hilly, winding roads and when towing a trailer, so that
there is less shifting between gears. PERFORMANCE SHIFTING:
If the vehicle has this
feature, it can detect a change in driving patterns
while in the Intermediate position. If you make an
aggressive driving maneuver, the vehicle's transmission
automatically shifts to the lowest possible gear to
maximize vehicle performance. The vehicle will
automatically return to normal operation when you
return to normal driving patterns.
L (Low): This position reduces vehicle speed more than
I (Intermediate) without actually using the brakes. You
can use it on very steep hills, or in deep snow or mud.
If the shift lever is put in L (Low), the transmission will
not shift into L (Low) until the vehicle is going slowly
enough.
Notice: Spinning the tires or holding the vehicle in
one place on a hill using only the accelerator pedal
may damage the transmission. The repair will not be
covered by the vehicle warranty. If you are stuck, do
not spin the tires. When stopping on a hill, use the
brakes to hold the vehicle in place.
3-30
Page 159 of 480
The rear vision camera system display in the rearview
mirror may turn off or not appear as expected due to
one of the following conditions. If this occurs the left
indicator light on the mirror will flash.
.A slow flash may indicate a loss of video signal,
or no video signal present during the reverse cycle.
.A fast flash may indicate that the display has
been on for the maximum allowable time during
a reverse cycle, or the display has reached an
Over Temperature limit.
The fast flash conditions are used to protect the
video device from high temperature conditions.
Once conditions return to normal the device will
reset and the green indicator will stop flashing.
During any of these fault conditions, the display will be
blank and the indicator will continue to flash as long as
the vehicle is in R (Reverse) or until the conditions
return to normal.
Pressing and holding
zwhen the left indicator light is
flashing will turn off the video display along with the left
indicator light.
Storage Areas
Glove Box
Lift up on the glove box lever to open it.
Cupholders
There are two cupholders located in the floor console
between the front seats. There is also a cupholder for
the rear seat passenger located at the rear of the floor
console.
Automatic transmission vehicles have a cupholder in
front of the shift lever.
Instrument Panel Storage
The vehicle has a storage compartment on the
instrument panel above the air vents. Push the button
on the compartment to open the cover.
Floor Console Storage Area
There are two small storage compartments on the floor
console.
3-47
Page 184 of 480
Ashtray(s) and Cigarette Lighter
The vehicle may have an ashtray and cigarette lighter.
To use the lighter, located on the instrument panel
below the climate controls, push it in all the way and
let go. When it is ready, it will pop back out by itself.
Notice:Holding a cigarette lighter in while it is
heating will not allow the lighter to back away from
the heating element when it is hot. Damage from
overheating may occur to the lighter or heating
element, or a fuse could be blown. Do not hold a
cigarette lighter in while it is heating. Do not use
equipment exceeding maximum amperage rating
of 15 amperes.
To clean the center console ashtray, remove the entire
ashtray and empty it.
Notice: If papers, pins, or other flammable items are
put in the ashtray, hot cigarettes or other smoking
materials could ignite them and possibly damage
the vehicle. Never put flammable items in the
ashtray.
Climate Controls
Climate Control System
The heating, cooling, and ventilation for the vehicle can
be controlled with this system.
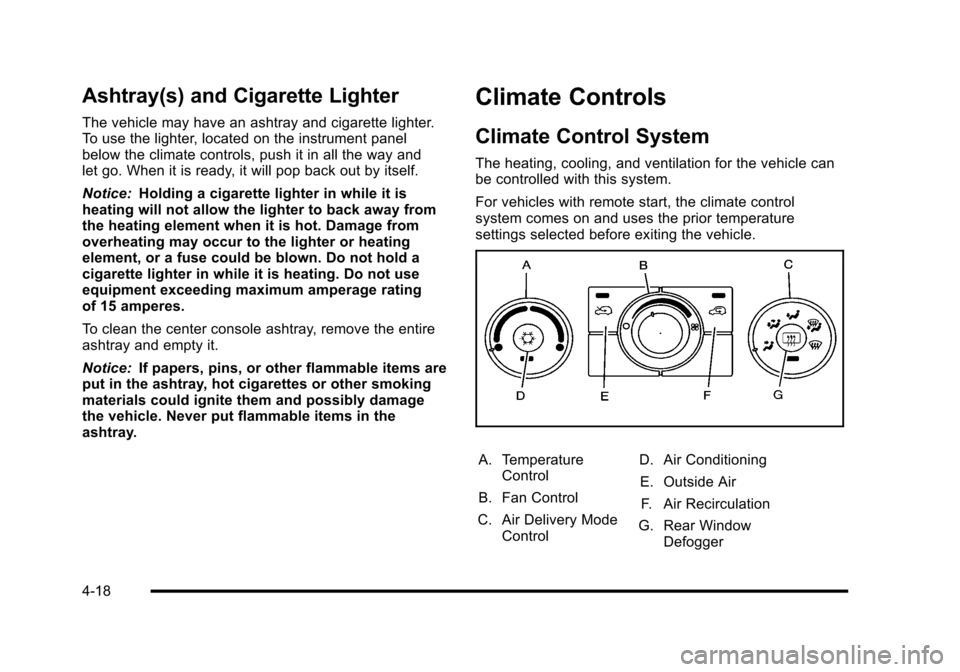
For vehicles with remote start, the climate control
system comes on and uses the prior temperature
settings selected before exiting the vehicle.
A. Temperature Control
B. Fan Control
C. Air Delivery Mode Control D. Air Conditioning
E. Outside Air F. Air Recirculation
G. Rear Window Defogger
4-18
Page 185 of 480
9(Off):Turn the fan control to this position to turn
the fan off.
Temperature Control: Turn clockwise or
counterclockwise to increase or decrease the
temperature.
9(Fan): Turn clockwise or counterclockwise to
increase or decrease the fan speed. In any setting other
than off, the fan runs continuously while the ignition is in
ON/RUN. The fan must be turned on to run the air
conditioning (AC) compressor.
Air Delivery Mode Control: Turn clockwise or
counterclockwise to change the direction of the airflow
inside the vehicle.
To change the current mode, select:
H(Vent): Air is directed to the instrument panel
outlets.
)(Bi-Level): Air is divided between the instrument
panel outlets and the floor outlets.
6(Floor): Air is directed to the floor outlets, with some
air directed to the windshield and side windows.
-(Defog): This mode clears the windows of fog or
moisture. Air is directed to the windshield, side window,
and floor outlets. In this mode, the system runs the air
conditioning compressor. To defog the windows faster,
turn the temperature control knob clockwise to the
warmest setting.
0(Defrost): This mode removes fog or frost from
the windshield more quickly. Air is directed to the
windshield, with some air directed to the side window
and floor outlets. In this mode, the system runs the air
conditioning compressor. To defrost the windows faster,
turn the temperature control knob clockwise to the
warmest setting.
#(Air Conditioning): Press to turn the air
conditioning system on or off. An indicator light comes
on to show that the air conditioning is on.
On hot days, open the windows to let hot inside air
escape; then close them. This helps to reduce the time
it takes for your vehicle to cool down. It also helps the
system to operate more efficiently.
4-19
Page 186 of 480
For quick cool down on hot days:1. Select
H.
2. Select
@.
3. Select
#.
4. Select the coolest temperature.
5. Select the highest fan speed.
Using these settings together for long periods of time
can cause the air inside of the vehicle to become too
dry. To prevent this from happening, after the air in the
vehicle has cooled, turn off the recirculation by pressing
the outside air button.
The air conditioning system removes moisture from the
air, so a small amount of water might drip under the
vehicle while idling or after turning off the engine. This
is normal.
The air conditioning compressor cannot be turned on
when the fan is off.
@(Recirculation): Press to turn the recirculation
mode on. An indicator light comes on to show that
recirculation is on. This mode recirculates and helps to quickly cool the
air inside the vehicle. It can be used to help prevent
outside air and odors from entering the vehicle.
The air conditioning compressor also comes on.
Recirculation is not available in floor, defog and defrost
modes. If the recirculation button is pressed, the
indicator light flashes five times and outside air is
delivered. Operation in this mode during periods of high
humidity and cool outside temperatures can result in
increased window fogging. If window fogging is
experienced, select the defrost mode.
;(Outside Air):
Press to allow outside air to circulate
through the vehicle. An indicator light comes on to show
that outside air is on.
Rear Window Defogger
The rear window defogger uses a warming grid to
remove fog from the rear window.
The rear window defogger only works when the ignition
is in ON/RUN.
<(Rear): Press to turn the rear window defogger on
or off. Be sure to clear as much snow from the rear
window as possible. An indicator light comes on to
show that the rear window defogger is on.
4-20
Page 195 of 480

Charging System Light
This light comes on briefly
when the ignition key is
turned on, but the engine
is not running, as a check
to show it is working.
It should go out once the engine is running. If it stays
on, or comes on while driving, there could be a problem
with the charging system or it could indicate that there
are problems with a generator drive belt, or that there is
an electrical problem. Have it checked right away. If the
vehicle must be driven a short distance with the light on,
to turn off the accessories, such as the radio and air
conditioner.
Up-Shift Light
The vehicle may have an
up-shift light.
When this light comes on, shift to the next higher gear if
weather, road, and traffic conditions allow.
See Manual Transmission Operation
on page 3‑31for
more information.
4-29
Page 202 of 480
If the check engine light comes on and stays on, while
the engine is running, this indicates that there is an
OBD II problem and service is required.
Malfunctions often are indicated by the system before
any problem is apparent. Being aware of the light can
prevent more serious damage to the vehicle. This
system assists the service technician in correctly
diagnosing any malfunction.
Notice:If the vehicle is continually driven with this
light on, after a while, the emission controls might
not work as well, the vehicle's fuel economy might
not be as good, and the engine might not run as
smoothly. This could lead to costly repairs that
might not be covered by the vehicle warranty.
Notice: Modifications made to the engine,
transmission, exhaust, intake, or fuel system of
the vehicle or the replacement of the original tires
with other than those of the same Tire Performance
Criteria (TPC) can affect the vehicle's emission
controls and can cause this light to come on.
Modifications to these systems could lead to
costly repairs not covered by the vehicle warranty.
This could also result in a failure to pass a
required Emission Inspection/Maintenance test.
See Accessories and Modifications on page 6‑3. This light comes on during a malfunction in one of
two ways:
Light Flashing:
A misfire condition has been detected.
A misfire increases vehicle emissions and could
damage the emission control system on the vehicle.
Diagnosis and service might be required.
To prevent more serious damage to the vehicle:
.Reduce vehicle speed.
.Avoid hard accelerations.
.Avoid steep uphill grades.
.If towing a trailer, reduce the amount of cargo
being hauled as soon as it is possible.
If the light continues to flash, when it is safe to do so,
stop the vehicle. Find a safe place to park the vehicle.
Turn the key off, wait at least 10 seconds, and restart
the engine. If the light is still flashing, follow the
previous steps and see your dealer/retailer for
service as soon as possible.
4-36