2010 CADILLAC ESCALADE ESV key
[x] Cancel search: keyPage 319 of 620
Black plate (17,1)Cadillac Escalade/Escalade ESV Owner Manual - 2010
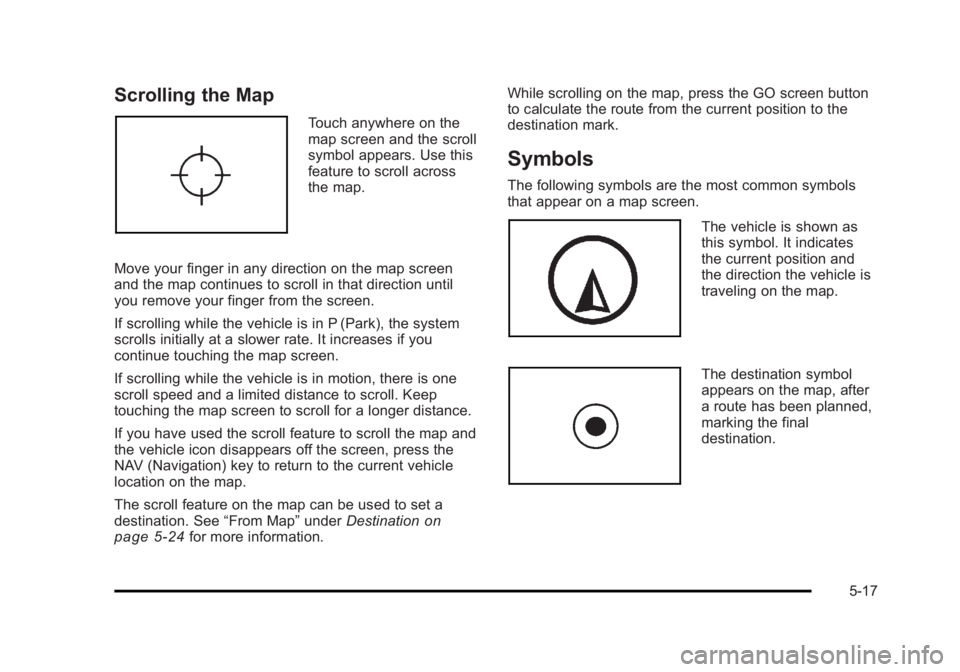
Scrolling the Map Touch anywhere on the
map screen and the scroll
symbol appears. Use this
feature to scroll across
the map.
Move your finger in any direction on the map screen
and the map continues to scroll in that direction until
you remove your finger from the screen.
If scrolling while the vehicle is in P (Park), the system
scrolls initially at a slower rate. It increases if you
continue touching the map screen.
If scrolling while the vehicle is in motion, there is one
scroll speed and a limited distance to scroll. Keep
touching the map screen to scroll for a longer distance.
If you have used the scroll feature to scroll the map and
the vehicle icon disappears off the screen, press the
NAV (Navigation) key to return to the current vehicle
location on the map.
The scroll feature on the map can be used to set a
destination. See “ From Map ” under Destination
on
page 5 ‑ 24 for more information. While scrolling on the map, press the GO screen button
to calculate the route from the current position to the
destination mark.
Symbols The following symbols are the most common symbols
that appear on a map screen.
The vehicle is shown as
this symbol. It indicates
the current position and
the direction the vehicle is
traveling on the map.
The destination symbol
appears on the map, after
a route has been planned,
marking the final
destination.
5-17
Page 326 of 620

Black plate (24,1)Cadillac Escalade/Escalade ESV Owner Manual - 2010
Destination Press the DEST key to access the Destination Entry
screen. From this screen, you can select from several
options to plan a route by entering destination points.
To enter a destination, choose from one of the following
destination entry methods:
Address Entry
2 Address Entry: Enter either a city or street to use
the address entry destination method. To enter a destination by inputting the city name first:
1. Press the DEST hard key.
2. Select the
2 screen button.
3. Select the state/province screen button, if needed,
to change the current state or province. A list of all
of the available states and provinces appear.
Select the state or province.
5-24
Page 327 of 620
Black plate (25,1)Cadillac Escalade/Escalade ESV Owner Manual - 2010
4. Once a state or province has been selected the
City name category is automatically selected for
entry.
Enter the City Name or touch the Last 5 Cities
screen button.
The Last 5 Cities screen displays a list of the last
five city names that had been entered. Select a city
from the list and it appears in the City name area.
If using the alpha keyboard, finish entering the city
name. If five or less names are available, a list
displays. If more than five are available, the List
screen button displays a number. This number
represents the number of available cities. Select
this button to view the list and select a city.
5. Once a city has been selected the Street name
category is automatically selected for entry.
Start entering the street name. If five or less names
are available, a list displays. If more than five are
available, the List screen button displays a
number. This number represents the number of
available streets. Select this button to view the list.
6. Once a street has been selected, press the
House # screen button to enter the house number.
The system displays the house number range that
is available for the street.
7. Select the Go screen button. The map screen, with
the destination marked displays. 8. Select the route preference (Fastest, Shortest,
or Other). The system calculates and highlights the
route.
9. Select the Start Guidance screen button. The route
is now ready to be started.
See “ Getting Started on Your Route ” later in this
section for more information.
To enter a destination by entering the street name first:
1. Press the DEST hard key.
2. Select the
2 screen button.
3. Select the state/province screen button, if needed,
to change the current state or province. A list of all
of the available states and provinces appear.
Select the state or province.
4. Select the Street screen button and start entering
the street name or touch the Last 5 Streets screen
button.
If the street name is common, the city might need
to be entered first.
The Last 5 Streets screen displays a list of the last
five street names that had been entered. Select a
street from the list and it appears in the Street
name area.
5-25
Page 328 of 620
Black plate (26,1)Cadillac Escalade/Escalade ESV Owner Manual - 2010
If using the alpha keyboard, finish entering the
street name. If five or less names are available, a
list displays. If more than five are available, the List
screen button displays a number. This number
represents the number of available streets. Select
this button to view the list and select a street.
5. Once a street has been selected, select the House
# screen button to enter the house number. The
system displays the house number range that is
available for the street.
6. Once the house number is selected, the city name
automatically populates. If there is more than one
city available for selection, a list of cities display.
Select the city.
7. Select the Go screen button. The map screen, with
the destination marked displays.
8. Select the route preference (Fastest, Shortest,
or Other). The system calculates and highlights the
route.
9. Select the Start Guidance screen button. The route
is now ready to be started.
See “ Getting Started on Your Route ” later in this
section for more information. To enter a destination by entering a cross street:
1. Press the DEST hard key.
2. Select the
2 screen button.
3. Select the state/province screen button, if needed,
to change the current state or province. A list of all
of the available states and provinces appear.
Select the state or province.
4. Select the Street screen button and start entering
the street name or touch the Last 5 Streets screen
button.
If the street name is common, the city might need
to be entered first.
The Last 5 Streets screen displays a list of the last
five street names that had been entered. Select a
street from the list and it appears in the Street
name area.
If using the alpha keyboard, finish entering the
street name. If five or less names are available, a
list displays. If more than five are available, the List
screen button displays a number. This number
represents the number of available streets. Select
this button to view the list and select a street.
5-26
Page 329 of 620
Black plate (27,1)Cadillac Escalade/Escalade ESV Owner Manual - 2010
5. Once a street has been selected, select the Cross
Street screen button and start entering the cross
street name. If five or less names are available, a
list displays. If more than five are available, the List
screen button displays a number. This number
represents the number of available streets. Select
this button to view the list and select a street.
6. Select the Go screen button. The map screen, with
the destination marked displays.
7. Select the route preference (Fastest, Shortest,
or Other). The system calculates and highlights the
route.
8. Select the Start Guidance screen button. The route
is now ready to be started.
See “ Getting Started on Your Route ” later in this
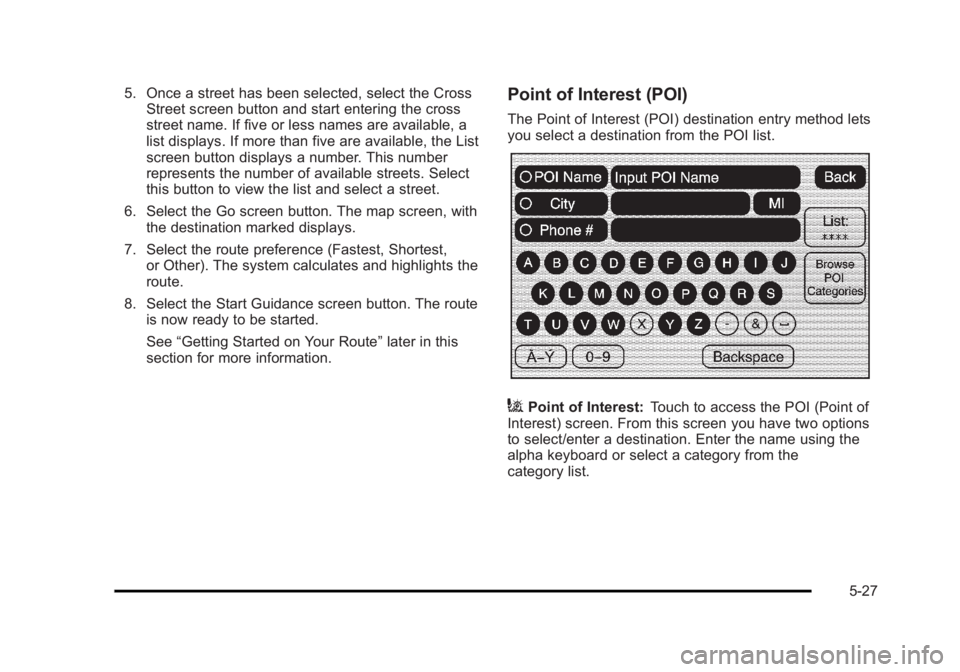
section for more information. Point of Interest (POI) The Point of Interest (POI) destination entry method lets
you select a destination from the POI list.
i Point of Interest: Touch to access the POI (Point of
Interest) screen. From this screen you have two options
to select/enter a destination. Enter the name using the
alpha keyboard or select a category from the
category list.
5-27
Page 330 of 620
Black plate (28,1)Cadillac Escalade/Escalade ESV Owner Manual - 2010
To use the point of interest destination entry method by
entering the name:
1. Press the DEST hard key.
2. Select the
i screen button.
3. Select the state/province screen button, if needed,
to change the current state or province. A list of all
of the available states and provinces appear.
Select the state or province.
4. Enter the POI name.
If five or less names are available, a list displays.
If more than five are available, the List screen
button displays a number. This number represents
the number of available POIs. Select this button to
view the list.
5. Select the Go screen button next to the POI. The
map screen, with the destination marked displays.
6. Select the route preference (Fastest, Shortest,
or Other). The system calculates and highlights the
route.
7. Select the Start Guidance screen button. The route
is now ready to be started.
See “ Getting Started on Your Route ” later in this
section for more information. To use the point of interest destination entry method by
selecting a category:
1. Press the DEST hard key.
2. Select the
i screen button.
3. Select the Browse POI Categories screen button to
view the list of POI categories.
4. Select a category.
The system displays available POI names in the
selected category.
5. Select the Go screen button next to the POI. The
map screen, with the destination marked displays.
6. Select the route preference (Fastest, Shortest,
or Other). The system calculates and highlights the
route.
7. Select the Start Guidance screen button. The route
is now ready to be started.
See “ Getting Started on Your Route ” later in this
section for more information.
5-28
Page 331 of 620

Black plate (29,1)Cadillac Escalade/Escalade ESV Owner Manual - 2010
Address Book The address book entry method lets you select a
destination by selecting an address that has been
stored in the address book.
g Address Book: Touch to access the Address Book
screen. From this screen an address that already exists
can be selected as the destination. To use the address book entry method:
1. Press the DEST hard key.
2. Select the
g screen button.
A list of the address book addresses display.
3. Select the Go screen button next to the
destination. The map screen, with the destination
marked displays.
4. Select the route preference (Fastest, Shortest,
or Other). The system calculates and highlights the
route.
5. Select the Start Guidance screen button. The route
is now ready to be started.
See “ Getting Started on Your Route ” later in this
section for more information.
See “ Adding Destinations to the Address Book ”
later in this section.
5-29
Page 332 of 620
Black plate (30,1)Cadillac Escalade/Escalade ESV Owner Manual - 2010
Previous Destination The previous destination entry method lets you select a
destination from a list of previous destination points.
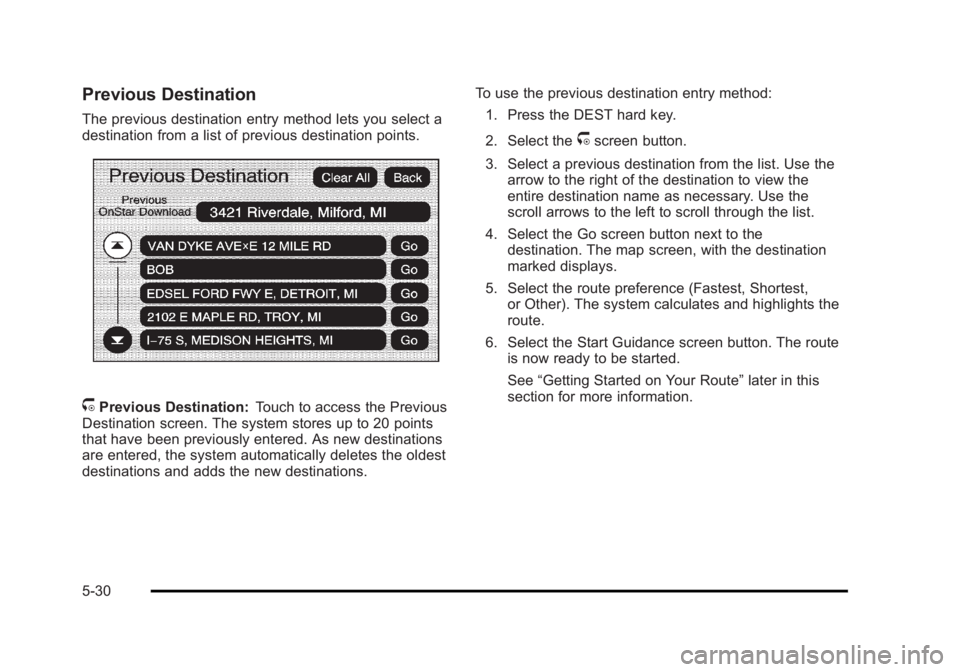
/ Previous Destination: Touch to access the Previous
Destination screen. The system stores up to 20 points
that have been previously entered. As new destinations
are entered, the system automatically deletes the oldest
destinations and adds the new destinations. To use the previous destination entry method:
1. Press the DEST hard key.
2. Select the
/ screen button.
3. Select a previous destination from the list. Use the
arrow to the right of the destination to view the
entire destination name as necessary. Use the
scroll arrows to the left to scroll through the list.
4. Select the Go screen button next to the
destination. The map screen, with the destination
marked displays.
5. Select the route preference (Fastest, Shortest,
or Other). The system calculates and highlights the
route.
6. Select the Start Guidance screen button. The route
is now ready to be started.
See “ Getting Started on Your Route ” later in this
section for more information.
5-30