2010 BUICK LUCERNE open hood
[x] Cancel search: open hoodPage 347 of 474

Notice:Ignoring these steps could result in costly
damage to the vehicle that would not be covered by
the warranty.
Trying to start the vehicle by pushing or pulling it
will not work, and it could damage the vehicle.
1. Check the other vehicle. It must have a 12-volt battery with a negative ground system.
Notice: If the other vehicle's system is not a 12-volt
system with a negative ground, both vehicles can
be damaged. Only use vehicles with 12-volt systems
with negative grounds to jump start your vehicle.
2. Get the vehicles close enough so the jumper cables can reach, but be sure the vehicles are
not touching each other. If they are, it could cause
a ground connection you do not want. You would
not be able to start your vehicle, and the bad
grounding could damage the electrical systems.
To avoid the possibility of the vehicles rolling, set
the parking brake firmly on both vehicles involved
in the jump start procedure. Put an automatic
transmission in P (Park) or a manual transmission
in Neutral before setting the parking brake. Notice:
If you leave the radio or other accessories
on during the jump starting procedure, they could
be damaged. The repairs would not be covered by
the warranty. Always turn off the radio and other
accessories when jump starting the vehicle.
3. Turn off the ignition on both vehicles. Unplug unnecessary accessories plugged into the
cigarette lighter or the accessory power outlet(s).
Turn off the radio and all lamps that are not
needed. This will avoid sparks and help save
both batteries. And it could save the radio!
4. Open the hood on the other vehicle and locate the positive (+) and negative (−) terminal locations on
that vehicle.
You will not see the battery of your vehicle under
the hood. It is located under the rear passenger's
seat. You will not need to access the battery for
jump starting. The remote positive (+) terminal is
for that purpose. See Engine Compartment
Overview
on page 6‑14for location.
6-45
Page 348 of 474

Access the remote positive (+) terminal by
removing the cover.
{WARNING:
An electric fan can start up even when the engine
is not running and can injure you. Keep hands,
clothing and tools away from any underhood
electric fan.
{WARNING:
Using an open flame near a battery can cause
battery gas to explode. People have been hurt
doing this, and some have been blinded. Use a
flashlight if you need more light.
Be sure the battery has enough water. You do not
need to add water to the battery installed in your
new vehicle. But if a battery has filler caps, be
sure the right amount of fluid is there. If it is low,
add water to take care of that first. If you do not,
explosive gas could be present.
Battery fluid contains acid that can burn you. Do
not get it on you. If you accidentally get it in your
eyes or on your skin, flush the place with water
and get medical help immediately.
6-46
Page 352 of 474
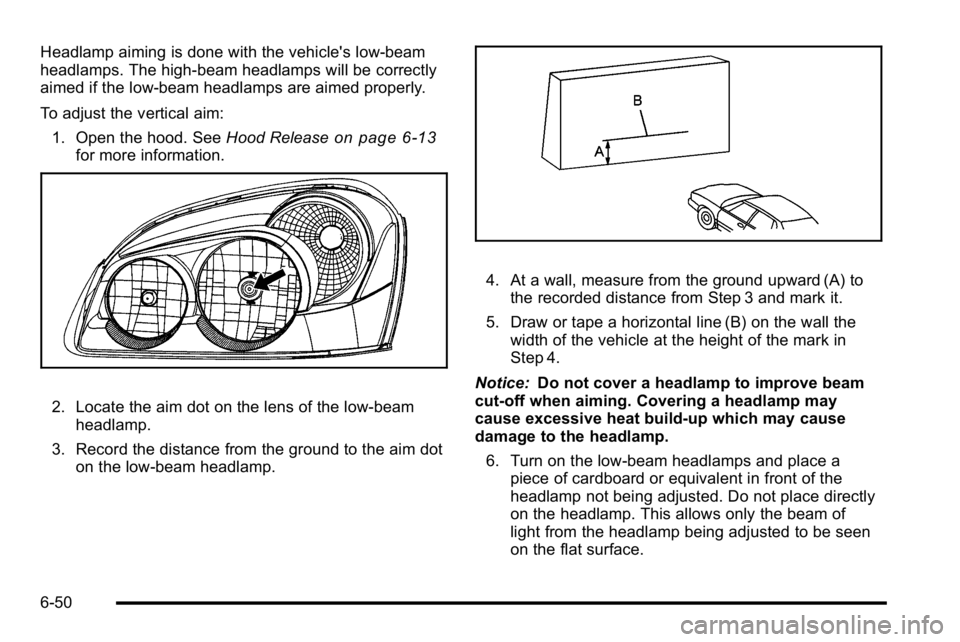
Headlamp aiming is done with the vehicle's low-beam
headlamps. The high-beam headlamps will be correctly
aimed if the low-beam headlamps are aimed properly.
To adjust the vertical aim:1. Open the hood. See Hood Release
on page 6‑13for more information.
2. Locate the aim dot on the lens of the low‐beam
headlamp.
3. Record the distance from the ground to the aim dot on the low‐beam headlamp.
4. At a wall, measure from the ground upward (A) tothe recorded distance from Step 3 and mark it.
5. Draw or tape a horizontal line (B) on the wall the width of the vehicle at the height of the mark in
Step 4.
Notice: Do not cover a headlamp to improve beam
cut-off when aiming. Covering a headlamp may
cause excessive heat build-up which may cause
damage to the headlamp.
6. Turn on the low-beam headlamps and place a piece of cardboard or equivalent in front of the
headlamp not being adjusted. Do not place directly
on the headlamp. This allows only the beam of
light from the headlamp being adjusted to be seen
on the flat surface.
6-50
Page 412 of 474

Electrical System
Add-On Electrical Equipment
Notice:Do not add anything electrical to the vehicle
unless you check with your dealer first. Some
electrical equipment can damage the vehicle and
the damage would not be covered by the vehicle's
warranty. Some add-on electrical equipment can
keep other components from working as they
should.
Add-on equipment can drain the vehicle battery, even if
the vehicle is not operating.
The vehicle has an airbag system. Before attempting to
add anything electrical to the vehicle, see Servicing
Your Airbag-Equipped Vehicle
on page 2‑72and
Adding Equipment to Your Airbag-Equipped Vehicleon
page 2‑73.
Power Windows and Other Power
Options
Circuit breakers in the rear fuse block protect the power
windows and other power accessories. When the
current load is too heavy, the circuit breaker opens and
closes, protecting the circuit until the problem is fixed or
goes away.
Fuses and Circuit Breakers
The wiring circuits in your vehicle are protected from
short circuits by a combination of fuses and circuit
breakers. This greatly reduces the chance of fires
caused by electrical problems.
Look at the silver-colored band inside the fuse. If the
band is broken or melted, replace the fuse. Be sure you
replace a bad fuse with a new one of the identical size
and rating.
You will find a fuse puller clipped in both of the fuse
blocks. Snap the wide end of the fuse puller at the side
indentations and pull the fuse out.
The MaxiFuses are located in two fuse blocks, one
located in the engine compartment on the passenger's
side and the other under the rear seat on the driver's
side. If a MaxiFuse should blow, have your vehicle
serviced by your dealer immediately.
Underhood Fuse Block
The underhood fuse block is located on the passenger
side of the engine compartment. Remove the fuse cover
and secondary service cover to access the fuse block.
Notice: Spilling liquid on any electrical components
on the vehicle may damage it. Always keep the
covers on any electrical component.
6-110
Page 464 of 474

Fog LampsBulb Replacement . . . . . . . . . . . . . . . . . . . . . . . . . . . . . . . . 4-14
Light . . . . . . . . . . . . . . . . . . . . . . . . . . . . . . . . . . . . . . . . . . . . . . 4-45
Front Reading Lamps . . . . . . . . . . . . . . . . . . . . . . . . . . . . . . 4-15
Front Storage Area . . . . . . . . . . . . . . . . . . . . . . . . . . . . . . . . 3-51
Fuel . . . . . . . . . . . . . . . . . . . . . . . . . . . . . . . . . . . . . . . . . . . . . . . . .6-5 Additives . . . . . . . . . . . . . . . . . . . . . . . . . . . . . . . . . . . . . . . . . . 6-7
California Fuel . . . . . . . . . . . . . . . . . . . . . . . . . . . . . . . . . . . . . 6-6
E85 (85% Ethanol) . . . . . . . . . . . . . . . . . . . . . . . . . . . . . . . . 6-8
Filling a Portable Fuel Container . . . . . . . . . . . . . . . . . . 6-12
Filling the Tank . . . . . . . . . . . . . . . . . . . . . . . . . . . . . . . . . . . 6-10
Fuels in Foreign Countries . . . . . . . . . . . . . . . . . . . . . . . . . 6-9
Gasoline Octane . . . . . . . . . . . . . . . . . . . . . . . . . . . . . . . . . . . 6-6
Gasoline Specifications . . . . . . . . . . . . . . . . . . . . . . . . . . . . 6-6
Gauge . . . . . . . . . . . . . . . . . . . . . . . . . . . . . . . . . . . . . . . . . . . . 4-46
Fuel Economy
Driving for Better . . . . . . . . . . . . . . . . . . . . . . . . . . . . . . . . . 1-23
Fuses Fuses and Circuit Breakers . . . . . . . . . . . . . . . . . . . . . . 6-110
Rear Underseat Fuse Block . . . . . . . . . . . . . . . . . . . . . 6-113
Underhood Fuse Block . . . . . . . . . . . . . . . . . . . . . . . . . . 6-110G
Garage Door Opener . . . . . . . . . . . . . . . . . . . . . . . . . . . . . . 3-44
GasolineOctane . . . . . . . . . . . . . . . . . . . . . . . . . . . . . . . . . . . . . . . . . . . . 6-6
Specifications . . . . . . . . . . . . . . . . . . . . . . . . . . . . . . . . . . . . . . 6-6
Gauges Engine Coolant Temperature . . . . . . . . . . . . . . . . . . . . . 4-40
Fuel . . . . . . . . . . . . . . . . . . . . . . . . . . . . . . . . . . . . . . . . . . . . . . 4-46
Speedometer . . . . . . . . . . . . . . . . . . . . . . . . . . . . . . . . . . . . . 4-32
Tachometer . . . . . . . . . . . . . . . . . . . . . . . . . . . . . . . . . . . . . . . 4-32
Trip Odometer . . . . . . . . . . . . . . . . . . . . . . . . . . . . . . . . . . . . 4-32
Glove Box . . . . . . . . . . . . . . . . . . . . . . . . . . . . . . . . . . . . . . . . . 3-51
GM Mobility Reimbursement Program . . . . . . . . . . . . . . .8-7
H
Halogen Bulbs . . . . . . . . . . . . . . . . . . . . . . . . . . . . . . . . . . . . . 6-52
Hazard Warning Flashers . . . . . . . . . . . . . . . . . . . . . . . . . . . .4-3
Head Restraints . . . . . . . . . . . . . . . . . . . . . . . . . . . . . . . . . . . . .2-2
Headlamps Aiming . . . . . . . . . . . . . . . . . . . . . . . . . . . . . . . . . . . . . . . . . . . . 6-49
Bulb Replacement . . . . . . . . . . . . . . . . . . . . . . . . . . . . . . . . 6-52
Daytime Running Lamps (DRL) . . . . . . . . . . . . . . . . . . . 4-13
i - 6