2010 BUICK LACROSSE park assist
[x] Cancel search: park assistPage 93 of 414

Instruments and Controls 4-5
A.Air Vents on page 7‑8.
B. Head-Up Display (HUD)
on
page 4‑28(If Equipped).
C. Turn and Lane-Change Lever. See Turn and Lane-Change
Signals
on page 5‑4. Driver
Information Center Buttons. See
Driver Information Center (DIC)
on page 4‑25.
D. Instrument Cluster
on
page 4‑13. Driver Information
Center Display. See Driver
Information Center (DIC)
on
page 4‑25.
E. Windshield Wiper/Washer
on
page 4‑7.
F. Info-Display.
G. AM-FM Radio on page 6‑12.
H. Exterior Lamp Controls
on
page 5‑1. Fog Lampson
page 5‑5(If Equipped).
Instrument Panel Illumination
Control on page 5‑5. I.
Front Storage on page 3‑1.
J. Cruise Control
on page 8‑37.
Heated Steering Wheelon
page 4‑7.
K. Steering Wheel Adjustment
on
page 4‑6.
L. Horn on page 4‑7.
M. Steering Wheel Controls
on
page 4‑6.
N. Ignition Positions (Key Access)
on page 8‑18orIgnition
Positions (Keyless Access)on
page 8‑19.
O. Heated and Ventilated Front
Seats on page 2‑8.
P. Automatic Climate Control
System
on page 7‑1orDual
Automatic Climate Control
System on page 7‑4.
Q. Power Door Locks
on
page 1‑10. Hazard Warning
Flasherson page 5‑4.
Passenger Sensing Systemon
page 2‑32. R.
Parking Brake on page 8‑32.
S. PRNDL. See Automatic
Transmission on page 8‑27.
T. Shift Lever. See Shifting Into
Park on page 8‑23.
U. Traction Control System (TCS)
on page 8‑34.Electronic
Stability Control (ESC)on
page 8‑35. Ultrasonic Parking
Assiston page 8‑40. Power
Rear Sunshade.
V. Glove Box on page 3‑1.
Page 106 of 414

4-18 Instruments and Controls
If the check engine light comes on
and stays on, while the engine is
running, this indicates that there is
an OBD II problem and service is
required.
Malfunctions often are indicated by
the system before any problem is
apparent. Being aware of the light
can prevent more serious damage
to the vehicle. This system assists
the service technician in correctly
diagnosing any malfunction.
Notice:If the vehicle is
continually driven with this light
on, after a while, the emission
controls might not work as well,
the vehicle's fuel economy might
not be as good, and the engine
might not run as smoothly. This
could lead to costly repairs that
might not be covered by the
vehicle warranty. Notice:
Modifications made to the
engine, transmission, exhaust,
intake, or fuel system of the
vehicle or the replacement of the
original tires with other than
those of the same Tire
Performance Criteria (TPC) can
affect the vehicle's emission
controls and can cause this light
to come on. Modifications to
these systems could lead to
costly repairs not covered by the
vehicle warranty. This could also
result in a failure to pass a
required Emission Inspection/
Maintenance test. See
Accessories and Modifications
on page 9‑3.
This light comes on during a
malfunction in one of two ways:
Light Flashing: A misfire condition
has been detected. A misfire
increases vehicle emissions and
could damage the emission control
system on the vehicle. Diagnosis
and service might be required. The following can prevent more
serious damage to the vehicle:
.Reduce vehicle speed.
.Avoid hard accelerations.
.Avoid steep uphill grades.
.If towing a trailer, reduce the
amount of cargo being hauled as
soon as it is possible.
If the light continues to flash, when
it is safe to do so, stop the vehicle.
Find a safe place to park the
vehicle. Turn the vehicle off, wait at
least 10 seconds, and restart the
engine. If the light is still flashing,
follow the previous steps and see
your dealer/retailer for service as
soon as possible.
Light On Steady: An emission
control system malfunction has
been detected on the vehicle.
Diagnosis and service might be
required.
Page 128 of 414

4-40 Instruments and Controls
Press the MENU / SELECT knob
when Auto Rear Defog is
highlighted to open the menu.
Turn the knob to highlight On or Off.
Press the knob to confirm the
selection and move back to the
last menu.
Comfort and Convenience
Select the Comfort and
Convenience menu and the
following will be displayed:
.Chime Volume
.Personalization by Driver
.Driver Seat Easy Exit
.Parking Tilt Mirrors
Chime Volume
This allows the selection of the
chime volume level.
Press the MENU / SELECT knob
when Chime Volume is highlighted.
Turn the knob to select Normal or
High. Press the knob to confirm and
go back to the last menu. Personalization by Driver
This allows the selection of if the
personalization settings are specific
to each driver or the same no matter
which key was used to enter and
start the vehicle.
Press the MENU / SELECT knob
when Personalization by Driver is
highlighted. Turn the knob to select
On or Off. Press the knob to confirm
and go back to the last menu.
Driver Seat Easy Exit
This allows you to turn the easy exit
seat feature on or off.
Press the MENU / SELECT knob
when Driver Seat Easy Exit is
highlighted. Turn the knob to select
On or Off. Press the knob to confirm
and go back to the last menu.
Park Tilt Mirrors
This allows you to turn the park tilt
mirrors feature on or off.
Press the MENU / SELECT knob
when Park Tilt Mirrors is highlighted.
Turn the knob to select Driver &Passenger or Off. Press the knob to
confirm and go back to the
last menu.
Collision/Detection Systems
Select the Collision/Detection
Systems menu and the following will
be displayed:
.Park Assist
Park Assist
This allows the Ultrasonic Parking
Assist feature to be turned on or off.
Press the MENU / SELECT knob
when Park Assist is highlighted.
Turn the knob to select On or Off.
Press the knob to confirm and go
back to the last menu.
Language
Select the Language menu and the
following will be displayed:
.English
.French
.Spanish
Page 134 of 414

4-46 Instruments and Controls
Do not use the Universal Home
Remote with any garage door
opener that does not have the stop
and reverse feature. This includes
any garage door opener model
manufactured before April 1, 1982.
Read the instructions completely
before attempting to program the
Universal Home Remote. Because
of the steps involved, it may be
helpful to have another person
available to assist you with
programming the Universal Home
Remote.
Keep the original hand-held
transmitter for use in other vehicles
as well as for future Universal Home
Remote programming. It is also
recommended that upon the sale of
the vehicle, the programmed
Universal Home Remote buttons
should be erased for security
purposes. See“Erasing Universal
Home Remote Buttons” later in this
section. When programming a garage door,
park outside of the garage. Park
directly in line with and facing the
garage door opener motor-head or
gate motor-head. Be sure that
people and objects are clear of the
garage door or gate that is being
programmed.
It is recommended that a new
battery be installed in your
hand-held transmitter for quicker
and more accurate transmission of
the radio-frequency signal.
Programming the Universal
Home Remote System
For questions or help programming
the Universal Home Remote
System, call 1-800-355-3515 or go
to www.homelink.com.
Programming a garage door opener
involves time-sensitive actions, so
read the entire procedure before
starting. Otherwise, the device will
time out and the procedure will have
to be repeated.To program up to three devices:
1. Hold the end of your hand-held
transmitter about 3 to 8 cm
(1 to 3 inches) away from the
Universal Home Remote buttons
while keeping the indicator light
in view. The hand-held
transmitter was supplied by the
manufacturer of your garage
door opener receiver
(motor-head unit).
2. At the same time, press and hold both the hand-held
transmitter button and one of the
three Universal Home Remote
buttons to be used to operate
the garage door. Do not release
the Universal Home Remote
button or the hand-held
transmitter button until the
indicator light changes from a
slow to a rapidly flashing light.
You now may release both
buttons.
Page 223 of 414

Driving and Operating 8-1
Driving and
Operating
Driving Information
Driving for Better FuelEconomy . . . . . . . . . . . . . . . . . . . . 8-2
Defensive Driving . . . . . . . . . . . . . 8-3
Drunk Driving . . . . . . . . . . . . . . . . . 8-3
Control of a Vehicle . . . . . . . . . . . 8-4
Braking . . . . . . . . . . . . . . . . . . . . . . . 8-4
Steering . . . . . . . . . . . . . . . . . . . . . . . 8-5
Off-Road Recovery . . . . . . . . . . . . 8-6
Loss of Control . . . . . . . . . . . . . . . . 8-7
Driving on Wet Roads . . . . . . . . . 8-8
Highway Hypnosis . . . . . . . . . . . . 8-8
Hill and Mountain Roads . . . . . . 8-9
Winter Driving . . . . . . . . . . . . . . . . . 8-9
If the Vehicle is Stuck . . . . . . . . 8-11
Vehicle Load Limits . . . . . . . . . . 8-12
Starting and Operating
New Vehicle Break-In . . . . . . . . 8-17
Ignition Positions (Key Access) . . . . . . . . . . . . . . . . . . . . 8-18
Ignition Positions (Keyless Access) . . . . . . . . . . . . . . . . . . . . 8-19 Retained Accessory
Power (RAP) . . . . . . . . . . . . . . . 8-20
Starting the Engine . . . . . . . . . . 8-20
Engine Heater . . . . . . . . . . . . . . . 8-22
Shifting Into Park . . . . . . . . . . . . 8-23
Shifting Out of Park . . . . . . . . . . 8-25
Parking Over Things That Burn . . . . . . . . . . . . . . . . . . 8-25
Engine Exhaust
Engine Exhaust . . . . . . . . . . . . . . 8-26
Running the Vehicle WhileParked . . . . . . . . . . . . . . . . . . . . . 8-26
Automatic Transmission
Automatic Transmission . . . . . 8-27
Manual Mode . . . . . . . . . . . . . . . . 8-29
Drive Systems
All-Wheel Drive . . . . . . . . . . . . . . 8-30
Brakes
Antilock BrakeSystem (ABS) . . . . . . . . . . . . . . 8-31
Parking Brake . . . . . . . . . . . . . . . 8-32
Brake Assist . . . . . . . . . . . . . . . . . 8-34
Ride Control Systems
Traction Control System (TCS) . . . . . . . . . . . . . . 8-34
Electronic Stability Control (ESC) . . . . . . . . . . . . . . 8-35
Selective Ride Control . . . . . . . 8-36
Cruise Control
Cruise Control . . . . . . . . . . . . . . . 8-37
Object Detection Systems
Ultrasonic Parking Assist . . . . 8-40
Side Blind Zone
Alert (SBZA) . . . . . . . . . . . . . . . 8-43
Rear Vision Camera (RVC) . . . . . . . . . . . . . 8-46
Fuel
Fuel . . . . . . . . . . . . . . . . . . . . . . . . . 8-49
Recommended Fuel . . . . . . . . . 8-50
Gasoline Specifications . . . . . . 8-50
California FuelRequirements . . . . . . . . . . . . . . 8-51
Fuels in Foreign Countries . . . 8-51
Fuel Additives . . . . . . . . . . . . . . . 8-51
Filling the Tank . . . . . . . . . . . . . . 8-52
Filling a Portable Fuel Container . . . . . . . . . . . . . . . . . . . 8-53
Page 227 of 414

Driving and Operating 8-5
If the engine ever stops while the
vehicle is being driven, brake
normally but do not pump the
brakes. If the brakes are pumped,
the pedal could get harder to push
down. If the engine stops, there will
still be some power brake assist but
it will be used when the brake is
applied. Once the power assist is
used up, it can take longer to stop
and the brake pedal will be harder
to push.
Adding non-dealer/non-retailer
accessories can affect vehicle
performance. SeeAccessories and
Modifications on page 9‑3.
Steering
Power Steering
If power steering assist is lost
because the engine stops or the
power steering system is not
functioning, the vehicle can be
steered but it will take more effort.
Speed Variable Assist Steering
The vehicle has a steering system
that varies the amount of effort
required to steer the vehicle in
relation to the speed of the vehicle.
The amount of steering effort
required is less at slower speeds to
make the vehicle more
maneuverable and easier to park. At
faster speeds, the steering effort
increases to provide a sport-like feel
to the steering. This provides
maximum control and stability.
If the vehicle seems harder to steer
than normal when parking or driving
slowly, there may be a problem with
the system. You will still have power
steering, but steering will be stiffer
than normal at slow speeds. See
your dealer/retailer for service.
Steering Tips
It is important to take curves at a
reasonable speed.
Traction in a curve depends on the
condition of the tires and the road
surface, the angle at which the
curve is banked, and vehicle speed.
While in a curve, speed is the one
factor that can be controlled.
If there is a need to reduce speed,
do it before entering the curve, while
the front wheels are straight.
Try to adjust the speed so you can
drive through the curve. Maintain a
reasonable, steady speed. Wait to
accelerate until out of the curve, and
then accelerate gently into the
straightaway.
Page 262 of 414

8-40 Driving and Operating
Using Cruise Control on Hills
How well the cruise control works
on hills depends upon the vehicle's
speed, load, and the steepness of
the hills. When going up steep hills,
you might have to step on the
accelerator pedal to maintain the
vehicle's speed. When going
downhill, you might have to brake or
shift to a lower gear to maintain the
vehicle's speed. When the brakes
are applied the cruise control
shuts off.Ending Cruise Control
There are three ways to disengage
the cruise control:
.Step lightly on the brake pedal
or clutch; when cruise control
disengages, the indicator light
will not be lit.
.Press\.
.Press5to turn the cruise
control system off completely.
The cruise control cannot be
resumed.
Erasing Speed Memory
The cruise control set speed
memory is erased when the cruise
control or the ignition is turned off.
Object Detection
Systems
Ultrasonic Parking Assist
For vehicles with the Ultrasonic
Rear Parking Assist (URPA) system,
it assists the driver with parking and
avoiding objects while in
R (Reverse). URPA operates at
speeds less than 8 km/h (5 mph),
and the sensors on the rear bumper
detect objects up to 2.5 m (8 ft.)
behind the vehicle, and at least
20 cm (8 in.) off the ground.
Page 263 of 414

Driving and Operating 8-41
{WARNING
The Ultrasonic Rear Parking
Assist (URPA) system does not
replace driver vision. It cannot
detect:
.objects that are below the
bumper, underneath the
vehicle, or if they are too
close or far from the vehicle
.children, pedestrians,
bicyclists, or pets.
If you do not use proper care
before and while backing; vehicle
damage, injury, or death could
occur. Even with URPA, always
check behind the vehicle before
backing up. While backing, be
sure to look for objects and check
the vehicle's mirrors. The display is located in the
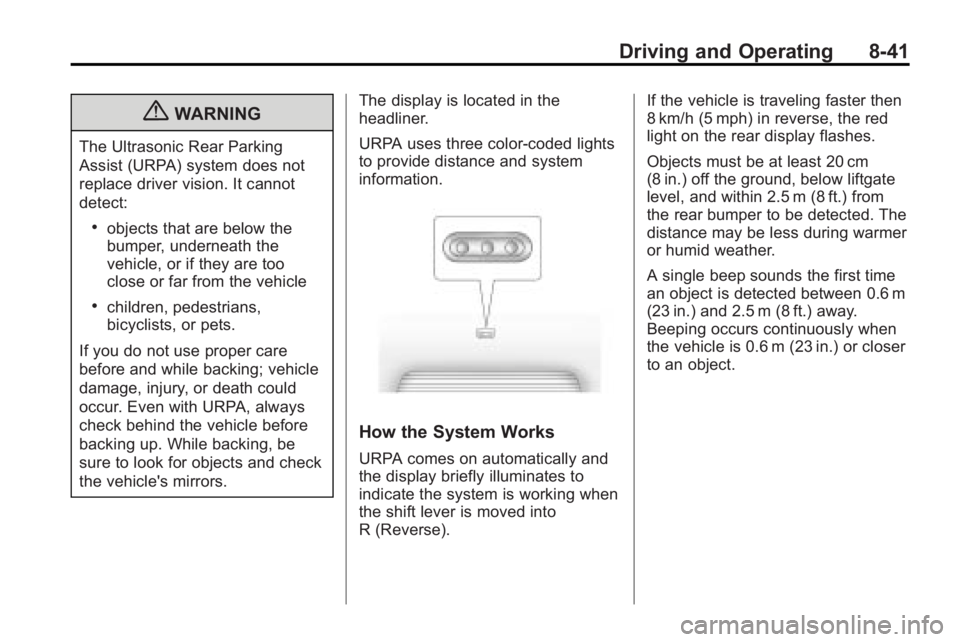
headliner.
URPA uses three color-coded lights
to provide distance and system
information.
How the System Works
URPA comes on automatically and
the display briefly illuminates to
indicate the system is working when
the shift lever is moved into
R (Reverse). If the vehicle is traveling faster then
8 km/h (5 mph) in reverse, the red
light on the rear display flashes.
Objects must be at least 20 cm
(8 in.) off the ground, below liftgate
level, and within 2.5 m (8 ft.) from
the rear bumper to be detected. The
distance may be less during warmer
or humid weather.
A single beep sounds the first time
an object is detected between 0.6 m
(23 in.) and 2.5 m (8 ft.) away.
Beeping occurs continuously when
the vehicle is 0.6 m (23 in.) or closer
to an object.