2010 BUICK LACROSSE key
[x] Cancel search: keyPage 285 of 414
Vehicle Care 9-3
California Perchlorate
Materials Requirements
Certain types of automotive
applications, such as airbag
initiators, seat belt pretensioners,
and lithium batteries contained in
remote keyless transmitters, may
contain perchlorate materials.
Special handling may be necessary.
For additional information, see
www.dtsc.ca.gov/hazardouswaste/
perchlorate.
Accessories and
Modifications
Adding non-dealer/non-retailer
accessories to the vehicle can affect
vehicle performance and safety,
including such things as airbags,
braking, stability, ride and handling,
emissions systems, aerodynamics,
durability, and electronic systems
like antilock brakes, traction control,
and stability control. Some of these
accessories could even cause
malfunction or damage not covered
by the vehicle warranty.
Damage to vehicle components
resulting from the installation or use
of non-GM certified parts, including
control module modifications, are
not covered under the terms of the
vehicle warranty and may affect
remaining warranty coverage for
affected parts.GM Accessories are designed to
complement and function with other
systems on the vehicle. Your GM
dealer/retailer can accessorize the
vehicle using genuine GM
Accessories. When you go to your
GM dealer/retailer and ask for GM
Accessories, you will know that
GM-trained and supported service
technicians will perform the work
using genuine GM Accessories.
Also, see
Adding Equipment to the
Airbag-Equipped Vehicle
on
page 2‑38.
Page 296 of 414
9-14 Vehicle Care
When the system has calculated
that oil life has been diminished, it
indicates that an oil change is
necessary. A Change Engine Oil
Soon message comes on. See
Engine Oil Messages
on
page 4‑35. Change the oil as soon
as possible within the next 1 000 km
(600 miles). It is possible that,
if driving under the best conditions,
the oil life system might not indicate
that an oil change is necessary for
over a year. However, the engine oil
and filter must be changed at least
once a year and at this time the
system must be reset. Your dealer/
retailer has trained service people
who will perform this work using
genuine parts and reset the system.
It is also important to check the oil
regularly and keep it at the proper
level.
If the system is ever reset
accidentally, the oil must be
changed at 5 000 km (3,000 miles)
since the last oil change.
Remember to reset the oil life
system whenever the oil is changed.
How to Reset the Engine Oil
Life System
Reset the system whenever the
engine oil is changed so that the
system can calculate the next
engine oil change. To reset the
system:
1. Turn the key to ON/RUN with the engine off.
2. Press the DIC menu button on the turn signal lever to scroll
through the menu items on the
DIC screen.
3. Press the set button to clear the Change Engine Oil Soon
message and/or restore the
Remaining Oil Life 100%
message.
4. Turn the key to LOCK/OFF.
The system is reset when the
Change Engine Oil Soon message
is off and the Remaining Oil Life
100% message is is displayed.
What to Do with Used Oil
Used engine oil contains certain
elements that can be unhealthy for
your skin and could even cause
cancer. Do not let used oil stay on
your skin for very long. Clean your
skin and nails with soap and water,
or a good hand cleaner. Wash or
properly dispose of clothing or rags
containing used engine oil. See the
manufacturer's warnings about the
use and disposal of oil products.
Used oil can be a threat to the
environment. If you change your
own oil, be sure to drain all the oil
from the filter before disposal. Never
dispose of oil by putting it in the
trash, pouring it on the ground, into
sewers, or into streams or bodies of
water. Recycle it by taking it to a
place that collects used oil.
Page 304 of 414

9-22 Vehicle Care
Power Steering Fluid
SeeEngine Compartment Overviewon page 9‑6for information on the
location of the power steering fluid
reservoir.
When to Check Power Steering
Fluid
It is not necessary to regularly
check power steering fluid unless a
leak is suspected in the system or
an unusual noise is heard. A fluid
loss in this system could indicate a
problem. Have the system inspected
and repaired.
How to Check Power Steering
Fluid
Check the level after the vehicle has
been driven for at least
twenty minutes so the fluid is warm.
To check the power steering fluid:
1. Turn the ignition key to LOCK/ OFF and let the engine
compartment cool down.
2. Wipe the cap and the top of the reservoir clean.
3. Unscrew the cap and pull it straight up.
4. Wipe the dipstick with a clean rag.
5. Replace the cap and completely tighten it.
6. Remove the cap again and look at the fluid level on the dipstick.
When the engine is hot, the level
should be at the hot MAX level.
When the engine is cold, the fluid
level should be between MIN and
MAX on the dipstick.
What to Use
To determine what kind of fluid to
use, see Recommended Fluids and
Lubricants
on page 10‑7. Always
use the proper fluid.
Page 308 of 414
9-26 Vehicle Care
What to Add
Use only new DOT 3 brake fluid
from a sealed container. See
Recommended Fluids and
Lubricants on page 10‑7.
Always clean the brake fluid
reservoir cap and the area around
the cap before removing it. This
helps keep dirt from entering the
reservoir.
{WARNING
With the wrong kind of fluid in the
brake hydraulic system, the
brakes might not work well. This
could cause a crash. Always use
the proper brake fluid.Notice:
.Using the wrong fluid can
badly damage brake
hydraulic system parts. For
example, just a few drops of
mineral-based oil, such as
engine oil, in the brake
hydraulic system can
damage brake hydraulic
system parts so badly that
they will have to be replaced.
Do not let someone put in
the wrong kind of fluid.
.If brake fluid is spilled on
the vehicle's painted
surfaces, the paint finish can
be damaged. Be careful not
to spill brake fluid on the
vehicle. If you do, wash it off
immediately.
Battery
Refer to the replacement number on
the original battery label when a
new battery is needed.
{WARNING
Battery posts, terminals, and
related accessories contain lead
and lead compounds, chemicals
known to the State of California to
cause cancer and reproductive
harm. Wash hands after handling.
If the battery has a very low charge
or is dead, it might not be possible
to remove the ignition key from the
ignition switch or shift out of
P (Park). See Shifting Out of Park
on page 8‑25.
Page 310 of 414
9-28 Vehicle Care
3. With the engine off, turn theignition to ON/RUN, but do not
start the engine. Without
applying the regular brake, try to
move the shift lever out of
P (Park) with normal effort. If the
shift lever moves out of P (Park),
contact your dealer/retailer for
service.
Ignition Transmission
Lock Check
While parked, and with the parking
brake set, try to turn the ignition to
LOCK/OFF in each shift lever
position.
.The ignition should turn to
LOCK/OFF only when the shift
lever is in P (Park).
.The ignition key should come
out only in LOCK/OFF.
Contact your dealer/retailer if
service is required.
Park Brake and P (Park)
Mechanism Check
{WARNING
When you are doing this check,
the vehicle could begin to move.
You or others could be injured
and property could be damaged.
Make sure there is room in front
of the vehicle in case it begins to
roll. Be ready to apply the regular
brake at once should the vehicle
begin to move. Park on a fairly steep hill, with the
vehicle facing downhill. Keeping
your foot on the regular brake, set
the parking brake.
.To check the parking brake's
holding ability: With the engine
running and the transmission in
N (Neutral), slowly remove foot
pressure from the regular brake
pedal. Do this until the vehicle is
held by the parking brake only.
.To check the P (Park)
mechanism's holding ability:
With the engine running, shift to
P (Park). Then release the
parking brake followed by the
regular brake.
Contact your dealer/retailer if
service is required.
Page 339 of 414

Vehicle Care 9-57
.The TPMS sensor matching
process was started but not
completed or not completed
successfully after rotating the
vehicle's tires. The DIC message
and TPMS malfunction light
should go off once the TPMS
sensor matching process is
performed successfully. See
“TPMS Sensor Matching
Process”later in this section.
.One or more TPMS sensors are
missing or damaged. The DIC
message and the TPMS
malfunction light should go off
when the TPMS sensors are
installed and the sensor
matching process is performed
successfully. See your dealer/
retailer for service.
.Replacement tires or wheels do
not match your vehicle's original
equipment tires or wheels. Tires
and wheels other than those
recommended for your vehicle
could prevent the TPMS from
functioning properly. See Buying
New Tires on page 9‑61.
.Operating electronic devices or
being near facilities using radio
wave frequencies similar to the
TPMS could cause the TPMS
sensors to malfunction.
If the TPMS is not functioning it
cannot detect or signal a low tire
condition. See your dealer/retailer
for service if the TPMS malfunction
light and DIC message comes on
and stays on.
TPMS Sensor Matching
Process
Each TPMS sensor has a unique
identification code. Any time you
rotate your vehicle's tires or replace
one or more of the TPMS sensors,
the identification codes will need to
be matched to the new tire/wheel
position. The sensors are matched
to the tire/wheel positions in the
following order: driver side front tire,
passenger side front tire, passenger
side rear tire, and driver side rear
tire using a TPMS diagnostic tool.
See your dealer/retailer for service. The TPMS sensors can also be
matched to each tire/wheel position
by increasing or decreasing the
tire's air pressure. If increasing the
tire's air pressure, do not exceed
the maximum inflation pressure
indicated on the tire's sidewall.
To decrease air-pressure out of a
tire you can use the pointed end of
the valve cap, a pencil-style air
pressure gage, or a key.
You have two minutes to match the
first tire/wheel position, and
five minutes overall to match all four
tire/wheel positions. If it takes longer
than two minutes, to match the first
tire and wheel, or more than
five minutes to match all four tire
and wheel positions the matching
process stops and you need to
start over.
Page 374 of 414

10-4 Service and Maintenance
.Windshield wiper blade
inspection for wear, cracking,
or contamination and windshield
and wiper blade cleaning,
if contaminated. SeeExterior
Care
on page 9‑82. Worn or
damaged wiper blade
replacement. See Wiper Blade
Replacement on page 9‑29.
.Body hinges and latches, key
lock cylinders, folding seat
hardware, and sunroof
(if equipped) lubrication.
See Recommended Fluids and
Lubricants
on page 10‑7.
More frequent lubrication may
be required when vehicle is
exposed to a corrosive
environment. Applying silicone
grease on weatherstrips with a
clean cloth makes them last
longer, seal better, and not stick
or squeak.
.Restraint system component
check. See Safety System
Check on page 2‑23.
.Automatic transmission fluid
level check and adding fluid,
if needed. See Automatic
Transmission Fluid
on
page 9‑15.
.Engine air cleaner filter
inspection. See Engine Air
Cleaner/Filter on page 9‑15.
.Passenger compartment air
filter replacement (or every
12 months, whichever occurs
first). More frequent replacement
may be required if vehicle is
driven regularly under dusty
conditions.
Additional Required Services
At Each Fuel Stop
.Engine oil level check. See
Engine Oil on page 9‑11.
.Engine coolant level check. See
Engine Coolant on page 9‑18.
.Windshield washer fluid level
check. See Washer Fluidon
page 9‑23.
Once a Month
.Tire inflation check. See Tire
Pressure on page 9‑53.
.Tire wear inspection. See Tire
Inspection on page 9‑59.
Once a Year
.See Starter Switch Checkon
page 9‑27.
.See Automatic Transmission
Shift Lock Control System
Check on page 9‑27.
Page 378 of 414
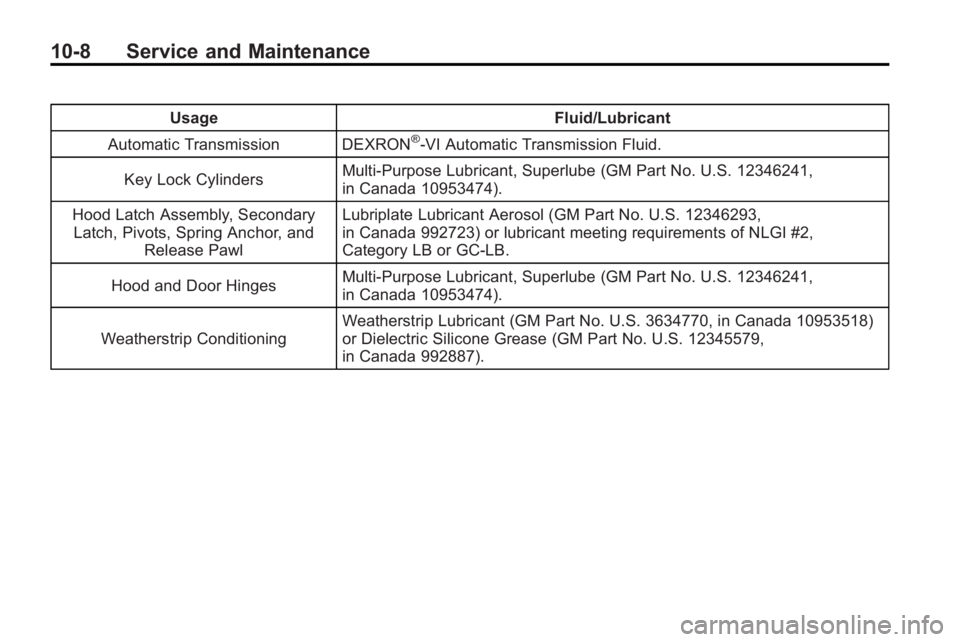
10-8 Service and Maintenance
UsageFluid/Lubricant
Automatic Transmission DEXRON
®-VI Automatic Transmission Fluid.
Key Lock Cylinders Multi-Purpose Lubricant, Superlube (GM Part No. U.S. 12346241,
in Canada 10953474).
Hood Latch Assembly, Secondary Latch, Pivots, Spring Anchor, and
Release Pawl Lubriplate Lubricant Aerosol (GM Part No. U.S. 12346293,
in Canada 992723) or lubricant meeting requirements of NLGI #2,
Category LB or GC-LB.
Hood and Door Hinges Multi-Purpose Lubricant, Superlube (GM Part No. U.S. 12346241,
in Canada 10953474).
Weatherstrip Conditioning Weatherstrip Lubricant (GM Part No. U.S. 3634770, in Canada 10953518)
or Dielectric Silicone Grease (GM Part No. U.S. 12345579,
in Canada 992887).