2010 BUICK LACROSSE radio
[x] Cancel search: radioPage 189 of 414

Infotainment System 6-43
Voice Recognition
The voice recognition system uses
commands to control the system
and dial phone numbers.
Noise:The system may not
recognize voice commands if there
is too much background noise.
When to Speak: A tone sounds to
indicate that the system is ready for
a voice command. Wait for the tone
and then speak.
How to Speak: Speak clearly in a
calm and natural voice.
Audio System
When using the Bluetooth system,
sound comes through the vehicle's
front audio system speakers and
overrides the audio system. Use the
VOL/
Oknob during a call to
change the volume level. The
adjusted volume level remains in
memory for later calls. The system
maintains a minimum volume level.
Other Information
The Bluetooth®word mark and
logos are owned by the Bluetooth®
SIG, Inc. and any use of such marks
by General Motors is under license.
Other trademarks and trade names
are those of their respective owners.
See Radio Frequency Statement
(US, Can)
on page 12‑16for FCC
information.
Bluetooth (Infotainment
Controls)
For information about how to
navigate the menu system using the
infotainment controls, see Operation
on page 6‑7.
Pairing
A Bluetooth enabled cell phone
must be paired to the Bluetooth
system first and then connected to
the vehicle before it can be used.
See the cell phone manufacturer
user guide for Bluetooth functions
before pairing the cell phone. If a
Bluetooth phone is not connected, calls will be made using OnStar
®
Hands-Free Calling, if available.
Refer to the OnStar Owner's Guide
for more information.
The pairing process can be started
by using the voice recognition
system or the controls on the
infotainment system.
Pairing Information:
.Up to five cell phones can be
paired to the Bluetooth system.
.The pairing process is disabled
when the vehicle is moving.
.The Bluetooth system links with
the first available paired cell
phone in the order the phone
was paired.
.Only one paired cell phone can
be connected to the Bluetooth
system at a time.
.Pairing should only need to be
completed once, unless changes
to the pairing information have
been made or the phone is
deleted.
Page 191 of 414

Infotainment System 6-45
Making a Call
Radio with CD
1. Press the
5button twice.
2. Enter the character sequence. See “Entering a Character
Sequence” inOperation
on
page 6‑7for more information.
3. Select Call to start dialing the number.
Radio with CD/DVD and MEM
1. Press the
5button.
2. Select Enter number.
3. Enter the character sequence. See “Entering a Character
Sequence” inOperation
on
page 6‑7for more information.
4. Select Call to start dialing the number.
Accepting or Declining a Call
When a call is received, the
infotainment system mutes and a
ring tone is heard in the vehicle. Accepting a Call
Turn the menu knob to Answer and
press the SELECT button.
Declining a Call
Turn the menu knob to Decline and
press the SELECT button.
Call Waiting
Call waiting must be supported on
the bluetooth phone and enabled by
the wireless service carrier to work.
Accepting a Call
Turn the menu knob to Answer and
press the SELECT button.
Declining a Call
Turn the menu knob to Decline and
press the SELECT button.
Switching Between Calls (Call
Waiting Calls Only)
To switch between calls:
1. Turn the menu knob.
2. Select Switch Call from
the menu.
Conference Calling
Conference calling and three way
calling must be supported on the
bluetooth phone and enabled by the
wireless service carrier to work.
To start a conference while in a
current call:
1. Turn the menu knob.
2. Select Enter Number.
3. Enter the character sequencethen select call. See “Entering a
Character Sequence” in
Operation
on page 6‑7for
more information.
4. After the call has been placed, turn the menu knob button and
choose Merge Calls.
5. To add more callers to the conference call, repeat steps 1
through 4. The amount of callers
that can be added are limited by
your wireless service carrier.
Page 215 of 414

Climate Controls 7-3
Pressing this button cancels
automatic air conditioning and turns
off the air conditioner. Press AUTO
to return to automatic operation and
the air conditioner runs
automatically as needed. When the
indicator light is on, the air
conditioner runs automatically to
cool the air inside the vehicle or to
dry the air needed to defog the
windshield faster.
>(Recirculation):Press to
alternate between recirculating air
inside the vehicle or pulling in
outside air. When the indicator light
is on, air is being recirculated inside
the vehicle. This helps to quickly
cool the air inside the vehicle or
prevent outside air and odors from
entering.
Pressing this button cancels
automatic recirculation. Press AUTO
to return to automatic operation and
recirculation runs automatically as
needed.
Rear Window Defogger
=(Rear Window Defogger):
Press to turn the rear window
defogger on or off.
The rear window defogger turns off
automatically after about
10 minutes. If turned on again it
runs for about 5 minutes before
turning off. The defogger can also
be turned off by turning the ignition
to ACC/ACCESSORY or
LOCK/OFF.
The rear window defogger can be
set to automatic operation, see
Climate and Air Quality under
Vehicle Personalization
on
page 4‑38. When auto rear defog is
selected, the rear window defogger
turns on automatically when the
interior temperature is cold and the
outside temperature is about 40°F
and below. The auto rear defogger
turns off automatically after about
10 minutes, or after 5 minutes if the
outside temperature is not as cold. For vehicles with heated outside
rearview mirrors, they turn on when
the rear window defogger button is
on and helps to clear fog or frost
from the surface of the mirror. See
Heated Mirrors on page 1‑16.
Notice:
Do not try to clear frost
or other material from the inside
of the front windshield and rear
window with a razor blade or
anything else that is sharp. This
may damage the rear window
defogger grid and affect your
radio's ability to pick up stations
clearly. The repairs wouldn't be
covered by your warranty.
Remote Start Climate Control
Operation: For vehicles with the
remote vehicle start feature, the
climate control system may run
when the vehicle is started remotely.
The system uses the driver's
previous settings to heat or cool the
inside of the vehicle. See Remote
Vehicle Start on page 1‑8.
The rear window defogger turns on
if it is cold outside.
Page 219 of 414

Climate Controls 7-7
Rear Window Defogger
=(Rear Window Defogger):
Press to turn the rear window
defogger on or off.
The rear window defogger turns off
automatically after about
10 minutes. If turned on again it
runs for about 5 minutes before
turning off. The defogger can also
be turned off by turning the ignition
to ACC/ACCESSORY or
LOCK/OFF.
The rear window defogger can be
set to automatic operation, see
Climate and Air Quality under
Vehicle Personalization
on
page 4‑38. When auto rear defog is
selected, the rear window defogger
turns on automatically when the
interior temperature is cold and the
outside temperature is about 40°F
and below. The auto rear defogger
turns off automatically after about
10 minutes, or after 5 minutes if the
outside temperature is not as cold. For vehicles with heated outside
rearview mirrors, they turn on when
the rear window defogger button is
on and helps to clear fog or frost
from the surface of the mirror. See
Heated Mirrors on page 1‑16.
Notice:
Do not try to clear frost
or other material from the inside
of the front windshield and rear
window with a razor blade or
anything else that is sharp. This
may damage the rear window
defogger grid and affect your
radio's ability to pick up stations
clearly. The repairs wouldn't be
covered by your warranty.((Heated Steering Wheel): For
vehicles with this feature, press to
turn on or off. See Heated Steering
Wheel on page 4‑7. Remote Start Climate Control
Operation:
For vehicles with the
remote vehicle start feature, the
climate control system may run
when the vehicle is started remotely.
The system uses the driver's
previous settings to heat or cool the
inside of the vehicle. See Remote
Vehicle Start on page 1‑8.
The rear window defogger turns on
if it is cold outside.
Sensors
The solar sensor, located on top of
the instrument panel near the
windshield monitors the solar heat.
The climate control system uses the
sensor information to adjust the
temperature, fan speed,
recirculation, and air delivery mode
for best comfort.
Do not cover the sensors or the
automatic climate control system
may not work properly.
Page 241 of 414

Driving and Operating 8-19
Ignition Positions
(Keyless Access)
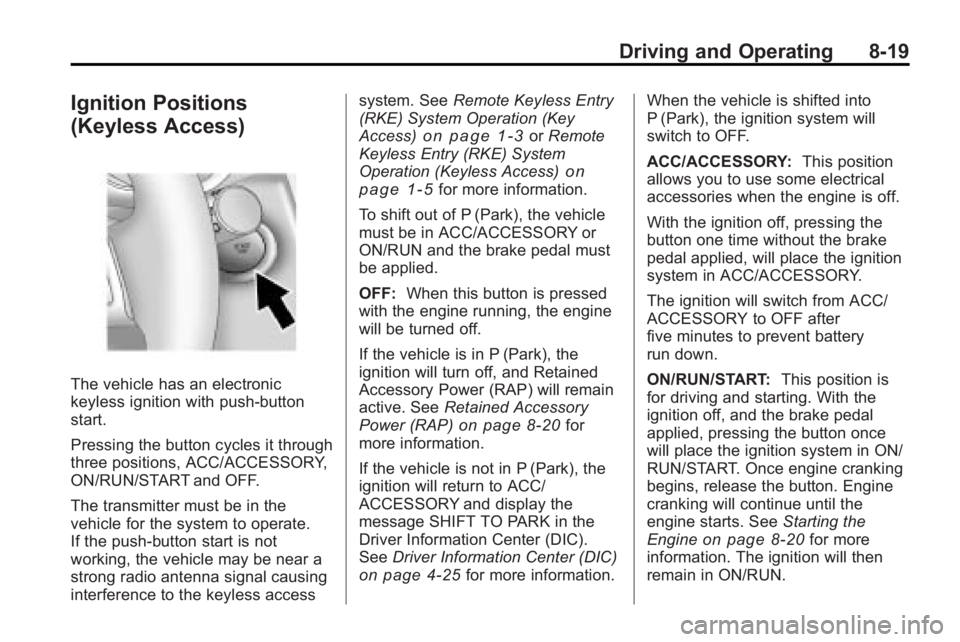
The vehicle has an electronic
keyless ignition with push-button
start.
Pressing the button cycles it through
three positions, ACC/ACCESSORY,
ON/RUN/START and OFF.
The transmitter must be in the
vehicle for the system to operate.
If the push-button start is not
working, the vehicle may be near a
strong radio antenna signal causing
interference to the keyless accesssystem. See
Remote Keyless Entry
(RKE) System Operation (Key
Access)
on page 1‑3or Remote
Keyless Entry (RKE) System
Operation (Keyless Access)
on
page 1‑5for more information.
To shift out of P (Park), the vehicle
must be in ACC/ACCESSORY or
ON/RUN and the brake pedal must
be applied.
OFF: When this button is pressed
with the engine running, the engine
will be turned off.
If the vehicle is in P (Park), the
ignition will turn off, and Retained
Accessory Power (RAP) will remain
active. See Retained Accessory
Power (RAP)
on page 8‑20for
more information.
If the vehicle is not in P (Park), the
ignition will return to ACC/
ACCESSORY and display the
message SHIFT TO PARK in the
Driver Information Center (DIC).
See Driver Information Center (DIC)
on page 4‑25for more information. When the vehicle is shifted into
P (Park), the ignition system will
switch to OFF.
ACC/ACCESSORY:
This position
allows you to use some electrical
accessories when the engine is off.
With the ignition off, pressing the
button one time without the brake
pedal applied, will place the ignition
system in ACC/ACCESSORY.
The ignition will switch from ACC/
ACCESSORY to OFF after
five minutes to prevent battery
run down.
ON/RUN/START: This position is
for driving and starting. With the
ignition off, and the brake pedal
applied, pressing the button once
will place the ignition system in ON/
RUN/START. Once engine cranking
begins, release the button. Engine
cranking will continue until the
engine starts. See Starting the
Engine
on page 8‑20for more
information. The ignition will then
remain in ON/RUN.
Page 268 of 414

8-46 Driving and Operating
SERVICE SIDE BLIND ZONE
ALERT SYSTEM:If this message
appears, both SBZA displays will
remain on indicating there is a
problem with the SBZA system.
If these displays remain on after
continued driving, the system needs
service. Take the vehicle to your
dealer/retailer.
FCC Information
See Radio Frequency Statement
(US, Can)on page 12‑16for FCC
information.
Rear Vision
Camera (RVC)
This vehicle may have an RVC
system. Read this entire section
before using it.
The RVC system can assist
the driver when backing up by
displaying a view of the area
behind the vehicle.
{WARNING
The Rear Vision Camera (RVC)
system does not replace driver
vision. RVC does not:
.Detect objects that are
outside the camera's field of
view, below the bumper,
or underneath the vehicle.
.Detect children, pedestrians,
bicyclists, or pets.
Do not back the vehicle by only
looking at the RVC screen, or use
the screen during longer, higher
speed backing maneuvers or
where there could be cross-traffic.
Your judged distances using the
screen will differ from actual
distances. (Continued)
WARNING (Continued)
So if you do not use proper care
before backing up, you could hit a
vehicle, child, pedestrian,
bicyclist, or pet, resulting in
vehicle damage, injury, or death.
Even though the vehicle has the
RVC system, always check
carefully before backing up by
checking behind and around the
vehicle.
An image appears on the navigation
screen with the message Check
Surroundings for Safety when the
vehicle is shifted into R (Reverse).
The navigation screen goes to the
previous screen after approximately
10 seconds once the vehicle is
shifted out of R (Reverse).
Page 324 of 414

9-42 Vehicle Care
Pull the door toward you to release
it from the hinge.
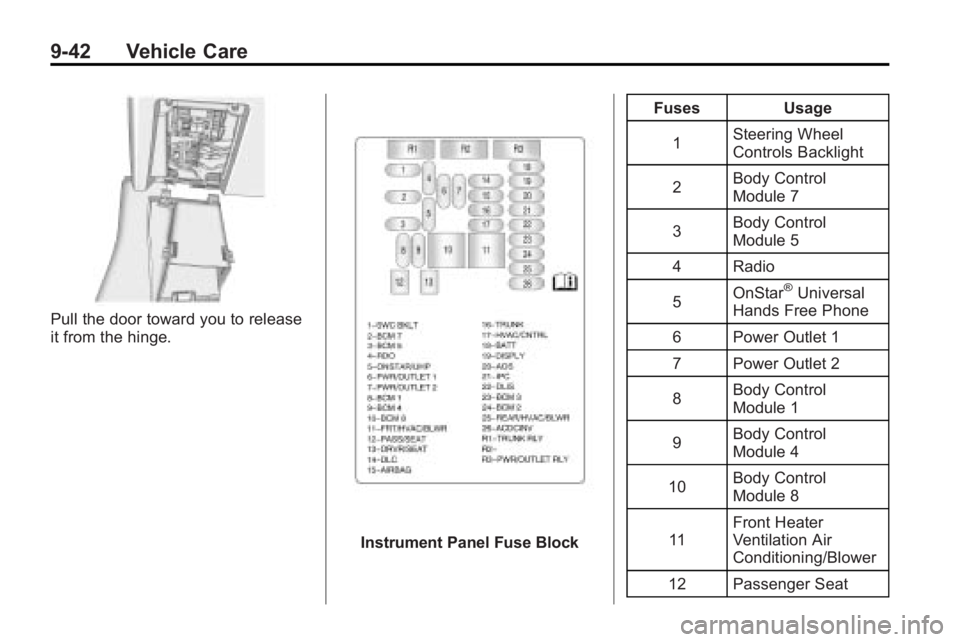
Instrument Panel Fuse BlockFuses Usage
1 Steering Wheel
Controls Backlight
2 Body Control
Module 7
3 Body Control
Module 5
4 Radio
5 OnStar
®Universal
Hands Free Phone
6 Power Outlet 1
7 Power Outlet 2
8 Body Control
Module 1
9 Body Control
Module 4
10 Body Control
Module 8
11 Front Heater
Ventilation Air
Conditioning/Blower
12 Passenger Seat
Page 325 of 414

Vehicle Care 9-43
FusesUsage
13 Driver Seat
14 Diagnostic Link
Connector
15 Airbag
16 Trunk
17 Heater Ventilation
Air Conditioning
Controller
18 Radio, OnStar
®,
Universal Hands
Free Phone
19 Display
20 Automatic Occupant
Sensing
21 Instrument Panel
Cluster
22 Discrete Logic
Ignition Switch
23 Body Control
Module 3 Fuses Usage
24 Body Control
Module 2
25 Rear Heater
Ventilation Air
Conditioning/Blower
26 AC/DC Inverter
Relays Usage R1 Trunk Relay
R2 Not Used
R3 Power Outlet Relay
Rear Compartment Fuse
Block
The rear compartment fuse block is
located on the left side of the trunk
behind a cover.