2010 BUICK LACROSSE change wheel
[x] Cancel search: change wheelPage 253 of 414

Driving and Operating 8-31
Brakes
Antilock Brake
System (ABS)
This vehicle has the Antilock Brake
System (ABS), an advanced
electronic braking system that helps
prevent a braking skid.
When the engine is started and the
vehicle begins to drive away, ABS
checks itself. A momentary motor or
clicking noise might be heard while
this test is going on, and it might
even be noticed that the brake
pedal moves a little. This is normal.
If there is a problem with ABS, this
warning light stays on. SeeAntilock
Brake System (ABS) Warning Light
on page 4‑21. If driving safely on a wet road and it
becomes necessary to slam on the
brakes and continue braking to
avoid a sudden obstacle, a
computer senses that the wheels
are slowing down. If one of the
wheels is about to stop rolling, the
computer will separately work the
brakes at each wheel.
ABS can change the brake pressure
to each wheel, as required, faster
than any driver could. This can help
the driver steer around the obstacle
while braking hard.
As the brakes are applied, the
computer keeps receiving updates
on wheel speed and controls
braking pressure accordingly.
Remember: ABS does not change
the time needed to get a foot up to
the brake pedal or always decrease
stopping distance. If you get too
close to the vehicle in front of you,
there will not be enough time to
apply the brakes if that vehicle
suddenly slows or stops. Always
leave enough room up ahead to
stop, even with ABS.
Using ABS
Do not pump the brakes. Just hold
the brake pedal down firmly and let
ABS work. The ABS pump or motor
might be heard operating, and the
brake pedal might be felt to pulsate,
but this is normal.
Braking in Emergencies
ABS allows the driver to steer and
brake at the same time. In many
emergencies, steering can help
more than even the very best
braking.
Page 259 of 414
Driving and Operating 8-37
TOUR:Use for normal city and
highway driving. This setting
provides a smooth, soft ride.
SPORT: Use where road conditions
or personal preference demand
more control. This setting provides
more “feel”, or response to road
conditions through increased
steering effort and suspension
tuning.
The setting can be changed at any
time. Based on road conditions,
steering wheel angle and the
vehicle speed, the system
automatically adjusts to provide the
best handling while providing a
smooth ride. The Tour and Sport
modes will feel similar on a
smooth road.Cruise Control
With cruise control, the vehicle can
maintain a speed of about 40 km/h
(25 mph) or more without keeping
your foot on the accelerator. Cruise
control does not work at speeds
below 40 km/h (25 mph).
On vehicles with the Traction
Control System (TCS) or Electronic
Stability Control (ESC), the system
may begin to limit wheel spin while
you are using cruise control. If this
happens, the cruise control will
automatically disengage. See
Traction Control System (TCS)
on
page 8‑34or Electronic Stability
Control (ESC) on page 8‑35.
{WARNING
Cruise control can be dangerous
where you cannot drive safely at
a steady speed. So, do not use
the cruise control on winding
roads or in heavy traffic.
Cruise control can be dangerous
on slippery roads. On such roads,
fast changes in tire traction can
cause excessive wheel slip, and
you could lose control. Do not use
cruise control on slippery roads.
Page 276 of 414

8-54 Driving and Operating
Towing
General Towing
Information
Only use towing equipment that has
been designed for the vehicle.
Contact your dealer/retailer or
towing retailer for assistance with
preparing the vehicle for towing a
trailer.
See the following trailer towing
information in this section:
.For information on driving while
towing a trailer, see Driving
Characteristics and Towing Tips.
.For maximum vehicle and trailer
weights, see Trailer Towing.
.For information on equipment to
tow a trailer, see Towing
Equipment.
For information on towing a disabled
vehicle, see Towing the Vehicle
on
page 9‑79. For information on
towing the vehicle behind another vehicle
—such as a motorhome,
see Recreational Vehicle Towing
on
page 9‑79.
Driving Characteristics
and Towing Tips
{WARNING
The driver can lose control when
pulling a trailer if the correct
equipment is not used or the
vehicle is not driven properly. For
example, if the trailer is too
heavy, the brakes may not work
well —or even at all. The driver
and passengers could be
seriously injured. The vehicle may
also be damaged; the resulting
repairs would not be covered by
the vehicle warranty. Pull a trailer
only if all the steps in this section
have been followed. Ask your
dealer/retailer for advice and
information about towing a trailer
with the vehicle. The vehicle can tow a trailer when
equipped with the proper trailer
towing equipment. For trailering
capacity, see
Trailer Towing (2.4L
L4 Engine)
on page 8‑58or Trailer
Towing (3.0L and 3.6L V6 Engines)
on page 8‑58. Trailering changes
handling, acceleration, braking,
durability and fuel economy. With
the added weight, the engine,
transmission, wheel assemblies and
tires are forced to work harder and
under greater loads. The trailer also
adds wind resistance, increasing the
pulling requirements. For safe
trailering, correctly use the proper
trailering equipment.
The following information has
important trailering tips and rules for
your safety and that of your
passengers. Read this section
carefully before pulling a trailer.
Page 278 of 414
8-56 Driving and Operating
Backing Up
Hold the bottom of the steering
wheel with one hand. To move the
trailer to the left, move that hand to
the left. To move the trailer to the
right, move your hand to the right.
Always back up slowly and,
if possible, have someone
guide you.
Making Turns
Notice:Making very sharp turns
while trailering could cause the
trailer to come in contact with the
vehicle. The vehicle could be
damaged. Avoid making very
sharp turns while trailering.
When turning with a trailer, make
wider turns than normal so the
trailer will not strike soft shoulders,
curbs, road signs, trees or other
objects. Use the turn signal well in
advance and avoid jerky or sudden
maneuvers.
Turn Signals When Towing a
Trailer
The turn signal indicators on the
instrument panel flash whenever
signaling a turn or lane change.
Properly hooked up, the trailer
lamps also flash, telling other
drivers the vehicle is turning,
changing lanes or stopping.
When towing a trailer, the arrows on
the instrument panel flash for turns
even if the bulbs on the trailer are
burned out. Check occasionally to
be sure the trailer bulbs are still
working.
Driving On Grades
Reduce speed and shift to a lower
gear before starting down a long or
steep downgrade. If the
transmission is not shifted down, the
brakes might have to be used so
much that they would get hot and no
longer work well.
The vehicle can tow in D (Drive).
Use a lower gear if the transmission
shifts too often. When towing at high altitude on
steep uphill grades, engine coolant
boils at a lower temperature than at
normal altitudes. If the engine is
turned off immediately after towing
at high altitude on steep uphill
grades, the vehicle could show
signs similar to engine overheating.
To avoid this, let the engine run
while parked, preferably on level
ground, with the transmission in
P (Park) for a few minutes before
turning the engine off. If the
overheat warning comes on, see
Engine Overheating on page 9‑20.
Parking on Hills
{WARNING
Parking the vehicle on a hill with
the trailer attached can be
dangerous. If something goes
wrong, the rig could start to move.
People can be injured, and both
the vehicle and the trailer can be
damaged. When possible, always
park the rig on a flat surface.
Page 306 of 414

9-24 Vehicle Care
Brakes
This vehicle has disc brakes. Disc
brake pads have built-in wear
indicators that make a high-pitched
warning sound when the brake pads
are worn and new pads are needed.
The sound can come and go or be
heard all the time the vehicle is
moving, except when applying the
brake pedal firmly.
{WARNING
The brake wear warning sound
means that soon the brakes will
not work well. That could lead to
an accident. When the brake
wear warning sound is heard,
have the vehicle serviced.
Notice: Continuing to drive with
worn-out brake pads could result
in costly brake repair. Some driving conditions or climates
can cause a brake squeal when the
brakes are first applied or lightly
applied. This does not mean
something is wrong with the brakes.
Properly torqued wheel nuts are
necessary to help prevent brake
pulsation. When tires are rotated,
inspect brake pads for wear and
evenly tighten wheel nuts in the
proper sequence to torque
specifications in
Capacities and
Specifications on page 11‑2.
Brake linings should always be
replaced as complete axle sets.
Brake Pedal Travel
See your dealer/retailer if the brake
pedal does not return to normal
height, or if there is a rapid increase
in pedal travel. This could be a sign
that brake service might be
required.
Brake Adjustment
Every time the brakes are applied,
with or without the vehicle moving,
the brakes adjust for wear.
Replacing Brake System Parts
The braking system on a vehicle is
complex. Its many parts have to be
of top quality and work well together
if the vehicle is to have really good
braking. The vehicle was designed
and tested with top-quality brake
parts. When parts of the braking
system are replaced, be sure to get
new, approved replacement parts.
If this is not done, the brakes might
not work properly. For example,
installing disc brake pads that are
wrong for the vehicle, can change
the balance between the front and
rear brakes —for the worse. The
braking performance expected can
change in many other ways if the
wrong replacement brake parts are
installed.
Page 328 of 414
9-46 Vehicle Care
Wheels and Tires
Tires
Your new vehicle comes with
high-quality tires made by a
leading tire manufacturer. If you
ever have questions about your
tire warranty and where to
obtain service, see your vehicle
Warranty booklet for details. For
additional information refer to
the tire manufacturer.
{WARNING
Poorly maintained and improperly
used tires are dangerous.
.Overloading your tires can
cause overheating as a result
of too much flexing. You
could have an air-out and a
serious accident. SeeVehicle
Load Limits on page 8‑12.
(Continued)
WARNING (Continued)
.Underinflated tires pose the
same danger as overloaded
tires. The resulting accident
could cause serious injury.
Check all tires frequently to
maintain the recommended
pressure. Tire pressure
should be checked when your
tires are cold. See Tire
Pressure on page 9‑53.
.Overinflated tires are more
likely to be cut, punctured or
broken by a sudden
impact —such as when you
hit a pothole. Keep tires at
the recommended pressure.
.Worn, old tires can cause
accidents. If your tread is
badly worn, or if your tires
have been damaged,
replace them.
Winter Tires
If you expect to drive on snow or ice
covered roads often, you may want
to get winter tires for your vehicle.
All season tires provide good overall
performance on most surfaces but
they may not offer the traction you
would like or the same level of
performance as winter tires on snow
or ice covered roads.
Winter tires, in general, are
designed for increased traction on
snow and ice covered roads. With
winter tires, there may be decreased
dry road traction, increased road
noise, and shorter tread life. After
switching to winter tires, be alert for
changes in vehicle handling and
braking.
See your dealer/retailer for details
regarding winter tire availability and
proper tire selection. Also, see
Buying New Tires on page 9‑61.
Page 350 of 414
9-68 Vehicle Care
A rear blowout, particularly on a
curve, acts much like a skid and
may require the same correction
you would use in a skid. In any rear
blowout remove your foot from the
accelerator pedal. Get the vehicle
under control by steering the way
you want the vehicle to go. It may
be very bumpy and noisy, but you
can still steer. Gently brake to a
stop, well off the road if possible.
{WARNING
Lifting a vehicle and getting under
it to do maintenance or repairs is
dangerous without the
appropriate safety equipment and
training. If a jack is provided with
the vehicle, it is designed only for
changing a flat tire. If it is used for
anything else, you or others could
be badly injured or killed if the
vehicle slips off the jack. If a jack
is provided with the vehicle, only
use it for changing a flat tire.If a tire goes flat, avoid further tire
and wheel damage by driving slowly
to a level place. Turn on the hazard
warning flashers. See
Hazard
Warning Flashers on page 5‑4.
{WARNING
Changing a tire can be
dangerous. The vehicle can slip
off the jack and roll over or fall on
you or other people. You and they
could be badly injured or even
killed. Find a level place to
change your tire. To help prevent
the vehicle from moving:
1. Set the parking brake firmly.
2. Put an automatic transmission shift lever in
P (Park), or shift a manual
transmission to 1 (First) or
R (Reverse).
(Continued)
WARNING (Continued)
3. Turn off the engine and donot restart while the vehicle
is raised.
4. Do not allow passengers to remain in the vehicle.
To be certain the vehicle will not
move, put blocks at the front and
rear of the tire farthest away from
the one being changed. That
would be the tire on the other
side, at the opposite end of the
vehicle.
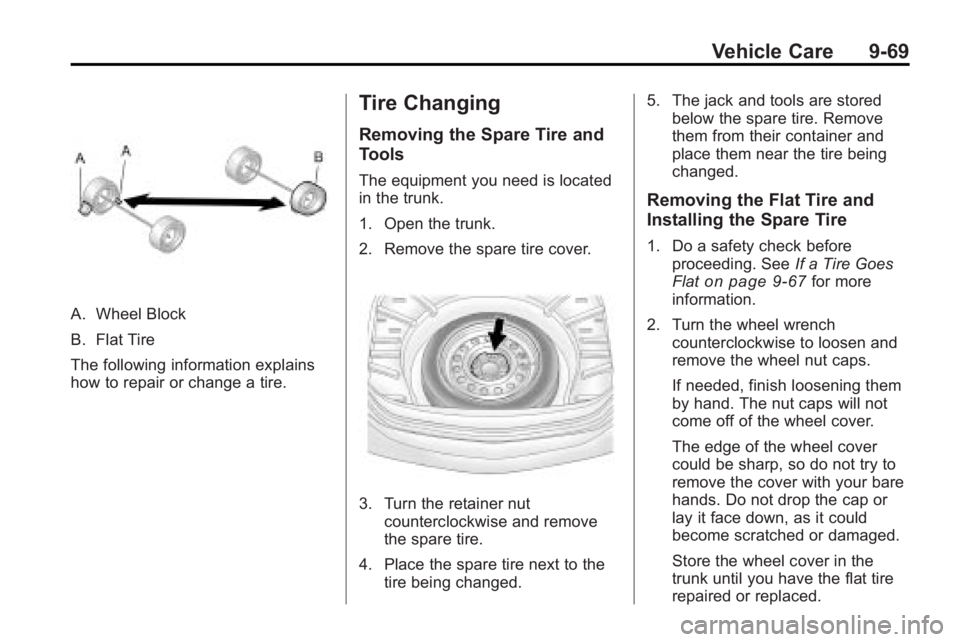
When the vehicle has a flat tire (B),
use the following example as a
guide to assist you in the placement
of wheel blocks (A).
Page 351 of 414
Vehicle Care 9-69
A. Wheel Block
B. Flat Tire
The following information explains
how to repair or change a tire.
Tire Changing
Removing the Spare Tire and
Tools
The equipment you need is located
in the trunk.
1. Open the trunk.
2. Remove the spare tire cover.
3. Turn the retainer nutcounterclockwise and remove
the spare tire.
4. Place the spare tire next to the tire being changed. 5. The jack and tools are stored
below the spare tire. Remove
them from their container and
place them near the tire being
changed.
Removing the Flat Tire and
Installing the Spare Tire
1. Do a safety check before
proceeding. See If a Tire Goes
Flat
on page 9‑67for more
information.
2. Turn the wheel wrench counterclockwise to loosen and
remove the wheel nut caps.
If needed, finish loosening them
by hand. The nut caps will not
come off of the wheel cover.
The edge of the wheel cover
could be sharp, so do not try to
remove the cover with your bare
hands. Do not drop the cap or
lay it face down, as it could
become scratched or damaged.
Store the wheel cover in the
trunk until you have the flat tire
repaired or replaced.