2010 BMW Z4 SDRIVE35I ROADSTER clutch
[x] Cancel search: clutchPage 64 of 254
Driving
62
One lever for all functions
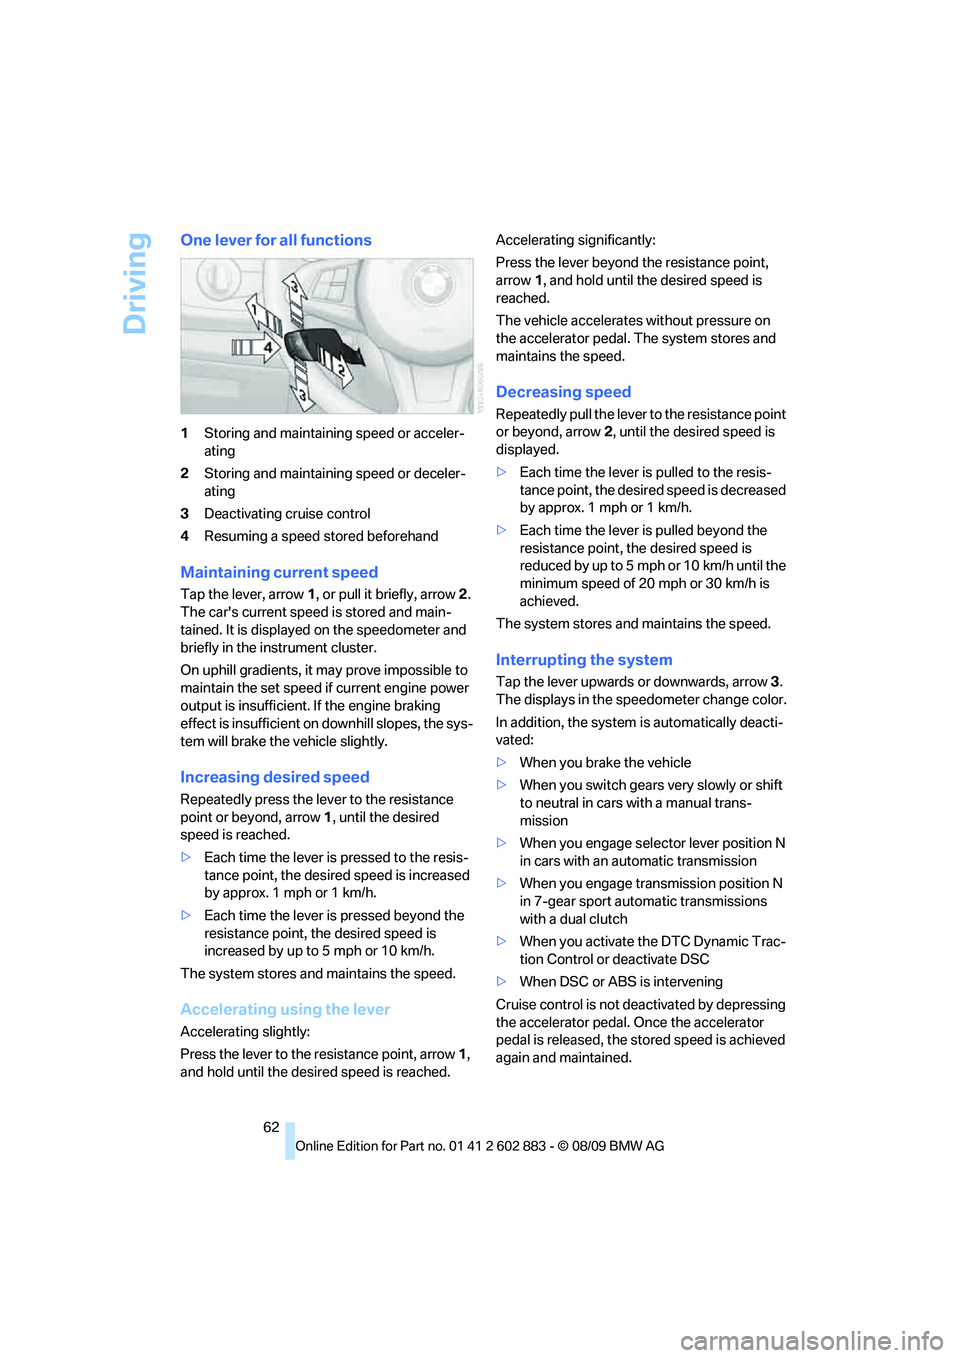
1Storing and maintaining speed or acceler-
ating
2Storing and maintaining speed or deceler-
ating
3Deactivating cruise control
4Resuming a speed stored beforehand
Maintaining current speed
Tap the lever, arrow 1, or pull it briefly, arrow 2.
The car's current speed is stored and main-
tained. It is displayed on the speedometer and
briefly in the instrument cluster.
On uphill gradients, it may prove impossible to
maintain the set speed if current engine power
output is insufficient. If the engine braking
effect is insufficient on downhill slopes, the sys-
tem will brake the vehicle slightly.
Increasing desired speed
Repeatedly press the lever to the resistance
point or beyond, arrow1, until the desired
speed is reached.
>Each time the lever is pressed to the resis-
tance point, the desired speed is increased
by approx. 1 mph or 1 km/h.
>Each time the lever is pressed beyond the
resistance point, the desired speed is
increased by up to 5 mph or 10 km/h.
The system stores and maintains the speed.
Accelerating using the lever
Accelerating slightly:
Press the lever to the resistance point, arrow 1,
and hold until the desired speed is reached.Accelerating significantly:
Press the lever beyond the resistance point,
arrow 1, and hold until the desired speed is
reached.
The vehicle accelerates without pressure on
the accelerator pedal. The system stores and
maintains the speed.
Decreasing speed
Repeatedly pull the lever to the resistance point
or beyond, arrow 2, until the desired speed is
displayed.
>Each time the lever is pulled to the resis-
tance point, the desired speed is decreased
by approx. 1 mph or 1 km/h.
>Each time the lever is pulled beyond the
resistance point, the desired speed is
reduc ed by up to 5 mph o r 10 km/h until the
minimum speed of 20 mph or 30 km/h is
achieved.
The system stores and maintains the speed.
Interrupting the system
Tap the lever upwards or downwards, arrow3.
The displays in the speedometer change color.
In addition, the system is automatically deacti-
vated:
>When you brake the vehicle
>When you switch gears very slowly or shift
to neutral in cars with a manual trans-
mission
>When you engage selector lever position N
in cars with an automatic transmission
>When you engage transmission position N
in 7-gear sport automatic transmissions
with a dual clutch
>When you activate the DTC Dynamic Trac-
tion Control or deactivate DSC
>When DSC or ABS is intervening
Cruise control is not deactivated by depressing
the accelerator pedal. Once the accelerator
pedal is released, the stored speed is achieved
again and maintained.
Page 114 of 254
Things to remember when driving
112
Things to remember when driving
Break-in period
Moving parts need breaking-in time to adjust to
each other. Please follow the instructions below
in order to achieve the optimal service life and
economy of operation for your vehicle.
Engine and differential
Always obey all official speed limits.
Up to 1,200 miles/2,000 km
Drive at varying engine and road speeds, but do
not exceed an engine speed of 4,500 rpm or a
road speed of 100 mph/160 km/h.
Do not drive with full-throttle operation, and do
not use the transmission's kickdown mode or
Launch Control.
After driving 1,200 miles/2,000 km
Engine and vehicle speeds can be gradually
increased.
Tires
Due to technical factors associated with their
manufacture, tires do not achieve their full trac-
tion potential until after an initial break-in
period. Therefore, drive cautiously during the
first 200 miles/300 km.
Brake system
Brakes require an initial break-in period of
approx. 300 miles/500 km to achieve optimized
contact and wear patterns between brake pads
and rotors. Drive cautiously during this break-in
period.
Clutch
The function of the clutch reaches its optimal
level only after a distance driven of approx.
300 miles/500 km. During this break-in period,
engage the clutch gently.
Following part replacement
The same break-in procedures should be
observed if any of the components mentioned
above have to be renewed in the course of the
vehicle's operating life.
Saving fuel
The fuel consumption of your vehicle depends
on several factors. You can lower fuel consump-
tion and the environmental impact by taking
certain measures, adjusting your driving style
and having the vehicle serviced regularly.
Remove any unneeded cargo
Additional weight increases fuel consumption.
Remove any mounted parts after you
have finished using them
Remove additional mirrors and the luggage rack
when they are no longer in use. Mounted parts
affect the vehicle's aerodynamics and increase
fuel consumption.
Close both windows
An open window causes higher air resistance
and thus increases fuel consumption.
Check tire inflation pressure regularly
Check the tire inflation pressure at least twice a
month and before embarking on a long journey,
and correct it if necessary.
Low tire inflation pressure causes higher rolling
resistance and thus increases fuel consumption
and tire wear.
Set off immediately
Do not let the engine warm up while the car is
still standing, but set off immediately at moder-
ate engine speed. This is the fastest way for the
cold engine to reach its operating temperature.
Page 116 of 254
Things to remember when driving
114 The risk of hydroplaning increases with declin-
ing tread depth on the tires, refer also to Mini-
mum tread depth on page198.
Driving through water
Drive though calm water only if it is not
deeper than 1 ft/25 cm and at this height
no faster than walking speed, up to 6 mph/
10 km/h. Otherwise, the vehicle's engine, the
electrical systems and the transmission may be
damaged.<
Use the parking brake on inclines
On inclines, do not hold the vehicle for a
lengthy period using the clutch; use the
parking brake instead. Otherwise, greater
clutch wear will result.<
For more information about the drive-off assis-
tant, refer to page80.
Braking safely
Your BMW is equipped with ABS as a standard
feature. Applying the brakes fully is the most
effective way of braking in situations in which
this is necessary. Since the vehicle maintains
steering responsiveness, you can still avoid
possible obstacles with a minimum of steering
effort.
Pulsation of the brake pedal, combined with
sounds from the hydraulic circuits, indicate that
ABS is in its active mode.
Driving in wet conditions
When roads are wet or there is heavy rain,
briefly exert gentle pressure on the brake pedal
every few miles. Monitor traffic conditions to
ensure that this maneuver does not endanger
other road users. The heat generated in this
process helps dry the pads and rotors. Full
braking efficiency will then be available when
you need it.
Hills
To prevent overheating and the resulting
reduced efficiency of the brake system,
drive long or steep downhill gradients in the
gear in which the least braking is required. Even light but consistent brake pressure can lead to
high temperatures, brake wear and possibly
even brake failure.<
You can increase the engine's braking effect by
shifting down, all the way to first gear if neces-
sary. This strategy helps you avoid placing
excessive loads on the brake system. Down-
shifting in manual mode of the automatic trans-
mission, refer to page54.
7-gear sport automatic transmission with
dual clutch: Never drive with the trans-
mission in neutral or with the engine switched
off; otherwise, engine braking action will not be
present or there will be no power assistance to
the brakes or steering.
Manual transmission: Never drive with the
clutch held down, with the transmission in neu-
tral or with the engine switched off; otherwise,
engine braking action will not be present or
there will be no power assistance to the brakes
or steering.
Never allow floor mats, carpets or any other
objects to protrude into the area around the
pedals; otherwise, pedal function could be
impaired.<
Corrosion on brake rotors
When the vehicle is driven only occasionally,
during extended periods when the vehicle is not
used at all, and in operating conditions where
brake applications are less frequent, there is an
increased tendency for corrosion to form on
rotors, while contaminants accumulate on the
brake pads. This occurs because the minimum
pressure which must be exerted by the pads
during brake applications to clean the rotors is
not reached.
Should corrosion form on the brake rotors, the
brakes will tend to respond with a pulsating
effect that even extended application will fail
to cure.
When the vehicle is parked
Condensation forms while the automatic cli-
mate control is in operation, and then exits
under the vehicle. Traces of condensed water
under the vehicle are therefore normal.
Page 117 of 254
Driving tips
115Reference
At a glance
Controls
Communications
Navigation
Entertainment
Mobility
Before driving into a car wash
General information on caring for your BMW
can be found on page208.
With Comfort Access and automatic
transmission
Insert the remote control into the ignition
switch.
The engine can be switched off when the selec-
tor lever is in position N. Refer also to page208.
With Comfort Access and 7-gear sport
automatic transmission with dual
clutch
Insert the remote control into the ignition
switch.
The engine can be switched off when the trans-
mission is in position N. Refer also to page209.
Cargo loading
To avoid loading the tires beyond their
approved carrying capacity, never over-
load the vehicle. Overloading can lead to over-
heating and increases the rate at which damage
develops inside the tires. This can ultimately
result in a sudden blowout.<
Make sure that no liquids are spilled or
leak from their containers in the cargo
area, as this could result in damage to the
vehicle.<
Always position and secure the cargo as
described so that it cannot endanger the
car's occupants, for example if sudden braking
or swerving is necessary.
Never exceed either the approved gross vehicle
weight or either of the approved axle loads, refer
to page228, as excessive loads can pose a
safety hazard, and may also place you in viola-
tion of traffic safety laws.
Heavy or hard objects should not be carried
loose inside the car, since they could be thrown
around, for example as a result of heavy braking,
sudden swerves, etc., and endanger the occu-
pants.<
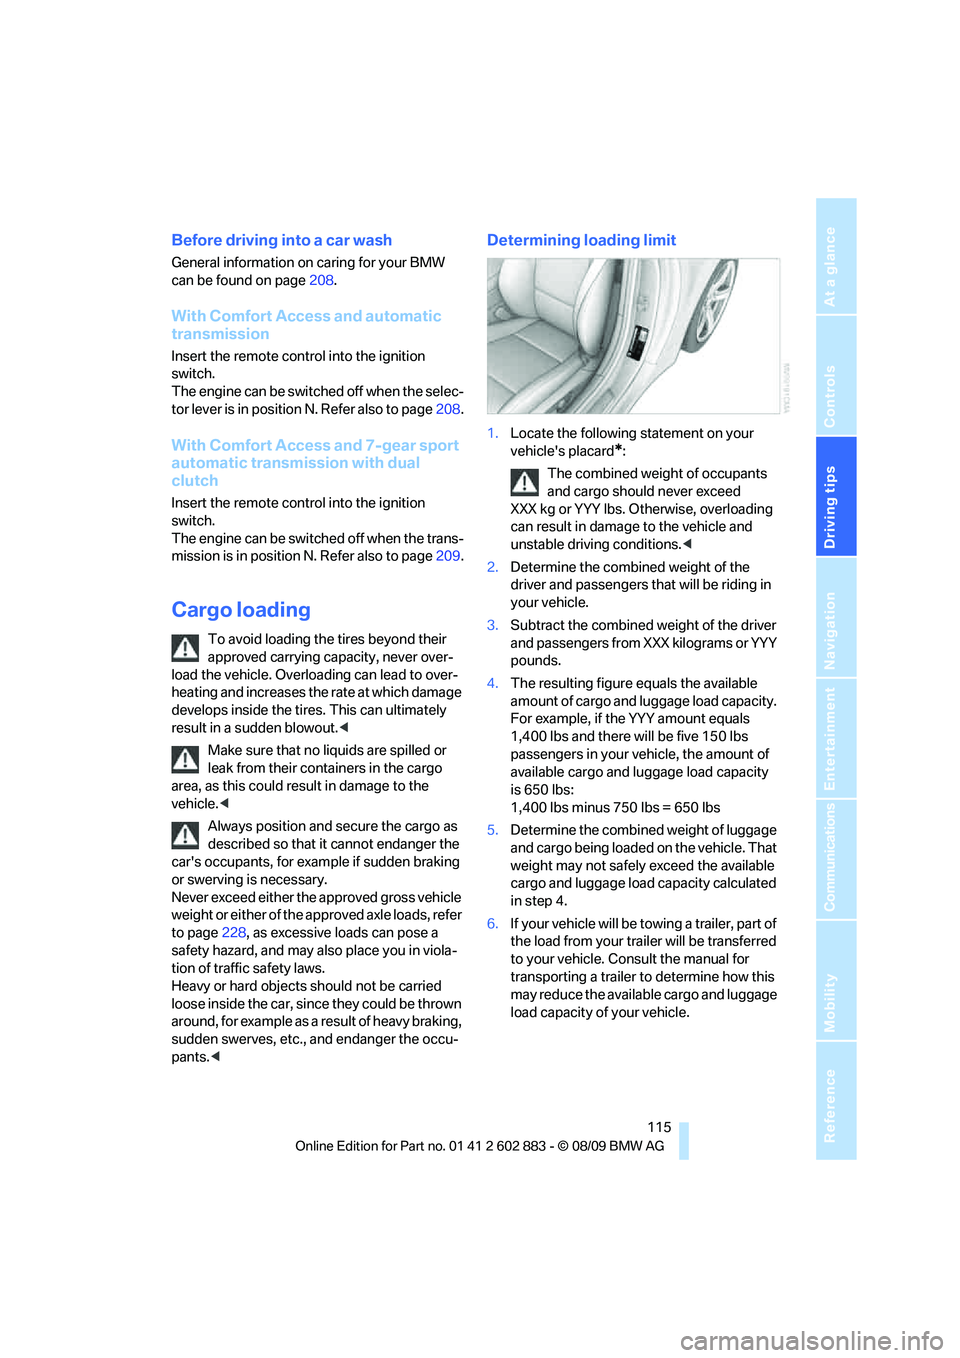
Determining loading limit
1.Locate the following statement on your
vehicle's placard
*:
The combined weight of occupants
and cargo should never exceed
XXX kg or YYY lbs. Otherwise, overloading
can result in damage to the vehicle and
unstable driving conditions.<
2.Determine the combined weight of the
driver and passengers that will be riding in
your vehicle.
3.Subtract the combined weight of the driver
and passengers from XXX kilograms or YYY
pounds.
4.The resulting figure equals the available
amount of cargo and luggage load capacity.
For example, if the YYY amount equals
1,400 lbs and there will be five 150 lbs
passengers in your vehicle, the amount of
available cargo and luggage load capacity
is 650 lbs:
1,400 lbs minus 750 lbs = 650 lbs
5.Determine the combined weight of luggage
and cargo being loaded on the vehicle. That
weight may not safely exceed the available
cargo and luggage load capacity calculated
in step 4.
6.If your vehicle will be towing a trailer, part of
the load from your trailer will be transferred
to your vehicle. Consult the manual for
transporting a trailer to determine how this
may reduce the available cargo and luggage
load capacity of your vehicle.
Page 173 of 254
171
Entertainment
Reference
At a glance
Controls
Driving tips Communications
Navigation
Mobility
>The mobile phone is ready to operate.
>Bluetooth is activated in the vehicle, refer to
page173, and on the mobile phone.
>Depending on the mobile phone, certain
settings may be necessary on the mobile
phone, e.g., via the following menu items:
>Bluetooth switched on
>Connection must be allowed without
requiring further confirmation
>Reconnection
>Depending on the mobile phone type, the
power-saving mode setting, for example,
may result in a paired mobile phone not
being detected by the vehicle.
>For pairing purposes, define any 4 to 16-
digit number as a Bluetooth passkey,
e.g. 25081107. A long and complex number
offers the best protection against unautho-
rized access. This Bluetooth passkey is no
longer required after pairing has been suc-
cessful.
>The ignition is switched on.
Pair the mobile phone with the vehicle
only when the car is stationary, to avoid
endangering the car's occupants and other
road users by being distracted.<
Switch on ignition
1.Insert remote control all the way into the
ignition lock.
2.Switch on ignition without operating the
brake or clutch or pressing the start/stop
button.
Preparation via iDrive
3."Telephone"
4."Bluetooth"
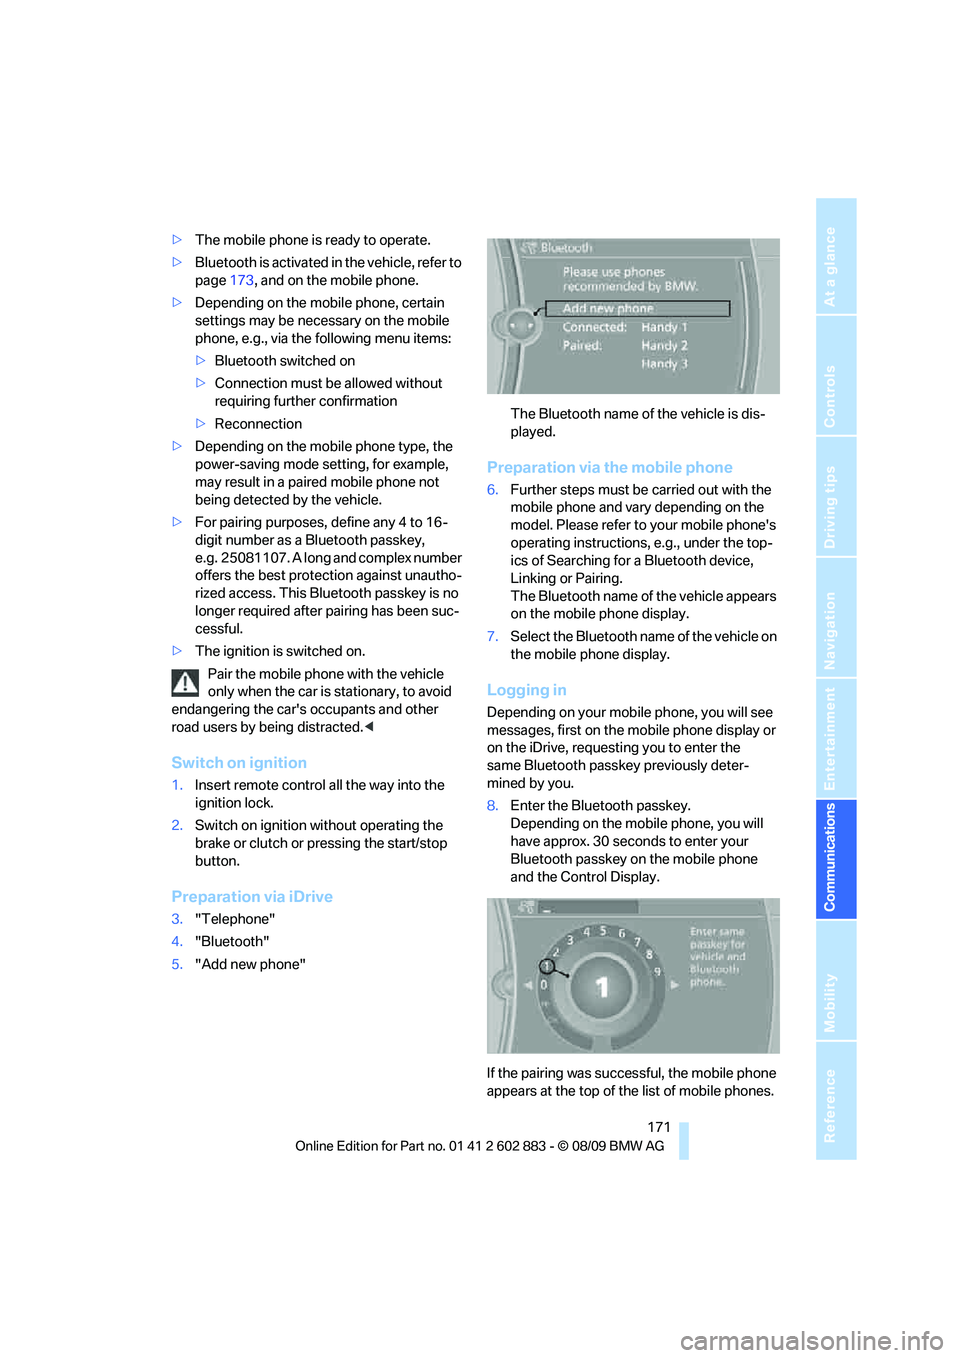
5."Add new phone"The Bluetooth name of the vehicle is dis-
played.
Preparation via the mobile phone
6.Further steps must be carried out with the
mobile phone and vary depending on the
model. Please refer to your mobile phone's
operating instructions, e.g., under the top-
ics of Searching for a Bluetooth device,
Linking or Pairing.
The Bluetooth name of the vehicle appears
on the mobile phone display.
7.Select the Bluetooth name of the vehicle on
the mobile phone display.
Logging in
Depending on your mobile phone, you will see
messages, first on the mobile phone display or
on the iDrive, requesting you to enter the
same Bluetooth passkey previously deter-
mined by you.
8.Enter the Bluetooth passkey.
Depending on the mobile phone, you will
have approx. 30 seconds to enter your
Bluetooth passkey on the mobile phone
and the Control Display.
If the pairing was successful, the mobile phone
appears at the top of the list of mobile phones.
Page 211 of 254
Mobility
209Reference
At a glance
Controls
Driving tips
Communications
Navigation
Entertainment
7-gear sport automatic transmission
with dual clutch
Before driving into an automatic car wash, per-
form the following steps to ensure that the vehi-
cle can roll:
1.Insert the remote control, even with Com-
fort Access, into the ignition lock.
2.Engage transmission position N.
3.Release the parking brake.
4.Switch off the engine.
5.Leave the remote control in the ignition lock
so that the vehicle can roll.
Transmission position P is engaged:
>Automatically after approx. 30 minutes
>When you take the remote control out of the
ignition lock
Steam jets / high-pressure washers
When using steam jets or high-pressure
washers, ensure that you maintain suffi-
cient clearance to the vehicle and do not exceed
a temperature of 1407/606.
Insufficient clearance or excessive pressure or
temperature can lead to component damage or
water penetration. Follow the operating instruc-
tions of the high-pressure washer.<
When using high-pressure washers, do
not spray against the seals of the retract-
able hardtop, the sensors and the cameras, e.g.,
of the Park Distance Control or Rear View Cam-
era, for an extended period and maintain a dis-
tance of at least 12 in/30 cm.<
Manual car wash
When washing the vehicle by hand, use large
quantities of water and car shampoo if neces-
sary. Clean the vehicle with a sponge or wash-
ing brush, applying light pressure only.
Before cleaning the windshield, deacti-
vate the rain sensor or switch off the igni-
tion to prevent unintentional activation of the
wipers.<
Observe local regulations pertaining to
washing vehicles by hand.<
Headlamps
Do not rub them dry and do not use abrasive or
corrosive cleaning agents.
Loosen dirt, e.g., insects, with shampoo or
insect remover and wash away with copious
quantities of water.
Thaw ice with a windshield deicer and do not
use an ice scraper.
Windows
Clean the inside and outside surfaces of the
windows and the mirrors with window cleaner.
Do not clean the mirrors with cleaners
containing quartz.<
Retractable hardtop
Proceed as you would in a normal car wash.
When you open a wet hardtop, water
drops may run into the cargo area. If nec-
essary, remove items from the cargo area
beforehand to avoid water stains or soiling.<
Paintwork care
Regular care contributes to value retention and
protects the paintwork against the long-term
effects of damaging substances.
Region-specific environmental influences can
damage the vehicle paintwork. Therefore, it is
important to adapt the frequency and scope of
car care accordingly.
Immediately remove aggressive materials such
as spilled fuel, oil, grease, brake fluid, tree sap
or bird droppings to prevent damage to the
paintwork.
Repairing paintwork damage
Immediately repair scratches or similar
damage, such as that caused by stones
hitting the vehicle, where necessary to prevent
rusting.<
BMW recommends having paintwork damage
repaired by a professional paint repair work-
shop according to BMW specifications using
original BMW paint materials.
Page 223 of 254
Mobility
221Reference
At a glance
Controls
Driving tips
Communications
Navigation
Entertainment
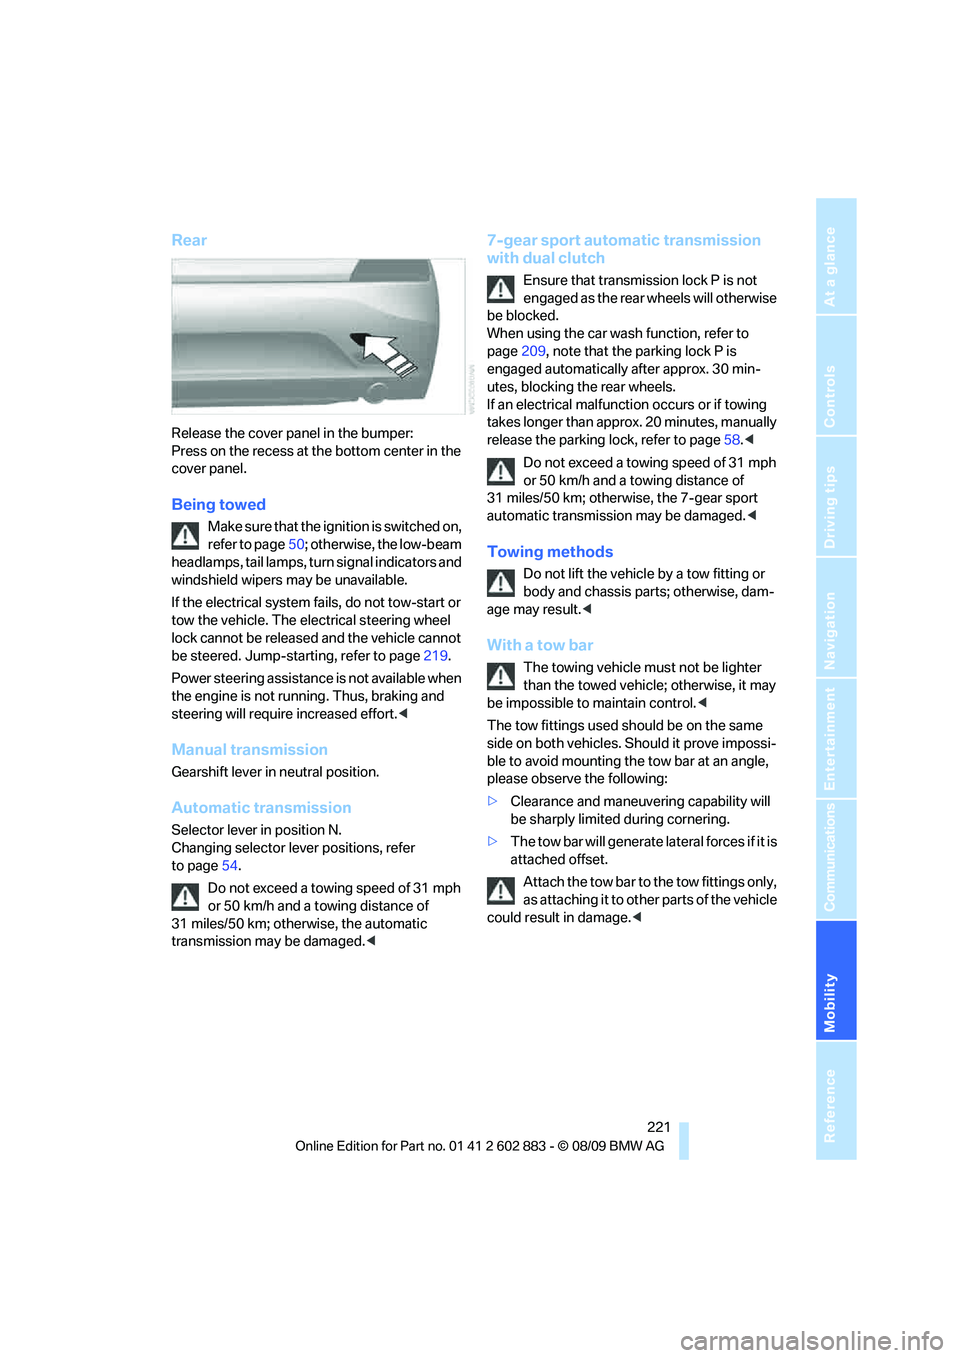
Rear
Release the cover panel in the bumper:
Press on the recess at the bottom center in the
cover panel.
Being towed
Make sure that the ignition is switched on,
refer to page50; otherwise, the low-beam
headlamps, tail lamps, turn signal indicators and
windshield wipers may be unavailable.
If the electrical system fails, do not tow-start or
tow the vehicle. The electrical steering wheel
lock cannot be released and the vehicle cannot
be steered. Jump-starting, refer to page219.
Power steering assistance is not available when
the engine is not running. Thus, braking and
steering will require increased effort.<
Manual transmission
Gearshift lever in neutral position.
Automatic transmission
Selector lever in position N.
Changing selector lever positions, refer
to page54.
Do not exceed a towing speed of 31 mph
or 50 km/h and a towing distance of
31 miles/50 km; otherwise, the automatic
transmission may be damaged.<
7-gear sport automatic transmission
with dual clutch
Ensure that transmission lock P is not
engaged as the rear wheels will otherwise
be blocked.
When using the car wash function, refer to
page209, note that the parking lock P is
engaged automatically after approx. 30 min-
utes, blocking the rear wheels.
If an electrical malfunction occurs or if towing
takes longer than approx. 20 minutes, manually
release the parking lock, refer to page58.<
Do not exceed a towing speed of 31 mph
or 50 km/h and a towing distance of
31 miles/50 km; otherwise, the 7-gear sport
automatic transmission may be damaged.<
Towing methods
Do not lift the vehicle by a tow fitting or
body and chassis parts; otherwise, dam-
age may result.<
With a tow bar
The towing vehicle must not be lighter
than the towed vehicle; otherwise, it may
be impossible to maintain control.<
The tow fittings used should be on the same
side on both vehicles. Should it prove impossi-
ble to avoid mounting the tow bar at an angle,
please observe the following:
>Clearance and maneuvering capability will
be sharply limited during cornering.
>The tow bar will generate lateral forces if it is
attached offset.
Attach the tow bar to the tow fittings only,
as attaching it to other parts of the vehicle
could result in damage.<
Page 224 of 254
Giving and receiving assistance
222
With a tow rope
When starting off in the towing vehicle, make
sure that the tow rope is taut.
To avoid jerking and the associated
stresses on vehicle components when
towing, always use nylon ropes or nylon straps.
Attach the tow rope to the tow fittings only, as
attaching it to other parts of the vehicle could
result in damage.<
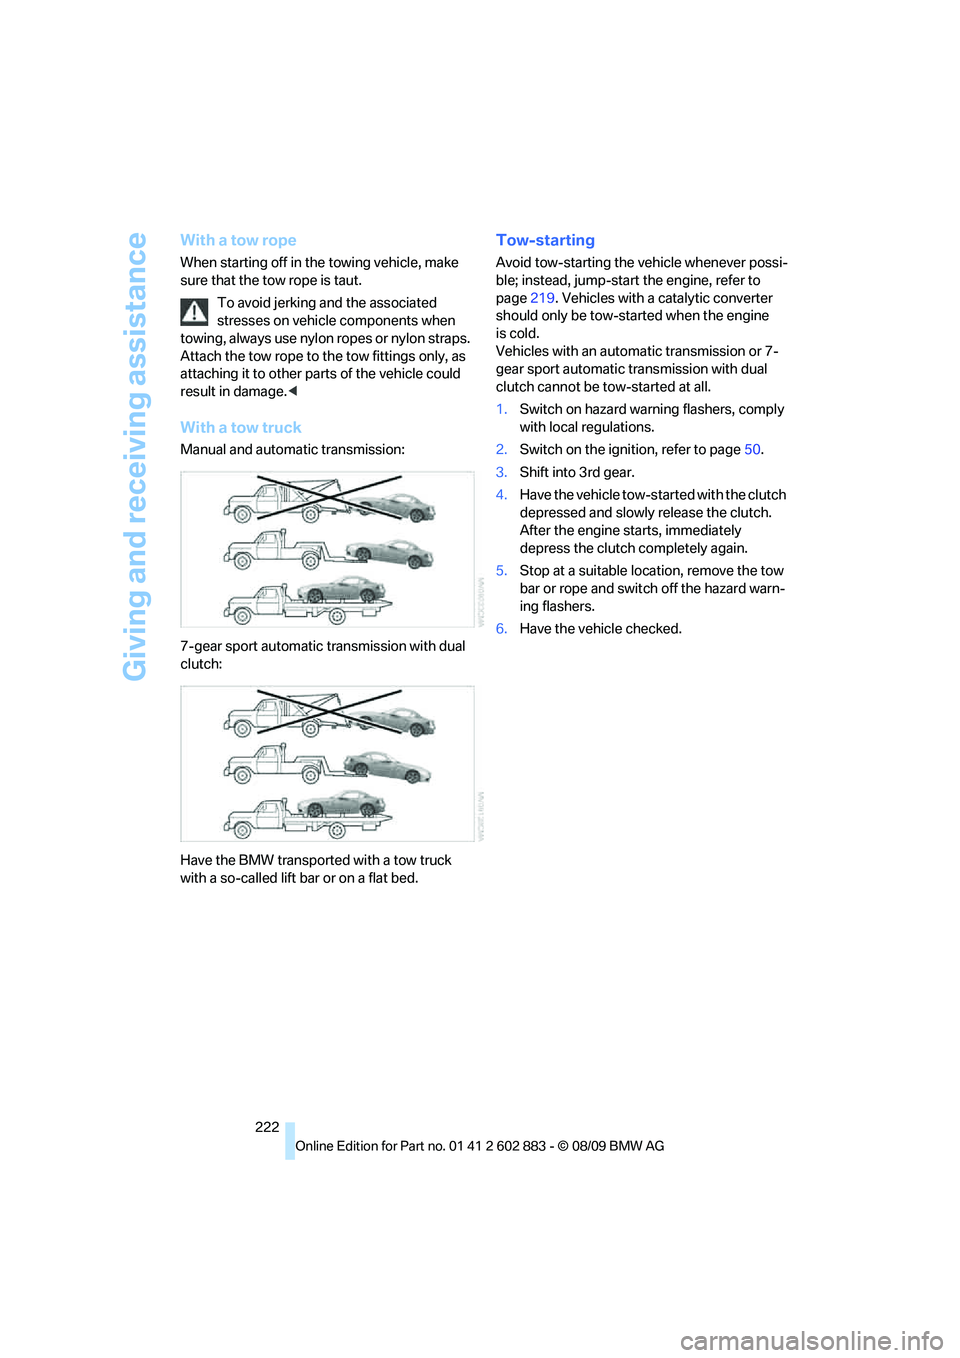
With a tow truck
Manual and automatic transmission:
7-gear sport automatic transmission with dual
clutch:
Have the BMW transported with a tow truck
with a so-called lift bar or on a flat bed.
Tow-starting
Avoid tow-starting the vehicle whenever possi-
ble; instead, jump-start the engine, refer to
page219. Vehicles with a catalytic converter
should only be tow-started when the engine
is cold.
Vehicles with an automatic transmission or 7-
gear sport automatic transmission with dual
clutch cannot be tow-started at all.
1.Switch on hazard warning flashers, comply
with local regulations.
2.Switch on the ignition, refer to page50.
3.Shift into 3rd gear.
4.Have the vehicle tow-started with the clutch
depressed and slowly release the clutch.
After the engine starts, immediately
depress the clutch completely again.
5.Stop at a suitable location, remove the tow
bar or rope and switch off the hazard warn-
ing flashers.
6.Have the vehicle checked.