2010 BMW Z4 SDRIVE30I ECO mode
[x] Cancel search: ECO modePage 8 of 254
Notes
6 Installation and operation of accessories not
approved by BMW, such as alarms, radios,
amplifiers, radar detectors, wheels, suspension
components, brake dust shields, telephones,
including operation of any mobile phone from
within the vehicle without using an externally
mounted antenna, or transceiver equipment, for
instance, CBs, walkie-talkies, ham radio or sim-
ilar accessories, may cause extensive damage
to the vehicle, compromise its safety, interfere
with the vehicle's electrical system or affect the
validity of the BMW Limited Warranty. See your
BMW center for additional information.<
Maintenance, replacement, or repair of
the emission control devices and sys-
tems may be performed by any automotive
repair establishment or individual using any cer-
tified automotive part.<
California Proposition 65 warning
California law requires us to issue the following
warning:
Engine exhaust and a wide variety of
automobile components and parts,
including components found in the interior fur-
nishings in a vehicle, contain or emit chemicals
known to the State of California to cause cancer
and birth defects and reproductive harm. In
addition, certain fluids contained in vehicles and
certain products of component wear contain or
emit chemicals known to the State of California
to cause cancer and birth defects or other
reproductive harm.
Battery posts, terminals and related accesso-
ries contain lead and lead compounds. Wash
your hands after handling.
Used engine oil contains chemicals that have
caused cancer in laboratory animals. Always
protect your skin by washing thoroughly with
soap and water.<
Service and warranty
We recommend that you read this publication
thoroughly.
Your BMW is covered by the following war-
ranties:
>New Vehicle Limited Warranty
>Rust Perforation Limited Warranty
>Federal Emissions System Defect Warranty
>Federal Emissions Performance Warranty
>California Emission Control System Limited
Warranty
Detailed information about these warranties is
listed in the Service and Warranty Information
Booklet for US models or in the Warranty and
Service Guide Booklet for Canadian models.
Your vehicle has been specifically adapted and
designed to meet the particular operating con-
ditions and homologation requirements in your
country and continental region in order to
deliver the full BMW driving pleasure while the
vehicle is operated under those conditions. If
you wish to operate your vehicle in another
country or region, you may be required to adapt
your vehicle to meet different prevailing operat-
ing conditions and homologation requirements.
You should also be aware of any applicable war-
ranty limitations or exclusions for such country
or region. In such case, please contact Cus-
tomer Relations for further information.
Reporting safety defects
For US customers
The following only applies to vehicles owned
and operated in the US.
If you believe that your vehicle has a defect
which could cause a crash or could cause injury
or death, you should immediately inform the
National Highway Traffic Safety Administration,
NHTSA, in addition to notifying BMW of North
America, LLC, P.O. Box 1227, Westwood,
New Jersey 07675-1227, Telephone 1-800-
831-1117.
Page 35 of 254

Controls
33Reference
At a glance
Driving tips
Communications
Navigation
Entertainment
Mobility
Opening from outside
Press on the top half of the BMW emblem or, for
approx. 1 second, on the button of the
remote control:
The luggage compartment can be opened.
Emergency release*
Pull the lever in the cargo area. The luggage
compartment lid is unlocked.
Closing
The handle recesses on the interior trim of the
luggage compartment lid make it easier to
pull down.Make sure that the closing path of the
luggage compartment lid is clear; other-
wise, injuries may result.<
To close the luggage compartment lid,
press it down lightly. The lid is closed
automatically.<
Alarm system*
The concept
The vehicle alarm system responds:
>When a door, the hood or the luggage com-
partment lid is opened
>To movements inside the vehicle: Interior
motion sensor, refer to page34
>When the car's inclination changes, for
instance if an attempt is made to jack it up
and steal the wheels or to raise it prior to
towing away
>When there is an interruption in the power
supply from the battery
The alarm system signals unauthorized entry
attempts for a short time by means of:
>An acoustic alarm
>Switching on the hazard warning flashers
>Flashing the high beams
Arming and disarming
When you lock or unlock the vehicle, either with
the remote control or at the door lock, the alarm
system is armed or disarmed at the same time.
You can open the luggage compartment lid
using the button of the remote control even
if the alarm system is armed, refer to page30.
The lid is locked and monitored again as soon
as it is closed.
Panic mode*
You can trigger the alarm system if you find
yourself in a dangerous situation:
Press the button for at least three seconds.
To switch off the alarm: press any button.
Page 56 of 254
Driving
54
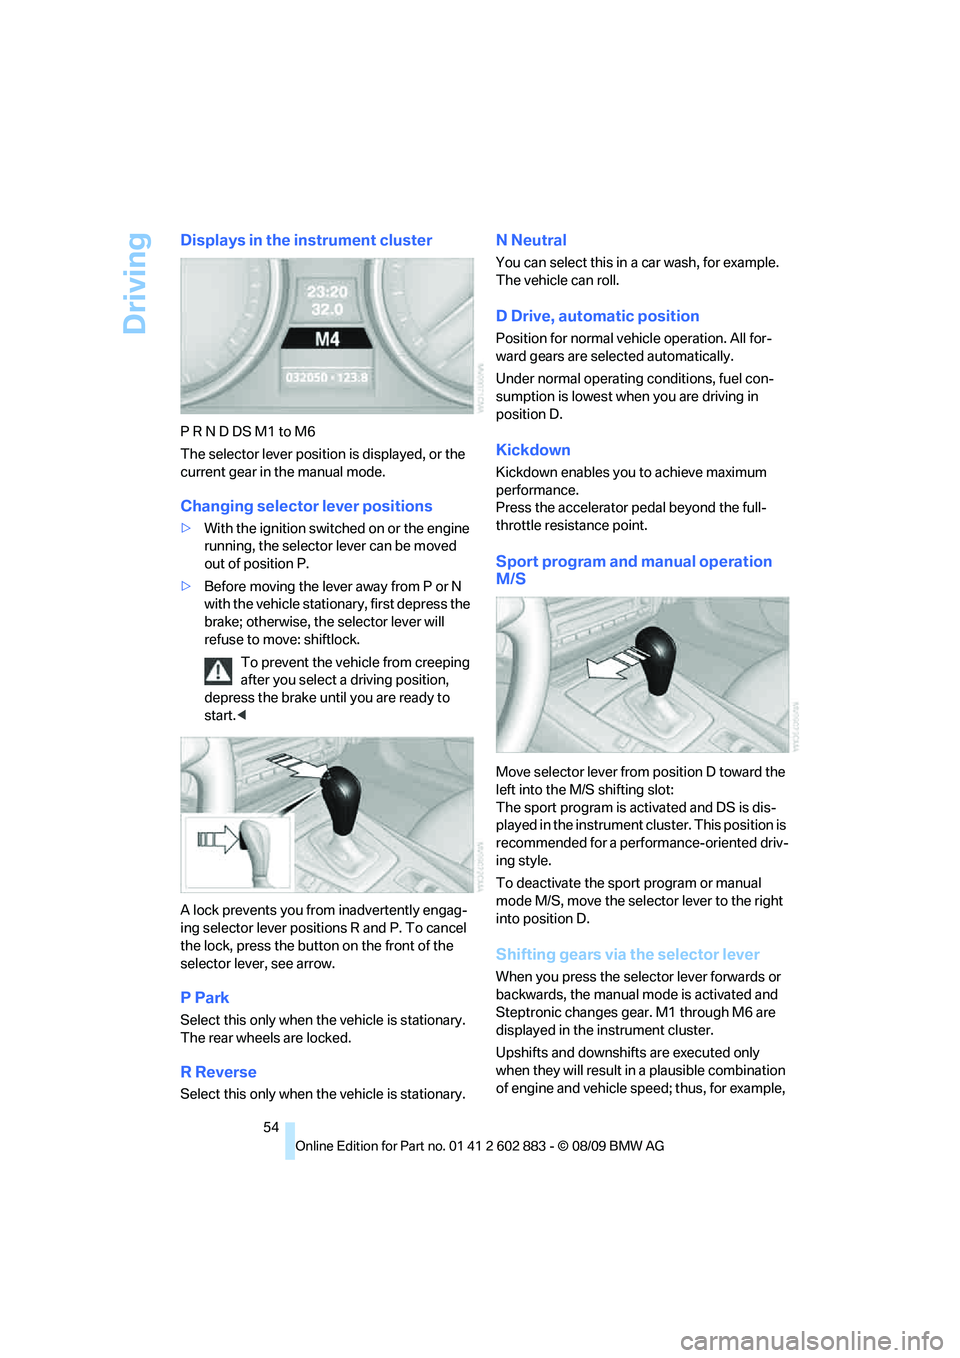
Displays in the instrument cluster
P R N D DS M1 to M6
The selector lever position is displayed, or the
current gear in the manual mode.
Changing selector lever positions
>With the ignition switched on or the engine
running, the selector lever can be moved
out of position P.
>Before moving the lever away from P or N
with the vehicle stationary, first depress the
brake; otherwise, the selector lever will
refuse to move: shiftlock.
To prevent the vehicle from creeping
after you select a driving position,
depress the brake until you are ready to
start.<
A lock prevents you from inadvertently engag-
ing selector lever positions R and P. To cancel
the lock, press the button on the front of the
selector lever, see arrow.
P Park
Select this only when the vehicle is stationary.
The rear wheels are locked.
R Reverse
Select this only when the vehicle is stationary.
N Neutral
You can select this in a car wash, for example.
The vehicle can roll.
D Drive, automatic position
Position for normal vehicle operation. All for-
ward gears are selected automatically.
Under normal operating conditions, fuel con-
sumption is lowest when you are driving in
position D.
Kickdown
Kickdown enables you to achieve maximum
performance.
Press the accelerator pedal beyond the full-
throttle resistance point.
Sport program and manual operation
M/S
Move selector lever from position D toward the
left into the M/S shifting slot:
The sport program is activated and DS is dis-
played in the instrument cluster. This position is
recommended for a performance-oriented driv-
ing style.
To deactivate the sport program or manual
mode M/S, move the selector lever to the right
into position D.
Shifting gears via the selector lever
When you press the selector lever forwards or
backwards, the manual mode is activated and
Steptronic changes gear. M1 through M6 are
displayed in the instrument cluster.
Upshifts and downshifts are executed only
when they will result in a plausible combination
of engine and vehicle speed; thus, for example,
Page 58 of 254
Driving
56
System limitations
This transmission is equipped with an over-
heating protection system that protects the
clutches against extremely high loads.
The indicator lamp lights up yellow if
the transmission becomes too warm.
Avoid high engine loads and driving off
frequently.
If the transmission overheats, the indicator
lamp lights up red and power flow to the engine
is interrupted. You can only continue driving
after the transmission has cooled down.
Avoid driving off frequently with high accelera-
tion and do not hold the vehicle on inclines by
depressing the accelerator lightly; otherwise,
the transmission may overheat.
Transmission positions
P R N D M/S + –
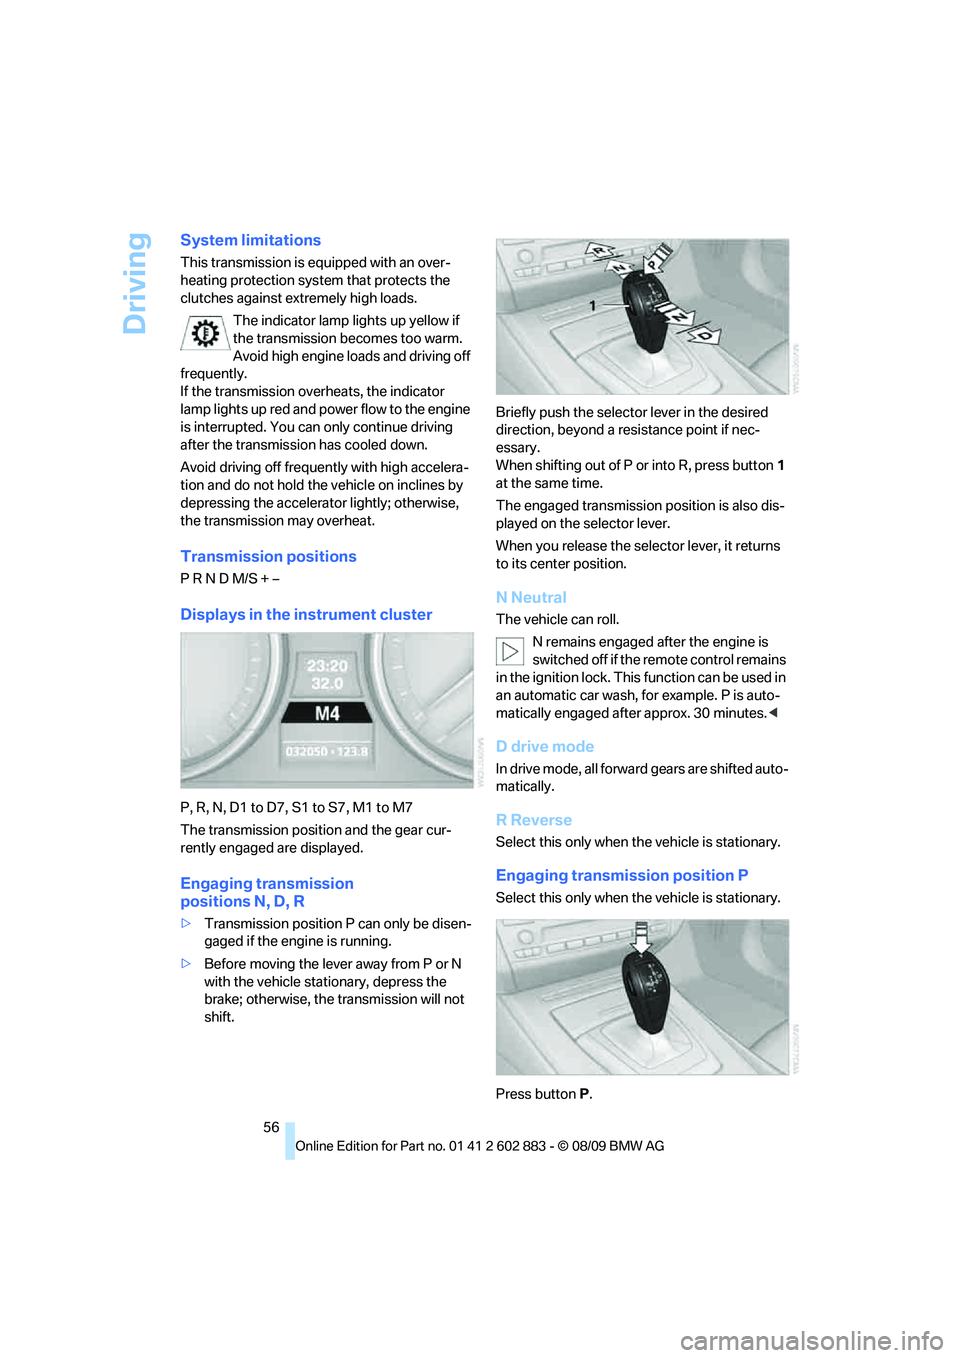
Displays in the instrument cluster
P, R, N, D1 to D7, S1 to S7, M1 to M7
The transmission position and the gear cur-
rently engaged are displayed.
Engaging transmission
positionsN,D,R
>Transmission position P can only be disen-
gaged if the engine is running.
>Before moving the lever away from P or N
with the vehicle stationary, depress the
brake; otherwise, the transmission will not
shift.Briefly push the selector lever in the desired
direction, beyond a resistance point if nec-
essary.
When shifting out of P or into R, press button1
at the same time.
The engaged transmission position is also dis-
played on the selector lever.
When you release the selector lever, it returns
to its center position.
N Neutral
The vehicle can roll.
N remains engaged after the engine is
switched off if the remote control remains
in the ignition lock. This function can be used in
an automatic car wash, for example. P is auto-
matically engaged after approx. 30 minutes.<
D drive mode
In drive mode, all forward gears are shifted auto-
matically.
R Reverse
Select this only when the vehicle is stationary.
Engaging transmission position P
Select this only when the vehicle is stationary.
Press buttonP.
Page 59 of 254
Controls
57Reference
At a glance
Driving tips
Communications
Navigation
Entertainment
Mobility
P Park
The rear wheels are locked.
P is engaged automatically when the following
conditions are met:
>The driver's door is opened while the
engine is running, your safety belt is not fas-
tened and neither the brake pedal nor the
accelerator are activated.
>The engine is switched off unless N is
engaged and the remote control is in the
ignition lock.
>The remote control is removed from the
ignition lock.
Kickdown
T o a cc ele ra te ra pidly, e.g., when passing, press
the accelerator down past the resistance point.
This provides maximum acceleration.
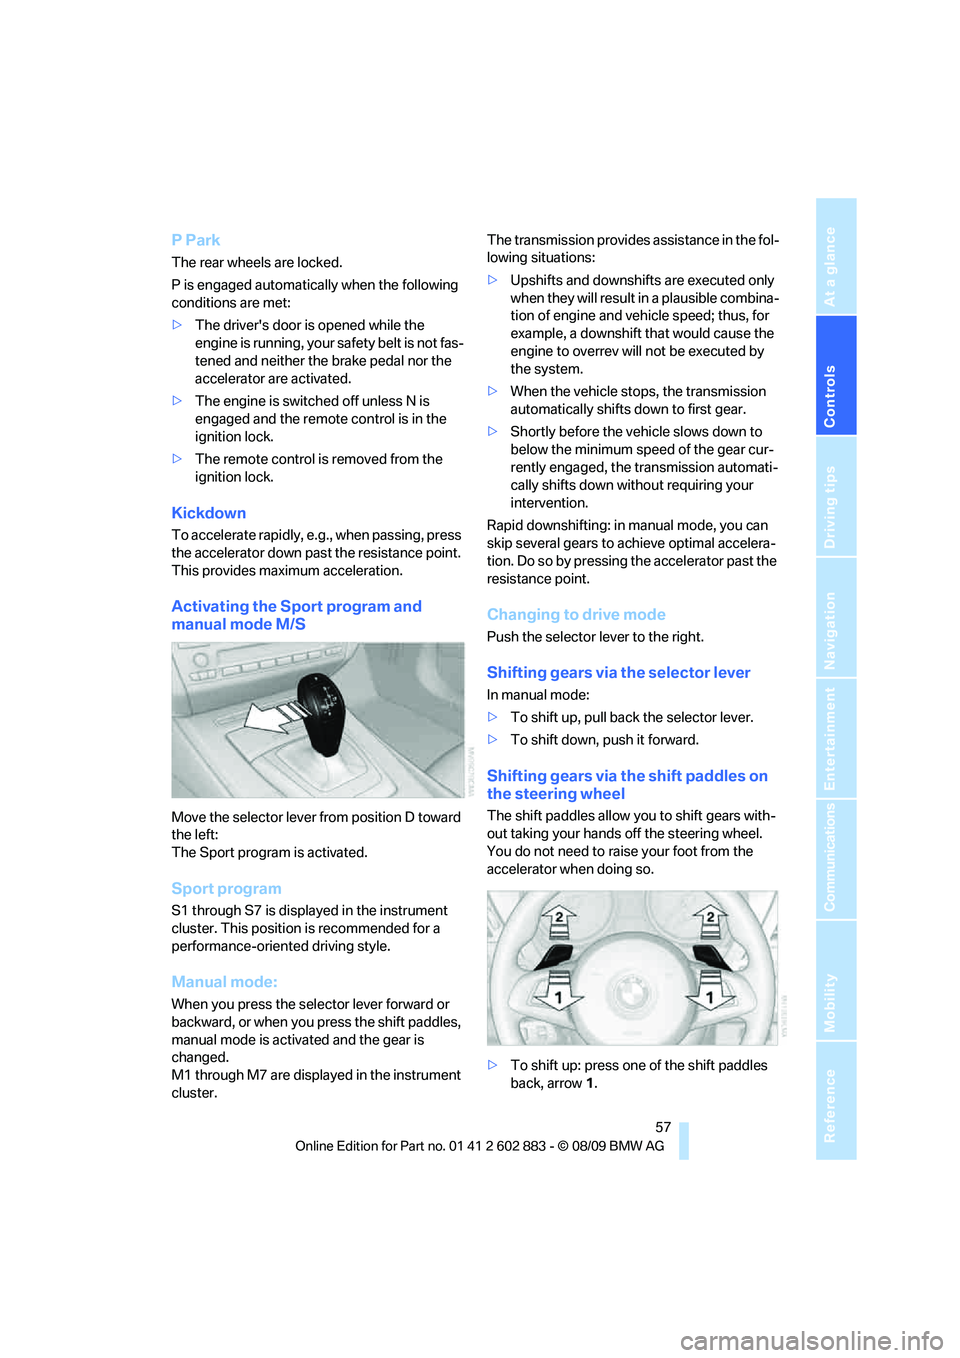
Activating the Sport program and
manual mode M/S
Move the selector lever from position D toward
the left:
The Sport program is activated.
Sport program
S1 through S7 is displayed in the instrument
cluster. This position is recommended for a
performance-oriented driving style.
Manual mode:
When you press the selector lever forward or
backward, or when you press the shift paddles,
manual mode is activated and the gear is
changed.
M1 through M7 are displayed in the instrument
cluster.The transmission provides assistance in the fol-
lowing situations:
>Upshifts and downshifts are executed only
when they will result in a plausible combina-
tion of engine and vehicle speed; thus, for
example, a downshift that would cause the
engine to overrev will not be executed by
the system.
>When the vehicle stops, the transmission
automatically shifts down to first gear.
>Shortly before the vehicle slows down to
below the minimum speed of the gear cur-
rently engaged, the transmission automati-
cally shifts down without requiring your
intervention.
Rapid downshifting: in manual mode, you can
skip several gears to achieve optimal accelera-
tion. Do so by pressing the accelerator past the
resistance point.
Changing to drive mode
Push the selector lever to the right.
Shifting gears via the selector lever
In manual mode:
>To shift up, pull back the selector lever.
>To shift down, push it forward.
Shifting gears via the shift paddles on
the steering wheel
The shift paddles allow you to shift gears with-
out taking your hands off the steering wheel.
You do not need to raise your foot from the
accelerator when doing so.
>To shift up: press one of the shift paddles
back, arrow1.
Page 60 of 254
Driving
58 >To shift down: press one of the shift pad-
dles forward, arrow2.
Gears can be shifted using the shift paddles in
drive mode or in manual mode.
Gear change in manual mode:
When manual mode is active, refer to page57,
gears can be changed using the shift paddles or
the selector lever.
Gear change in drive mode
The shift paddles can be used to change gears
in drive mode as well.
Afterwards, if the shift paddles are not used for
some time and vehicle acceleration is insuffi-
cient, the forward gears are changed again
automatically.
Launch Control
Launch Control enables you to drive off with an
optimal vehicle acceleration on a high grip road
surface.
Do not use Launch Control too often, as
the higher loads on the vehicle lead to
premature component wear.<
Launch Control is available when the engine is
at operating temperature, i.e., after driving con-
tinuously for at least 6 miles/10 km.
1.With the engine running, depress the brake
pedal with your left foot.
2.Activate the SPORT+ program of the
Dynamic Driving Control, refer to page79.
3.With the vehicle stationary, activate manual
mode and select first gear.
4.Press the accelerator all the way down. The
engine speed when driving off is controlled.
A flag symbol appears in the instrument
cluster.
5.The vehicle accelerates when you release
the brake pedal. Keep the accelerator
pressed all the way down.
6.The transmission shifts up automatically as
long as the accelerator is pressed all the
way down.Launch Control only becomes available again
after a certain distance has been driven.
Launch Control can only be used after the
break-in phase, refer to page112.
To maintain driving stability, activate DSC
whenever possible.<
Manually releasing and engaging the
transmission lock
If a power failure occurs, e.g., if the battery
is discharged or disconnected or if there
is an electrical malfunction, the transmission
lock must be released manually; otherwise, the
rear wheels are blocked and the vehicle cannot
be towed.<
Release the transmission lock manually for tow-
ing only and set the parking brake beforehand
to prevent the vehicle from rolling. After parking
the vehicle, lock the transmission lock again
manually, refer to page59.
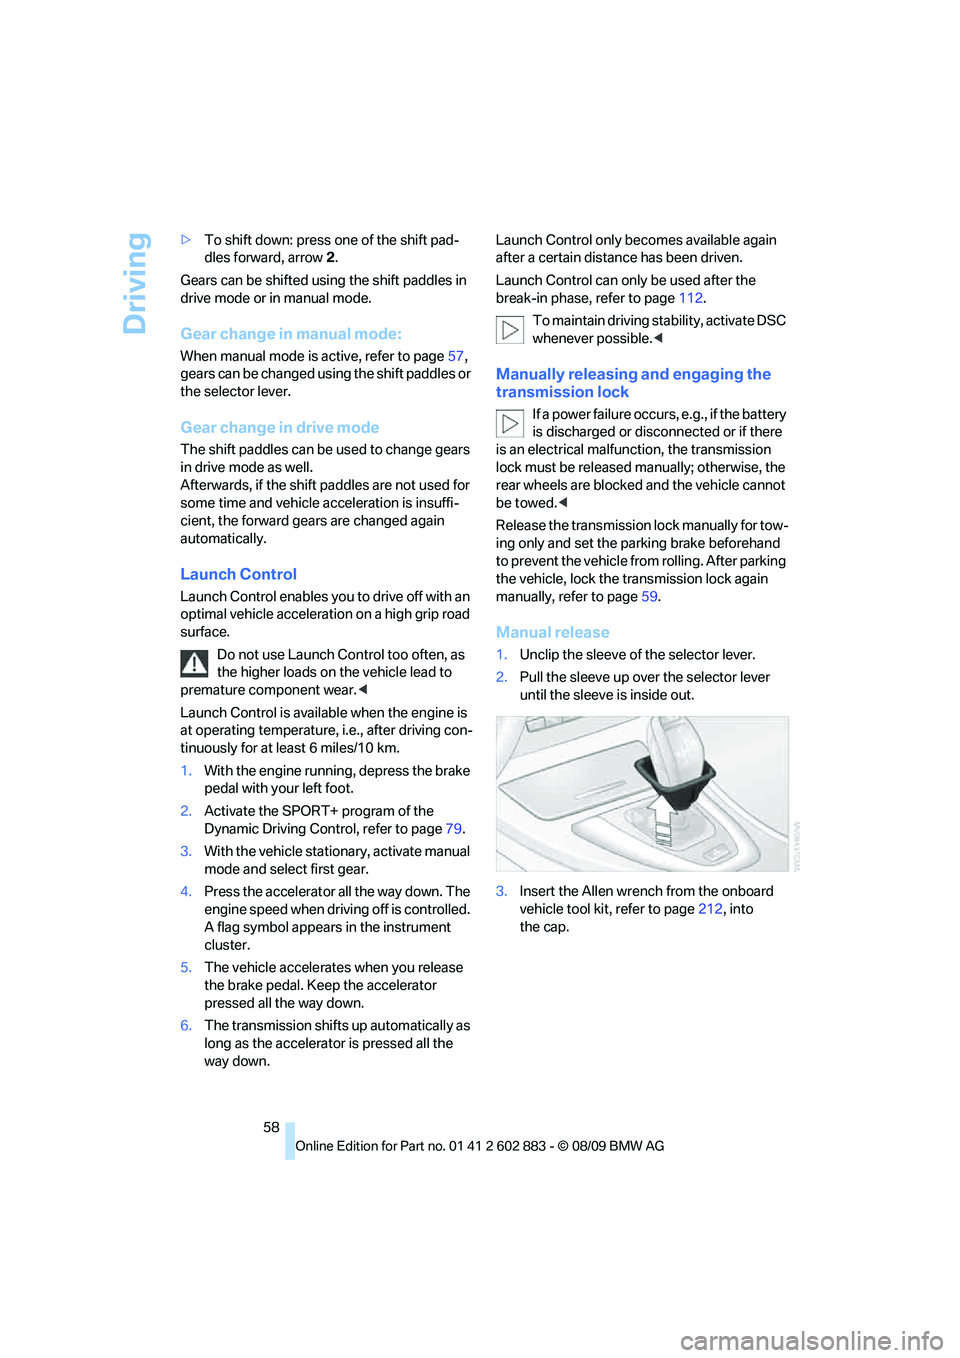
Manual release
1.Unclip the sleeve of the selector lever.
2.Pull the sleeve up over the selector lever
until the sleeve is inside out.
3.Insert the Allen wrench from the onboard
vehicle tool kit, refer to page212, into
the cap.
Page 97 of 254

Controls
95Reference
At a glance
Driving tips
Communications
Navigation
Entertainment
Mobility
Rear window defroster
The defroster switches off auto-
matically after a certain time or
when the hardtop is opened.
Temperature
To increase the temperature, turn
the rotary switch clockwise
towards red.
For a lower temperature, turn the
rotary switch counterclockwise towards blue.
Defrosting windows and removing
condensation
1.Air distribution1 in position .
2.Deactivate recirculated-air mode 2.
3.Switch on cooling function 3.
4.Temperature4 to the right, red.
5.Set the air flow rate5 to the maximum level.
6.Switch on rear window defroster 6 to
defrost the rear window .
Ventilation
1Use the lever to change the direction of the
air flow
2Use the thumbwheels to smoothly open
and close the air vents
Ventilation for cooling
Adjust the vent outlets to direct the flow of cool
air in your direction, for instance if it has become
too hot in the car.
Draft-free ventilation
Set the vent outlets so that the air flows past
you and not straight at you.
Microfilter
The microfilter removes dust and pollen from
the incoming air. The microfilter is changed by
your BMW center during routine mainte-
nance work.
Page 100 of 254

Climate
98
Residual heat
The heat stored in the engine is used to heat the
interior.
This function can be switched on
using the right button under the
following conditions:
>Up to 15 minutes after the engine has been
switched off
>While the engine is at operating tem-
perature
>As long as battery voltage is sufficient
>At an outside temperature below 777/
256
The middle LED is lit when the function is on.
Automatic recirculated-air control
AUC/recirculated-air mode
Switch on the desired operating
mode by pressing this button
repeatedly:
>LED off: outside air flows in continuously.
>Left-hand LED on, AUC mode: a sensor
detects pollutants in the outside air. If nec-
essary, the system blocks the supply of out-
side air and recirculates the inside air. As
soon as the concentration of pollutants in
the outside air has decreased sufficiently,
the system automatically switches back to
outside air supply.
>Right-hand LED on, recirculated-air mode:
the supply of outside air is permanently
shut off. The system then recirculates the
air currently within the vehicle.
If condensation starts to form on the
inside window surfaces during operation
in the recirculated-air mode, you should switch
it off while also increasing the air flow rate as
required.
The recirculated-air mode should not be used
over an extended period of time; otherwise, the
air quality inside the car will deteriorate contin-
uously.<
Defrosting windows and removing
condensation
Quickly removes ice and conden-
sation from the windshield and
front side windows.
Switch on the cooling function as well.
Rear window defroster
The defroster switches off auto-
matically after a certain time or
when the hardtop is opened.
Ventilation
1Lever for changing the direction of the
air flow.
2Thumbwheels for opening and closing the
air vents.
3Thumbwheel for adjusting the amount of
cool air from the vents to the upper body
area. In this way you can optimize the air
temperature for the upper body area.
Ventilation for cooling
Adjust the vent outlets to direct the flow of cool
air in your direction, for instance if it has become
too hot in the car.
Draft-free ventilation
Set the vent outlets so that the air flows past
you and not straight at you.
Microfilter/activated-charcoal filter
The microfilter traps dust and pollen in the
incoming air. The activated-charcoal filter pro-
vides additional protection by filtering gaseous
pollutants from the outside air. Your BMW cen-
ter replaces this combined filter during routine
maintenance.