2010 BMW Z4 SDRIVE30I remote control
[x] Cancel search: remote controlPage 54 of 254

Driving
52
Switching off the engine
Always take the remote control with you
when you leave the vehicle.
Set the parking brake firmly when parking; oth-
erwise, the vehicle could roll.<
Manual transmission
1.With the car at a standstill, press the start/
stop button.
2.Shift into first gear or reverse.
3.Set the parking brake.
4.Removing the remote control from the igni-
tion lock, refer to page50.
Automatic transmission
1.With the car at a standstill, move the selec-
tor lever to position P.
2.Press the start/stop button.
3.Set the parking brake.
4.Removing the remote control from the igni-
tion lock, refer to page50.
7-gear sport automatic transmission
with dual clutch
1.With the car at a standstill, engage trans-
mission position P.
2.Press the start/stop button.
3.Set the parking brake.
4.Removing the remote control from the igni-
tion lock, refer to page50.
Parking brake
The concept
Your BMW is equipped with an electromechan-
ical parking brake that can be set and released
by using a button.
The parking brake is primarily used to prevent
the vehicle from rolling when it is parked.When the vehicle is stationary, the parking
brake acts on the rear wheels via an electrome-
chanical mechanism. When the vehicle is rolling
or being driven, the parking brake acts on the
disc brakes of the front and rear wheels via the
hydraulic brake system.
Setting the brake
Pull the button. The parking brake is set.
The indicator lamp in the instrument
cluster and the LED on the button light
up red. The parking brake is set.
Indicator lamp in Canadian models.
To set the parking brake, the remote control
does not need to be in the ignition lock.
While driving
In the rare case that the parking brake needs to
be used while driving, pull the button for a
lengthy period:
The vehicle brakes hard while the button is
being pulled.
The indicator lamp in the instrument
cluster lights up red, a sound is issued
and the brake lamps light up.
Indicator lamp in Canadian models.
As soon as you brake the vehicle almost to a
standstill, approx. 2 mph/3 km/h, the parking
brake remains set.
Page 55 of 254

Controls
53Reference
At a glance
Driving tips
Communications
Navigation
Entertainment
Mobility
Releasing
Take the remote control with you when
leaving the vehicle so that children, for
example, cannot release the parking brake.<
The parking brake can only be released while
the ignition is switched on or the engine is
running.
With manual transmission
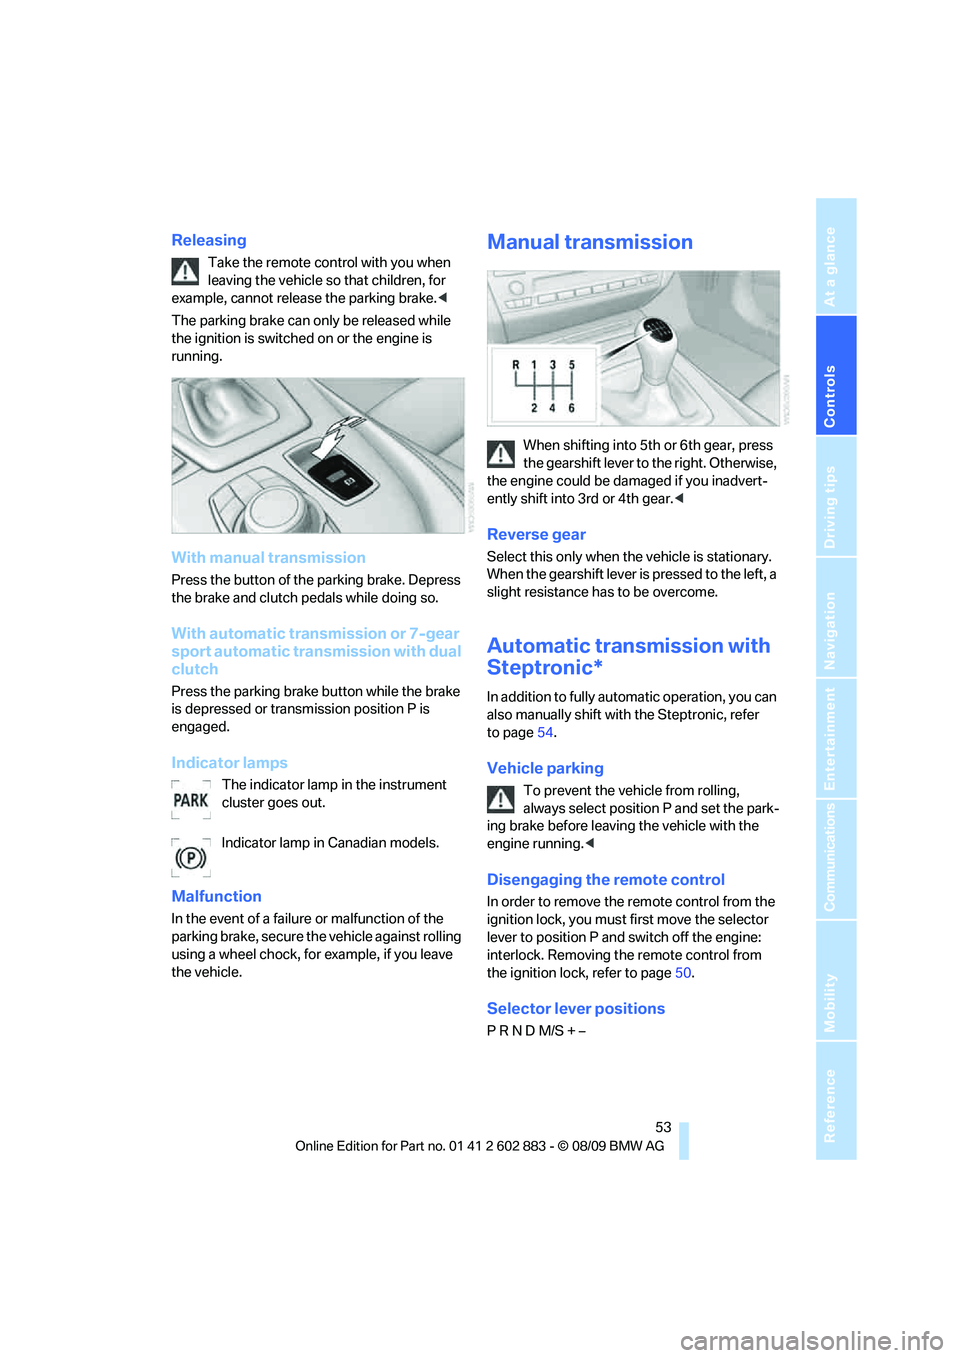
Press the button of the parking brake. Depress
the brake and clutch pedals while doing so.
With automatic transmission or 7-gear
sport automatic transmission with dual
clutch
Press the parking brake button while the brake
is depressed or transmission position P is
engaged.
Indicator lamps
The indicator lamp in the instrument
cluster goes out.
Indicator lamp in Canadian models.
Malfunction
In the event of a failure or malfunction of the
parking brake, secure the vehicle against rolling
using a wheel chock, for example, if you leave
the vehicle.
Manual transmission
When shifting into 5th or 6th gear, press
the gearshift lever to the right. Otherwise,
the engine could be damaged if you inadvert-
ently shift into 3rd or 4th gear.<
Reverse gear
Select this only when the vehicle is stationary.
When the gearshift lever is pressed to the left, a
slight resistance has to be overcome.
Automatic transmission with
Steptronic*
In addition to fully automatic operation, you can
also manually shift with the Steptronic, refer
to page54.
Vehicle parking
To prevent the vehicle from rolling,
always select position P and set the park-
ing brake before leaving the vehicle with the
engine running.<
Disengaging the remote control
In order to remove the remote control from the
ignition lock, you must first move the selector
lever to position P and switch off the engine:
interlock. Removing the remote control from
the ignition lock, refer to page50.
Selector lever positions
P R N D M/S + –
Page 58 of 254

Driving
56
System limitations
This transmission is equipped with an over-
heating protection system that protects the
clutches against extremely high loads.
The indicator lamp lights up yellow if
the transmission becomes too warm.
Avoid high engine loads and driving off
frequently.
If the transmission overheats, the indicator
lamp lights up red and power flow to the engine
is interrupted. You can only continue driving
after the transmission has cooled down.
Avoid driving off frequently with high accelera-
tion and do not hold the vehicle on inclines by
depressing the accelerator lightly; otherwise,
the transmission may overheat.
Transmission positions
P R N D M/S + –
Displays in the instrument cluster
P, R, N, D1 to D7, S1 to S7, M1 to M7
The transmission position and the gear cur-
rently engaged are displayed.
Engaging transmission
positionsN,D,R
>Transmission position P can only be disen-
gaged if the engine is running.
>Before moving the lever away from P or N
with the vehicle stationary, depress the
brake; otherwise, the transmission will not
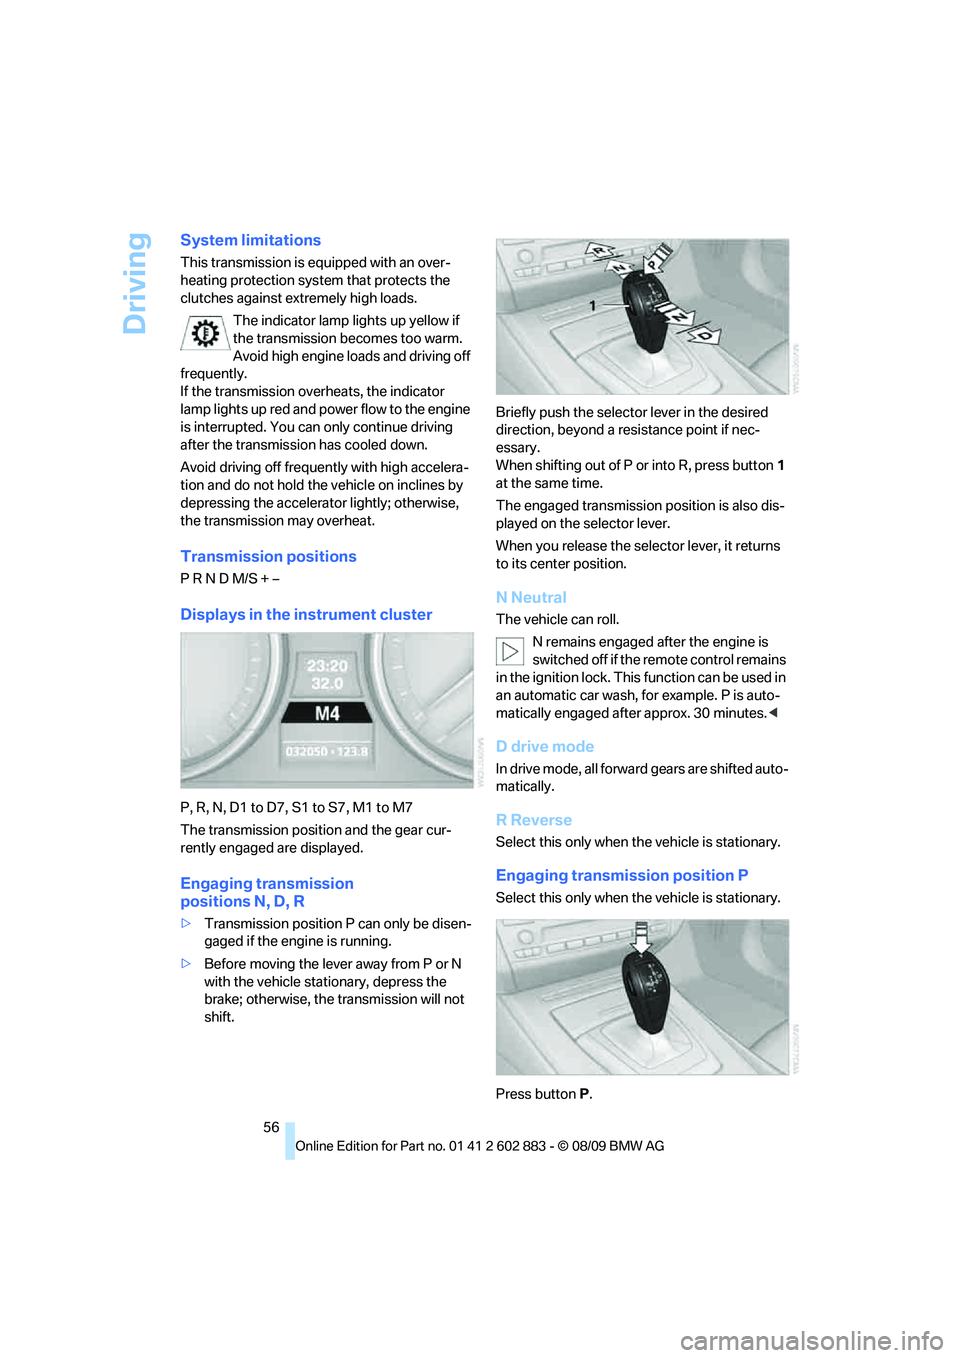
shift.Briefly push the selector lever in the desired
direction, beyond a resistance point if nec-
essary.
When shifting out of P or into R, press button1
at the same time.
The engaged transmission position is also dis-
played on the selector lever.
When you release the selector lever, it returns
to its center position.
N Neutral
The vehicle can roll.
N remains engaged after the engine is
switched off if the remote control remains
in the ignition lock. This function can be used in
an automatic car wash, for example. P is auto-
matically engaged after approx. 30 minutes.<
D drive mode
In drive mode, all forward gears are shifted auto-
matically.
R Reverse
Select this only when the vehicle is stationary.
Engaging transmission position P
Select this only when the vehicle is stationary.
Press buttonP.
Page 59 of 254

Controls
57Reference
At a glance
Driving tips
Communications
Navigation
Entertainment
Mobility
P Park
The rear wheels are locked.
P is engaged automatically when the following
conditions are met:
>The driver's door is opened while the
engine is running, your safety belt is not fas-
tened and neither the brake pedal nor the
accelerator are activated.
>The engine is switched off unless N is
engaged and the remote control is in the
ignition lock.
>The remote control is removed from the
ignition lock.
Kickdown
T o a cc ele ra te ra pidly, e.g., when passing, press
the accelerator down past the resistance point.
This provides maximum acceleration.
Activating the Sport program and
manual mode M/S
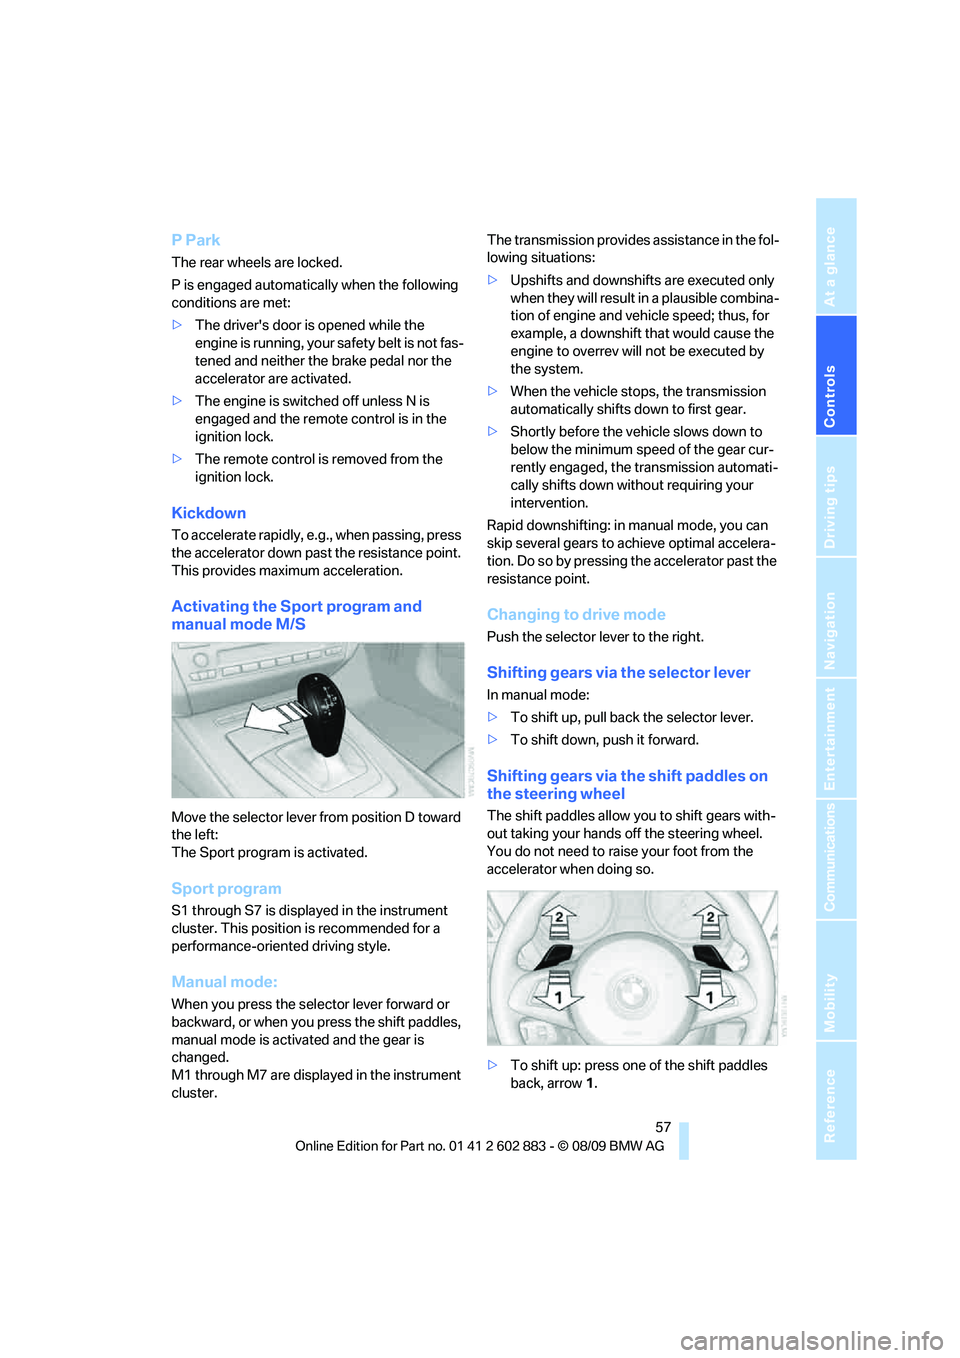
Move the selector lever from position D toward
the left:
The Sport program is activated.
Sport program
S1 through S7 is displayed in the instrument
cluster. This position is recommended for a
performance-oriented driving style.
Manual mode:
When you press the selector lever forward or
backward, or when you press the shift paddles,
manual mode is activated and the gear is
changed.
M1 through M7 are displayed in the instrument
cluster.The transmission provides assistance in the fol-
lowing situations:
>Upshifts and downshifts are executed only
when they will result in a plausible combina-
tion of engine and vehicle speed; thus, for
example, a downshift that would cause the
engine to overrev will not be executed by
the system.
>When the vehicle stops, the transmission
automatically shifts down to first gear.
>Shortly before the vehicle slows down to
below the minimum speed of the gear cur-
rently engaged, the transmission automati-
cally shifts down without requiring your
intervention.
Rapid downshifting: in manual mode, you can
skip several gears to achieve optimal accelera-
tion. Do so by pressing the accelerator past the
resistance point.
Changing to drive mode
Push the selector lever to the right.
Shifting gears via the selector lever
In manual mode:
>To shift up, pull back the selector lever.
>To shift down, push it forward.
Shifting gears via the shift paddles on
the steering wheel
The shift paddles allow you to shift gears with-
out taking your hands off the steering wheel.
You do not need to raise your foot from the
accelerator when doing so.
>To shift up: press one of the shift paddles
back, arrow1.
Page 62 of 254

Driving
60
Triple turn signal activation
Press the lever as far as the resistance point.
The turn signals flash once.
You can set whether it should flash once or
three times when activated.
1. Press the button.
2."Settings"
3."Lighting"
4."Triple turn signal"
The setting is stored for the remote control
currently in use.
Wiper system
1Switching on wipers
2Switching off wipers or brief wipe
3Activating/deactivating intermittent wipe or
rain sensor
*
4Cleaning windshield and headlamps
5Setting speed for intermittent wipe, or sen-
sitivity of the rain sensor
Switching on wipers
Press the lever upward, arrow 1.
The lever automatically returns to its initial posi-
tion when released.
Normal wiper speed
Press once.
The system switches to operation in the inter-
mittent mode when the vehicle is stationary.
Fast wiper speed
Press twice or press beyond the resistance
point.
The system switches to normal speed when the
vehicle is stationary.
Intermittent wipe or rain sensor*
If the car is not equipped with a rain sensor, the
intermittent-wipe time is a preset.
If the car is equipped with a rain sensor, the time
between wipes is controlled automatically and
depends on the intensity of the rainfall. The rain
sensor is mounted on the windshield, directly in
front of the interior rearview mirror.
Activating intermittent wipe or rain
sensor
Press the button, arrow3. The LED in the but-
ton lights up.
Setting speed for intermittent wipe or
sensitivity of the rain sensor
Turn knurled wheel5 up or down.
Page 66 of 254

Controls overview
64
Controls overview
Odometer, outside
temperature display, clock
1Knob in the instrument cluster
2Outside temperature display and clock
3Odometer and trip odometer
Knob in the instrument cluster
>To reset the trip odometer while the ignition
is switched on
>To display the time, outside temperature
and odometer briefly while the ignition is
switched off
Units of measure
To select the respective units of measure, miles
or km for the odometer as well as 7 or 6 for
the outside temperature, refer to page68.
The setting is stored for the remote control cur-
rently in use.
Time, outside temperature display
Setting the time, refer to page71.
Outside temperature warning
When the displayed temperature sinks to
approx. +377/+36, a signal sounds and a
warning lamp lights up. There is an increased
risk of black ice.Black ice can also form at temperatures
above +377/+36. You should there-
fore drive carefully on bridges and shaded
roads, for example; otherwise, there is an
increased risk of an accident.<
Odometer and trip odometer
Resetting trip odometer:
With the ignition switched on, press button1 in
the instrument cluster.
When the vehicle is parked
If you still want to view the time, outside tem-
perature and odometer reading briefly after the
remote control has been taken out of the igni-
tion lock:
Press button 1 in the instrument cluster.
Tachometer
Never force the engine speed up into the red
warning field, see arrow. In this range, the fuel
supply is interrupted to protect the engine.
Page 70 of 254

Controls overview
68
Settings and information
Operating principle
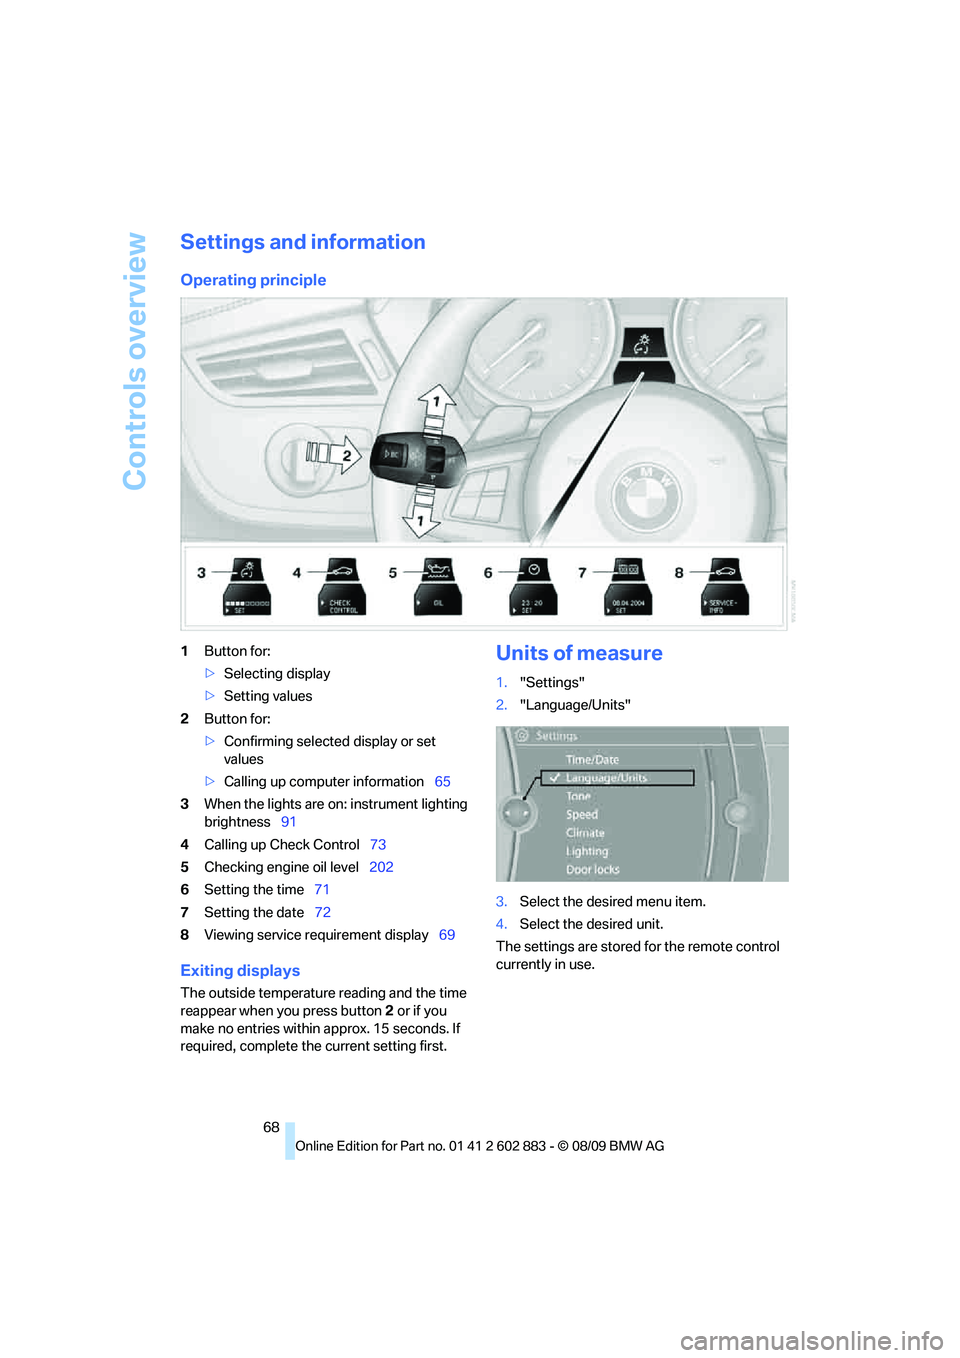
1Button for:
>Selecting display
>Setting values
2Button for:
>Confirming selected display or set
values
>Calling up computer information65
3When the lights are on: instrument lighting
brightness91
4Calling up Check Control73
5Checking engine oil level202
6Setting the time71
7Setting the date72
8Viewing service requirement display69
Exiting displays
The outside temperature reading and the time
reappear when you press button2 or if you
make no entries within approx. 15 seconds. If
required, complete the current setting first.
Units of measure
1."Settings"
2."Language/Units"
3.Select the desired menu item.
4.Select the desired unit.
The settings are stored for the remote control
currently in use.
Page 71 of 254

Controls
69Reference
At a glance
Driving tips
Communications
Navigation
Entertainment
Mobility
Service requirements
The remaining driving distance and the date of
the next scheduled service are displayed briefly
immediately after you start the engine or switch
on the ignition.
The extent of service work required can
be read out from the remote control by
your BMW Service Advisor.<
For certain maintenance operations, you can
view the respective distance remaining or due
date individually in the instrument cluster.
1.Switch on the ignition, refer to page50.
2.Push button 1 in the turn indicator lever up
or down repeatedly until the appropriate
symbol appears in the display, accompa-
nied by the words "SERVICE-INFO".
3.Press button 2.
4.Use button 1 to scroll through the individual
service items.