Page 94 of 136
Connect plug5.
Seat the intake air pipe inmount4.
Seat the intake air pipe inguides7of the air filterhousing. Take care not tobend the rubber seals of the airfilter element out of shape.
Install connecting flange2.
Install two screws1.
Install the right side panel(97).
Jump starting
The wires leading to thepower socket do not havea load-capacity rating adequatefor jump-starting the engine. Ex-cessively high current can leadto a cable fire or damage to thevehicle electronics.
Do not use the on-board socketto jump-start the engine of themotorcycle.
A short-circuit can res-ult if the crocodile clipsof the jump leads are accident-ally brought into contact with themotorcycle.
Use only jump leads fitted withfully insulated crocodile clips atboth ends.
8
92
zMaintenance
Page 95 of 136

Jump-starting with a donor-battery voltage higher than12 V can damage the vehicleelectronics.
Make sure that the battery of thedonor vehicle has a voltage ratingof 12 V.
Make sure the ground is leveland firm and place the motor-cycle on its stand.
Remove the seat (38).
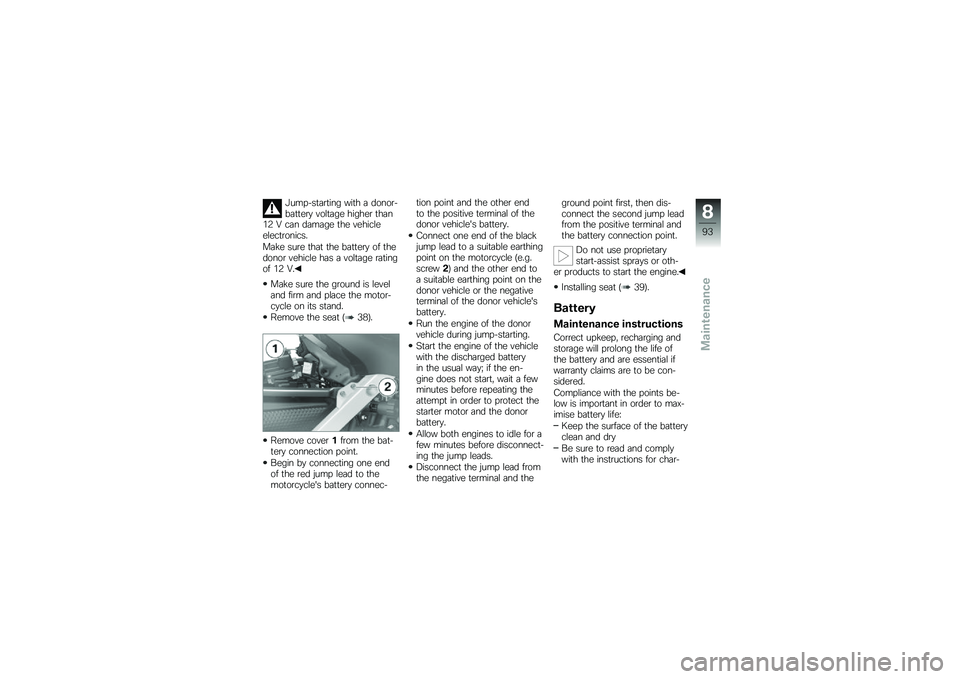
Remove cover1from the bat-tery connection point.
Begin by connecting one endof the red jump lead to themotorcycle's battery connec-
tion point and the other endto the positive terminal of thedonor vehicle's battery.
Connect one end of the blackjump lead to a suitable earthingpoint on the motorcycle (e.g.screw2) and the other end toa suitable earthing point on thedonor vehicle or the negativeterminal of the donor vehicle'sbattery.
Run the engine of the donorvehicle during jump-starting.
Start the engine of the vehiclewith the discharged batteryin the usual way; if the en-gine does not start, wait a fewminutes before repeating theattempt in order to protect thestarter motor and the donorbattery.
Allow both engines to idle for afew minutes before disconnect-ing the jump leads.
Disconnect the jump lead fromthe negative terminal and the
ground point first, then dis-connect the second jump leadfrom the positive terminal andthe battery connection point.
Do not use proprietarystart-assist sprays or oth-er products to start the engine.
Installing seat (39).
Battery
Maintenance instructions
Correct upkeep, recharging andstorage will prolong the life ofthe battery and are essential ifwarranty claims are to be con-sidered.
Compliance with the points be-low is important in order to max-imise battery life:
Keep the surface of the batteryclean and dry
Be sure to read and complywith the instructions for char-
8
93
zMaintenance
Page 96 of 136

ging the battery on the follow-ing pages
Do not turn the battery upsidedown
If the battery is not discon-nected, the on-board elec-tronics (e.g. clock, etc.) graduallydrain the battery. This can causethe battery to run flat. If this hap-pens, warranty claims will not beaccepted.
If the motorcycle is to be out ofuse for more than four weeks,disconnect the battery or con-nect a suitable trickle charger tothe battery.
Charging battery when
connected
Charging the connectedbattery directly at the bat-tery terminals can damage thevehicle electronics.
Always disconnect the batteryfrom the on-board circuits be-
fore recharging it with a chargerconnected directly to the batteryposts.
If you switch on the igni-tion and the multifunctiondisplay and telltale lights fail tolight up, the battery is completelyflat. Attempting to charge a com-pletely flat battery via the on-board socket can cause damageto the motorcycle's electronics.
If a battery has discharged to theextent that it is completely flat, ithas to be disconnected from theon-board circuits and chargedwith the charger connected dir-ectly to the battery posts.
With the battery connectedto the motorcycle's on-boardelectrical system, charge onlyvia the power socket.
Comply with the operating in-structions of the charger.
Charging battery when
disconnected
Charge the battery using asuitable charger.
Comply with the operating in-structions of the charger.
Once the battery is fullycharged, disconnect thecharger's terminal clips fromthe battery terminals.
The battery has to be re-charged at regular intervalsin the course of a lengthy periodof disuse. See the instructionsfor caring for your battery. Al-ways fully recharge the batterybefore restoring it to use
Removing battery
Switch off the ignition.
Remove the centre trim panel(100).
8
94
zMaintenance
Page 97 of 136
Push back cover1of the bat-tery's positive terminal.
Disconnection in the wrongsequence increases the riskof short-circuits.
Always proceed in the correctsequence.
Disconnect negative lead2first.
Then disconnect positivelead3.
Disengage battery retainingstrap4and disconnect breath-er hose5.
Lift the battery up and out;work it slightly back and forthif it is difficult to remove.
Install the battery
Install the battery, making sureto connect breather hose5.
Install battery retaining strap4.
Connect positive lead3first.
Then connect negative lead2.
Push cover1into position overthe battery positive terminal.
Install the centre trim panel(100).
Setting clock (29).
Checking battery-acid
level
Check the acid level regularlyat intervals of approximatelythree months.
Remove the battery (94).
Check the acid level at mark1.
8
95
zMaintenance
Page 98 of 136
Specified level, batteryfluid
distilled water
Between MIN and MAXmarks
If the acid level is below the MINmark:
Top up the battery acid withdistilled water to the specifiedlevel.
Body panels
Removing right side panel
Make sure the ground is leveland firm and place the motor-cycle on its stand.
Remove four screws1and re-move the flashing turn indicatorwith the side panel.
Disconnect plug2.
Remove the seat (38).
Remove two screws3.
8
96
zMaintenance
Page 99 of 136
Slacken screw4.
Pull the side panel out of themount at position5, then workthe side panel up and clear ofthe motorcycle.
Installing right side panel
Seat the side panel in thecentre trim panel at points6and push it into mount5.
Tighten screw4.
Install two screws3.
Installing seat (39).
Connect plug2.
8
97
zMaintenance
Page 100 of 136
Hold the flashing turn indicatorwith side panel in position andinstall four screws1.
Removing left side panel
Make sure the ground is leveland firm and place the motor-cycle on its stand.
Remove four screws1and re-move the flashing turn indicatorwith the side panel.
Disconnect plug2.
Remove the seat (38).
Remove two screws3.
Remove oil filler cap4.
Slacken screw5.
8
98
zMaintenance
Page 101 of 136
Pull the side panel out of themount at position6, then workthe side panel up and clear ofthe motorcycle. In this process,take care not to damage rubberboot7.
Installing left side panel
Lower the side panel over theoil filler neck from above. Inthis process, take care not todamage rubber boot7.
Seat the side panel in thecentre trim panel at points8and push it into mount6.
Tighten screw5.
Install oil filler cap4.
Install two screws3.
Installing seat (39).
8
99
zMaintenance