Page 73 of 136

with centre standOE
Make sure the ground is leveland firm and place the motor-cycle on its centre stand.
Move the handlebars to thestraight-ahead position.
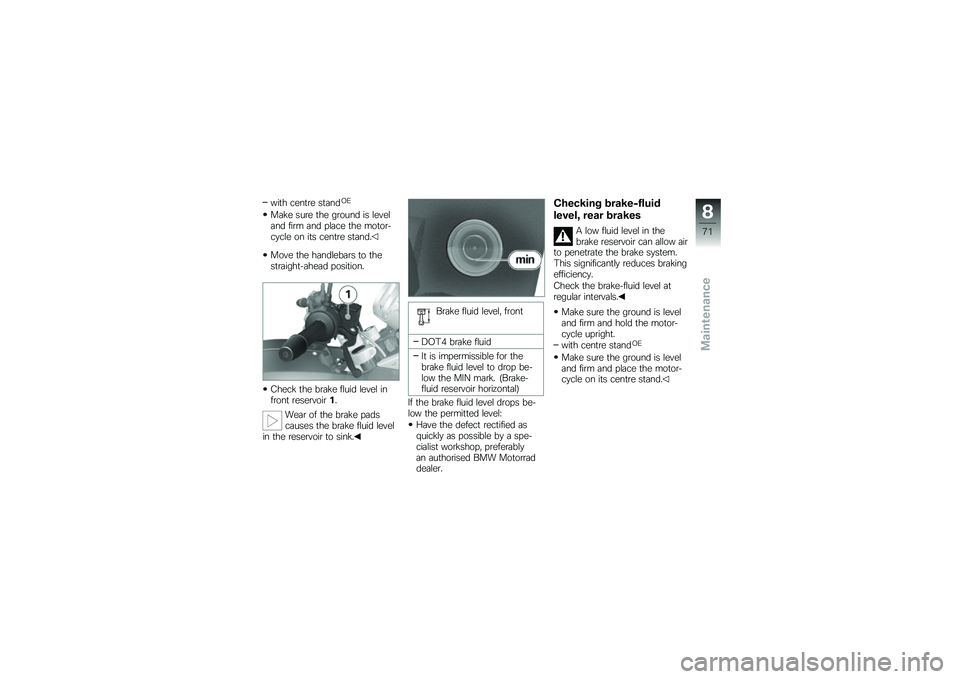
Check the brake fluid level infront reservoir1.
Wear of the brake padscauses the brake fluid levelin the reservoir to sink.
Brake fluid level, front
DOT4 brake fluid
It is impermissible for thebrake fluid level to drop be-low the MIN mark. (Brake-fluid reservoir horizontal)
If the brake fluid level drops be-low the permitted level:
Have the defect rectified asquickly as possible by a spe-cialist workshop, preferablyan authorised BMW Motorraddealer.
Checking brake-fluid
level, rear brakes
A low fluid level in thebrake reservoir can allow airto penetrate the brake system.This significantly reduces brakingefficiency.
Check the brake-fluid level atregular intervals.
Make sure the ground is leveland firm and hold the motor-cycle upright.
with centre standOE
Make sure the ground is leveland firm and place the motor-cycle on its centre stand.
8
71
zMaintenance
Page 74 of 136
Check the brake fluid level inrear reservoir1.
Wear of the brake padscauses the brake fluid levelin the reservoir to sink.
Brake fluid level, rear
DOT4 brake fluid
It is impermissible for thebrake fluid level to drop be-low the MIN mark. (Brake-fluid reservoir horizontal)
If the brake fluid level drops be-low the permitted level:
Have the defect rectified asquickly as possible by a spe-cialist workshop, preferablyan authorised BMW Motorraddealer.
Coolant
Checking coolant level
Make sure the ground is leveland firm and place the motor-cycle on its stand.
Check the coolant level in ex-pansion tank1.
8
72
zMaintenance
Page 80 of 136
Release axle clamping screw2.
Remove axle3, while support-ing the wheel.
Do not remove the grease fromthe axle.
Roll the front wheel forward toremove.
Remove spacing bushings4and5from the wheel hub.
Installing front wheel
Slip spacing bushings5and4onto the wheel hub.
The front wheel must beinstalled right way round torotate in the correct direction.
Note the direction-of-rotation ar-rows on the tyre or the wheelrim.
Roll the front wheel into posi-tion between the forks, makingsure that the brake disc passesbetween the brake pads.
Raise the front wheel, insertaxle3and tighten to specifiedtorque.
8
78
zMaintenance
Page 83 of 136
Remove quick-release axle5,supporting the rear wheel asyou do so.
Roll the rear wheel back untilit is clear of the swinging arm,while holding the brake caliperon the left-hand side.
The sprocket and thespacer sleeves on leftand right are loose fits in thewheel. Make sure that theseparts are not damaged or lost onremoval.
Install the rear wheel
Threaded fasteners nottightened to the specifiedtorque can work loose or theirthreads can suffer damage.
Always have the security of thefasteners checked by a specialistworkshop, preferably an author-ised BMW Motorrad dealer.
Make sure that the brake cal-iper moves on guide6.
Roll the rear wheel into theswinging arm, making sure thatthe brake disc passes betweenthe brake pads.
Lift the rear wheel and workquick-release axle5throughthe swinging arm, the brakecaliper and the rear wheel.
8
81
zMaintenance
Page 104 of 136

Care products
BMW Motorrad recommendsthat you use the cleaning andcare products you can obtainfrom your authorised BMWMotorrad dealer. The substancesin BMW Care Products havebeen tested in laboratories and inpractice; they provide optimisedcare and protection for thematerials used in your vehicle.
The use of unsuitablecleaning and care productscan damage vehicle components.
Do not use solvents such as cel-lulose thinners, cold cleaners,fuel or the like, and do not usecleaning products that containalcohol.
Washing motorcycle
BMW Motorrad recommendsthat you use BMW insect re-mover to soften and wash offinsects and stubborn dirt on
painted parts prior to washingthe motorcycle.
To prevent stains, do not washthe motorcycle immediately afterit has been exposed to strongsunlight and do not wash it in thesun.
Make sure that the motorcycleis washed frequently, especiallyduring the winter months.
To remove road salt, clean themotorcycle with cold water im-mediately after every trip.
After the motorcycle hasbeen washed, riddenthrough water or ridden inthe rain, the brake discs andpads might be wet and thebrakes might not take effectimmediately.
Apply the brakes in good timeuntil the brake discs and brakepads have dried out.
Warm water intensifies theeffect of salt.
Use only cold water to wash offroad salt.
The high pressure of steamcleaners can damage seals,the hydraulic brake system, theelectrical system, and the seat.
Do not use a steam jet or high-pressure cleaning equipment.
Cleaning easily
damaged components
Plastics
Clean plastic parts with waterand BMW plastic care emulsion.This includes in particular:
Windscreen and slipstream de-flectors
Headlight lens made of plastic
Glass cover of the instrumentcluster
Black, unpainted parts
9
102
zCare
Page 105 of 136

If plastic parts are cleanedusing unsuitable cleaningagents, the surfaces can be dam-aged.
Do not use cleaning agents thatcontain alcohol, solvents or ab-rasives to clean plastic parts.
Even fly-remover pads or clean-ing pads with hard surfaces canproduce scratches.
Soften stubborn dirt andinsects by covering the af-fected areas with a wet cloth.
Chrome
Use plenty of water and BMWshampoo to clean chrome, par-ticularly if it has been exposed toroad salt. Use chrome polish foradditional treatment.
Radiator
Clean the radiator regularly toprevent overheating of the en-gine due to inadequate cooling.
For example, use a garden hosewith low water pressure.
Cooling fins can be benteasily.
Take care not to bend the finswhen cleaning the radiator.
Rubber
Treat rubber components withwater or BMW rubber-careproducts.
Using silicone sprays forthe care of rubber seals cancause damage.
Do not use silicone sprays orother care products that containsilicon.
Paint care
Washing the motorcycle regularlywill help counteract the long-termeffects of substances that dam-age the paint, especially if yourmotorcycle is ridden in areaswith high air pollution or naturalsources of dirt, for example treeresin or pollen.
Remove particularly aggressivesubstances immediately, how-ever, as otherwise the paint canbe affected or become discol-oured. Substances of this natureinclude spilt fuel, oil, grease,brake fluid and bird droppings.We recommend BMW vehiclepolish or BMW paint cleaner forthis purpose.
Marks on the paintwork are par-ticularly easy to see after themotorcycle has been washed.Remove stains of this kind im-mediately, using cleaning-gradebenzene or petroleum spirit on aclean cloth or ball of cotton wool.
9
103
zCare
Page 131 of 136

AAbbreviations and symbols, 6
ABSControl, 18
Engineering details, 54
Self-diagnosis, 45
Switching off and on, 33
Warnings, 23
AccessoriesNotes, 58
Air filterPosition on the motorcycle, 13
Replacing, 91
BBatteryCharging battery whenconnected, 94
Charging battery whendisconnected, 94
Installation, 95
Maintenance instructions, 93
Removal, 94
Stowage, 11
BMW Motorrad service, 120
Brake fluidChecking fluid levels, 70
Reservoir, front, 13
Reservoir, rear, 13
Brake padsChecking brake-padthickness, 68
Running in, 46
BrakesChecking operation, 68
Notes, 47
Technical data, 113
BulbsNotes on replacement, 85
Replacing brake-light bulb, 90
Replacing high-beam headlightbulb, 85
Replacing low-beam headlightbulb, 85
Replacing rear light bulb, 90
Replacing side-light bulb, 87
Replacing turn indicatorbulb, 88
Technical data, 115
CCare, 101
CaseOperation, 59
ChainAdjusting sag, 76
Checking sag, 75
Checking wear, 76
Lubricating, 75
Checklist, 44
Clock, 15Adjusting, 29
ClutchAdjusting clutch lever, 34
Adjusting handlebar-leverplay, 74
Checking play, 73
Technical data, 111
Confirmation of maintenancework, 122
CoolantChecking fluid level, 72
Fore-and-aft tilt indicator, 11
Topping up, 73
12
129
zIndex