2010 BMW 650I COUPE power steering
[x] Cancel search: power steeringPage 62 of 252

Driving
60 position is recommended for a performance-
oriented driving style.
When the selector lever is pressed forward or
back, the manual mode is activated and the
Steptronic shifts the gear. The instrument clus-
ter shows M1 through M6.
Upshifts and downshifts are only carried out at a
suitable engine and vehicle speed, e.g. a down-
shift is not carried out at excessively high
engine speeds. The selected gear is briefly dis-
played in the instrument cluster, followed by the
current gear.
To resume automatic mode, press the selector
lever to the right.
Shift paddles on steering wheel
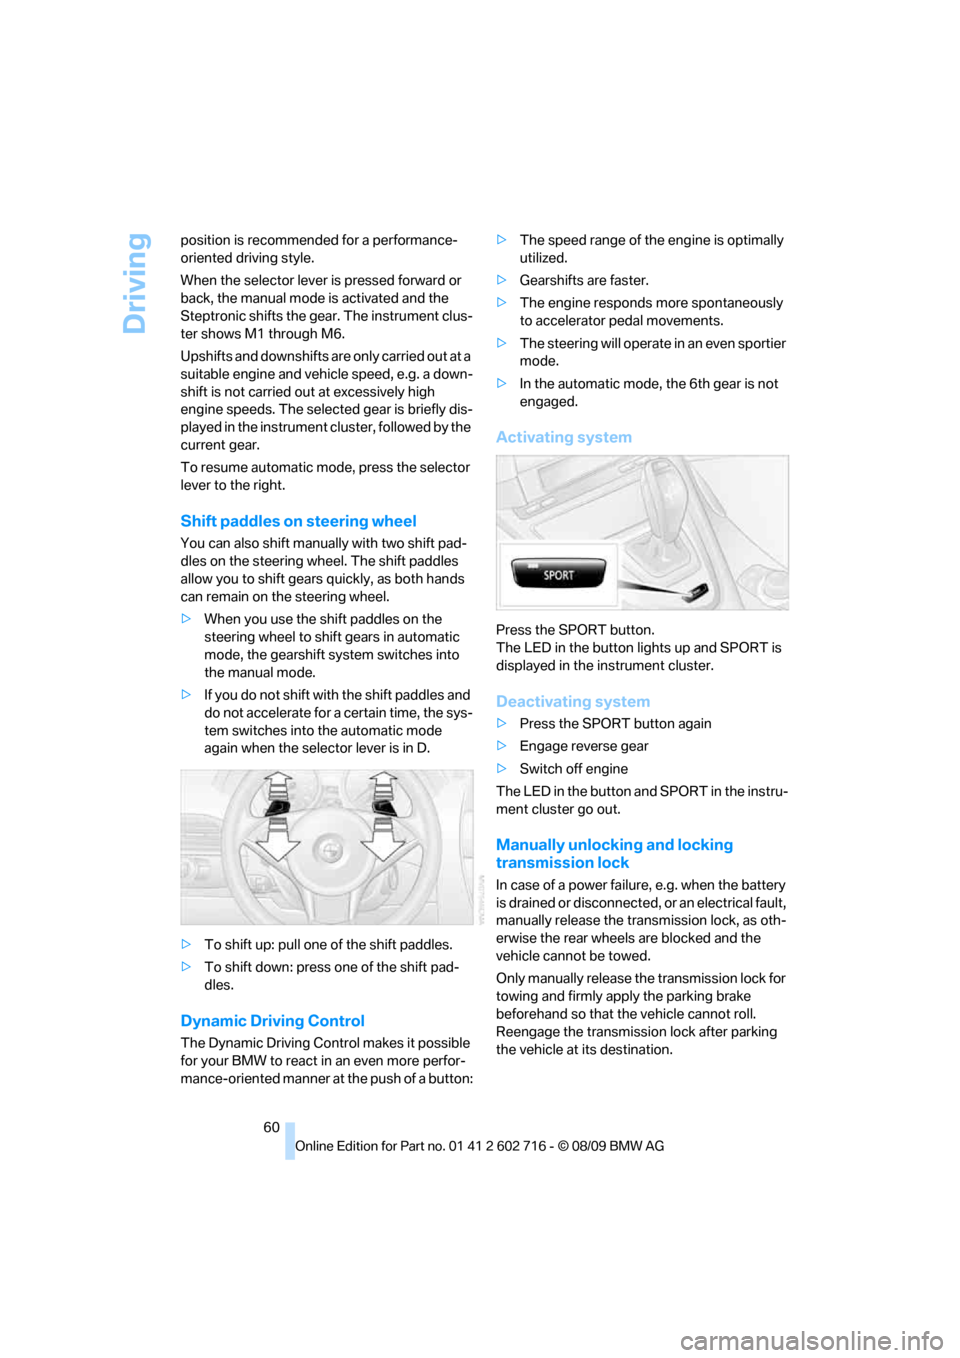
You can also shift manually with two shift pad-
dles on the steering wheel. The shift paddles
allow you to shift gears quickly, as both hands
can remain on the steering wheel.
>When you use the shift paddles on the
steering wheel to shift gears in automatic
mode, the gearshift system switches into
the manual mode.
>If you do not shift with the shift paddles and
do not accelerate for a certain time, the sys-
tem switches into the automatic mode
again when the selector lever is in D.
>To shift up: pull one of the shift paddles.
>To shift down: press one of the shift pad-
dles.
Dynamic Driving Control
The Dynamic Driving Control makes it possible
for your BMW to react in an even more perfor-
mance-oriented manner at the push of a button:>The speed range of the engine is optimally
utilized.
>Gearshifts are faster.
>The engine responds more spontaneously
to accelerator pedal movements.
>The steering will operate in an even sportier
mode.
>In the automatic mode, the 6th gear is not
engaged.
Activating system
Press the SPORT button.
The LED in the button lights up and SPORT is
displayed in the instrument cluster.
Deactivating system
>Press the SPORT button again
>Engage reverse gear
>Switch off engine
The LED in the button and SPORT in the instru-
ment cluster go out.
Manually unlocking and locking
transmission lock
In case of a power failure, e.g. when the battery
is drained or disconnected, or an electrical fault,
manually release the transmission lock, as oth-
erwise the rear wheels are blocked and the
vehicle cannot be towed.
Only manually release the transmission lock for
towing and firmly apply the parking brake
beforehand so that the vehicle cannot roll.
Reengage the transmission lock after parking
the vehicle at its destination.
Page 185 of 252

183
Entertainment
Reference
At a glance
Controls
Driving tips Communications
Navigation
Mobility
that the mobile phone can engage in the
snap-in adapter.
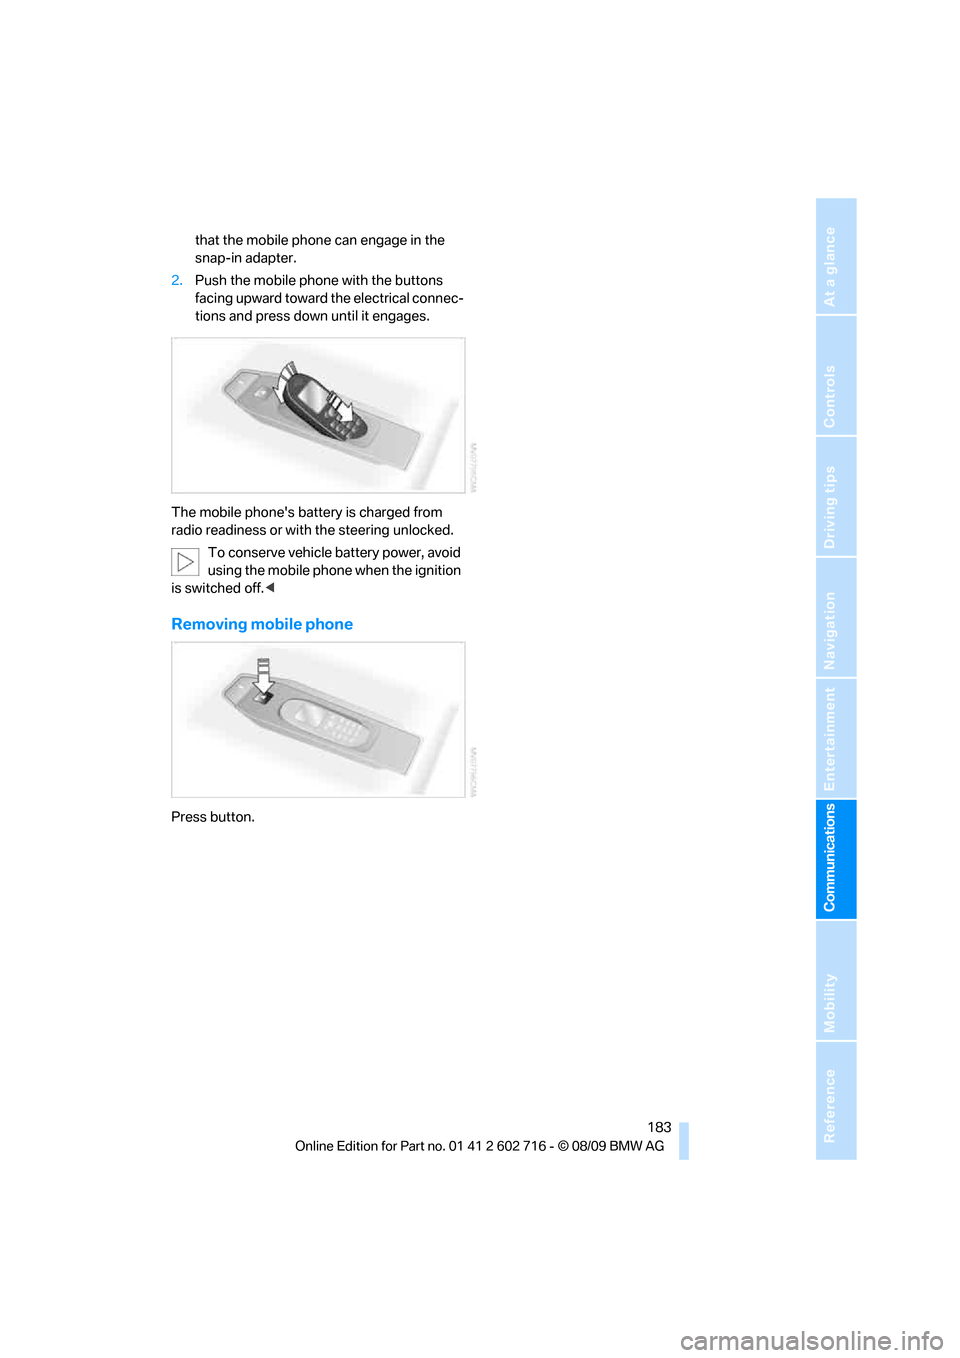
2.Push the mobile phone with the buttons
facing upward toward the electrical connec-
tions and press down until it engages.
The mobile phone's battery is charged from
radio readiness or with the steering unlocked.
To conserve vehicle battery power, avoid
using the mobile phone when the ignition
is switched off.<
Removing mobile phone
Press button.
Page 217 of 252

Mobility
215Reference
At a glance
Controls
Driving tips
Communications
Navigation
Entertainment
>Seat, mirror and steering wheel* memory
The positions must be stored again, refer to
page47.
>Time and date
Must be updated again, refer to page76.
>Radio
Radio stations need to be stored again,
refer to page150.
>Navigation system
You must wait until the system becomes
functional again, refer to page126.
>Glass roof, electric
It may not be possible to move the glass
roof. The system must be initialized, refer to
page38.
>Active steering
The system automatically initializes itself
briefly during a trip. The system is deacti-
vated during this time, refer to page89.
>Power windows
The pinch prevention system for the power
windows must be reinitialized, refer to
page36.
Talk to your BMW center before placing
the stored vehicle back in service. <
Fuses
Never attempt to repair a blown fuse and
do not replace a defective fuse with a sub-
stitute of another color or amperage rating, as
this could lead to a circuit overload, ultimately
resulting in a fire in the vehicle.<
Spare fuses and a pair of plastic tweezers are
located in the compartment for the onboard tool
kit, refer to page212.
Information on fuse allocation is located below
the bracket for the onboard tool kit, see below.
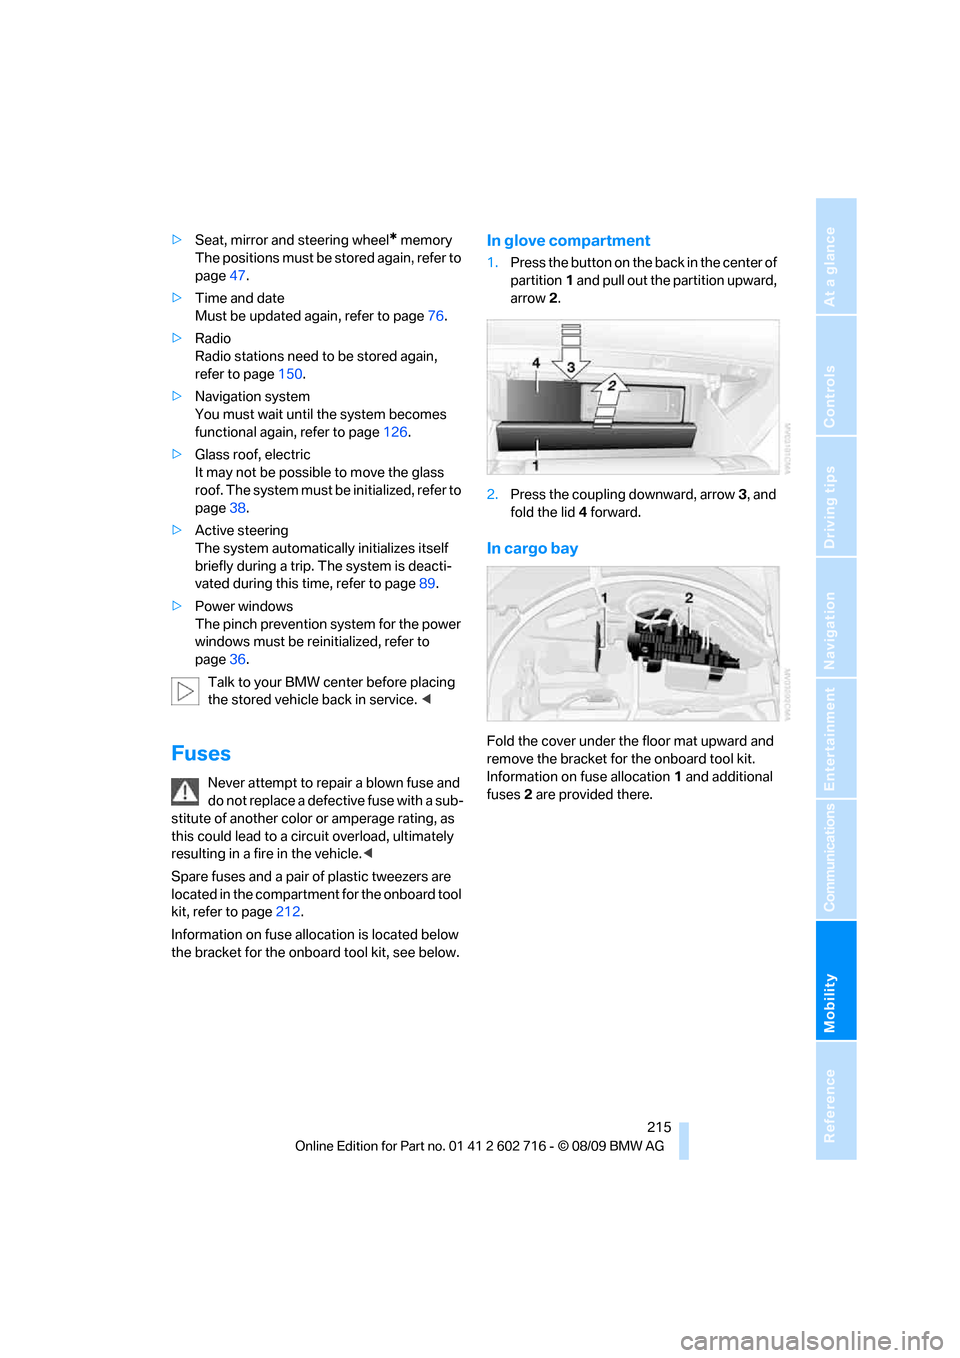
In glove compartment
1.Press the button on the back in the center of
partition1 and pull out the partition upward,
arrow2.
2.Press the coupling downward, arrow3, and
fold the lid 4 forward.
In cargo bay
Fold the cover under the floor mat upward and
remove the bracket for the onboard tool kit.
Information on fuse allocation1 and additional
fuses2 are provided there.
Page 221 of 252

Mobility
219Reference
At a glance
Controls
Driving tips
Communications
Navigation
Entertainment
Access to screw thread
Press the arrow symbol on the cover in the
bumper.
Front
Rear
Being towed
Make sure that the ignition is switched on,
refer to page56, otherwise the low
beams, tail lamps, turn signals and windshield
wipers would not be available. Do not tow the
vehicle with the rear axle raised, as otherwise
the steering can turn to the left or right.When
the engine is stopped, there is no power assist.
This then requires increased effort for braking
and steering. Active steering is deactivated and
larger steering wheel movements are
required.<
Switch on the hazard warning flashers depend-
ing on the local regulations. If the electrical sys-
tem fails, mark the vehicle to be towed, e.g. with
a sign or warning triangle in the rear window.
Manual transmission
Gearshift lever in neutral position.
Sport automatic transmission
Before towing, manually release the
transmission lock, even if there is no mal-
function in the transmission. Otherwise there is
a risk that the transmission lock will engage dur-
ing towing.<
Manually unlocking and locking transmission
lock, refer to page60.
Do not exceed a towing speed of
45 mph/70 km/h and a towing distance of
90 miles/150 km; otherwise, the sport auto-
matic transmission may be damaged.<
Towing methods
Do not lift vehicle by tow fitting or body
and chassis parts; otherwise, damage
may result.<
In some countries, towing with tow bars or
ropes in public traffic is not permitted. Familiar-
ize yourself with the regulations on towing in the
respective country.
With tow bar
The towing vehicle may not be lighter
than the vehicle to be towed, otherwise it
will not be possible to reliably control vehicle
response.<
The tow fittings used should be on the same
side on both vehicles. Should it prove impossi-
ble to avoid mounting the tow bar at an offset
angle, please observe the following:
>Clearance and maneuvering capability will
be sharply limited during cornering.
>When mounted at an angle, the tow bar will
exert lateral forces, tending to push the
vehicle sideways.
Only attach the tow bar to the tow fittings,
as attachment to other vehicle parts can
lead to damage.<
With tow rope
When starting off in the towing vehicle, make
sure that the tow rope is taut.
To avoid jerking and the associated
stresses on vehicle components when
Page 243 of 252

Reference 241
At a glance
Controls
Driving tips
Communications
Navigation
Entertainment
Mobility
Indicator/warning lamps
– ABS Antilock Brake
System84
– active steering89
– airbags92
– brake system84
– DSC13,84
– DTC13,84
– Flat Tire Monitor86
– fog lamps13,102
– parking brake13,58
– safety belt warning50
– TPM Tire Pressure
Monitor88
Indicator and warning lamps
– overview13
Inflation pressure, refer to Tire
inflation pressure196
Inflation pressure monitoring,
refer to Flat Tire Monitor85
Inflation pressure monitoring,
refer to Tire Pressure
Monitor87
Initializing
– Flat Tire Monitor86
– radio, refer to Storing
stations150
– refer to Power failure214
– refer to Setting time and
date77
– seat, mirror and steering
wheel memory47
Instructions for navigation
system, refer to Voice
instructions137
Instrument cluster12
Instrument illumination, refer
to Instrument lighting102
Instrument lighting102
Instrument panel, refer to
Cockpit10
Instrument panel, refer to
Instrument cluster12
Integrated key26
Integrated universal remote
control109
Interactive map132Interior lamps102
– switching on with remote
control28
Interior motion sensor33
– switching off34
Interior rearview mirror,
automatic dimming
feature52
Intermittent mode of the
wipers62
Intersection, entering for
navigation128
iPod, connecting, refer to
AUX-IN port166
iPod, connecting, refer to USB
audio interface166
J
Jacking points214
Joystick, refer to iDrive16
Jumpering, refer to Jump
starting217
Jump starting217
K
Keyless-Go, refer to Comfort
Access34
Keyless opening and closing,
refer to Comfort Access34
Key Memory, refer to Personal
Profile26
Keys26
– key-related settings, refer to
Personal Profile26
– spare key26
Kickdown, Sport automatic
transmission59
Knee airbags90
Knock control195
L
Lamps
– refer to High-beam
Assistant100
– refer to Parking lamps/low
beams98Lamps and bulbs212
Lane demarcation lines, refer
to Lane Departure
Warning96
Lane Departure Warning96
Lashing eyes, refer to
Securing cargo122
Last destinations130
LATCH child restraint fixing
system54
Leather care210
LEDs light-emitting
diodes212
Length, refer to
Dimensions225
License plate lamp, replacing
bulbs214
Light Control, refer to
Adaptive Light Control99
Light-emitting diodes
LEDs212
Lighter113
Lighting
– instruments102
– lamps and bulbs212
– of the vehicle, refer to
Lamps98
Light switch98
Loading
– securing cargo122
– stowing cargo121
– vehicle120
Loading, refer to Cargo
loading120
Load securing equipment,
refer to Securing cargo122
Lock buttons in the doors,
refer to Locking30
Locking28
– confirmation signals29
– from inside30
– from outside28
– without key, refer to Comfort
Access34
– without key, refer to Comfort
access34