2010 BMW 650I COUPE change time
[x] Cancel search: change timePage 87 of 252

Controls
85Reference
At a glance
Driving tips
Communications
Navigation
Entertainment
Mobility
Display of the previously described
malfunction in Canadian models.
The DSC indicator lamp lights up. A
message appears on the Control Dis-
play. A malfunction has occurred in the
DSC and DTC. The stabilizing actions are no
longer available. The vehicle remains opera-
tional. Have the system checked as soon as
possible.
The brake system warning lamp lights
up yellow. A message appears on the
Control Display. The brake assistant is
defective. Have the system checked as soon as
possible.
Display of the previously described
malfunction in Canadian models.
Drive-off assistant
The drive-off assistant enables you to start off
conveniently on slopes. The parking brake is
not required for this purpose.
1.Hold the vehicle with the brake.
2.Release the brake and begin to drive imme-
diately.
After releasing the brake, begin to drive
immediately; otherwise, the drive-off
assistant no longer holds the vehicle after
approx. 2 seconds and your vehicle will start to
roll backward.<
Dynamic Drive*
The concept
Dynamic Drive minimizes body roll and opti-
mizes vehicle stability during cornering and
evasive maneuvers.Dynamic Drive is based on active stabilizers on
the front and rear axles. Suspension compli-
ance adapts to suit driving conditions, varying
from performance-oriented during cornering to
smooth and comfort-oriented when the vehicle
is proceeding in a straight line. During vehicle
operation, the system continuously runs
through closed-loop control cycles lasting only
fractions of a second.
The system assumes operational status each
time you start the engine.
FTM Flat Tire Monitor*
The concept
The Flat Tire Monitor detects a pressure loss in
one tire by comparing the speeds of the individ-
ual wheels during driving.
In the event of a pressure loss, there is a change
in the rolling circumference and therefore the
rotation speed of the corresponding wheel. The
system detects this change and reports it as a
flat tire.
Functional requirement
The system must have been initialized when the
tire inflation pressure was correct; otherwise,
reliable signaling of a flat tire is not ensured.
The initialization must be repeated after
every correction of the tire inflation pres-
sure and after every tire or wheel change.<
System limits
The Flat Tire Monitor is unable to warn
the driver of sudden, severe tire damage
caused by external factors, nor can it identify
the gradual loss of pressure that will inevitably
occur in all four tires over a lengthy period of
time.<
In the following situations, the system could be
delayed or malfunction:
>System has not been initialized
>Driving on snowy or slippery road surface
Page 88 of 252

Technology for comfort, convenience and safety
86 >Sporty driving style: slip in the drive wheels,
high lateral acceleration
>Driving with snow chains
*
Initializing system
The initialization finishes during driving,
which can be interrupted at any time.
When driving resumes, the initialization is con-
tinued automatically. The system is initialized
after this activation phase.
The initialization process adopts the set infla-
tion tire pressures as reference values for the
detection of a flat tire. Initialization is started by
confirming the inflation pressures.
The system is not initialized when traveling with
snow chains
*.<
iDrive, for operating principle refer to page16.
1."Vehicle Info"
2."Vehicle status"
3."Reset"
4.Start the engine - do not drive away.
5.Start the initialization using "Reset".
"Activating…" is displayed on the Control
Display.
6.Start to drive.
The initialization finishes during driving, which
can be interrupted at any time. "Flat Tire Moni-
tor active" is displayed on the Control Display.
Indication of a flat tire
The warning lamp lights up red. A mes-
sage appears on the Control Display.
In addition, an acoustic signal sounds.
There is a flat tire or extensive inflation pressure
loss.1.Cautiously reduce the vehicle speed to
below 50 mph/80 km/h. Avoid severe brak-
ing and steering maneuvers and do not
exceed a speed of 50 mph/80 km/h.
Stop driving if the vehicle is no longer
equipped with run-flat tires, as it was
when it came from the factory, refer to
page200. Continued driving after a flat tire
can result in serious accidents.<
2.At the next opportunity, check the air pres-
sure in all four tires.
If the tire inflation pressure in all four
tires is correct, the Flat Tire Monitor
may not have been initialized. The system
must then be initialized.<
3.In the event of complete tire pressure loss,
0 psi/0 kPa, you can estimate the possible
distance for continued driving on the basis
of the following guide values:
>With a light load:
1 to 2 persons without luggage:
approx. 155 miles/250 km
>With a medium load:
2 persons, cargo bay full, or
4 persons without luggage:
approx. 94 miles/150 km
>With a full load:
4 persons, luggage compartment full:
approx. 30 miles/50 km
Drive reservedly and do not exceed a
speed of 50 mph/80 km/h. In the
event of pressure loss, vehicle handling
changes. This includes reduced tracking
stability in braking, extended braking dis-
tance and altered natural steering charac-
teristics.
When towing a trailer, heavy trailers in par-
ticular can begin to swing back and forth.
Therefore, do not exceed 35 mph/60 km/h,
otherwise there is the danger of an acci-
dent.
If unusual vibrations or loud noises occur
while the vehicle is being driven, this can
indicate final failure of the damaged tire.
Reduce speed and stop at a suitable loca-
tion as soon as possible, otherwise pieces
of the tire could become detached and
Page 90 of 252

Technology for comfort, convenience and safety
88 Resetting finishes during driving, which can be
interrupted at any time. When driving resumes,
resetting is continued automatically.
iDrive, for operating principle refer to page16.
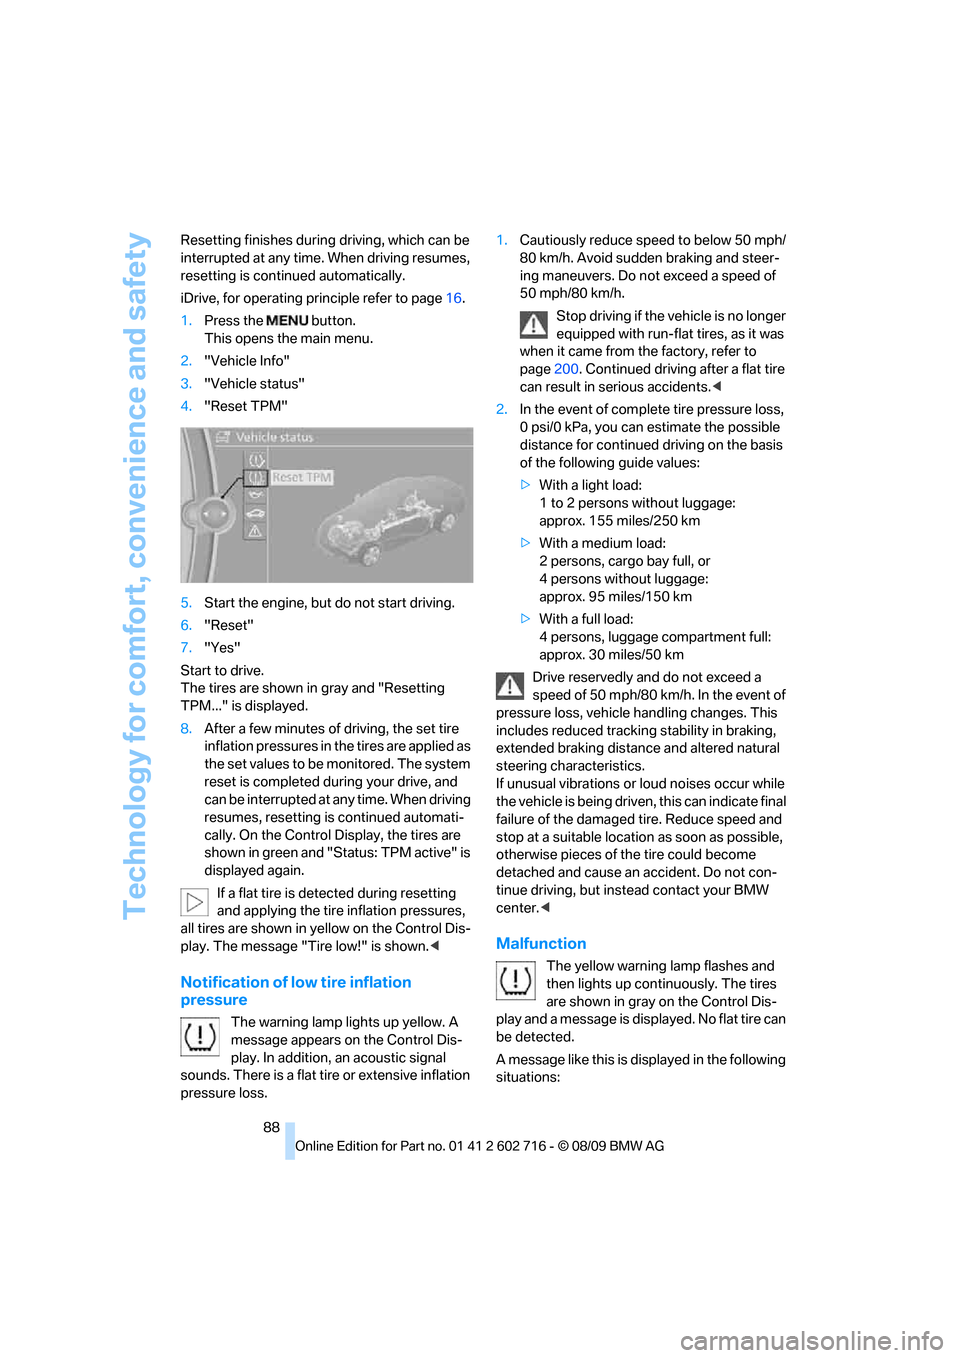
1.Press the button.
This opens the main menu.
2."Vehicle Info"
3."Vehicle status"
4."Reset TPM"
5.Start the engine, but do not start driving.
6."Reset"
7."Yes"
Start to drive.
The tires are shown in gray and "Resetting
TPM..." is displayed.
8.After a few minutes of driving, the set tire
inflation pressures in the tires are applied as
the set values to be monitored. The system
reset is completed during your drive, and
can be interrupted at any time. When driving
resumes, resetting is continued automati-
cally. On the Control Display, the tires are
shown in green and "Status: TPM active" is
displayed again.
If a flat tire is detected during resetting
and applying the tire inflation pressures,
all tires are shown in yellow on the Control Dis-
play. The message "Tire low!" is shown.<
Notification of low tire inflation
pressure
The warning lamp lights up yellow. A
message appears on the Control Dis-
play. In addition, an acoustic signal
sounds. There is a flat tire or extensive inflation
pressure loss.1.Cautiously reduce speed to below 50 mph/
80 km/h. Avoid sudden braking and steer-
ing maneuvers. Do not exceed a speed of
50 mph/80 km/h.
Stop driving if the vehicle is no longer
equipped with run-flat tires, as it was
when it came from the factory, refer to
page200. Continued driving after a flat tire
can result in serious accidents.<
2.In the event of complete tire pressure loss,
0 psi/0 kPa, you can estimate the possible
distance for continued driving on the basis
of the following guide values:
>With a light load:
1 to 2 persons without luggage:
approx. 155 miles/250 km
>With a medium load:
2 persons, cargo bay full, or
4 persons without luggage:
approx. 95 miles/150 km
>With a full load:
4 persons, luggage compartment full:
approx. 30 miles/50 km
Drive reservedly and do not exceed a
speed of 50 mph/80 km/h. In the event of
pressure loss, vehicle handling changes. This
includes reduced tracking stability in braking,
extended braking distance and altered natural
steering characteristics.
If unusual vibrations or loud noises occur while
the vehicle is being driven, this can indicate final
failure of the damaged tire. Reduce speed and
stop at a suitable location as soon as possible,
otherwise pieces of the tire could become
detached and cause an accident. Do not con-
tinue driving, but instead contact your BMW
center.<
Malfunction
The yellow warning lamp flashes and
then lights up continuously. The tires
are shown in gray on the Control Dis-
play and a message is displayed. No flat tire can
be detected.
A message like this is displayed in the following
situations:
Page 93 of 252

Controls
91Reference
At a glance
Driving tips
Communications
Navigation
Entertainment
Mobility
In the event of malfunctions, deactivation, or
triggering of the airbag restraint system, have
the testing, repair, removal, and disposal of air-
bag generators executed only by a BMW center
or a workshop that works according to BMW
repair procedures with correspondingly trained
personnel and has the required explosives
licenses. Otherwise unprofessional attempts to
service the system could lead to failure in an
emergency or undesired airbag triggering,
either of which could result in personal injury.<
Warnings and information on the airbags is also
provided on the sun visors.
Automatic deactivation of front
passenger airbags
The occupation of the seat is detected by eval-
uating the impression on the occupied seat sur-
face of the front passenger seat. The system
correspondingly activates or deactivates the
front, knee and side airbags on the front pas-
senger side.
The current status of the front passenger
airbag, i.e. deactivated or activated, is
indicated by the indicator lamp over the interior
rearview mirror, refer to Operating state of front
passenger airbags in the following.<
Before transporting a child in the front
passenger seat, read the safety informa-
tion and follow the instructions under Trans-
porting children safely, refer to page53.
The front, knee and side airbags on the front
passenger side can be deactivated for teenag-
ers and adults in certain sitting positions; the
indicator lamp for the front passenger airbags
lights up when this occurs. In these cases,
change the sitting position so that the front pas-
senger airbags are activated and the indicator
lamp goes out. If the desired status cannot be
produced by changing the sitting position,
transport the corresponding person in the rear
seat.
Do not fit seat covers, seat cushion padding,
ball mats or other items onto the front passen-
ger seat unless they are specifically recom-
mended by BMW. Do not lay objects under the
seat which could press against the seat from below. Otherwise a correct evaluation of the
occupied seat surface cannot be ensured.<
Operating state of front passenger
airbags
The illustration here shows a possible arrange-
ment in the Coupe. With some vehicle equip-
ment packages or in the Convertible, the
arrangement of the switches and indicator
lamps may differ somewhat.
The indicator lamp for the front passenger air-
bags indicates the operating status of the front,
knee and side airbags on the front passenger
side depending on whether the seat is occu-
pied. The indicator lamp shows whether the
front passenger airbags are activated or deacti-
vated.
>The indicator lamp lights up when a child in
a child restraint system intended for the
purpose is properly detected on the seat.
The front, knee and side airbags on the front
passenger side are deactivated.
Most child seats are detected by the sys-
tem, especially the child seats required by
the NHTSA at the time the vehicle is manufac-
tured. After installing a child seat, make sure
that the indicator lamp for the front passenger
airbags lights up. This indicates that the child
seat has been detected and the front passenger
airbags are not activated.<
>The indicator lamp does not light up if, for
example, the system detects a person of
sufficient size seated correctly on the seat.
The front, knee and side airbags on the front
passenger side are activated.
>The indicator lamp does not light up when
the seat is empty.
Page 100 of 252

Lamps
98
Lamps
Parking lamps/low beams
0Lights off and daytime running lamps*
1Parking lamps and daytime running lamps*
2Low beams and welcome lamps
3Automatic headlamp control, daytime run-
ning lamps
*, welcome lamps, Adaptive
Light Control
* and High-beam Assistant*
If you open the driver's door with the ignition
switched off, the exterior lighting is switched off
when the light switch is in position2 or 3. The
daytime running lamps have already been
switched off at the same time as the ignition.
For this reason, switch on the side marker
lamps as needed, switch position1; otherwise,
the vehicle is not lit.
Parking lamps
In switch position1, the front, rear and side
vehicle lighting is switched on. You can use the
parking lamps for parking.
The parking lamps drain the battery. Do
not leave them switched on for long peri-
ods of time, otherwise it may no longer be pos-
sible to start the engine. It is preferable to
switch on the roadside parking lamps on one
side, refer to page100.<
Low beams
The low beams light up when the light switch is
in position 2 and the ignition is on.
Automatic headlamp control
In switch position3, the system activates the
low beams and switches them on or off in
response to changes in ambient light condi-
tions, for instance, in a tunnel, at dawn and dusk
and in case of precipitation. Adaptive Light
Control
* is active. The LED next to the symbol
lights up when the low beams are on.
You can also change to the daytime running
lamps, refer to page99. In the situation
described above, the lamps switch to the low
beams.
A blue sky with the sun low on the horizon can
cause the lights to be switched on.
The low beams remain on independent of
the ambient lighting conditions when you
switch on the fog lamps.<
The automatic headlamp control cannot
serve as a substitute for your personal
judgment in determining when the lamps
should be switched on in response to ambient
lighting conditions. For example, the sensors
cannot detect fog of hazy weather. To avoid
safety risks, you should always switch on the
low beams manually under these conditions.<
Welcome lamps
If you leave the light switch in position2 or 3
when parking the vehicle, then when you unlock
the vehicle, the parking lamps and interior light-
ing remain illuminated for a brief time.
Activating/deactivating welcome
lamps
iDrive, for operating principle refer to page16.
1."Settings"
2."Lighting"
Page 130 of 252

Destination entry
128 To delete letters:
>To delete individual letters:
Turn the controller to select , and
then press the controller.
>To delete all letters:
Turn the controller to select , and
then press the controller for an extended
period.
To enter spaces:
>Select the symbol.
The list gradually grows smaller each time
you enter a new letter.
3.Move the controller to the right.
4.Select the name of the town/city from the
list.
If there are several towns/cities with the same
name:
1.Change to the list of town/city names.
2.Highlight the town/city: a preview map is
displayed.
3.Select the town/city.
Entering the postal code
1.Select "Town/City/Postal Code" or the dis-
played town/city.
2.Select the symbol.
3.Select the digits.
4.Change to the list of postal codes and
towns/cities.
5.Highlight the postal code: a preview map is
displayed.
6.Select the postal code.
Entering street and intersection
1.Select "Street" or the displayed street.
2.Enter a street and intersection as you would
the town/city.
After the street you can also enter the intersec-
tion or the house number.
If there are several streets with the same name:1.Change to the list of street names.
2.Highlight the street: a preview map is dis-
played.
3.Select the street.
Entering a street without a destination
town/city
You can also enter a street without specifying a
town/city. In this case all streets of the entered
country are offered for selection. The related
town/city is displayed after the street name.
If a town/city has already been entered, you can
undo this entry. This may be practical if the
desired street does not exist in the entered des-
tination, because, for example, it belongs to
another part of the town/city.
1."Navigation"
2."Enter address"
3.Select "Street" or the displayed street.
4.Change to the list of street names.
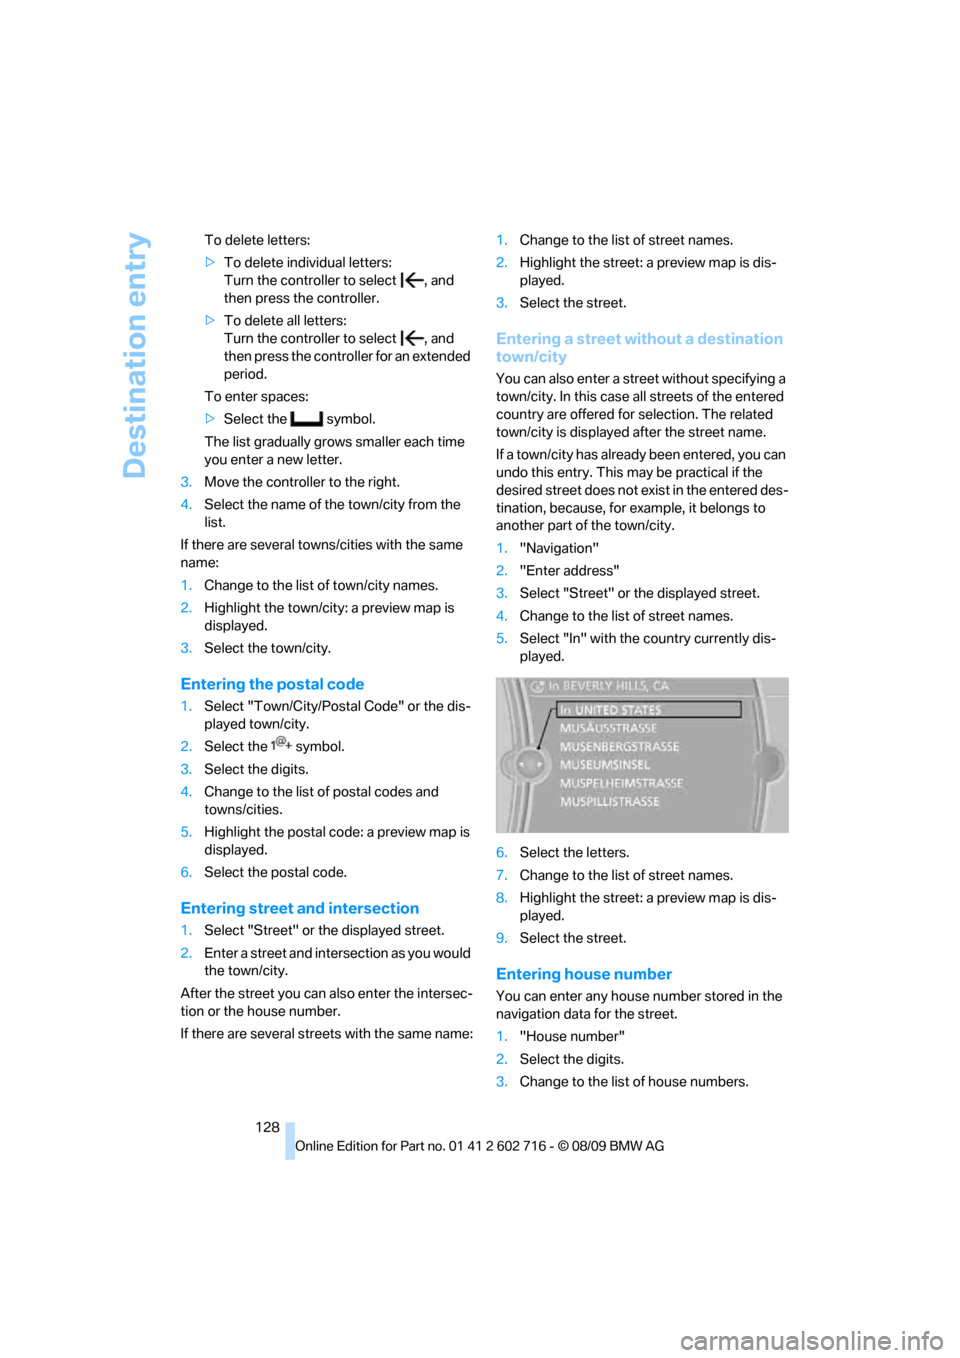
5.Select "In" with the country currently dis-
played.
6.Select the letters.
7.Change to the list of street names.
8.Highlight the street: a preview map is dis-
played.
9.Select the street.
Entering house number
You can enter any house number stored in the
navigation data for the street.
1."House number"
2.Select the digits.
3.Change to the list of house numbers.
Page 133 of 252

Navigation
Driving tips
131Reference
At a glance
Controls
Communications
Entertainment
Mobility
1."Search area"
2.Select the location where the system is to
search for the special destination:
>"At current location"
>"At destination"
>"At a different destination"
>"Along route"
Special destination category
1."Category"
2.Select "All" or a specific category, e.g.
hotels or restaurants.
Category details
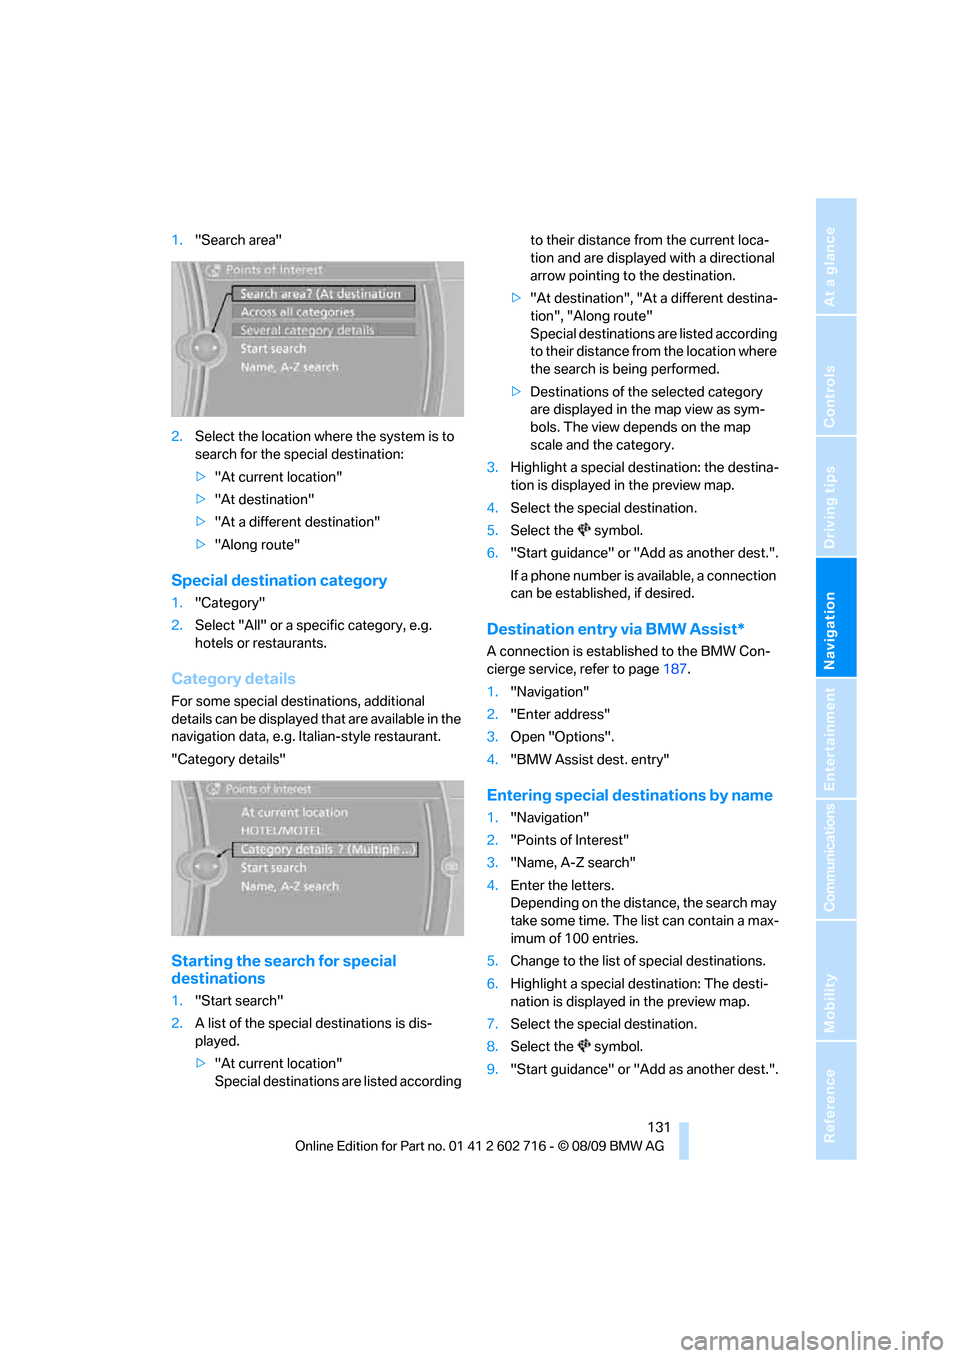
For some special destinations, additional
details can be displayed that are available in the
navigation data, e.g. Italian-style restaurant.
"Category details"
Starting the search for special
destinations
1."Start search"
2.A list of the special destinations is dis-
played.
>"At current location"
Special destinations are listed according to their distance from the current loca-
tion and are displayed with a directional
arrow pointing to the destination.
>"At destination", "At a different destina-
tion", "Along route"
Special destinations are listed according
to their distance from the location where
the search is being performed.
>Destinations of the selected category
are displayed in the map view as sym-
bols. The view depends on the map
scale and the category.
3.Highlight a special destination: the destina-
tion is displayed in the preview map.
4.Select the special destination.
5.Select the symbol.
6."Start guidance" or "Add as another dest.".
If a phone number is available, a connection
can be established, if desired.
Destination entry via BMW Assist*
A connection is established to the BMW Con-
cierge service, refer to page187.
1."Navigation"
2."Enter address"
3.Open "Options".
4."BMW Assist dest. entry"
Entering special destinations by name
1."Navigation"
2."Points of Interest"
3."Name, A-Z search"
4.Enter the letters.
Depending on the distance, the search may
take some time. The list can contain a max-
imum of 100 entries.
5.Change to the list of special destinations.
6.Highlight a special destination: The desti-
nation is displayed in the preview map.
7.Select the special destination.
8.Select the symbol.
9."Start guidance" or "Add as another dest.".
Page 135 of 252

Navigation
Driving tips
133Reference
At a glance
Controls
Communications
Entertainment
Mobility
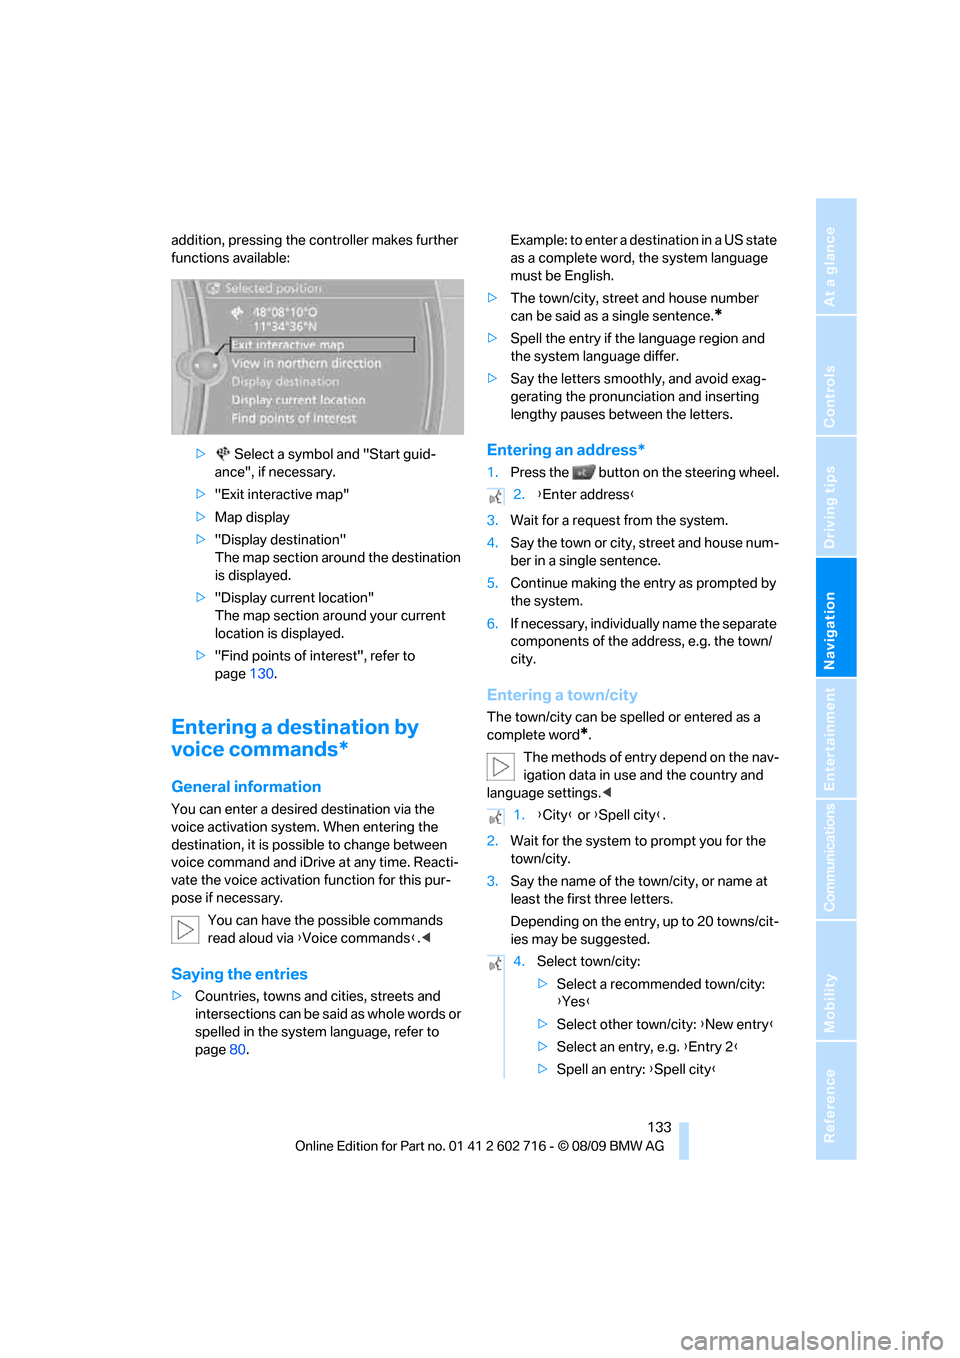
addition, pressing the controller makes further
functions available:
> Select a symbol and "Start guid-
ance", if necessary.
>"Exit interactive map"
>Map display
>"Display destination"
The map section around the destination
is displayed.
>"Display current location"
The map section around your current
location is displayed.
>"Find points of interest", refer to
page130.
Entering a destination by
voice commands*
General information
You can enter a desired destination via the
voice activation system. When entering the
destination, it is possible to change between
voice command and iDrive at any time. Reacti-
vate the voice activation function for this pur-
pose if necessary.
You can have the possible commands
read aloud via {Voice commands}.<
Saying the entries
>Countries, towns and cities, streets and
intersections can be said as whole words or
spelled in the system language, refer to
page80.Example: to enter a destination in a US state
as a complete word, the system language
must be English.
>The town/city, street and house number
can be said as a single sentence.
*
>Spell the entry if the language region and
the system language differ.
>Say the letters smoothly, and avoid exag-
gerating the pronunciation and inserting
lengthy pauses between the letters.
Entering an address*
1.Press the button on the steering wheel.
3.Wait for a request from the system.
4.Say the town or city, street and house num-
ber in a single sentence.
5.Continue making the entry as prompted by
the system.
6.If necessary, individually name the separate
components of the address, e.g. the town/
city.
Entering a town/city
The town/city can be spelled or entered as a
complete word
*.
The methods of entry depend on the nav-
igation data in use and the country and
language settings.<
2.Wait for the system to prompt you for the
town/city.
3.Say the name of the town/city, or name at
least the first three letters.
Depending on the entry, up to 20 towns/cit-
ies may be suggested.
2.{Enter address}
1.{City} or {Spell city}.
4.Select town/city:
>Select a recommended town/city:
{Yes}
>Select other town/city: {New entry}
>Select an entry, e.g. {Entry 2}
>Spell an entry: {Spell city}