2010 BMW 650I CONVERTIBLE navigation system
[x] Cancel search: navigation systemPage 76 of 252
Controls Overview
74
For different routes
You can display the average speed and average
fuel consumption for two different routes on the
Control Display, refer to the following and to
Trip computer.
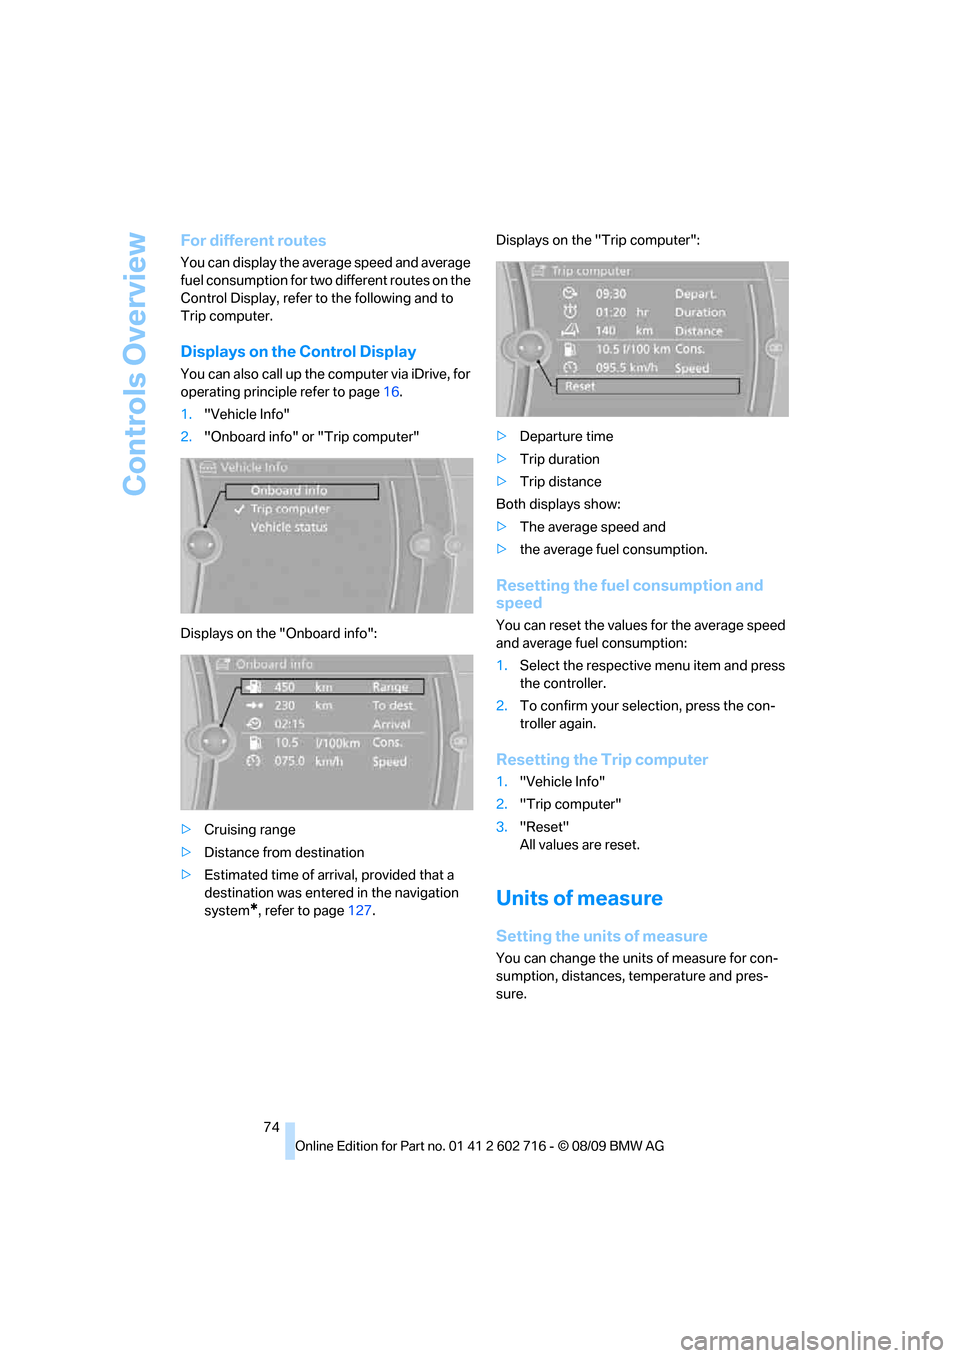
Displays on the Control Display
You can also call up the computer via iDrive, for
operating principle refer to page16.
1."Vehicle Info"
2."Onboard info" or "Trip computer"
Displays on the "Onboard info":
>Cruising range
>Distance from destination
>Estimated time of arrival, provided that a
destination was entered in the navigation
system
*, refer to page127.Displays on the "Trip computer":
>Departure time
>Trip duration
>Trip distance
Both displays show:
>The average speed and
>the average fuel consumption.
Resetting the fuel consumption and
speed
You can reset the values for the average speed
and average fuel consumption:
1.Select the respective menu item and press
the controller.
2.To confirm your selection, press the con-
troller again.
Resetting the Trip computer
1."Vehicle Info"
2."Trip computer"
3."Reset"
All values are reset.
Units of measure
Setting the units of measure
You can change the units of measure for con-
sumption, distances, temperature and pres-
sure.
Page 79 of 252
Controls
77Reference
At a glance
Driving tips
Communications
Navigation
Entertainment
Mobility
2."Settings"
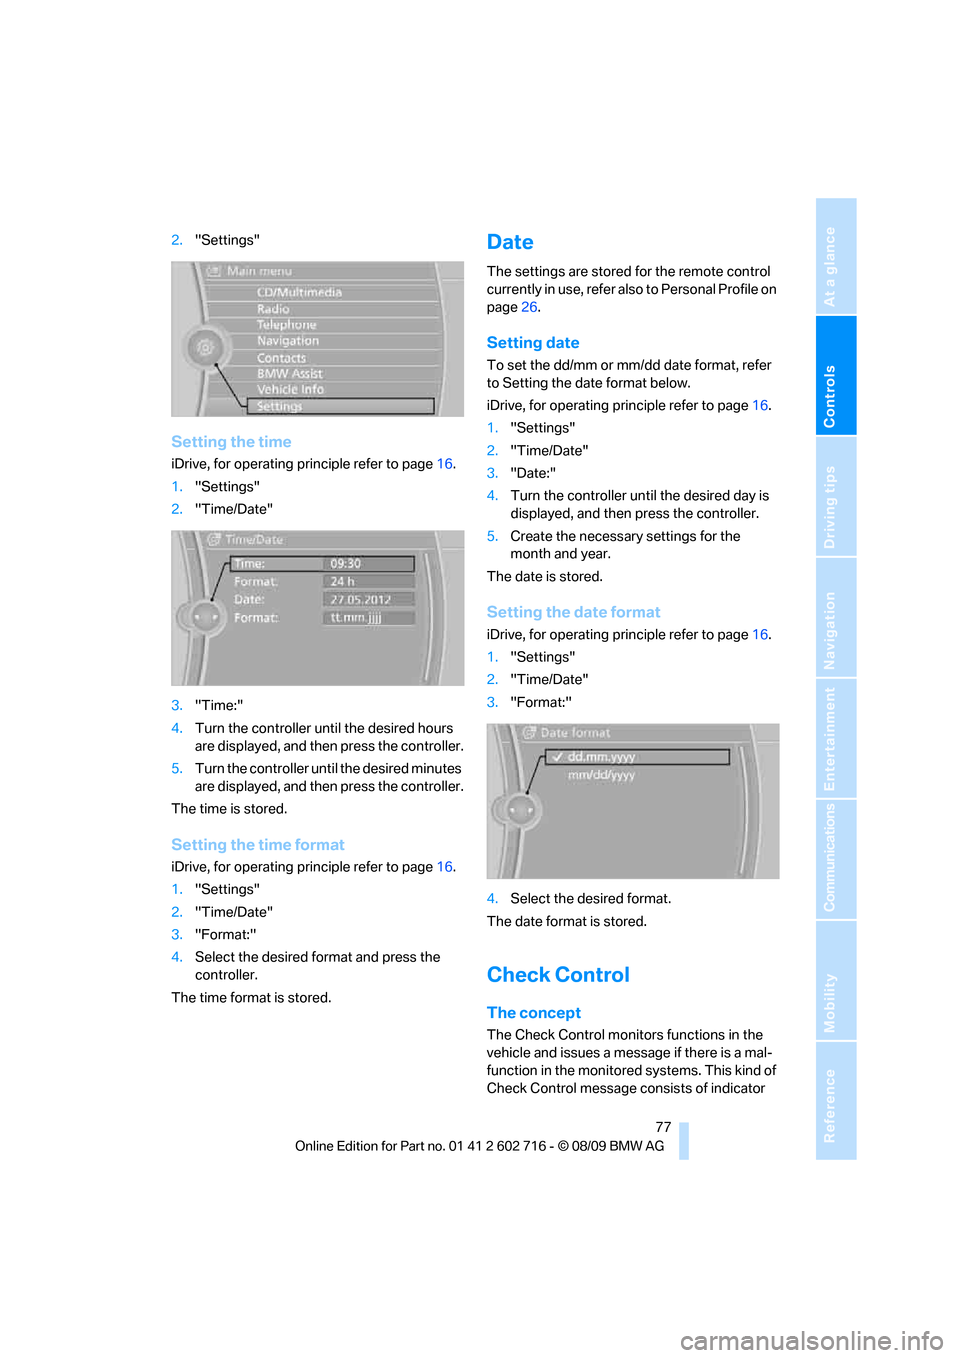
Setting the time
iDrive, for operating principle refer to page16.
1."Settings"
2."Time/Date"
3."Time:"
4.Turn the controller until the desired hours
are displayed, and then press the controller.
5.Turn the controller until the desired minutes
are displayed, and then press the controller.
The time is stored.
Setting the time format
iDrive, for operating principle refer to page16.
1."Settings"
2."Time/Date"
3."Format:"
4.Select the desired format and press the
controller.
The time format is stored.
Date
The settings are stored for the remote control
currently in use, refer also to Personal Profile on
page26.
Setting date
To set the dd/mm or mm/dd date format, refer
to Setting the date format below.
iDrive, for operating principle refer to page16.
1."Settings"
2."Time/Date"
3."Date:"
4.Turn the controller until the desired day is
displayed, and then press the controller.
5.Create the necessary settings for the
month and year.
The date is stored.
Setting the date format
iDrive, for operating principle refer to page16.
1."Settings"
2."Time/Date"
3."Format:"
4.Select the desired format.
The date format is stored.
Check Control
The concept
The Check Control monitors functions in the
vehicle and issues a message if there is a mal-
function in the monitored systems. This kind of
Check Control message consists of indicator
Page 81 of 252
Controls
79Reference
At a glance
Driving tips
Communications
Navigation
Entertainment
Mobility
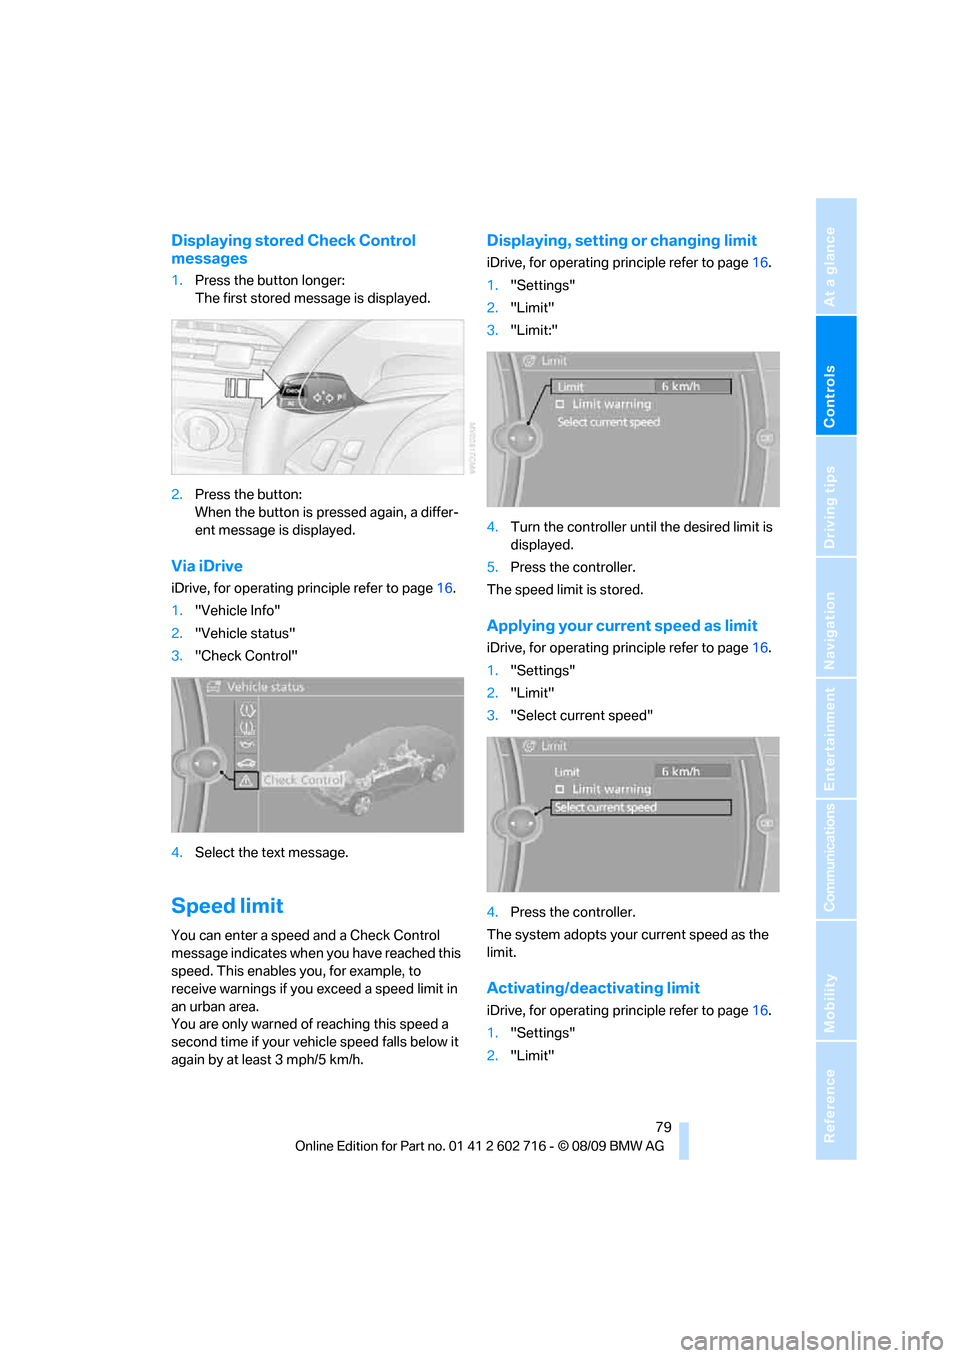
Displaying stored Check Control
messages
1.Press the button longer:
The first stored message is displayed.
2.Press the button:
When the button is pressed again, a differ-
ent message is displayed.
Via iDrive
iDrive, for operating principle refer to page16.
1."Vehicle Info"
2."Vehicle status"
3."Check Control"
4.Select the text message.
Speed limit
You can enter a speed and a Check Control
message indicates when you have reached this
speed. This enables you, for example, to
receive warnings if you exceed a speed limit in
an urban area.
You are only warned of reaching this speed a
second time if your vehicle speed falls below it
again by at least 3 mph/5 km/h.
Displaying, setting or changing limit
iDrive, for operating principle refer to page16.
1."Settings"
2."Limit"
3."Limit:"
4.Turn the controller until the desired limit is
displayed.
5.Press the controller.
The speed limit is stored.
Applying your current speed as limit
iDrive, for operating principle refer to page16.
1."Settings"
2."Limit"
3."Select current speed"
4.Press the controller.
The system adopts your current speed as the
limit.
Activating/deactivating limit
iDrive, for operating principle refer to page16.
1."Settings"
2."Limit"
Page 85 of 252

Controls
83Reference
At a glance
Driving tips
Communications
Navigation
Entertainment
Mobility
System limits
Even with PDC, final responsibility for
estimating the distance between the
vehicle and any obstacles always remains with
the driver. Even when sensors are provided,
there is a blind spot in which objects can no
longer be detected. The system is also subject
to the physical limits that apply to all forms of
ultrasonic measurement, such as those
encountered with tow bars and trailer cou-
plings, or thin and wedge-shaped objects etc.
Low objects already displayed, e. g. curbs, can
also disappear from the detection area of the
sensors again before or after a continuous tone
already sounds. Higher, protruding objects, e.g.
ledges, cannot be detected. For this reason,
drive with care; otherwise, there is a danger of
personal injury or property damage.
Loud sources of sound, inside and outside the
vehicle, could drown out the PDC signal tone.<
Driving stability control
systems
Your BMW is equipped with an extended array
of systems designed to enhance and maintain
vehicle stability under extreme conditions.
Antilock Brake System ABS
ABS prevents locking of the wheels during
braking. Safe steering response is maintained
even during full braking. Active safety is thus
increased.
The ABS is operational every time you start the
engine. For information on safe braking, refer to
page120.
CBC Cornering Brake Control
When braking during curves or when braking
during a lane change, driving stability and steer-
ing response are improved further.
Electronic brake-force distribution
The system controls the brake pressure in the
rear wheels to ensure stable braking behavior.
Brake assistant
When you apply the brakes rapidly, this system
produces maximum braking force boosting and
thus helps to achieve the shortest possible
braking distance during full braking maneuvers.
This system exploits all of the benefits provided
by ABS.
Do not reduce the pressure on the brake pedal
for the duration of the full braking.
Adaptive brake assistant*
In conjunction with the active cruise control
with the stop-and-go function, the adaptive
brake assistant ensures that the brake
responds even more quickly during braking
with the brake assistant.
DSC Dynamic Stability Control
DSC prevents traction loss in the driving wheels
when starting off and accelerating. The system
also identifies unstable driving conditions, such
as a loss of traction at the rear of the vehicle or
sliding of the vehicle in its front wheels. In these
cases, DSC helps the vehicle maintain a safe
course within physical limits by reducing engine
output and through braking actions in the indi-
vidual wheels.
The laws of physics cannot be repealed,
even with DSC. An appropriate driving
style always remains the responsibility of the
driver. Therefore, do not restrict the additional
safety margin with a risky driving style, as other-
wise there is a risk of an accident.<
Deactivating DSC
Press the button until the DSC indicator lamp in
the instrument cluster lights up, but not longer
Page 87 of 252

Controls
85Reference
At a glance
Driving tips
Communications
Navigation
Entertainment
Mobility
Display of the previously described
malfunction in Canadian models.
The DSC indicator lamp lights up. A
message appears on the Control Dis-
play. A malfunction has occurred in the
DSC and DTC. The stabilizing actions are no
longer available. The vehicle remains opera-
tional. Have the system checked as soon as
possible.
The brake system warning lamp lights
up yellow. A message appears on the
Control Display. The brake assistant is
defective. Have the system checked as soon as
possible.
Display of the previously described
malfunction in Canadian models.
Drive-off assistant
The drive-off assistant enables you to start off
conveniently on slopes. The parking brake is
not required for this purpose.
1.Hold the vehicle with the brake.
2.Release the brake and begin to drive imme-
diately.
After releasing the brake, begin to drive
immediately; otherwise, the drive-off
assistant no longer holds the vehicle after
approx. 2 seconds and your vehicle will start to
roll backward.<
Dynamic Drive*
The concept
Dynamic Drive minimizes body roll and opti-
mizes vehicle stability during cornering and
evasive maneuvers.Dynamic Drive is based on active stabilizers on
the front and rear axles. Suspension compli-
ance adapts to suit driving conditions, varying
from performance-oriented during cornering to
smooth and comfort-oriented when the vehicle
is proceeding in a straight line. During vehicle
operation, the system continuously runs
through closed-loop control cycles lasting only
fractions of a second.
The system assumes operational status each
time you start the engine.
FTM Flat Tire Monitor*
The concept
The Flat Tire Monitor detects a pressure loss in
one tire by comparing the speeds of the individ-
ual wheels during driving.
In the event of a pressure loss, there is a change
in the rolling circumference and therefore the
rotation speed of the corresponding wheel. The
system detects this change and reports it as a
flat tire.
Functional requirement
The system must have been initialized when the
tire inflation pressure was correct; otherwise,
reliable signaling of a flat tire is not ensured.
The initialization must be repeated after
every correction of the tire inflation pres-
sure and after every tire or wheel change.<
System limits
The Flat Tire Monitor is unable to warn
the driver of sudden, severe tire damage
caused by external factors, nor can it identify
the gradual loss of pressure that will inevitably
occur in all four tires over a lengthy period of
time.<
In the following situations, the system could be
delayed or malfunction:
>System has not been initialized
>Driving on snowy or slippery road surface
Page 89 of 252
Controls
87Reference
At a glance
Driving tips
Communications
Navigation
Entertainment
Mobility
cause an accident. Do not continue driving,
but instead contact your BMW center.<
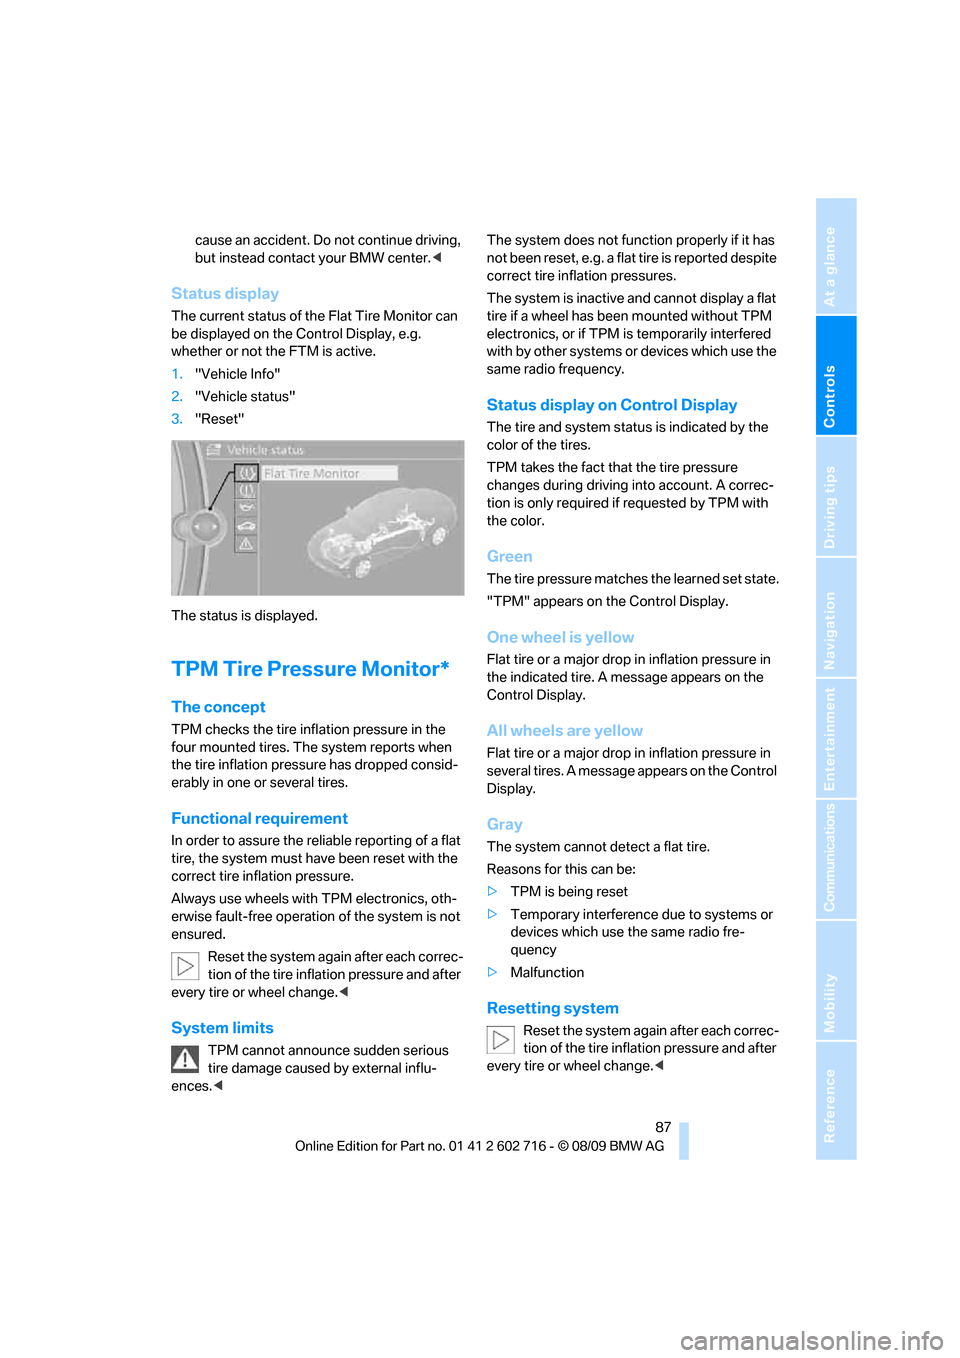
Status display
The current status of the Flat Tire Monitor can
be displayed on the Control Display, e.g.
whether or not the FTM is active.
1."Vehicle Info"
2."Vehicle status"
3."Reset"
The status is displayed.
TPM Tire Pressure Monitor*
The concept
TPM checks the tire inflation pressure in the
four mounted tires. The system reports when
the tire inflation pressure has dropped consid-
erably in one or several tires.
Functional requirement
In order to assure the reliable reporting of a flat
tire, the system must have been reset with the
correct tire inflation pressure.
Always use wheels with TPM electronics, oth-
erwise fault-free operation of the system is not
ensured.
Reset the system again after each correc-
tion of the tire inflation pressure and after
every tire or wheel change.<
System limits
TPM cannot announce sudden serious
tire damage caused by external influ-
ences.
correct tire inflation pressures.
The system is inactive and cannot display a flat
tire if a wheel has been mounted without TPM
electronics, or if TPM is temporarily interfered
with by other systems or devices which use the
same radio frequency.
Status display on Control Display
The tire and system status is indicated by the
color of the tires.
TPM takes the fact that the tire pressure
changes during driving into account. A correc-
tion is only required if requested by TPM with
the color.
Green
The tire pressure matches the learned set state.
"TPM" appears on the Control Display.
One wheel is yellow
Flat tire or a major drop in inflation pressure in
the indicated tire. A message appears on the
Control Display.
All wheels are yellow
Flat tire or a major drop in inflation pressure in
several tires. A message appears on the Control
Display.
Gray
The system cannot detect a flat tire.
Reasons for this can be:
>TPM is being reset
>Temporary interference due to systems or
devices which use the same radio fre-
quency
>Malfunction
Resetting system
Reset the system again after each correc-
tion of the tire inflation pressure and after
every tire or wheel change.<
Page 91 of 252
Controls
89Reference
At a glance
Driving tips
Communications
Navigation
Entertainment
Mobility
>In case of a malfunction;
have the system checked.
>If a wheel is mounted without TPM elec-
tronics.
>If TPM is temporarily interfered with by
other systems or devices which use the
same radio frequency.
Declaration according to NHTSA/
FMVSS 138 Tire Pressure Monitoring
Systems
Each tire should be checked monthly when cold
and inflated to the inflation pressure recom-
mended by the vehicle manufacturer on the
vehicle placard or tire inflation pressure label. If
your vehicle has tires of a different size than the
size indicated on the vehicle placard or tire infla-
tion pressure label, you should determine the
proper tire inflation pressure for those tires. As
an added safety feature, your vehicle has been
equipped with a tire pressure monitoring sys-
tem, TPMS, that illuminates a low tire pressure
telltale when one or more of your tires are signif-
icantly underinflated. Accordingly, when the
low tire pressure telltale illuminates, you should
stop and check your tires as soon as possible,
and inflate them to the proper pressure. Driving
on a significantly underinflated tire causes the
tire to overheat and can lead to tire failure.
Underinflation also reduces fuel efficiency and
tire tread life, and may affect the vehicle's han-
dling and stopping ability. Please note that the
TPMS is not a substitute for proper tire mainte-
nance, and it is the driver's responsibility to
maintain correct tire pressure, even if underin-
flation has not reached the level to trigger illumi-
nation of the TPMS low tire pressure telltale.
The TPMS malfunction indicator is combined
with the low tire pressure telltale. When the sys-
tem detects a malfunction, the telltale will flash
for approximately one minute and then remain
continuously illuminated. This sequence will
continue upon subsequent vehicle startups as
long as the malfunction exists. When the mal-
function indicator lights up, the system may not
be able to detect or signal low tire pressure as
intended. TPMS malfunctions may occur for a
variety of reasons, including the installation of replacement or alternate tires or wheels on the
vehicle that prevent the TPMS from functioning
properly. Always check the TPMS malfunction
telltale after replacing one or more tires or
wheels on your vehicle to ensure that the
replacement or alternate tires and wheels allow
the TPMS to continue to function properly.
Active steering*
The concept
Active steering varies the turning angle of the
front wheels in relation to steering wheel move-
ments. It also varies the steering force required
to turn the wheels depending on the speed at
which you are driving.
When you are driving in the low speed range,
e. g. in a town or when parking, the steering
angle increases, i.e. the steering becomes very
direct. In the higher speed range, on the other
hand, the steering angle is reduced more and
more. This improves the handling capability of
your BMW over the entire speed range.
In critical situations, the system can make tar-
geted corrections to the steering angle pro-
vided by the driver and thus stabilize the vehicle
before the driver intervenes. This stability-pro-
moting intervention is deactivated when DSC is
switched off, refer to page83.
Malfunction
The warning lamp lights up yellow and
a message is shown on the Control Dis-
play. Active steering is malfunctioning
or is temporarily deactivated. At low speed,
larger steering wheel movements are required,
while the vehicle reacts more sensitively to
steering wheel movements in the higher road
speed range. The stability-promoting interven-
tion can also be deactivated. Proceed cau-
tiously and drive defensively.
Deactivation
Active steering is deactivated to perform an ini-
tialization. A message indicates that the feature
Page 93 of 252

Controls
91Reference
At a glance
Driving tips
Communications
Navigation
Entertainment
Mobility
In the event of malfunctions, deactivation, or
triggering of the airbag restraint system, have
the testing, repair, removal, and disposal of air-
bag generators executed only by a BMW center
or a workshop that works according to BMW
repair procedures with correspondingly trained
personnel and has the required explosives
licenses. Otherwise unprofessional attempts to
service the system could lead to failure in an
emergency or undesired airbag triggering,
either of which could result in personal injury.<
Warnings and information on the airbags is also
provided on the sun visors.
Automatic deactivation of front
passenger airbags
The occupation of the seat is detected by eval-
uating the impression on the occupied seat sur-
face of the front passenger seat. The system
correspondingly activates or deactivates the
front, knee and side airbags on the front pas-
senger side.
The current status of the front passenger
airbag, i.e. deactivated or activated, is
indicated by the indicator lamp over the interior
rearview mirror, refer to Operating state of front
passenger airbags in the following.<
Before transporting a child in the front
passenger seat, read the safety informa-
tion and follow the instructions under Trans-
porting children safely, refer to page53.
The front, knee and side airbags on the front
passenger side can be deactivated for teenag-
ers and adults in certain sitting positions; the
indicator lamp for the front passenger airbags
lights up when this occurs. In these cases,
change the sitting position so that the front pas-
senger airbags are activated and the indicator
lamp goes out. If the desired status cannot be
produced by changing the sitting position,
transport the corresponding person in the rear
seat.
Do not fit seat covers, seat cushion padding,
ball mats or other items onto the front passen-
ger seat unless they are specifically recom-
mended by BMW. Do not lay objects under the
seat which could press against the seat from below. Otherwise a correct evaluation of the
occupied seat surface cannot be ensured.<
Operating state of front passenger
airbags
The illustration here shows a possible arrange-
ment in the Coupe. With some vehicle equip-
ment packages or in the Convertible, the
arrangement of the switches and indicator
lamps may differ somewhat.
The indicator lamp for the front passenger air-
bags indicates the operating status of the front,
knee and side airbags on the front passenger
side depending on whether the seat is occu-
pied. The indicator lamp shows whether the
front passenger airbags are activated or deacti-
vated.
>The indicator lamp lights up when a child in
a child restraint system intended for the
purpose is properly detected on the seat.
The front, knee and side airbags on the front
passenger side are deactivated.
Most child seats are detected by the sys-
tem, especially the child seats required by
the NHTSA at the time the vehicle is manufac-
tured. After installing a child seat, make sure
that the indicator lamp for the front passenger
airbags lights up. This indicates that the child
seat has been detected and the front passenger
airbags are not activated.<
>The indicator lamp does not light up if, for
example, the system detects a person of
sufficient size seated correctly on the seat.
The front, knee and side airbags on the front
passenger side are activated.
>The indicator lamp does not light up when
the seat is empty.