2010 BMW 535I XDRIVE SEDAN ESP
[x] Cancel search: ESPPage 218 of 271

Maintenance
216
Socket for OBD Onboard
Diagnostics interface
Components which are decisive for the
exhaust-gas composition can be checked via
the OBD socket with a device.
T h i s s o c k e t i s l o c a t e d o n t h e d r i v e r ' s s i d e o n t h e
left under a cover.
Exhaust-gas values
The warning lamp lights up:
The vehicle emissions are raised. The
trip can be continued. Have the vehicle
checked as soon as possible.
Display of the previously described
malfunction in Canadian models.
The lamp flashes under certain condi-
tions. This is a sign of excessive misfiring of the
engine. In this case you should reduce speed
and drive to the nearest BMW center as soon as
possible. Heavy engine misfiring causes seri-
ous damage to the emission-relevant compo-
nents, especially the catalytic converter, within
a short time.
If the fuel filler cap is not properly tight-
ened, the OBD system will assume that
fuel vapor escapes. Then a display lights up. If
the cap is then tightened, the display will go out
within a few days.<
Data recorders
Your vehicle may be equipped with one or sev-
eral measuring and diagnosis modules, or with
a device for recording or transmitting certain
vehicle data or information. If you have also sub-
scribed to BMW Assist, certain vehicle data can be transmitted or recorded to enable corre-
sponding services.
Page 219 of 271
Mobility
217Reference
At a glance
Controls
Driving tips
Communications
Navigation
Entertainment
Care
Car-care products
Regular cleaning and care make a significant
contribution to retaining your BMW's value.
For the cleaning and care of your vehicle, BMW
recommends using only products that BMW
has approved for this purpose.
Your BMW center will be glad to advise you
about products and services for the cleaning
and care of your BMW.
Genuine BMW Care Products are materi-
als tested, laboratory tested, and tested in
actual use. They offer optimum care and pro-
tection for your vehicle.<
Do not use cleaners that contain alcohol
or solvents; they can damage your vehi-
cle.<
Cleaning agents can contain substances
that are dangerous or pose health risks.
You should therefore heed the warnings and
hazard indications on the packaging. Open the
doors or windows on your vehicle whenever
cleaning the interior. Make sure there is suffi-
cient ventilation in enclosed spaces. Use only
products that are formulated for vehicle clean-
ing.<
Exterior care
Washing your vehicle
In the winter months, it is especially
important to ensure that the vehicle is
washed on a regular basis. Otherwise, signifi-
cant soiling and road salt can cause damage to
the vehicle.<
After washing the vehicle, apply the
brakes briefly to dry them. Failure to do so
may lead to a reduction in braking efficiency and
also to corrosion of the brake rotors.<
Car washes
Give preference to cloth car washes.Before driving into the car wash, make sure that
it is suitable for your BMW. Pay attention to the
following points:
>Dimensions of your vehicle, refer to
page239.
>If necessary, fold in the outside rearview
mirrors, refer to page51.
>Maximum permissible tire width.
Avoid car washes with rail heights over
4in/10cm, otherwise there is danger of
damaging chassis parts.<
Preparations for driving into the car wash:
>Deactivate rain sensor to prevent unwanted
wiper activation.
>Deactivate rear window wiper
* and protect
it from damage. Take appropriate protec-
tive measures; inquiring with the car wash
operator as needed.
>Remove additional add-on parts, e.g., spoil-
ers or phone antennas, if they could be
damaged.
Automatic transmission
Before driving into the car wash, make sure the
vehicle is able to roll by making sure to:
1.Insert the remote control into the ignition
lock, even with Comfort Access.
2.Shift into transmission position N.
3.Release the parking brake.
4.Switch off the engine.
5.Leave the remote control in the ignition lock
so that the vehicle can roll.
Steam jets/high-pressure washers
When using steam jets or high-pressure
washers, ensure that you maintain suffi-
cient clearance to the vehicle and do not exceed
a temperature of 1407/606.
Insufficient distance or excessive pressure or
temperature can damage parts of the vehicle or
can result in water penetration. Follow the oper-
Page 225 of 271
Mobility
223Reference
At a glance
Controls
Driving tips
Communications
Navigation
Entertainment
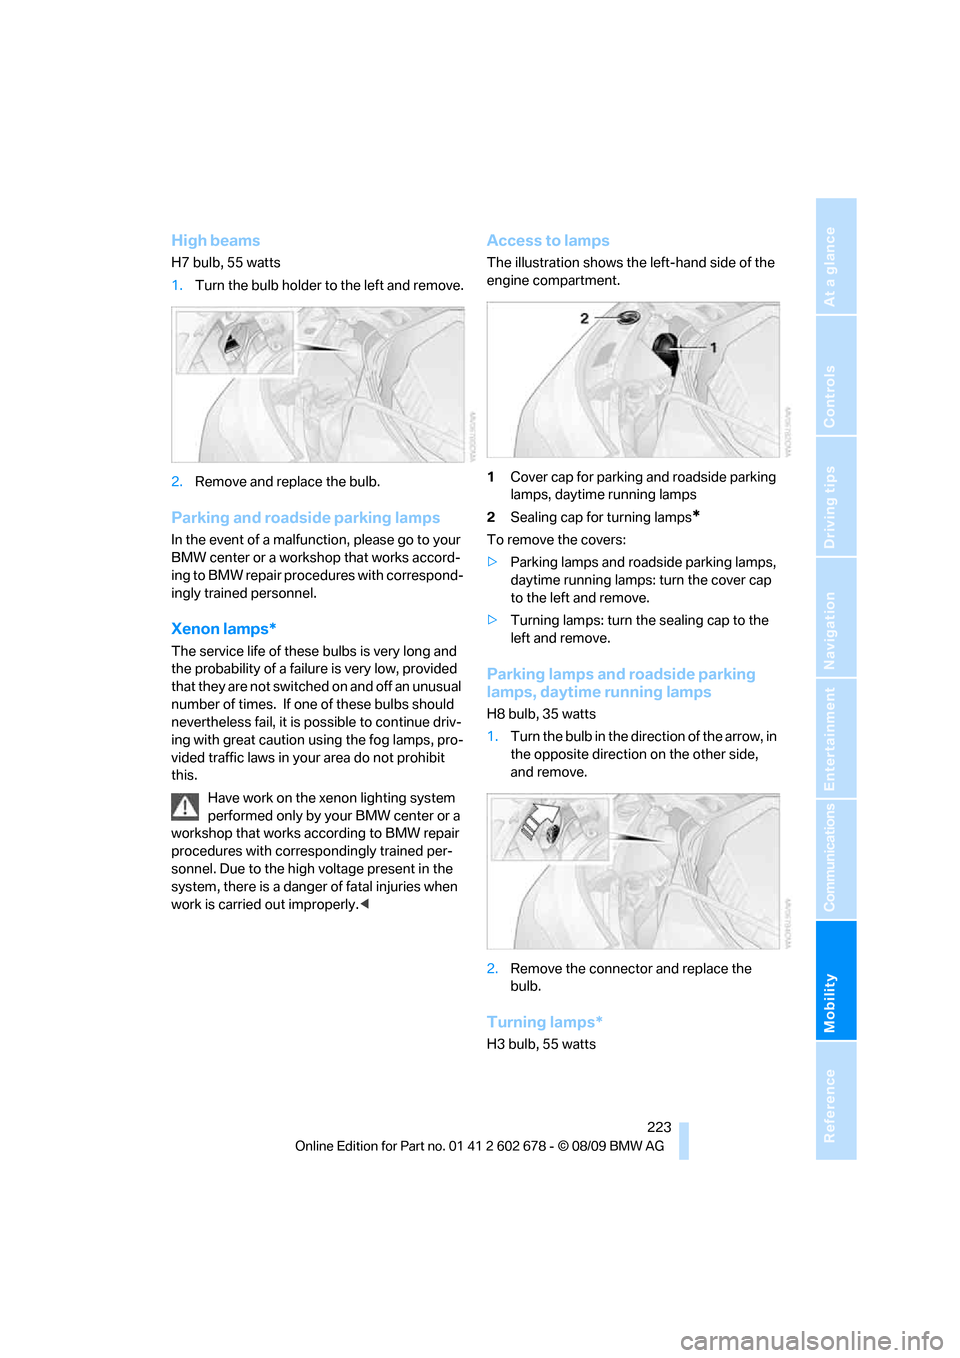
High beams
H7 bulb, 55 watts
1.Turn the bulb holder to the left and remove.
2.Remove and replace the bulb.
Parking and roadside parking lamps
In the event of a malfunction, please go to your
BMW center or a workshop that works accord-
ing to BMW repair procedures with correspond-
ingly trained personnel.
Xenon lamps*
The service life of these bulbs is very long and
the probability of a failure is very low, provided
that they are not switched on and off an unusual
number of times. If one of these bulbs should
nevertheless fail, it is possible to continue driv-
ing with great caution using the fog lamps, pro-
vided traffic laws in your area do not prohibit
this.
Have work on the xenon lighting system
performed only by your BMW center or a
workshop that works according to BMW repair
procedures with correspondingly trained per-
sonnel. Due to the high voltage present in the
system, there is a danger of fatal injuries when
work is carried out improperly.<
Access to lamps
The illustration shows the left-hand side of the
engine compartment.
1Cover cap for parking and roadside parking
lamps, daytime running lamps
2Sealing cap for turning lamps
*
To remove the covers:
>Parking lamps and roadside parking lamps,
daytime running lamps: turn the cover cap
to the left and remove.
>Turning lamps: turn the sealing cap to the
left and remove.
Parking lamps and roadside parking
lamps, daytime running lamps
H8 bulb, 35 watts
1.Turn the bulb in the direction of the arrow, in
the opposite direction on the other side,
and remove.
2.Remove the connector and replace the
bulb.
Turning lamps*
H3 bulb, 55 watts
Page 226 of 271
Replacing components
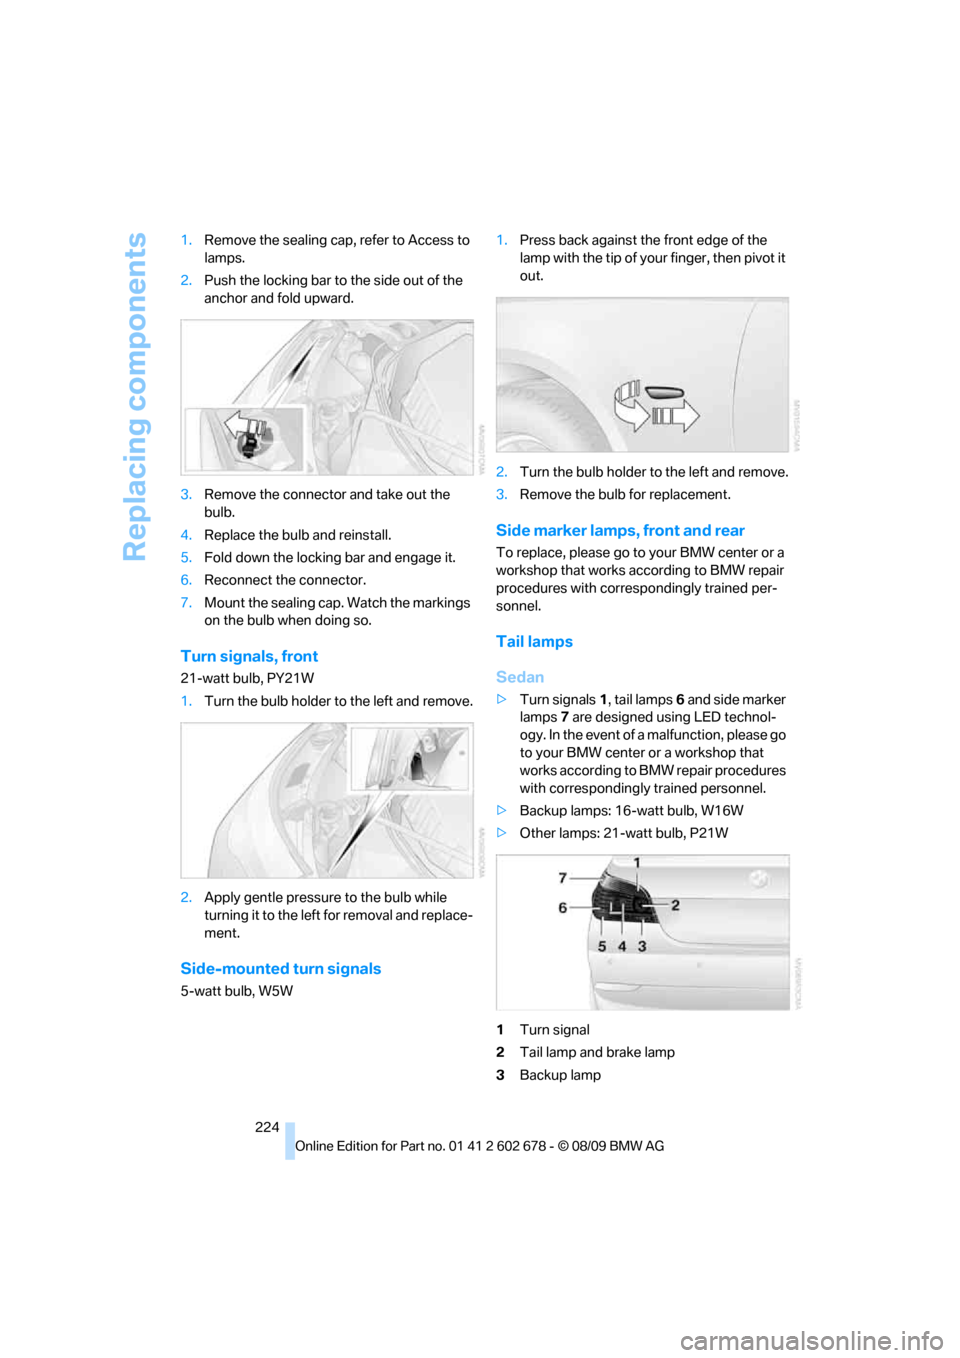
224 1.Remove the sealing cap, refer to Access to
lamps.
2.Push the locking bar to the side out of the
anchor and fold upward.
3.Remove the connector and take out the
bulb.
4.Replace the bulb and reinstall.
5.Fold down the locking bar and engage it.
6.Reconnect the connector.
7.Mount the sealing cap. Watch the markings
on the bulb when doing so.
Turn signals, front
21-watt bulb, PY21W
1.Turn the bulb holder to the left and remove.
2.Apply gentle pressure to the bulb while
turning it to the left for removal and replace-
ment.
Side-mounted turn signals
5-watt bulb, W5W1.Press back against the front edge of the
lamp with the tip of your finger, then pivot it
out.
2.Turn the bulb holder to the left and remove.
3.Remove the bulb for replacement.
Side marker lamps, front and rear
To replace, please go to your BMW center or a
workshop that works according to BMW repair
procedures with correspondingly trained per-
sonnel.
Tail lamps
Sedan
>Turn signals1, tail lamps6 and side marker
lamps7 are designed using LED technol-
ogy. In the event of a malfunction, please go
to your BMW center or a workshop that
works according to BMW repair procedures
with correspondingly trained personnel.
>Backup lamps: 16-watt bulb, W16W
>Other lamps: 21-watt bulb, P21W
1Turn signal
2Tail lamp and brake lamp
3Backup lamp
Page 227 of 271
Mobility
225Reference
At a glance
Controls
Driving tips
Communications
Navigation
Entertainment
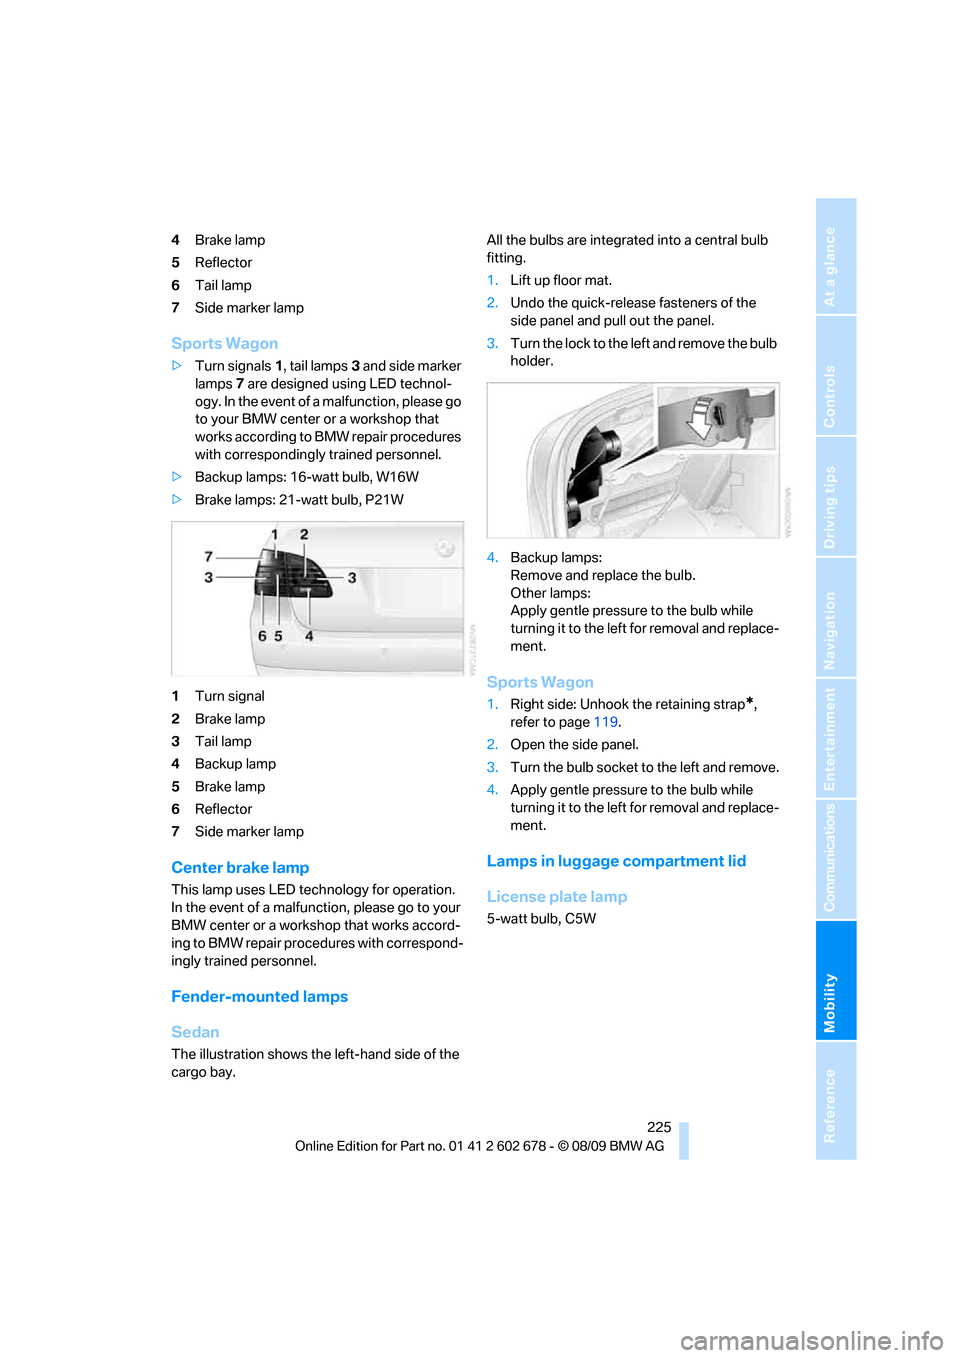
4Brake lamp
5Reflector
6Tail lamp
7Side marker lamp
Sports Wagon
>Turn signals1, tail lamps3 and side marker
lamps7 are designed using LED technol-
ogy. In the event of a malfunction, please go
to your BMW center or a workshop that
works according to BMW repair procedures
with correspondingly trained personnel.
>Backup lamps: 16-watt bulb, W16W
>Brake lamps: 21-watt bulb, P21W
1Turn signal
2Brake lamp
3Tail lamp
4Backup lamp
5Brake lamp
6Reflector
7Side marker lamp
Center brake lamp
This lamp uses LED technology for operation.
In the event of a malfunction, please go to your
BMW center or a workshop that works accord-
ing to BMW repair procedures with correspond-
ingly trained personnel.
Fender-mounted lamps
Sedan
The illustration shows the left-hand side of the
cargo bay.All the bulbs are integrated into a central bulb
fitting.
1.Lift up floor mat.
2.Undo the quick-release fasteners of the
side panel and pull out the panel.
3.Turn the lock to the left and remove the bulb
holder.
4.Backup lamps:
Remove and replace the bulb.
Other lamps:
Apply gentle pressure to the bulb while
turning it to the left for removal and replace-
ment.
Sports Wagon
1.Right side: Unhook the retaining strap*,
refer to page119.
2.Open the side panel.
3.Turn the bulb socket to the left and remove.
4.Apply gentle pressure to the bulb while
turning it to the left for removal and replace-
ment.
Lamps in luggage compartment lid
License plate lamp
5-watt bulb, C5W
Page 233 of 271

Mobility
231Reference
At a glance
Controls
Driving tips
Communications
Navigation
Entertainment
Giving and receiving assistance
Emergency request
Requirements
>BMW Assist is activated.
Activating BMW Assist, refer to page194.
>Radio readiness is activated.
>The BMW Assist system is logged on to a
mobile phone network.
>The BMW Assist system is functional.
>Full preparation package mobile phone.
With this equipment, an emergency request
is still possible when no mobile phone is
paired with the vehicle.
Once your BMW Assist subscription expires,
the BMW Assist system can be deactivated by
a BMW center without you having to visit a
workshop. If the BMW Assist system has been
deactivated, Emergency Requests are not pos-
sible. The BMW Assist system can be reacti-
vated by a BMW center after signing a new con-
tract.
Initiating an emergency request
1.Briefly press protective cover to open.
Depending on the vehicle's equipment, the
arrangement of the switches and indicator
lamps may differ somewhat.
2.Press the SOS button until the LED in the
button lights up.
As soon as the voice connection to the BMW
Assist Response Center has been established,
the LED flashes.When the Emergency Request is received at
the BMW Assist Response Center, the BMW
Assist Response Center contacts you and
a r r a n g e s f o r a d d i t i o n a l s t e p s t o h e l p y o u . E v e n i f
you are unable to respond, the BMW Assist
Response Center can take further steps to help
you under certain circumstances.
If conditions allow, remain in the vehicle until
the connection has been established. You will
then be able to provide a detailed description of
the situation.
In the event of a BMW Assist emergency call,
data that are used to determine the necessary
rescue measures, such as the current position
of your vehicle if it can be established, are trans-
mitted to the BMW Assist Response Center.
If the LED is flashing but the BMW Assist
Response Center cannot be heard over the
hands-free system, it is possible that the
hands-free system is malfunctioning. The BMW
Assist Response Center may still be able to
hear you, though.
Under certain conditions, an Emergency
Request is automatically initiated immediately
after a severe accident. Automatic Collision
Notification is not affected by pressing the but-
ton.
For technical reasons, the Emergency
Request cannot be guaranteed under
unfavorable conditions.<
Warning triangle*
The warning triangle is located in the luggage
compartment lid/tailgate.
Page 236 of 271
Giving and receiving assistance
234 Sedan:
It is located in the toolkit in the luggage com-
partment lid, refer to page221.
Sports Wagon:
It is located in the toolkit behind the left side
panel in the cargo bay, refer to page221.
Use only the tow fitting provided with the
vehicle and screw it all the way in. Use the
tow fitting for towing only on roads. Avoid lateral
loading of the tow fitting, e.g. do not lift the vehi-
cle by the tow fitting. Otherwise damage to the
tow fitting and the vehicle can occur.<
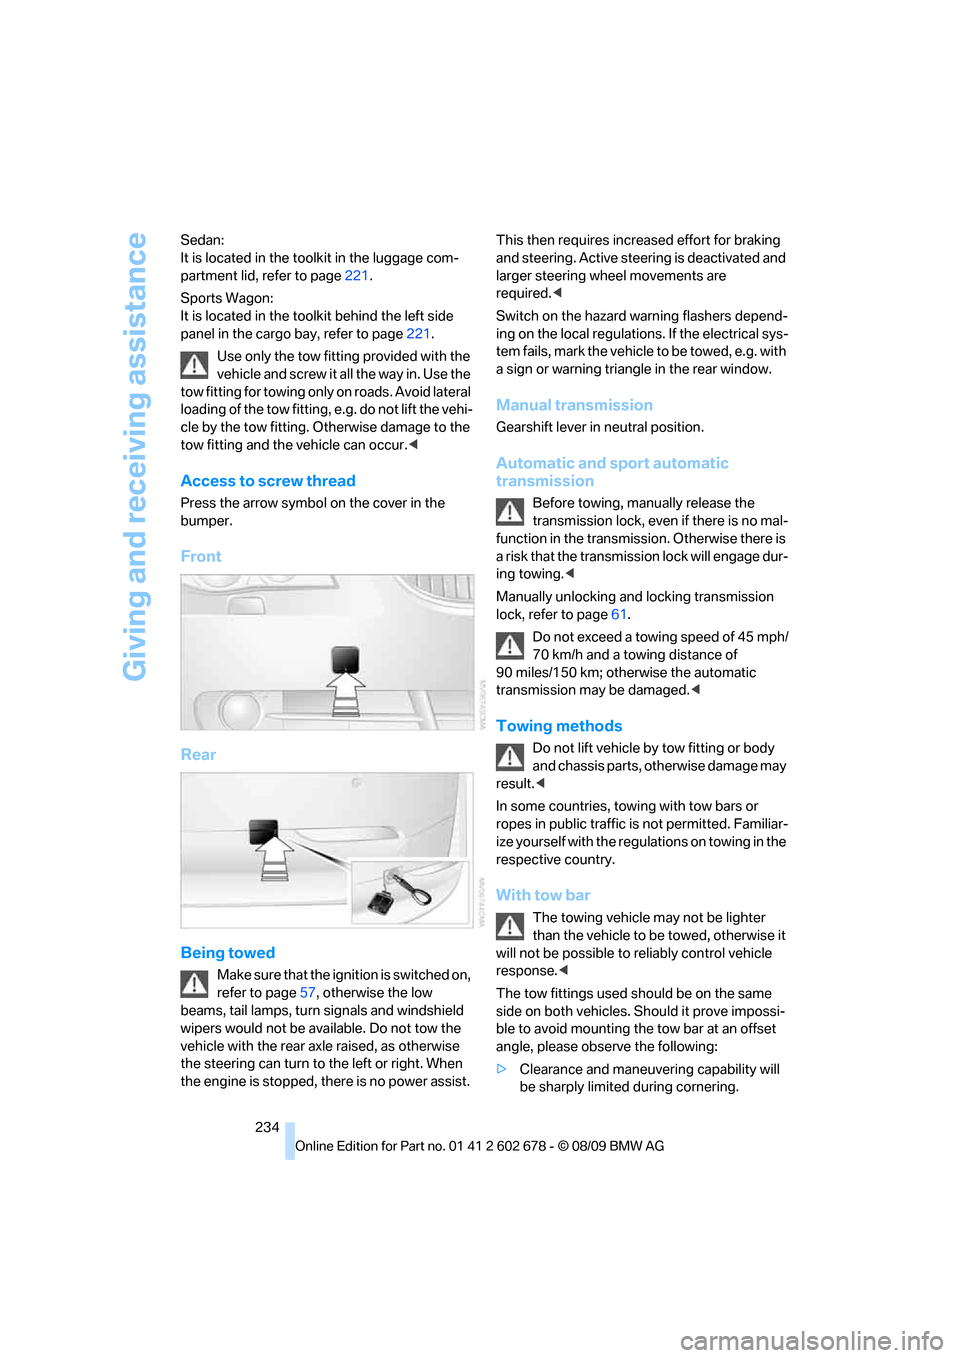
Access to screw thread
Press the arrow symbol on the cover in the
bumper.
Front
Rear
Being towed
Make sure that the ignition is switched on,
refer to page57, otherwise the low
beams, tail lamps, turn signals and windshield
wipers would not be available. Do not tow the
vehicle with the rear axle raised, as otherwise
the steering can turn to the left or right. When
the engine is stopped, there is no power assist. This then requires increased effort for braking
and steering. Active steering is deactivated and
larger steering wheel movements are
required.<
Switch on the hazard warning flashers depend-
ing on the local regulations. If the electrical sys-
tem fails, mark the vehicle to be towed, e.g. with
a sign or warning triangle in the rear window.
Manual transmission
Gearshift lever in neutral position.
Automatic and sport automatic
transmission
Before towing, manually release the
transmission lock, even if there is no mal-
function in the transmission. Otherwise there is
a risk that the transmission lock will engage dur-
ing towing.<
Manually unlocking and locking transmission
lock, refer to page61.
Do not exceed a towing speed of 45 mph/
70 km/h and a towing distance of
90 miles/150 km; otherwise the automatic
transmission may be damaged.<
Towing methods
Do not lift vehicle by tow fitting or body
and chassis parts, otherwise damage may
result.<
In some countries, towing with tow bars or
ropes in public traffic is not permitted. Familiar-
ize yourself with the regulations on towing in the
respective country.
With tow bar
The towing vehicle may not be lighter
than the vehicle to be towed, otherwise it
will not be possible to reliably control vehicle
response.<
The tow fittings used should be on the same
side on both vehicles. Should it prove impossi-
ble to avoid mounting the tow bar at an offset
angle, please observe the following:
>Clearance and maneuvering capability will
be sharply limited during cornering.
Page 257 of 271
Reference 255
At a glance
Controls
Driving tips
Communications
Navigation
Entertainment
Mobility
Driving through water126
Driving tips, refer to General
driving notes124
Dry air, refer to Cooling
function107
Drying the air, refer to Cooling
function107
DSC Dynamic Stability
Control85
– indicator lamp13,86
– malfunction87
DTC Dynamic Traction
Control86
– activating86
– indicator lamp13,86
DVD
– country codes162
– settings163
– video playback162
DVD menu163
DVD player, refer to CD
player160
DVD video162
Dynamic Brake Control DBC
– warning lamp87
Dynamic destination
guidance143
Dynamic Drive88
Dynamic Driving Control62
Dynamic Stability Control
DSC85
Dynamic Traction Control
DTC86
E
Easy entry/exit52
– backrest width45
Eject button, refer to Buttons
in area of CD/DVD
player152
Electrical malfunction
– door lock30
– driver's door30
– fuel filler flap200
– glass sunroof, electric40
– luggage compartment lid32
– panorama glass sunroof41
– tailgate33Electrical steering wheel
adjustment52
Electronic brake-force
distribution85
Electronic oil level check212
Emergency operation, refer to
Manual operation
– door lock30
– driver's door30
– fuel filler flap200
– luggage compartment lid32
– tailgate33
– transmission lock, automatic
transmission61
Emergency operation, refer to
Moving manually
– glass sunroof40
– panorama glass sunroof41
Emergency release for
luggage compartment lid in
cargo bay32
Emergency request231
Emergency services, refer to
Roadside Assistance232
Energy-conscious driving,
refer to Energy Control75
Energy Control75
Engine
– breaking-in124
– data238
– overheated, refer to Coolant
temperature74
– speed238
– starting58
– starting, with Comfort
Access36
– switching off58
Engine compartment212
Engine coolant214Engine oil
– adding213
– additives, refer to Approved
engine oils213
– approved engine oil213
– checking oil level212
– electronic oil level check212
– interval between changes,
refer to Service
requirements
77
– oil change213
– oil grades, refer to Approved
engine oils213
Engine output, refer to Engine
data238
Engine speed, refer to Engine
data238
Engine starting, refer to
Starting engine58
Entering destination via town/
city name133
Entering intersection,
navigation134
Entering special destinations
by name137
Entering the
address133,139
Entering zip code for
navigation134
Entertainment sound output
on/off152
Entry map for destination138
Environmentally friendly
driving
– refer to Energy control75
Equalizer, refer to Tone
control153
ESP Electronic Stability
Program, refer to DSC
Dynamic Stability
Control85
Event Data Recorders216
Exhaust system, refer to Hot
exhaust system125