2010 BMW 528I XDRIVE SEDAN page 51
[x] Cancel search: page 51Page 5 of 271

Reference
At a glance
Controls
Driving tips
Communications
Navigation
Entertainment
Mobility
Contents
The fastest way to find specific topics is to use
the index, refer to page250.
Using this Owner's Manual
4Notes
7Reporting safety defects
At a glance
10Cockpit
16iDrive
21Letters and numbers
22Voice activation system
Controls
26Opening and closing
43Adjusting
53Transporting children safely
57Driving
74Controls Overview
84Technology for comfort, convenience
and safety
100Lamps
105Climate
110Practical interior accessories
Driving tips
124Things to remember when driving
Navigation
132Navigation system
133Destination entry
142Destination guidance
148What to do if...
Entertainment
152On/off and tone
155Radio
158Satellite radio
160CD/DVD player and CD changer
167Music collection
172External devices
Communications
178Telephone
190Contacts
192BMW Assist
Mobility
200Refueling
202Wheels and tires
211Under the hood
215Maintenance
217Care
221Replacing components
231Giving and receiving assistance
Reference
238Technical data
243Short commands of voice activation
system
250Everything from A to Z
Page 15 of 271

At a glance
13Reference
Controls
Driving tips
Communications
Navigation
Entertainment
Mobility
Indicator and warning lamps
The concept
The indicator and warning lamps can light up in
different combinations and colors.
Some lamps are tested for proper function by
briefly lighting up during starting of the engine
or when the ignition is switched on.
Explanatory text messages
Text messages at the upper edge of the Control
Display explain the meaning of the displayed
indicator and warning lamps.
Additional information, e. g. on the cause and
elimination of a malfunction, can be opened via
the Check Control system, refer to page79.
In urgent cases, this information will be shown
as soon as the corresponding lamp comes on.
Indicator lamps without text messages
The following indicator lamps signal particular
functions:
High beams/headlamp flasher102
Fog lamps
*104
Parking brake applied59
Parking brake applied for Canadian
models
Lamp flashes:
DSC or DTC controls the drive and
braking forces for maintaining vehicle
stability86
DTC Dynamic Traction Control86
Exhaust-gas values216
Exhaust-gas values for Canadian
models216
Page 19 of 271

At a glance
17Reference
Controls
Driving tips
Communications
Navigation
Entertainment
Mobility
Operating principle
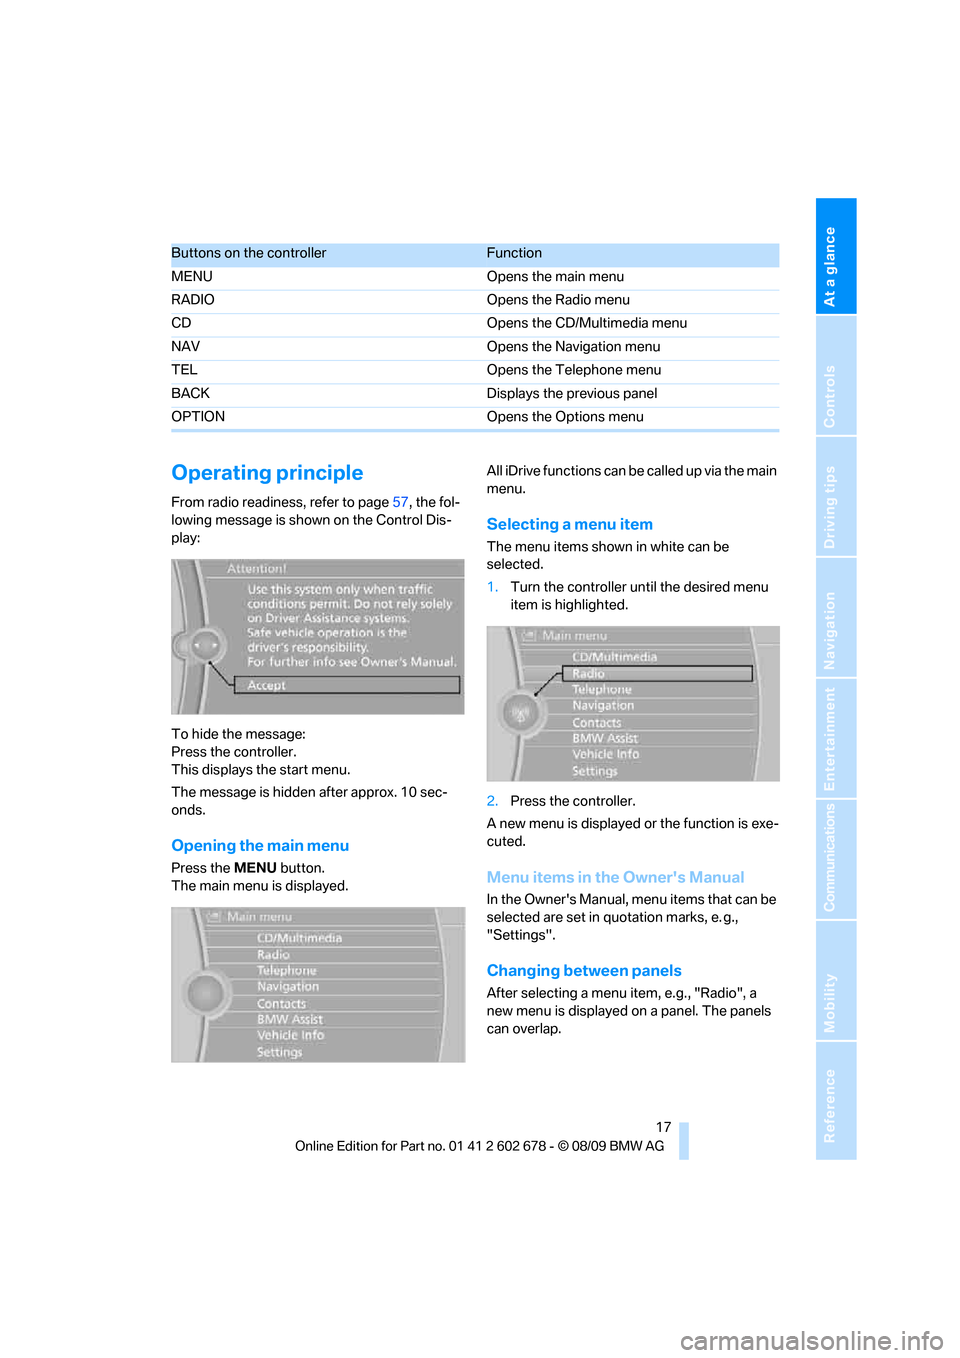
From radio readiness, refer to page57, the fol-
lowing message is shown on the Control Dis-
play:
To hide the message:
Press the controller.
This displays the start menu.
The message is hidden after approx. 10 sec-
onds.
Opening the main menu
Press the MENU button.
The main menu is displayed.All iDrive functions can be called up via the main
menu.
Selecting a menu item
The menu items shown in white can be
selected.
1.Turn the controller until the desired menu
item is highlighted.
2.Press the controller.
A new menu is displayed or the function is exe-
cuted.
Menu items in the Owner's Manual
In the Owner's Manual, menu items that can be
selected are set in quotation marks, e. g.,
"Settings".
Changing between panels
After selecting a menu item, e.g., "Radio", a
new menu is displayed on a panel. The panels
can overlap.
Buttons on the controllerFunction
MENU Opens the main menu
RADIO Opens the Radio menu
CD Opens the CD/Multimedia menu
NAV Opens the Navigation menu
TEL Opens the Telephone menu
BACK Displays the previous panel
OPTION Opens the Options menu
Page 20 of 271

iDrive
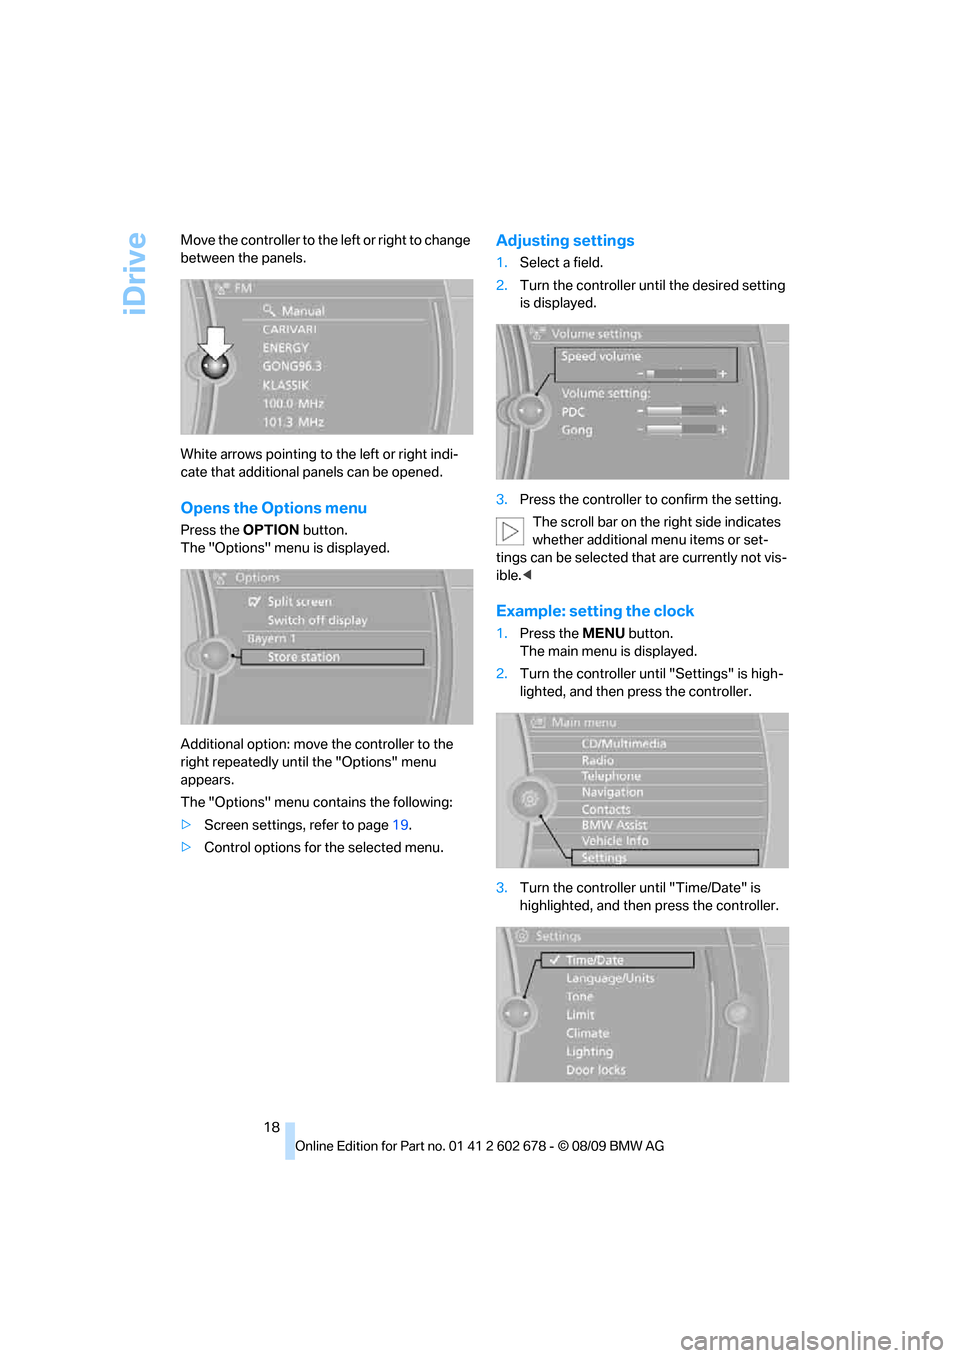
18 Move the controller to the left or right to change
between the panels.
White arrows pointing to the left or right indi-
cate that additional panels can be opened.
Opens the Options menu
Press the OPTION button.
The "Options" menu is displayed.
Additional option: move the controller to the
right repeatedly until the "Options" menu
appears.
The "Options" menu contains the following:
>Screen settings, refer to page19.
>Control options for the selected menu.
Adjusting settings
1.Select a field.
2.Turn the controller until the desired setting
is displayed.
3.Press the controller to confirm the setting.
The scroll bar on the right side indicates
whether additional menu items or set-
tings can be selected that are currently not vis-
ible.<
Example: setting the clock
1.Press the MENU button.
The main menu is displayed.
2.Turn the controller until "Settings" is high-
lighted, and then press the controller.
3.Turn the controller until "Time/Date" is
highlighted, and then press the controller.
Page 24 of 271

Voice activation system
22
Voice activation system
The concept
The voice activation system allows you to con-
trol operation of various vehicle systems with-
out removing your hands from the steering
wheel.
Individual menu items on the Control Display
can be spoken as commands. This frees you of
having to use the controller.
The voice activation system transforms your
oral commands into control signals for the
selected systems and provides support in the
form of instructions or questions.
The voice activation system uses a special
microphone located in the area of the interior
rearview mirror, refer to page14.
Precondition
Via iDrive, set the language that applies for the
voice activation system in order to enable iden-
tification of the spoken commands. To set the
language of iDrive, refer to page82.
Symbols in Owner's Manual
Voice commands
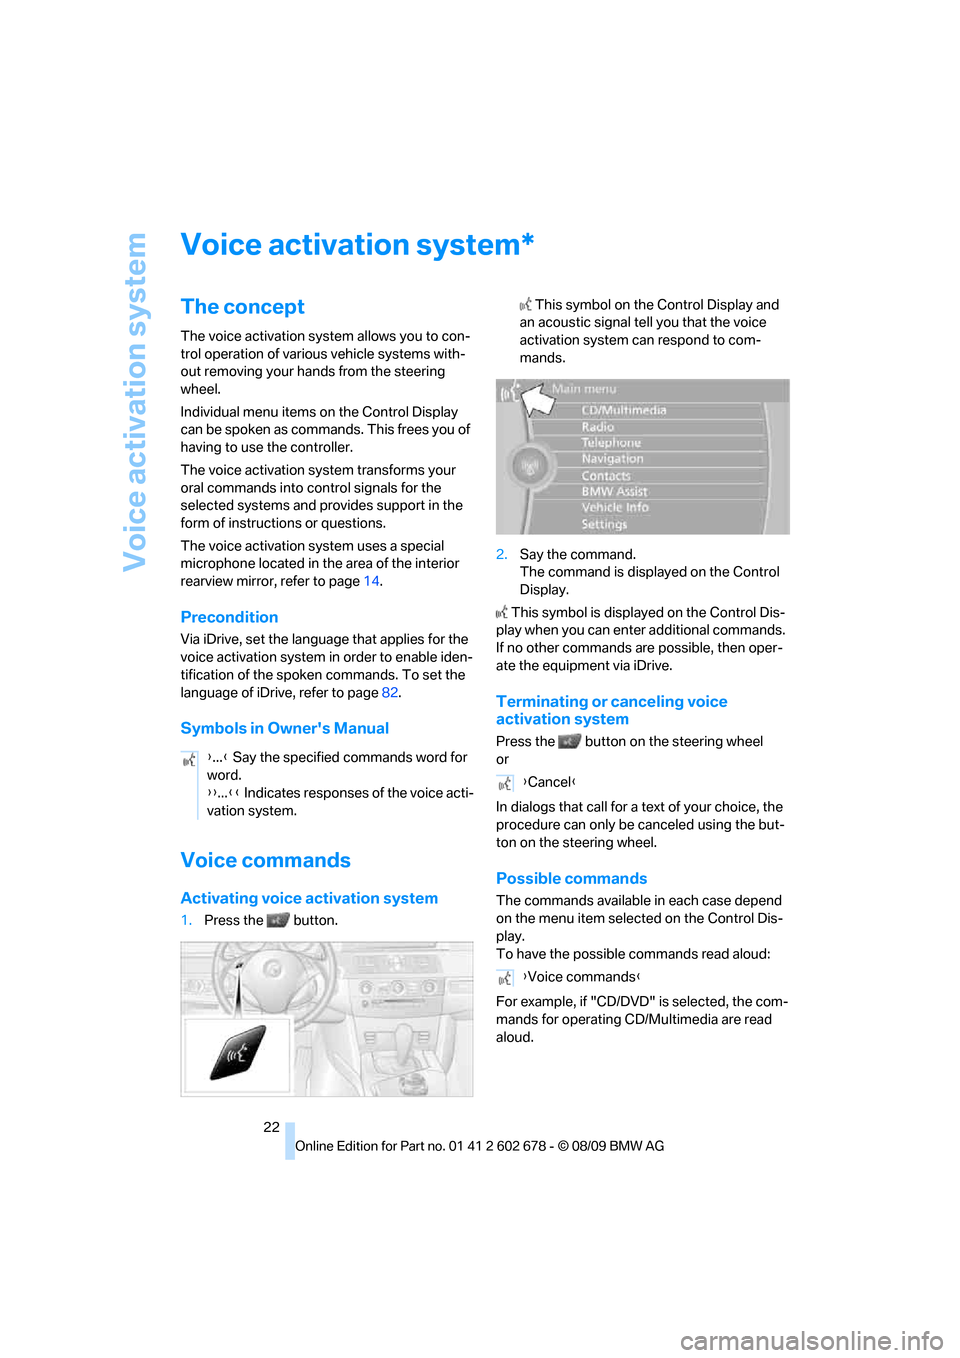
Activating voice activation system
1.Press the button. This symbol on the Control Display and
an acoustic signal tell you that the voice
activation system can respond to com-
mands.
2.Say the command.
The command is displayed on the Control
Display.
This symbol is displayed on the Control Dis-
play when you can enter additional commands.
If no other commands are possible, then oper-
ate the equipment via iDrive.
Terminating or canceling voice
activation system
Press the button on the steering wheel
or
In dialogs that call for a text of your choice, the
procedure can only be canceled using the but-
ton on the steering wheel.
Possible commands
The commands available in each case depend
on the menu item selected on the Control Dis-
play.
To have the possible commands read aloud:
For example, if "CD/DVD" is selected, the com-
mands for operating CD/Multimedia are read
aloud.
*
{...} Say the specified commands word for
word.
{{...}} Indicates responses of the voice acti-
vation system.
{Cancel}
{Voice commands}
Page 25 of 271

At a glance
23Reference
Controls
Driving tips
Communications
Navigation
Entertainment
Mobility
Calling up functions immediately via
short commands
Short commands enable you to perform certain
functions immediately, irrespective of which
menu item is selected, refer to page243.
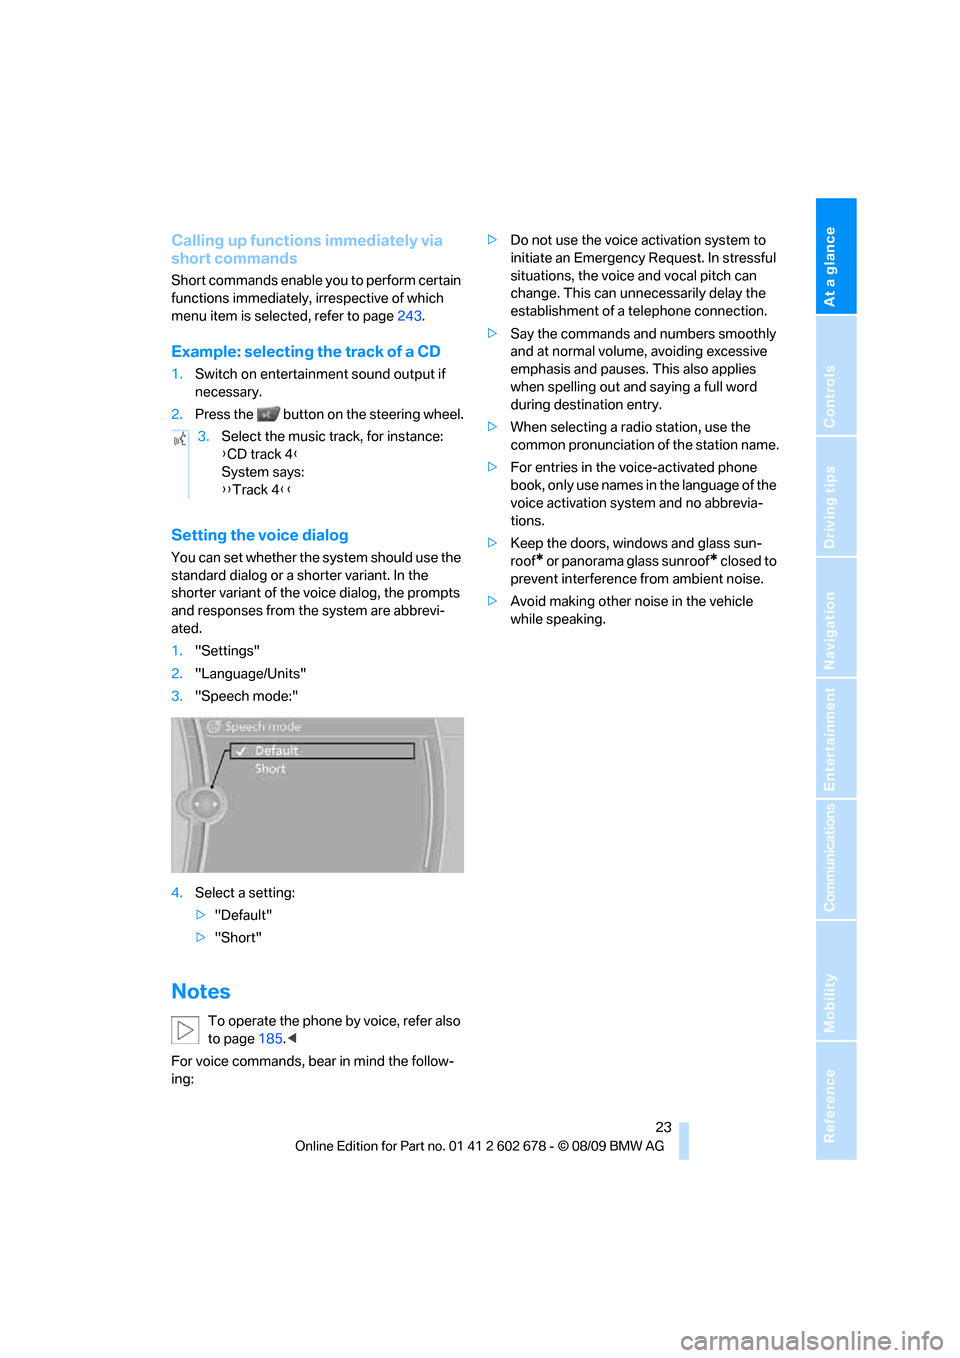
Example: selecting the track of a CD
1.Switch on entertainment sound output if
necessary.
2.Press the button on the steering wheel.
Setting the voice dialog
You can set whether the system should use the
standard dialog or a shorter variant. In the
shorter variant of the voice dialog, the prompts
and responses from the system are abbrevi-
ated.
1."Settings"
2."Language/Units"
3."Speech mode:"
4.Select a setting:
>"Default"
>"Short"
Notes
To operate the phone by voice, refer also
to page185.<
For voice commands, bear in mind the follow-
ing:>Do not use the voice activation system to
initiate an Emergency Request. In stressful
situations, the voice and vocal pitch can
change. This can unnecessarily delay the
establishment of a telephone connection.
>Say the commands and numbers smoothly
and at normal volume, avoiding excessive
emphasis and pauses. This also applies
when spelling out and saying a full word
during destination entry.
>When selecting a radio station, use the
common pronunciation of the station name.
>For entries in the voice-activated phone
book, only use names in the language of the
voice activation system and no abbrevia-
tions.
>Keep the doors, windows and glass sun-
roof
* or panorama glass sunroof* closed to
prevent interference from ambient noise.
>Avoid making other noise in the vehicle
while speaking. 3.Select the music track, for instance:
{CD track 4}
System says:
{{Track 4}}
Page 28 of 271

Opening and closing
26
Opening and closing
Keys/remote control
1Remote control with integrated key
2Spare key
3Adapter for spare key, in glove compart-
ment
Remote control with integrated key
Each remote control contains a battery which is
charged in the ignition lock while driving. Drive a
longer distance with each remote control at
least twice a year to keep the battery charged.
For Comfort Access
*, the remote control con-
tains a replaceable battery, refer to page38.
Depending on which remote control is detected
by the vehicle during unlocking, different set-
tings are activated and executed in the vehicle,
refer to Personal Profile, page26.
Information on the required for maintenance is
also stored in the remote control, refer to Ser-
vice data in remote control, page215.
Integrated key
Press button1 to unlock the key.The integrated key fits the following locks:
>Glove compartment, refer to page112
>Sports Wagon: floor panel flap in cargo bay,
refer to page118
>Driver's door, refer to page30
>Luggage compartment lid, refer to page31.
New remote controls
To obtain additional or replace lost keys, new
remote controls with an integrated key are
available at your BMW center.
Spare key
Store the spare key in a safe place such as your
wallet. This key is not intended for regular use.
The spare key and integrated key fit the same
locks.
Adapter for spare key
The adapter is required so that the vehicle can
be started with the spare key or radio readiness
can be switched on.
Remove the adapter from the holder in the
glove compartment and slide the spare key into
the adapter before use.
Personal Profile
The concept
You can set a number of functions of your BMW
individually according to your preferences. Per-
Page 29 of 271

Controls
27Reference
At a glance
Driving tips
Communications
Navigation
Entertainment
Mobility
sonal Profile ensures that most of these set-
tings are stored for the remote control currently
in use without you having to do anything. When
the vehicle is unlocked, the corresponding
remote control is detected and the settings
stored for it are called up and carried out.
This means that you will always find your BMW
set to your own personal settings even if
another person with his/her own remote control
and settings has used the vehicle since the last
time you drove it. The individual settings are
stored for a maximum of four remote controls,
for two with Comfort Access
*.
Personal Profile settings
Details on the settings are provided on the
specified pages.
>Behavior of the central locking system
when unlocking vehicle, refer to page28
>Automatic locking of the vehicle, refer to
page30
>Displays on Control Display:
>Brightness of the Control Display, refer
to page83
>Measuring units for consumption, route/
distances, temperature, and pressure,
refer to page76
>12h/24h clock format, refer to page79
>Date format, refer to page79
>Language on Control Display, refer to
page82
>Lighting settings:
>Triple turn signal activation, refer to
page63
>Welcome lamps, refer to page100
>Pathway lighting, refer to page101
>Daytime running lamps
*, refer to
page101
>High-beam Assistant
*, refer to
page102
>PDC Park Distance Control
*: optical warn-
ing, refer to page84
>Head-up Display
*: selection and brightness
of display, refer to page96>BMW Night Vision
*: display settings, refer
to page98
>Automatic climate control: AUTO program
and intensity, cooling function, and auto-
matic recirculated air control/recirculated-
air mode, temperature, air distribution, tem-
perature in the upper body region, refer to
text starting on page106
>Navigation system
*: voice instructions for
destination guidance, refer to page143
In addition, the following, most recently
selected settings are recalled during unlocking:
>Programmable memory buttons: selecting
stored functions, refer to page20
>Positions of driver's seat, outside mirrors,
and steering wheel
*, refer to page45
>Audio sources: volume and tone settings,
refer to page152
>Radio:
>Display of stored stations, refer to
page157
>Switching RDS Radio Data System on/
off
*, refer to page156
>Phone: volume setting, refer to page181
Central locking system
The concept
The central locking system functions when the
driver's door is closed.
The system simultaneously engages and
releases the locks on the following:
>Doors
>Luggage compartment lid or tailgate and
rear window
>Fuel filler flap
Operating from outside
>Via the remote control
>Using door lock
>With Comfort Access
* via the door handles