Page 3 of 271
528i
535i
550i
528i xDrive
535i xDriveOwner's Manual for Vehicle
Congratulations, and thank you for choosing a BMW.
Thorough familiarity with your vehicle will provide you with
enhanced control and security when you drive it. We therefore
have this request:
Please take the time to read this Owner's Manual and familiarize
yourself with the information that we have compiled for you
before starting off in your new vehicle. It contains important data
and instructions intended to assist you in gaining maximum use
and satisfaction from your BMW's unique range of technical fea-
tures. The manual also contains information on maintenance
designed to enhance operating safety and contribute to main-
taining the value of your BMW throughout an extended service
life.
This manual is supplemented by a Service and Warranty Informa-
tion Booklet for US models or a Warranty and Service Guide
Booklet for Canadian models.
We wish you an enjoyable driving experience.
BMW AG
Page 5 of 271

Reference
At a glance
Controls
Driving tips
Communications
Navigation
Entertainment
Mobility
Contents
The fastest way to find specific topics is to use
the index, refer to page250.
Using this Owner's Manual
4Notes
7Reporting safety defects
At a glance
10Cockpit
16iDrive
21Letters and numbers
22Voice activation system
Controls
26Opening and closing
43Adjusting
53Transporting children safely
57Driving
74Controls Overview
84Technology for comfort, convenience
and safety
100Lamps
105Climate
110Practical interior accessories
Driving tips
124Things to remember when driving
Navigation
132Navigation system
133Destination entry
142Destination guidance
148What to do if...
Entertainment
152On/off and tone
155Radio
158Satellite radio
160CD/DVD player and CD changer
167Music collection
172External devices
Communications
178Telephone
190Contacts
192BMW Assist
Mobility
200Refueling
202Wheels and tires
211Under the hood
215Maintenance
217Care
221Replacing components
231Giving and receiving assistance
Reference
238Technical data
243Short commands of voice activation
system
250Everything from A to Z
Page 15 of 271

At a glance
13Reference
Controls
Driving tips
Communications
Navigation
Entertainment
Mobility
Indicator and warning lamps
The concept
The indicator and warning lamps can light up in
different combinations and colors.
Some lamps are tested for proper function by
briefly lighting up during starting of the engine
or when the ignition is switched on.
Explanatory text messages
Text messages at the upper edge of the Control
Display explain the meaning of the displayed
indicator and warning lamps.
Additional information, e. g. on the cause and
elimination of a malfunction, can be opened via
the Check Control system, refer to page79.
In urgent cases, this information will be shown
as soon as the corresponding lamp comes on.
Indicator lamps without text messages
The following indicator lamps signal particular
functions:
High beams/headlamp flasher102
Fog lamps
*104
Parking brake applied59
Parking brake applied for Canadian
models
Lamp flashes:
DSC or DTC controls the drive and
braking forces for maintaining vehicle
stability86
DTC Dynamic Traction Control86
Exhaust-gas values216
Exhaust-gas values for Canadian
models216
Page 17 of 271

At a glance
15Reference
Controls
Driving tips
Communications
Navigation
Entertainment
Mobility
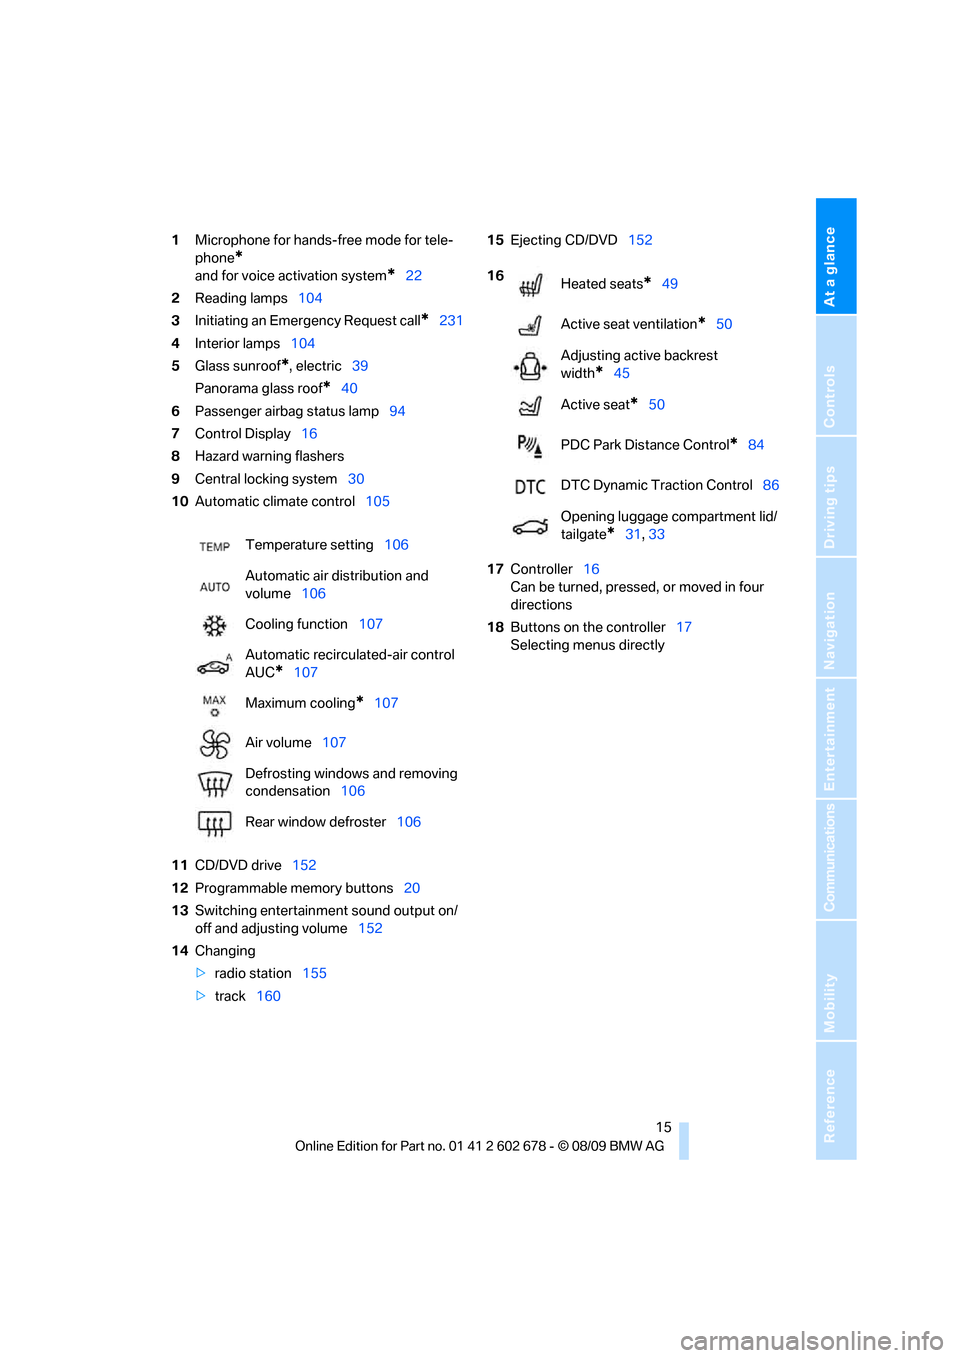
1Microphone for hands-free mode for tele-
phone
*
and for voice activation system*22
2Reading lamps104
3Initiating an Emergency Request call
*231
4Interior lamps104
5Glass sunroof
*, electric39
Panorama glass roof
*40
6Passenger airbag status lamp94
7Control Display16
8Hazard warning flashers
9Central locking system30
10Automatic climate control105
11CD/DVD drive152
12Programmable memory buttons20
13Switching entertainment sound output on/
off and adjusting volume152
14Changing
>radio station155
>track16015Ejecting CD/DVD152
17Controller16
Can be turned, pressed, or moved in four
directions
18Buttons on the controller17
Selecting menus directly Temperature setting106
Automatic air distribution and
volume106
Cooling function107
Automatic recirculated-air control
AUC
*107
Maximum cooling
*107
Air volume107
Defrosting windows and removing
condensation106
Rear window defroster106
16
Heated seats*49
Active seat ventilation
*50
Adjusting active backrest
width
*45
Active seat
*50
PDC Park Distance Control
*84
DTC Dynamic Traction Control86
Opening luggage compartment lid/
tailgate
*31, 33
Page 18 of 271
iDrive
16
iDrive
iDrive combines the functions of a large number
of switches. This allows these functions to be
operated from a central position. The following
section provides an introduction to basic menu navigation. The control of the individual func-
tions is described in connection with the rele-
vant equipment.
Controls
1Control Display
2Controller with buttons
You can use the buttons to open the menus
directly. The controller can be used to
select the menu items and create settings.
>Call up a menu directly, arrow3
>Move in four directions, arrows4
>Turn, arrow5
>Press, arrow6To avoid posing an unnecessary hazard
due to inattention, both to your own vehi-
cle's occupants and to other road users: never
attempt to use the controls or make entries
unless traffic and road conditions allow.<
Page 19 of 271

At a glance
17Reference
Controls
Driving tips
Communications
Navigation
Entertainment
Mobility
Operating principle
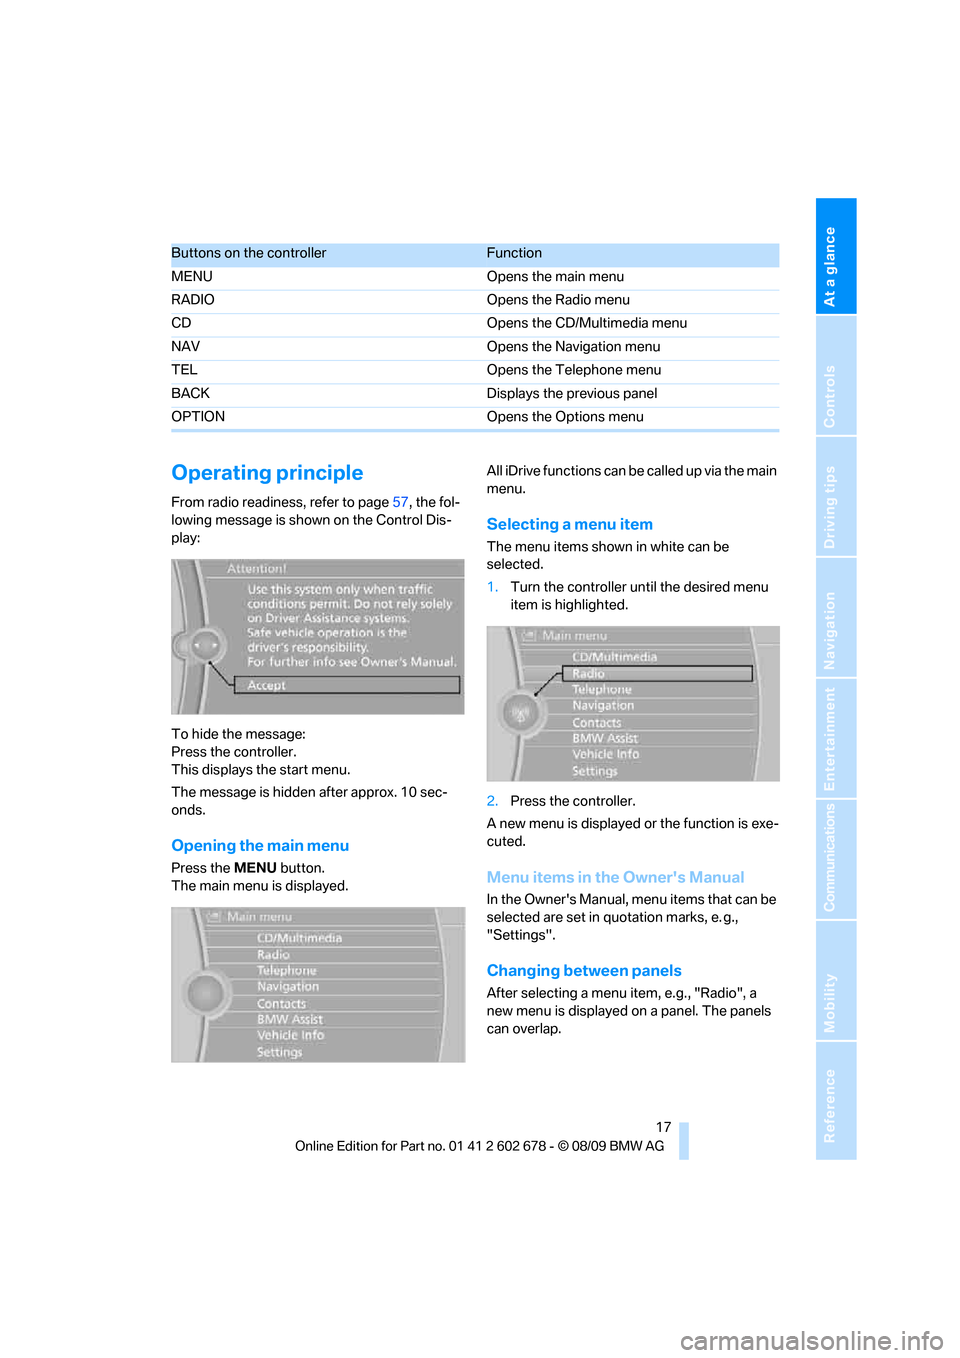
From radio readiness, refer to page57, the fol-
lowing message is shown on the Control Dis-
play:
To hide the message:
Press the controller.
This displays the start menu.
The message is hidden after approx. 10 sec-
onds.
Opening the main menu
Press the MENU button.
The main menu is displayed.All iDrive functions can be called up via the main
menu.
Selecting a menu item
The menu items shown in white can be
selected.
1.Turn the controller until the desired menu
item is highlighted.
2.Press the controller.
A new menu is displayed or the function is exe-
cuted.
Menu items in the Owner's Manual
In the Owner's Manual, menu items that can be
selected are set in quotation marks, e. g.,
"Settings".
Changing between panels
After selecting a menu item, e.g., "Radio", a
new menu is displayed on a panel. The panels
can overlap.
Buttons on the controllerFunction
MENU Opens the main menu
RADIO Opens the Radio menu
CD Opens the CD/Multimedia menu
NAV Opens the Navigation menu
TEL Opens the Telephone menu
BACK Displays the previous panel
OPTION Opens the Options menu
Page 20 of 271

iDrive
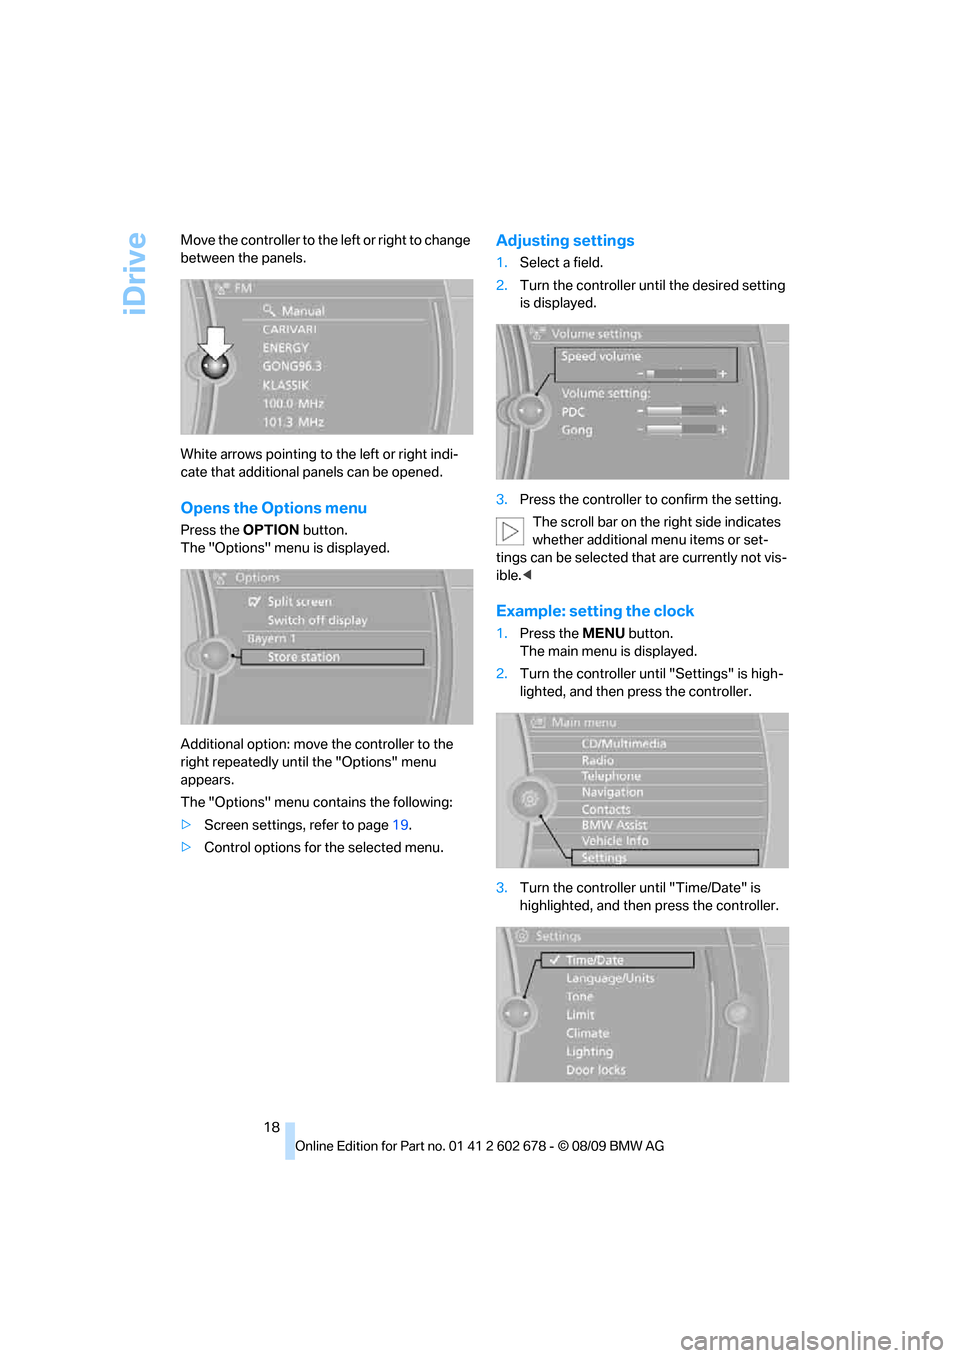
18 Move the controller to the left or right to change
between the panels.
White arrows pointing to the left or right indi-
cate that additional panels can be opened.
Opens the Options menu
Press the OPTION button.
The "Options" menu is displayed.
Additional option: move the controller to the
right repeatedly until the "Options" menu
appears.
The "Options" menu contains the following:
>Screen settings, refer to page19.
>Control options for the selected menu.
Adjusting settings
1.Select a field.
2.Turn the controller until the desired setting
is displayed.
3.Press the controller to confirm the setting.
The scroll bar on the right side indicates
whether additional menu items or set-
tings can be selected that are currently not vis-
ible.<
Example: setting the clock
1.Press the MENU button.
The main menu is displayed.
2.Turn the controller until "Settings" is high-
lighted, and then press the controller.
3.Turn the controller until "Time/Date" is
highlighted, and then press the controller.
Page 22 of 271

iDrive
20
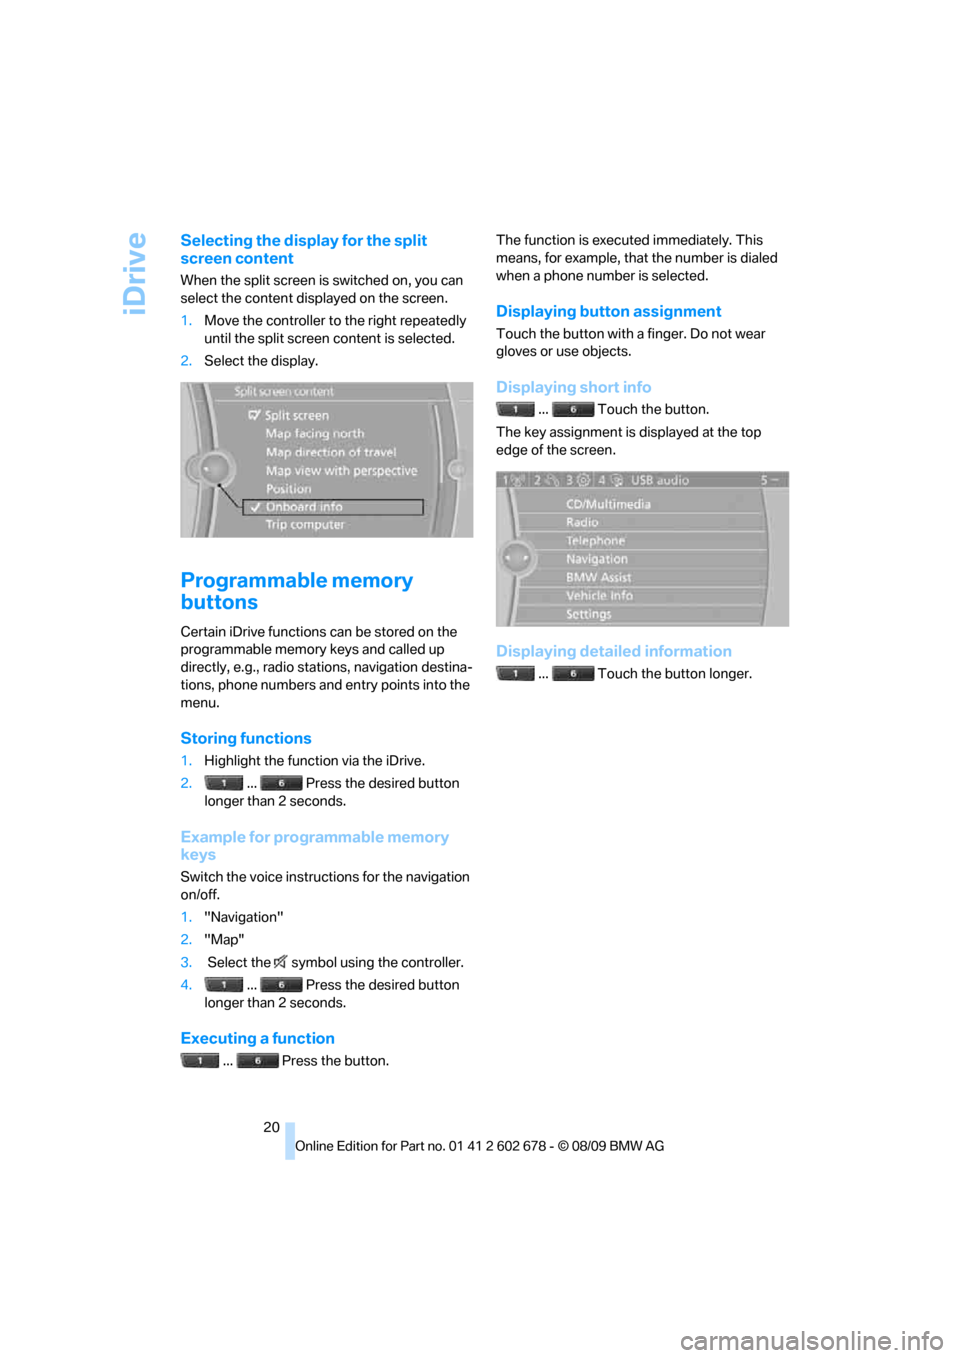
Selecting the display for the split
screen content
When the split screen is switched on, you can
select the content displayed on the screen.
1.Move the controller to the right repeatedly
until the split screen content is selected.
2.Select the display.
Programmable memory
buttons
Certain iDrive functions can be stored on the
programmable memory keys and called up
directly, e.g., radio stations, navigation destina-
tions, phone numbers and entry points into the
menu.
Storing functions
1.Highlight the function via the iDrive.
2.... Press the desired button
longer than 2 seconds.
Example for programmable memory
keys
Switch the voice instructions for the navigation
on/off.
1."Navigation"
2."Map"
3. Select the symbol using the controller.
4.... Press the desired button
longer than 2 seconds.
Executing a function
... Press the button.The function is executed immediately. This
means, for example, that the number is dialed
when a phone number is selected.
Displaying button assignment
Touch the button with a finger. Do not wear
gloves or use objects.
Displaying short info
... Touch the button.
The key assignment is displayed at the top
edge of the screen.
Displaying detailed information
... Touch the button longer.