2010 BMW 335I SEDAN high beam
[x] Cancel search: high beamPage 96 of 274

Lamps
94
High beams/roadside parking
lamps
1High beams
2Headlamp flasher
3Roadside parking lamps
*
Roadside parking lamps, left or right*
There is an additional option of switching on the
lamps on the side of the car facing the road
when parked.
Switching on
After parking the vehicle, press the lever up or
down beyond the pressure point for a longer
period, arrow 3.
The roadside parking lamps drain the bat-
tery. Therefore, do not leave them on for
unduly long periods of time; otherwise, the bat-
tery might not have enough power to start the
engine.<
Switching off
Press the lever in the opposite direction to the
pressure point, arrow 3.
High-beam assistant*
The concept
This system automatically switches the high
beams on and off. The procedure is controlled
by a sensor on the front of the interior rearview
mirror. The assistant ensures that the high
beams are switched on whenever the traffic sit-
uation allows. It handles this task for you and
gives you the benefit of the best possible view. You can intervene at any time and switch the
high beams on and off as usual.
Activating the system
1.Turn the light switch to position3, refer to
page92.
2.With the low beams switched on, briefly
push the turn indicator lever in the direction
of the high beam.
The indicator lamp in the instrument
cluster lights up when the high beams
are activated. The system automati-
cally switches from high beams to low beams
and vice versa in response to oncoming traffic,
traffic ahead of you, and adequate ambient
lighting, e.g. on city streets.
Switching the high beams on and off
manually
Whenever you wish, or when the situation
requires, you can intervene:
>If the high-beam assistant switches on the
high beams, but you would like to drive with
the low beams, simply switch off the high
beams using the turn indicator lever. This
deactivates the high-beam assistant.
To reactivate the system, briefly push the
turn indicator lever toward the high beams
again.
>If the high-beam assistant switches on the
low beams, but you would like to drive with
the high beams, switch on the high beams
as usual. This deactivates the system and
the high beams need to be switched off
manually, if necessary.
To reactivate the system, briefly push the
turn indicator lever toward the high beams
again.
>Use the headlamp flasher as usual with the
low beams switched on.
System limitations
The high-beam assistant cannot serve as
a substitute for the driver's personal judg-
ment of when to use the high beams. Therefore,
manually switch off the high beams in situations
where this is required to avoid a safety risk.<
Page 97 of 274

Controls
95Reference
At a glance
Driving tips
Communications
Navigation
Entertainment
Mobility
The system is not fully functional in situations
such as the following, and driver intervention
may be necessary:
>In very unfavorable weather conditions,
such as fog or heavy precipitation
>In detecting poorly-lit road users, such as
pedestrians, cyclists, horseback riders and
wagons; when driving close to train or ship
traffic; and at animal crossings
>In tight curves, on hilltops or in depressions,
in cross traffic or half-obscured oncoming
traffic on highways
>In poorly lit towns and cities and in the pres-
ence of highly reflective signs
>At low speeds
>When the windshield in front of the interior
rearview mirror is fogged over, dirty or cov-
ered with stickers, etc.
>If the sensor is dirty. Clean the sensor on
the front of the interior rearview mirror using
a cloth moistened with a small amount of
glass cleaner.
Switching off via iDrive
1."Settings"
2."Lighting"
3."High beam assistant"
The high-beam assistant is activated and is
stored for the remote control currently in use.
Fog lamps
The parking lamps or low beams must
be switched on for the fog lamps to
operate. The green indicator lamp in
the instrument cluster lights up whenever the
fog lamps are on.
The fog lamps are switched off while you acti-
vate the headlamp flasher or switch on the high
beams.
If the automatic headlamp control is acti-
vated, the low beams will come on auto-
matically when you switch on the fog lamps.<
Instrument lighting
You can adjust the brightness of the instrument
lighting only when the parking lamps or the low
beams are switched on.
1.Push button 1 up or down repeatedly until
the appropriate symbol appears in the dis-
play, accompanied by the brightness set-
ting and scale the word "SET".
2.Press button 2.
Page 229 of 274

Mobility
227Reference
At a glance
Controls
Driving tips
Communications
Navigation
Entertainment
Outside sensors/cameras
Keep the sensors and cameras on the
outside of the vehicle, e.g. those for Park
Distance Control, clean and free of ice to ensure
that they remain fully functional.<
Interior care
Upholstery fabrics/cloth trims/
Alcantara fabrics
Vacuum regularly with a vacuum cleaner to
remove superficial dirt.
To remove severe spots such as stains from
beverages, use a soft sponge or lint-free
microfiber cloth and suitable interior cleaners.
Follow the instructions on the packaging.
Clean the upholstery down to the seams
using a sweeping motion. Avoid strong
rubbing.<
Opened Velcro fasteners on pants or
other articles of clothing can damage the
seat covers. Ensure that Velcro fasteners are
closed.<
Leather/leather trim
The leather used by BMW is a high quality
natural product. Slight irregularities in the
leather are a typical characteristic of natural
leather.<
Dust and road grit in the pores and folds of the
leather have an abrasive effect, leading to
increased wear and causing the leather surface
to become brittle prematurely. Therefore, fre-
quently clean the leather of dust using a cloth or
vacuum cleaner.
Clean light-colored leather more frequently as
dust and dirt are more noticeable.
Treat the leather at least once every two
months using a leather lotion as dirt and grease
will gradually attack the leather's protective
layer.
Carpets/cargo area
You can vacuum the carpets and floor mats or
clean them with interior cleaner if heavily soiled.The floor mats can be removed for cleaning.
When replacing the mats, ensure that the seat
rails do not extend over the floor mats, as this
may damage the mats.
Lint on the floor mats occurs for technical rea-
sons and can be removed by vacuuming
repeatedly.
Interior plastic parts
>Imitation leather surfaces
>Lamp glasses
>Display pane of instrument cluster
>Matte parts
Clean with water and solvent-free plastic
cleaner if necessary.
Fine wood parts
Clean fine wood trim and fine wood parts with a
damp cloth. Wipe dry with a soft cloth.
Safety belts
Dirty belt straps impede the reeling action and
thus have a negative impact on safety.
Do not clean chemically, as this may
destroy the webbing.<
Interior sensors/cameras
To clean interior sensors and cameras, e.g. of
the high-beam assistant, use a lint-free cloth
moistened with glass cleaner.
Displays
To clean displays, e.g. of the radio or instrument
cluster, use a cleaning cloth for displays or a
soft, non-abrasive, lint-free cloth.
Avoid applying excessive pressure when
cleaning the displays; otherwise, damage
may occur.<
Do not use chemical or abrasive house-
hold cleaning agents. Keep all types of
fluid away from the device. Otherwise, surfaces
or electrical components may be corroded or
damaged.<
Page 233 of 274

Mobility
231Reference
At a glance
Controls
Driving tips
Communications
Navigation
Entertainment
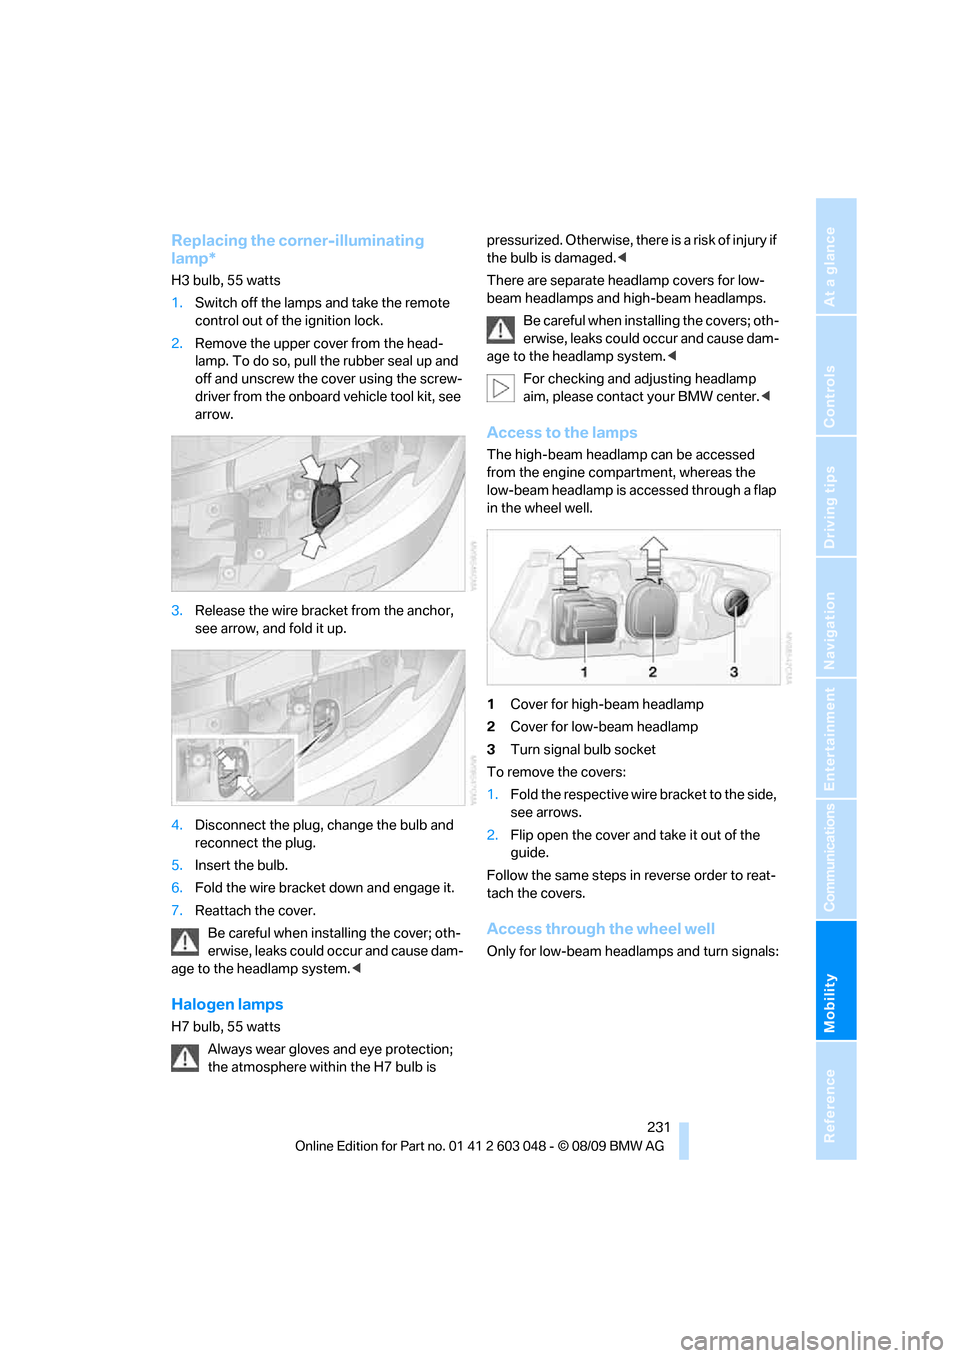
Replacing the corner-illuminating
lamp*
H3 bulb, 55 watts
1.Switch off the lamps and take the remote
control out of the ignition lock.
2.Remove the upper cover from the head-
lamp. To do so, pull the rubber seal up and
off and unscrew the cover using the screw-
driver from the onboard vehicle tool kit, see
arrow.
3.Release the wire bracket from the anchor,
see arrow, and fold it up.
4.Disconnect the plug, change the bulb and
reconnect the plug.
5.Insert the bulb.
6.Fold the wire bracket down and engage it.
7.Reattach the cover.
Be careful when installing the cover; oth-
erwise, leaks could occur and cause dam-
age to the headlamp system.<
Halogen lamps
H7 bulb, 55 watts
Always wear gloves and eye protection;
the atmosphere within the H7 bulb is pressurized. Otherwise, there is a risk of injury if
the bulb is damaged.<
There are separate headlamp covers for low-
beam headlamps and high-beam headlamps.
Be careful when installing the covers; oth-
erwise, leaks could occur and cause dam-
age to the headlamp system.<
For checking and adjusting headlamp
aim, please contact your BMW center.<
Access to the lamps
The high-beam headlamp can be accessed
from the engine compartment, whereas the
low-beam headlamp is accessed through a flap
in the wheel well.
1Cover for high-beam headlamp
2Cover for low-beam headlamp
3Turn signal bulb socket
To remove the covers:
1.Fold the respective wire bracket to the side,
see arrows.
2.Flip open the cover and take it out of the
guide.
Follow the same steps in reverse order to reat-
tach the covers.
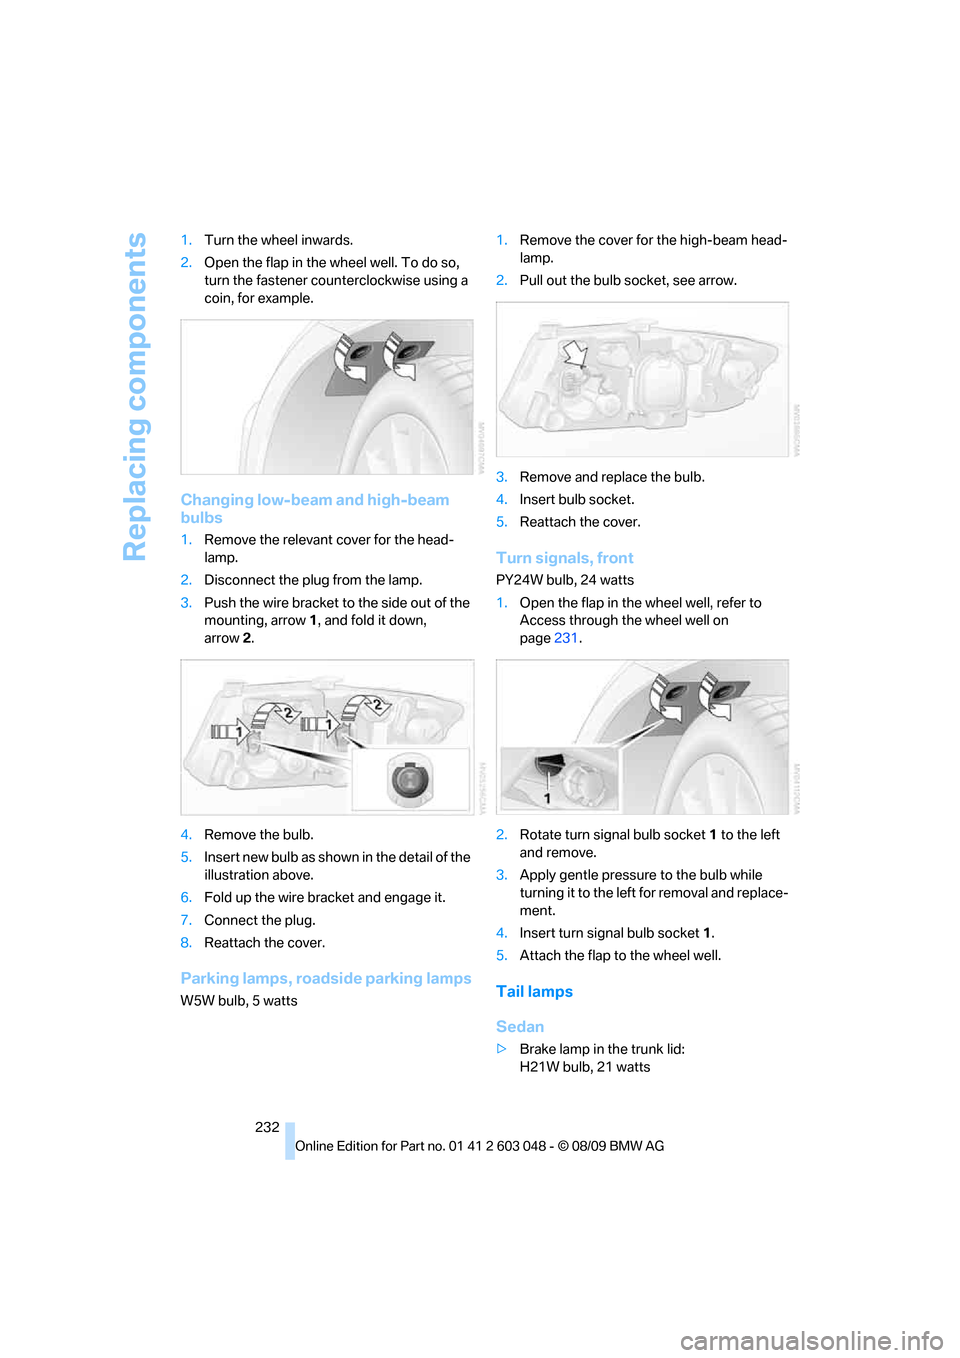
Access through the wheel well
Only for low-beam headlamps and turn signals:
Page 234 of 274

Replacing components
232 1.Turn the wheel inwards.
2.Open the flap in the wheel well. To do so,
turn the fastener counterclockwise using a
coin, for example.
Changing low-beam and high-beam
bulbs
1.Remove the relevant cover for the head-
lamp.
2.Disconnect the plug from the lamp.
3.Push the wire bracket to the side out of the
mounting, arrow1, and fold it down,
arrow2.
4.Remove the bulb.
5.Insert new bulb as shown in the detail of the
illustration above.
6.Fold up the wire bracket and engage it.
7.Connect the plug.
8.Reattach the cover.
Parking lamps, roadside parking lamps
W5W bulb, 5 watts1.Remove the cover for the high-beam head-
lamp.
2.Pull out the bulb socket, see arrow.
3.Remove and replace the bulb.
4.Insert bulb socket.
5.Reattach the cover.
Turn signals, front
PY24W bulb, 24 watts
1.Open the flap in the wheel well, refer to
Access through the wheel well on
page231.
2.Rotate turn signal bulb socket 1 to the left
and remove.
3.Apply gentle pressure to the bulb while
turning it to the left for removal and replace-
ment.
4.Insert turn signal bulb socket 1.
5.Attach the flap to the wheel well.
Tail lamps
Sedan
>Brake lamp in the trunk lid:
H21W bulb, 21 watts
Page 256 of 274

Everything from A - Z
254
Everything from A - Z
Index
A
ABS Antilock Brake
System82
ACC, refer to Active cruise
control62
Accident, refer to Sending an
Emergency Request237
Activated-charcoal filter for
automatic climate
control100
Active cruise control62
– indicator lamps65
– malfunction66
– selecting distance64
– sensor66
Active steering88
Adaptive brake light
– Brake Force Display89
Adaptive light control93
Additives
– coolant222
Address, entering125,131
Address for navigation
– entering125
Adjusting temperature inside
the car, refer to Automatic
climate control98
Adjusting the thigh support42
Airbags90
– indicator/warning lamp91
– sitting safely41
Air conditioning mode
– automatic climate control98
– ventilation100
Air distribution
– automatic98
Airing, refer to Ventilation100
Air pressure, refer to Tire
inflation pressure201
Air recirculation, refer to
Recirculated-air mode99Air supply
– automatic climate control98
– ventilation100
Air vents97
Air volume98
AKI, refer to Fuel
specifications197
Alarm system33
– avoiding unintentional
alarms34
– interior motion sensor33
– switching off an alarm33
– tilt alarm sensor33
Albums of music
collection164
ALL program99
All-season tires, refer to
Winter tires217
All-wheel drive, refer to
xDrive83
AM, waveband147
Ambient air, refer to
Recirculated-air mode99
Antenna for mobile phone174
Antifreeze
– coolant222
– washer fluid60
Antilock Brake System
ABS82
Anti-theft alarm system, refer
to Alarm system33
Anti-theft system27
Approved axle loads, refer to
Weights247
Approved gross vehicle
weight, refer to Weights247
Armrest, refer to Center
armrest106
Arrival time, refer to
Computer71
Ashtray107Assistance systems, refer to
Driving stability control
systems82
AUC Automatic recirculated-
air control99
Audio144
– controls144
– switching on/off144
– tone control144
– volume144
Audio device, external106
Automatic
– air distribution98
– air volume98
– cruise control61,62
– headlamp control92
Automatic car washes225
Automatic climate control97
– automatic air distribution98
Automatic curb monitor48
Automatic high beams and
low beams, refer to High-
beam assistant94
Automatic recirculated-air
control AUC99
Automatic Service
Request192
Automatic transmission with
Steptronic56
– interlock56,57
– overriding selector lever
lock58
– shiftlock, refer to Changing
selector lever position57
– sport program57
– towing239
– tow-starting239
AUTO program for automatic
climate control
98
AUX-IN
– port106
AUX-IN port167
Available services192
Page 262 of 274

Everything from A - Z
260 Glass roof, electric37
– closing after electrical
malfunction37
– Convenient operation28,29
– initializing37
– opening, closing37
– pinch protection system37
– power failure37
– raising37
– remote control28
Glove compartment105
GPS navigation, refer to
Navigation system124
Grills97
Gross vehicle weight, refer to
Weights247
H
Halogen lamps
– replacing bulbs231
Handbrake, refer to Parking
brake56
Hands-free system14
Hazard warning flashers14
HDC Hill Descent Control83
HD Radio148
Head airbags90
Headlamp control,
automatic92
Headlamp cover231
Headlamp flasher58
– indicator lamp11,13
Headlamps
– replacing bulbs231
Head restraints43
– rear, removing44
– sitting safely41
Heated
– mirrors47
– rear window99
– seats45
– steering wheel49
Heating
– mirrors47
– rear window99
– seats45
– steering wheel49Heating and ventilation, refer
to Climate97
Heavy loads, refer to Stowing
cargo119
Height, refer to
Dimensions245
Height adjustment
– seats42
– steering wheel48
High-beam assistant94
High beams94
– headlamp flasher94
– indicator lamp13
– replacing bulbs231
High beams and low beams,
automatic, refer to High-
beam assistant94
High-pressure
washer225,226
High water, refer to Driving
through water118
Highways, refer to Route
criteria134
Hill Descent Control HDC83
Hills118
Holders for cups107
Homepage BMW4
Hood
218
Hooks for shopping
bags111,112
Horn10,11
Hotel function, refer to
Locking or unlocking
separately31
Hot exhaust system117
Hydraulic brake assist, refer to
Dynamic Brake Control
DBC82
Hydroplaning118
I
IBOC, refer to HD Radio148
Ice warning, refer to Outside
temperature
warning69
Identification marks
– run-flat tires216
– tire coding214iDrive16
– adjusting brightness80
– changing language79
– changing settings79
– changing units of measure
and display format73
– controls16
– menu guidance17
– operating principle16
– overview16
– setting the date and time76
– start menu17
– status information19
iDrive operating principle16
Ignition54
– switched off55
– switched on54
Ignition key, refer to Remote
control with integrated
key26
Ignition key position 1, refer to
Radio readiness54
Ignition key position 2, refer to
Ignition on54
Ignition lock54
Imprint2
Indicator and warning
lamps13
– Tire Pressure Monitor
TPM87
Inflation pressure, refer to Tire
inflation pressure201
Inflation pressure monitoring,
refer to Tire Pressure
Monitor TPM86
Initializing
– after power failure236
– compass, refer to
Calibrating104
– Flat Tire Monitor FTM85
– glass roof37
– panorama glass roof39
– radio, refer to Station,
storing147
– refer to Setting the time and
date76
Installation location
– telephone106
Page 263 of 274

Reference 261
At a glance
Controls
Driving tips
Communications
Navigation
Entertainment
Mobility
Instructions for navigation
system, refer to Voice
instructions135
Instrument cluster12
Instrument lighting95
Instrument panel, refer to
Cockpit10
Integrated key26
Integrated universal remote
control102
Interactive map130
Interior lamps96
– remote control28
Interior motion sensor33
Interior rearview mirror48
– automatic dimming
feature48
– compass104
Interlock, refer to Disengaging
the remote control56
Intermittent mode of the
wipers59
Intersection, entering,
navigation126
iPod, connecting, refer to
AUX-IN port167
iPod, connecting, refer to USB
audio interface167
J
Jacking points235
Joystick, refer to iDrive16
Jumpering, refer to Jump-
starting238
Jump-starting238
K
Key, refer to Integrated key/
remote control26
Keyless go, refer to Comfort
Access34
Keyless opening and closing,
refer to Comfort Access34
Key Memory, refer to Personal
Profile26Kickdown57
– automatic transmission with
Steptronic57
Knock control197
L
Lamps
– automatic headlamp
control92
– parking lamps/low beams92
Lamps and bulbs, replacing
bulbs229
Lap-and-shoulder belt, refer
to Safety belts46
Lashing eyes, refer to
Securing cargo120
Last destinations128
LATCH child restraint fixing
system51
Leather care227
LED Light-emitting
diodes230
Length, refer to
Dimensions245
License plate lamp, replacing
bulb235
Light
– high-beam assistant94
Light-alloy wheels226
Light-emitting diodes
LED230
Lighter108
– connecting electrical
appliances108
Lighting
– instruments95
– lamps and bulbs229
– vehicle, refer to Lamps92
Light switch92
Limit, refer to Speed limit79
Load119
Load securing equipment,
refer to Securing cargo120
Lock buttons, doors, refer to
Locking30Locking
– adjusting confirmation
signal28
– from inside30
– from outside28
– without remote control, refer
to Comfort Access34
Locking and unlocking doors
– confirmation signals28
– from inside30
– from outside27
Low beam control, refer to
High-beam assistant94
Low-beam headlamps92
– automatic92
– replacing bulbs231
Lower back support, refer to
Lumbar support43
Luggage rack, refer to Roof-
mounted luggage rack120
Lumbar support43
M
M+S tires, refer to Winter
tires217
Maintenance, refer to Service
Booklet
Maintenance system223
Malfunction
– automatic transmission with
Steptronic58
– tires85
– trunk lid31
Malfunction warnings, refer to
Check Control77
Manual car wash226
Manual mode, automatic
transmission with
Steptronic57
Manual operation
– door lock29
– driver's door29
– fuel filler flap196
– glass roof37
– panorama glass roof39
– transmission lock, automatic
transmission58
– trunk lid31